Set up an Azure Digital Twins instance and authentication (CLI)
This article covers the steps to set up a new Azure Digital Twins instance, including creating the instance and setting up authentication. After completing this article, you'll have an Azure Digital Twins instance ready to start programming against.
Full setup for a new Azure Digital Twins instance consists of two parts:
- Creating the instance
- Setting up user access permissions: Azure users need to have the Azure Digital Twins Data Owner role on the Azure Digital Twins instance to be able to manage it and its data. In this step, you as an Owner/administrator of the Azure subscription will assign this role to the person who will be managing your Azure Digital Twins instance. This may be yourself or someone else in your organization.
Important
To complete this full article and completely set up a usable instance, you need permissions to manage both resources and user access on the Azure subscription. The first step can be completed by anyone who's able to create resources on the subscription, but the second step requires user access management permissions (or the cooperation of someone with these permissions). You can read more about this in the Prerequisites: Required permissions section for the user access permission step.
Prerequisites
Use the Bash environment in Azure Cloud Shell. For more information, see Quickstart for Bash in Azure Cloud Shell.

If you prefer to run CLI reference commands locally, install the Azure CLI. If you're running on Windows or macOS, consider running Azure CLI in a Docker container. For more information, see How to run the Azure CLI in a Docker container.
If you're using a local installation, sign in to the Azure CLI by using the az login command. To finish the authentication process, follow the steps displayed in your terminal. For other sign-in options, see Sign in with the Azure CLI.
When you're prompted, install the Azure CLI extension on first use. For more information about extensions, see Use extensions with the Azure CLI.
Run az version to find the version and dependent libraries that are installed. To upgrade to the latest version, run az upgrade.
Set up CLI session
To start working with Azure Digital Twins in the CLI, the first thing to do is log in and set the CLI context to your subscription for this session. Run these commands in your CLI window:
az login
az account set --subscription "<your-Azure-subscription-ID>"
Tip
You can also use your subscription name instead of the ID in the command above.
If this is the first time you've used this subscription with Azure Digital Twins, run this command to register with the Azure Digital Twins namespace. (If you're not sure, it's ok to run it again even if you've done it sometime in the past.)
az provider register --namespace 'Microsoft.DigitalTwins'
Next you'll add the Microsoft Azure IoT Extension for Azure CLI, to enable commands for interacting with Azure Digital Twins and other IoT services. Run this command to make sure you have the latest version of the extension:
az extension add --upgrade --name azure-iot
Now you are ready to work with Azure Digital Twins in the Azure CLI.
You can verify this by running az dt --help at any time to see a list of the top-level Azure Digital Twins commands that are available.
Create the Azure Digital Twins instance
In this section, you will create a new instance of Azure Digital Twins using the CLI command. You will need to provide:
- A resource group where the instance will be deployed. If you do not already have an existing resource group in mind, you can create one now with this command:
az group create --location <region> --name <name-for-your-resource-group> - A region for the deployment. To see what regions support Azure Digital Twins, visit Azure products available by region.
- A name for your instance. If your subscription has another Azure Digital Twins instance in the region that is already using the specified name, you'll be asked to pick a different name.
Use these values in the following az dt command to create the instance:
az dt create --dt-name <name-for-your-Azure-Digital-Twins-instance> --resource-group <your-resource-group> --location <region>
There are several optional parameters that can be added to the command to specify additional things about your resource during creation, including creating a managed identity for the instance or enabling/disabling public network access. For a full list of supported parameters, see the az dt create reference documentation.
Create the instance with a managed identity
When you enable a managed identity on your Azure Digital Twins instance, an identity is created for it in Microsoft Entra ID. That identity can then be used to authenticate to other services. You can enable a managed identity for an Azure Digital Twins instance while the instance is being created, or later on an existing instance.
Use the CLI command below for your chosen type of managed identity.
System-assigned identity command
To create an Azure Digital Twins instance with system-assigned identity enabled, you can add an --mi-system-assigned parameter to the az dt create command that's used to create the instance. (For more information about the creation command, see its reference documentation or the general instructions for setting up an Azure Digital Twins instance).
To create an instance with a system-assigned identity, add the --mi-system-assigned parameter like this:
az dt create --dt-name <new-instance-name> --resource-group <resource-group> --mi-system-assigned
User-assigned identity command
To create an instance with a user-assigned identity, provide the ID of an existing user assigned identity using the --mi-user-assigned parameter, like this:
az dt create --dt-name <new-instance-name> --resource-group <resource-group> --mi-user-assigned <user-assigned-identity-resource-ID>
Verify success and collect important values
If the instance was created successfully, the result in the CLI looks something like this, outputting information about the resource you have created:

Note the Azure Digital Twins instance's hostName, name, and resourceGroup from the output. These values are all important and you may need to use them as you continue working with your Azure Digital Twins instance, to set up authentication and related Azure resources. If other users will be programming against the instance, you should share these values with them.
Tip
You can see these properties, along with all the properties of your instance, at any time by running az dt show --dt-name <your-Azure-Digital-Twins-instance>.
You now have an Azure Digital Twins instance ready to go. Next, you will give the appropriate Azure user permissions to manage it.
Set up user access permissions
Azure Digital Twins uses Microsoft Entra ID for role-based access control (RBAC). This means that before a user can make data plane calls to your Azure Digital Twins instance, that user needs to be assigned a role with appropriate permissions for it.
For Azure Digital Twins, this role is Azure Digital Twins Data Owner. You can read more about roles and security in Security for Azure Digital Twins solutions.
Note
This role is different from the Microsoft Entra ID Owner role, which can also be assigned at the scope of the Azure Digital Twins instance. These are two distinct management roles, and Owner does not grant access to data plane features that are granted with Azure Digital Twins Data Owner.
This section will show you how to create a role assignment for a user in your Azure Digital Twins instance, using that user's email in the Microsoft Entra tenant on your Azure subscription. Depending on your role in your organization, you might set up this permission for yourself, or set it up on behalf of someone else who will be managing the Azure Digital Twins instance.
Prerequisites: Permission requirements
To be able to complete all the following steps, you need to have a role in your subscription that has the following permissions:
- Create and manage Azure resources
- Manage user access to Azure resources (including granting and delegating permissions)
Common roles that meet this requirement are Owner, Account admin, or the combination of User Access Administrator and Contributor. For a complete explanation of roles and permissions, including what permissions are included with other roles, visit Azure roles, Microsoft Entra roles, and classic subscription administrator roles in the Azure RBAC documentation.
To view your role in your subscription, visit the subscriptions page in the Azure portal (you can use this link or look for Subscriptions with the portal search bar). Look for the name of the subscription you are using, and view your role for it in the My role column:

If you find that the value is Contributor, or another role that doesn't have the required permissions described above, you can contact the user on your subscription that does have these permissions (such as a subscription Owner or Account admin) and proceed in one of the following ways:
- Request that they complete the role assignment steps on your behalf.
- Request that they elevate your role on the subscription so that you will have the permissions to proceed yourself. Whether this is appropriate depends on your organization and your role within it.
Assign the role
To give a user permission to manage an Azure Digital Twins instance, you must assign them the Azure Digital Twins Data Owner role within the instance.
Use the following command to assign the role (must be run by a user with sufficient permissions in the Azure subscription). The command requires you to pass in the user principal name on the Microsoft Entra account for the user that should be assigned the role. In most cases, this value will match the user's email on the Microsoft Entra account.
az dt role-assignment create --dt-name <your-Azure-Digital-Twins-instance> --assignee "<Azure-AD-user-principal-name-of-user-to-assign>" --role "Azure Digital Twins Data Owner"
The result of this command is outputted information about the role assignment that has been created for the user.
Note
If this command returns an error saying that the CLI cannot find user or service principal in graph database:
Assign the role using the user's Object ID instead. This may happen for users on personal Microsoft accounts (MSAs).
Use the Azure portal page of Microsoft Entra users to select the user account and open its details. Copy the user's Object ID:

Then, repeat the role assignment list command using the user's Object ID for the assignee parameter above.
Verify success
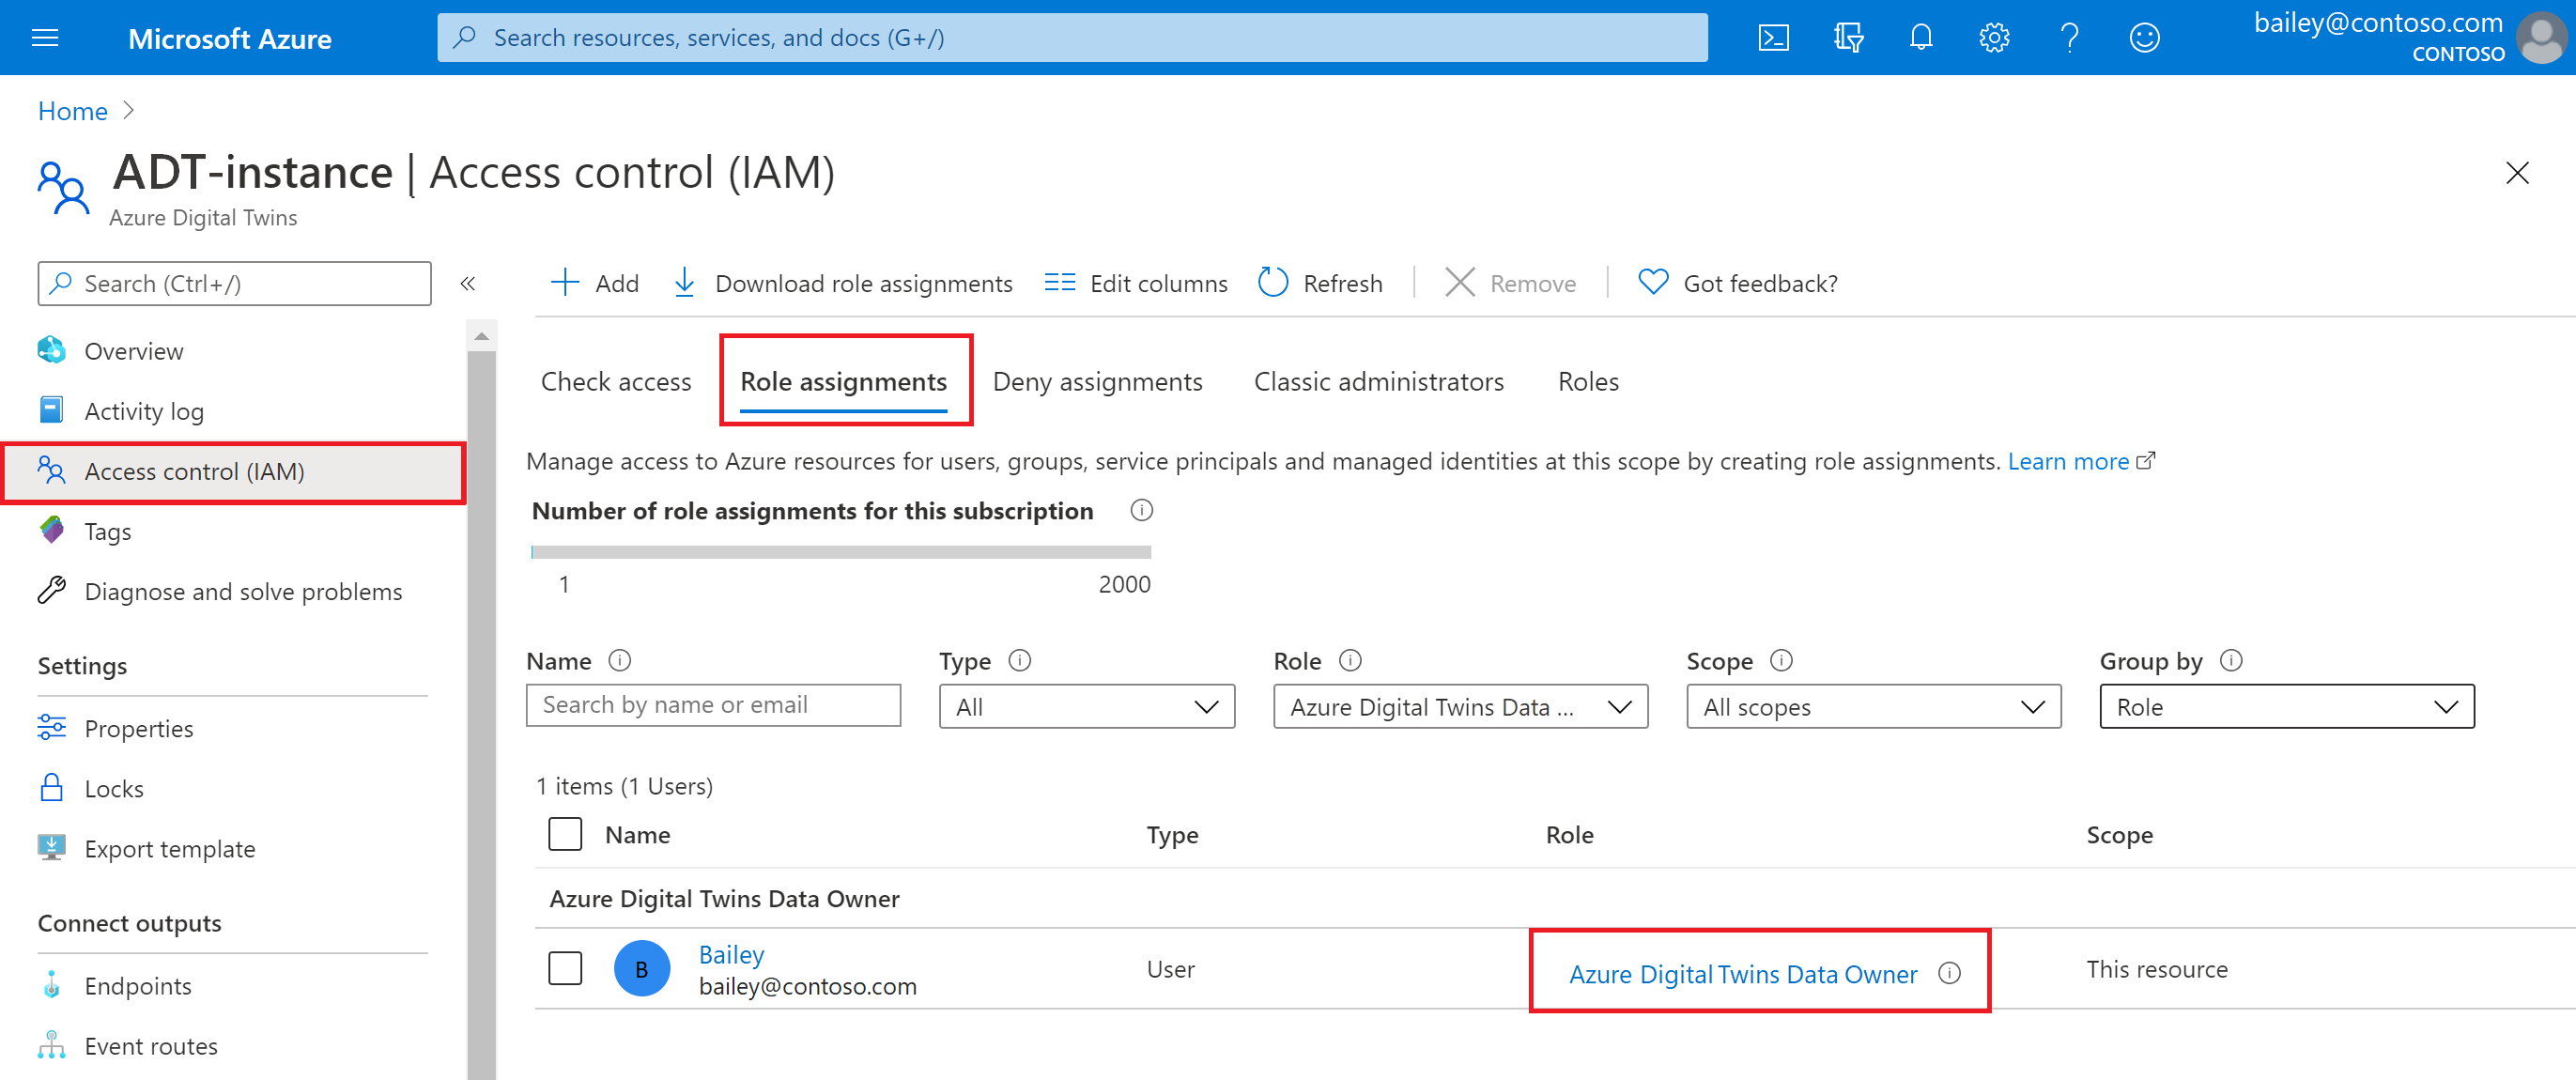
One way to check that you have successfully set up the role assignment is to view the role assignments for the Azure Digital Twins instance in the Azure portal. Go to your Azure Digital Twins instance in the Azure portal. To get there, you can look it up on the page of Azure Digital Twins instances or search its name in the portal search bar).
Then, view all of its assigned roles under Access control (IAM) > Role assignments. Your role assignment should appear in the list.
You now have an Azure Digital Twins instance ready to go, and have assigned permissions to manage it.
Enable/disable managed identity for the instance
This section shows you how to add a managed identity to an Azure Digital Twins instance that already exists. You can also disable managed identity on an instance that has it already.
Use the CLI commands below for your chosen type of managed identity.
System-assigned identity commands
The command to enable a system-assigned identity for an existing instance is the same az dt create command that's used to create a new instance with a system-assigned identity. Instead of providing a new name of an instance to create, you can provide the name of an instance that already exists. Then, make sure to add the --mi-system-assigned parameter.
az dt create --dt-name <name-of-existing-instance> --resource-group <resource-group> --mi-system-assigned
To disable system-assigned identity on an instance where it's currently enabled, use the following command to set --mi-system-assigned to false.
az dt create --dt-name <name-of-existing-instance> --resource-group <resource-group> --mi-system-assigned false
User-assigned identity commands
To enable a user-assigned identity on an existing instance, provide the ID of an existing user assigned identity in the following command:
az dt identity assign --dt-name <name-of-existing-instance> --resource-group <resource-group> --user <user-assigned-identity-resource-ID>
To disable a user-assigned identity on an instance where it's currently enabled, provide the ID of the identity in the following command:
az dt identity remove --dt-name <name-of-existing-instance> --resource-group <resource-group> --user <user-assigned-identity-resource-ID>
Considerations for disabling managed identities
It's important to consider the effects that any changes to the identity or its roles can have on the resources that use it. If you're using managed identities with your Azure Digital Twins endpoints or for data history and the identity is disabled, or a necessary role is removed from it, the endpoint or data history connection can become inaccessible and the flow of events will be disrupted.
To continue using an endpoint that was set up with a managed identity that's now been disabled, you'll need to delete the endpoint and re-create it with a different authentication type. It may take up to an hour for events to resume delivery to the endpoint after this change.
Next steps
Test out individual REST API calls on your instance using the Azure Digital Twins CLI commands:
Or, see how to connect a client application to your instance with authentication code:
Feedback
Coming soon: Throughout 2024 we will be phasing out GitHub Issues as the feedback mechanism for content and replacing it with a new feedback system. For more information see: https://aka.ms/ContentUserFeedback.
Submit and view feedback for