Tutorial: Configure Apache HBase policies in HDInsight with Enterprise Security Package
Learn how to configure Apache Ranger policies for Enterprise Security Package (ESP) Apache HBase clusters. ESP clusters are connected to a domain allowing users to authenticate with domain credentials. In this tutorial, you create two Ranger policies to restrict access to different column-families in an HBase table.
In this tutorial, you learn how to:
- Create domain users.
- Create Ranger policies.
- Create tables in an HBase cluster.
- Test Ranger policies.
Before you begin
- If you don't have an Azure subscription, create a free account.
- Sign in to the Azure portal.
- Create an HDInsight HBase cluster with Enterprise Security Package.
Connect to Apache Ranger Admin UI
From a browser, connect to the Ranger Admin user interface (UI) by using the URL
https://<ClusterName>.azurehdinsight.net/Ranger/. Remember to change<ClusterName>to the name of your HBase cluster.Note
Ranger credentials aren't the same as Hadoop cluster credentials. To prevent browsers from using cached Hadoop credentials, use a new InPrivate browser window to connect to the Ranger Admin UI.
Sign in by using your Microsoft Entra admin credentials. The Microsoft Entra admin credentials aren't the same as HDInsight cluster credentials or Linux HDInsight node Secure Shell (SSH) credentials.
Create domain users
To learn how to create the sales_user1 and marketing_user1 domain users, see Create an HDInsight cluster with Enterprise Security Package. In a production scenario, domain users come from your Active Directory tenant.
Create HBase tables and import sample data
You can use SSH to connect to HBase clusters and then use Apache HBase Shell to create HBase tables, insert data, and query data. For more information, see Use SSH with HDInsight.
Use the HBase shell
From SSH, run the following HBase command:
hbase shellCreate an HBase table
Customerswith two column-families:NameandContact.create 'Customers', 'Name', 'Contact' listInsert some data:
put 'Customers','1001','Name:First','Alice'
put 'Customers','1001','Name:Last','Johnson'
put 'Customers','1001','Contact:Phone','333-333-3333'
put 'Customers','1001','Contact:Address','313 133rd Place'
put 'Customers','1001','Contact:City','Redmond'
put 'Customers','1001','Contact:State','WA'
put 'Customers','1001','Contact:ZipCode','98052'
put 'Customers','1002','Name:First','Robert'
put 'Customers','1002','Name:Last','Stevens'
put 'Customers','1002','Contact:Phone','777-777-7777'
put 'Customers','1002','Contact:Address','717 177th Ave'
put 'Customers','1002','Contact:City','Bellevue'
put 'Customers','1002','Contact:State','WA'
put 'Customers','1002','Contact:ZipCode','98008'
View the contents of the table:
scan 'Customers'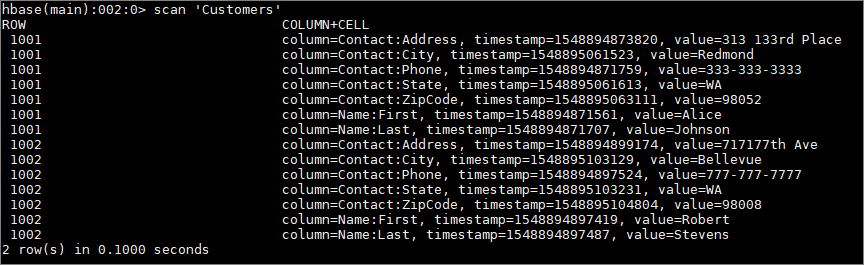
Create Ranger policies
Create a Ranger policy for sales_user1 and marketing_user1.
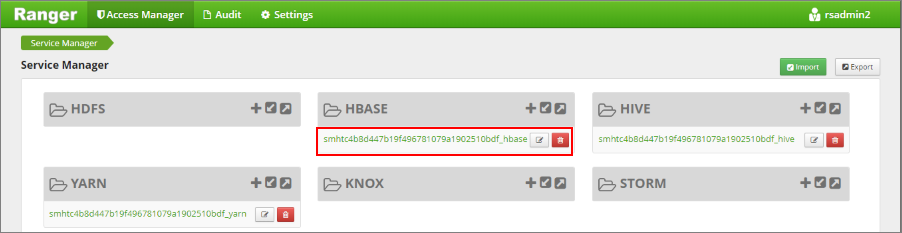
Open the Ranger Admin UI. Under HBase, select <ClusterName>_hbase.
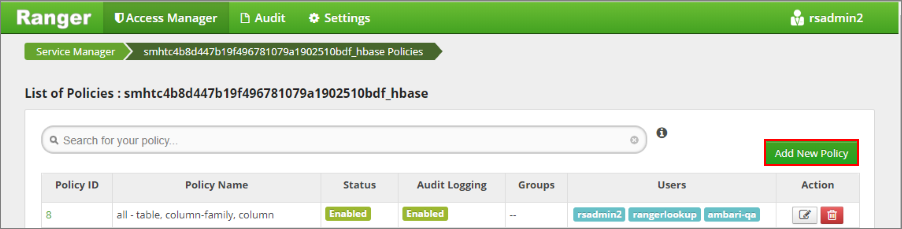
The List of Policies screen shows all Ranger policies created for this cluster. One preconfigured policy might be listed. Select Add New Policy.
On the Create Policy screen, enter the following values:
Setting Suggested value Policy Name sales_customers_name_contact HBase Table Customers HBase Column-family Name, Contact HBase Column * Select Group Select User sales_user1 Permissions Read The following wildcards can be included in the topic name:
*indicates zero or more occurrences of characters.?indicates single character.

Note
Wait a few moments for Ranger to sync with Microsoft Entra ID if a domain user isn't automatically populated for Select User.
Select Add to save the policy.
Select Add New Policy and then enter the following values:
Setting Suggested value Policy Name marketing_customers_contact HBase Table Customers HBase Column-family Contact HBase Column * Select Group Select User marketing_user1 Permissions Read 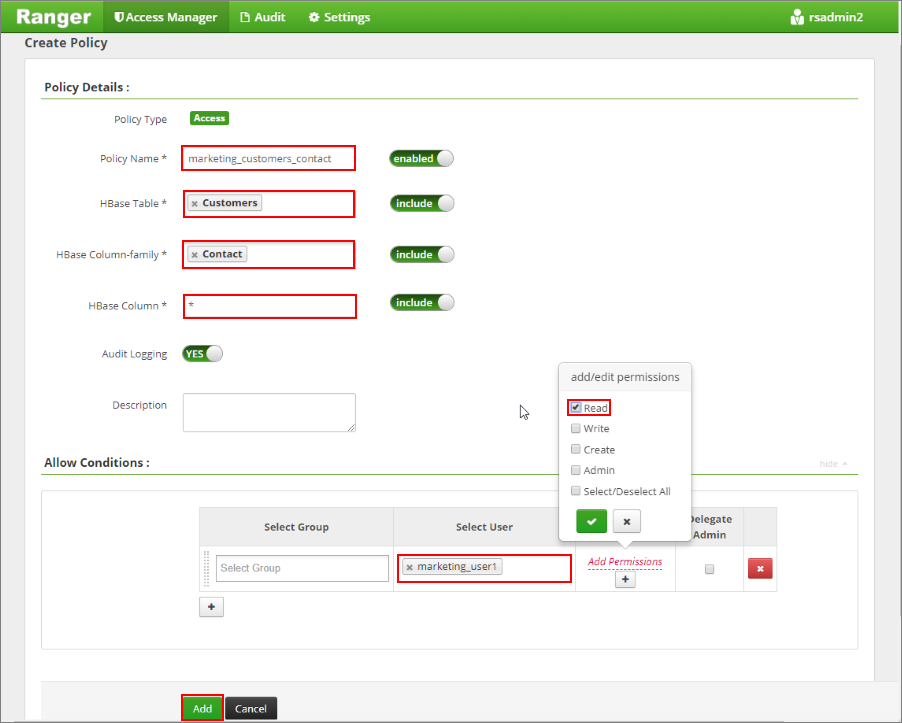
Select Add to save the policy.
Test the Ranger policies
Based on the Ranger policies configured, sales_user1 can view all the data for the columns in both the Name and Contact column families. The marketing_user1 can view data only in the Contact column family.
Access data as sales_user1
Open a new SSH connection to the cluster. Use the following command to sign in to the cluster:
ssh sshuser@CLUSTERNAME-ssh.azurehdinsight.netUse the
kinitcommand to change to the context of the desired user:kinit sales_user1Open the HBase shell and scan the table
Customers:hbase shell scan `Customers`Notice that the sales user can view all columns of the
Customerstable. The user can see the two columns in theNamecolumn-family and the five columns in theContactcolumn-family.ROW COLUMN+CELL 1001 column=Contact:Address, timestamp=1548894873820, value=313 133rd Place 1001 column=Contact:City, timestamp=1548895061523, value=Redmond 1001 column=Contact:Phone, timestamp=1548894871759, value=333-333-3333 1001 column=Contact:State, timestamp=1548895061613, value=WA 1001 column=Contact:ZipCode, timestamp=1548895063111, value=98052 1001 column=Name:First, timestamp=1548894871561, value=Alice 1001 column=Name:Last, timestamp=1548894871707, value=Johnson 1002 column=Contact:Address, timestamp=1548894899174, value=717 177th Ave 1002 column=Contact:City, timestamp=1548895103129, value=Bellevue 1002 column=Contact:Phone, timestamp=1548894897524, value=777-777-7777 1002 column=Contact:State, timestamp=1548895103231, value=WA 1002 column=Contact:ZipCode, timestamp=1548895104804, value=98008 1002 column=Name:First, timestamp=1548894897419, value=Robert 1002 column=Name:Last, timestamp=1548894897487, value=Stevens 2 row(s) in 0.1000 seconds
Access data as marketing_user1
Open a new SSH connection to the cluster. Use the following command to sign in as marketing_user1:
ssh sshuser@CLUSTERNAME-ssh.azurehdinsight.netUse the
kinitcommand to change to the context of our desired user:kinit marketing_user1Open the HBase shell and scan the table
Customers:hbase shell scan `Customers`Notice that the marketing user can only view the five columns of the
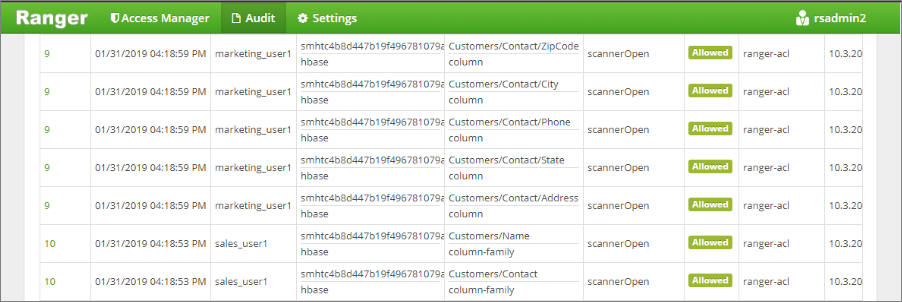
Contactcolumn-family.ROW COLUMN+CELL 1001 column=Contact:Address, timestamp=1548894873820, value=313 133rd Place 1001 column=Contact:City, timestamp=1548895061523, value=Redmond 1001 column=Contact:Phone, timestamp=1548894871759, value=333-333-3333 1001 column=Contact:State, timestamp=1548895061613, value=WA 1001 column=Contact:ZipCode, timestamp=1548895063111, value=98052 1002 column=Contact:Address, timestamp=1548894899174, value=717 177th Ave 1002 column=Contact:City, timestamp=1548895103129, value=Bellevue 1002 column=Contact:Phone, timestamp=1548894897524, value=777-777-7777 1002 column=Contact:State, timestamp=1548895103231, value=WA 1002 column=Contact:ZipCode, timestamp=1548895104804, value=98008 2 row(s) in 0.0730 secondsView the audit access events from the Ranger UI.
Clean up resources
If you aren't going to continue to use this application, delete the HBase cluster that you created:
- Sign in to the Azure portal.
- In the Search box at the top, enter HDInsight.
- Under Services, select HDInsight clusters.
- In the list of HDInsight clusters that appears, select the ... next to the cluster that you created for this tutorial.
- Select Delete > Yes.
Next steps
Feedback
Coming soon: Throughout 2024 we will be phasing out GitHub Issues as the feedback mechanism for content and replacing it with a new feedback system. For more information see: https://aka.ms/ContentUserFeedback.
Submit and view feedback for