Set up TLS encryption and authentication for ESP Apache Kafka cluster in Azure HDInsight
This article shows you how to set up Transport Layer Security (TLS) encryption, previously known as Secure Sockets Layer (SSL) encryption, between Apache Kafka clients and Apache Kafka brokers. It also shows you how to set up authentication of clients (sometimes referred to as two-way TLS).
Important
There are two clients which you can use for Kafka applications: a Java client and a console client. Only the Java client ProducerConsumer.java can use TLS for both producing and consuming. The console producer client console-producer.sh does not work with TLS.
Apache Kafka broker setup
The Kafka TLS broker setup uses four HDInsight cluster VMs in the following way:
- headnode 0 - Certificate Authority (CA)
- worker node 0, 1, and 2 - brokers
Note
This guide uses self-signed certificates, but the most secure solution is to use certificates issued by trusted CAs.
The summary of the broker setup process is as follows:
The following steps are repeated on each of the three worker nodes:
- Generate a certificate.
- Create a cert signing request.
- Send the cert signing request to the Certificate Authority (CA).
- Sign in to the CA and sign the request.
- SCP the signed certificate back to the worker node.
- SCP the public certificate of the CA to the worker node.
Once you have all of the certificates, put the certs into the cert store.
Go to Ambari and change the configurations.
Use the following detailed instructions to complete the broker setup:
Important
In the following code snippets wnX is an abbreviation for one of the three worker nodes and should be substituted with
wn0,wn1orwn2as appropriate.WorkerNode0_NameandHeadNode0_Nameshould be substituted with the names of the respective machines.Perform initial setup on head node 0, which for HDInsight fills the role of the Certificate Authority (CA).
# Create a new directory 'ssl' and change into it
mkdir ssl
cd ssl
Perform the same initial setup on each of the brokers (worker nodes 0, 1 and 2).
# Create a new directory 'ssl' and change into it
mkdir ssl
cd ssl
On each of the worker nodes, execute the following steps using the code snippet.
- Create a keystore and populate it with a new private certificate.
- Create a certificate signing request.
- SCP the certificate signing request to the CA (headnode0)
keytool -genkey -keystore kafka.server.keystore.jks -keyalg RSA -validity 365 -storepass "MyServerPassword123" -keypass "MyServerPassword123" -dname "CN=FQDN_WORKER_NODE" -ext SAN=DNS:FQDN_WORKER_NODE -storetype pkcs12
keytool -keystore kafka.server.keystore.jks -certreq -file cert-file -storepass "MyServerPassword123" -keypass "MyServerPassword123"
scp cert-file sshuser@HeadNode0_Name:~/ssl/wnX-cert-sign-request
Note
FQDN_WORKER_NODE is Fully Qualified Domain Name of worker node machine.You can get that details from /etc/hosts file in head node
For example,
wn0-espkaf.securehadooprc.onmicrosoft.com
wn0-kafka2.zbxwnwsmpcsuvbjqbmespcm1zg.bx.internal.cloudapp.net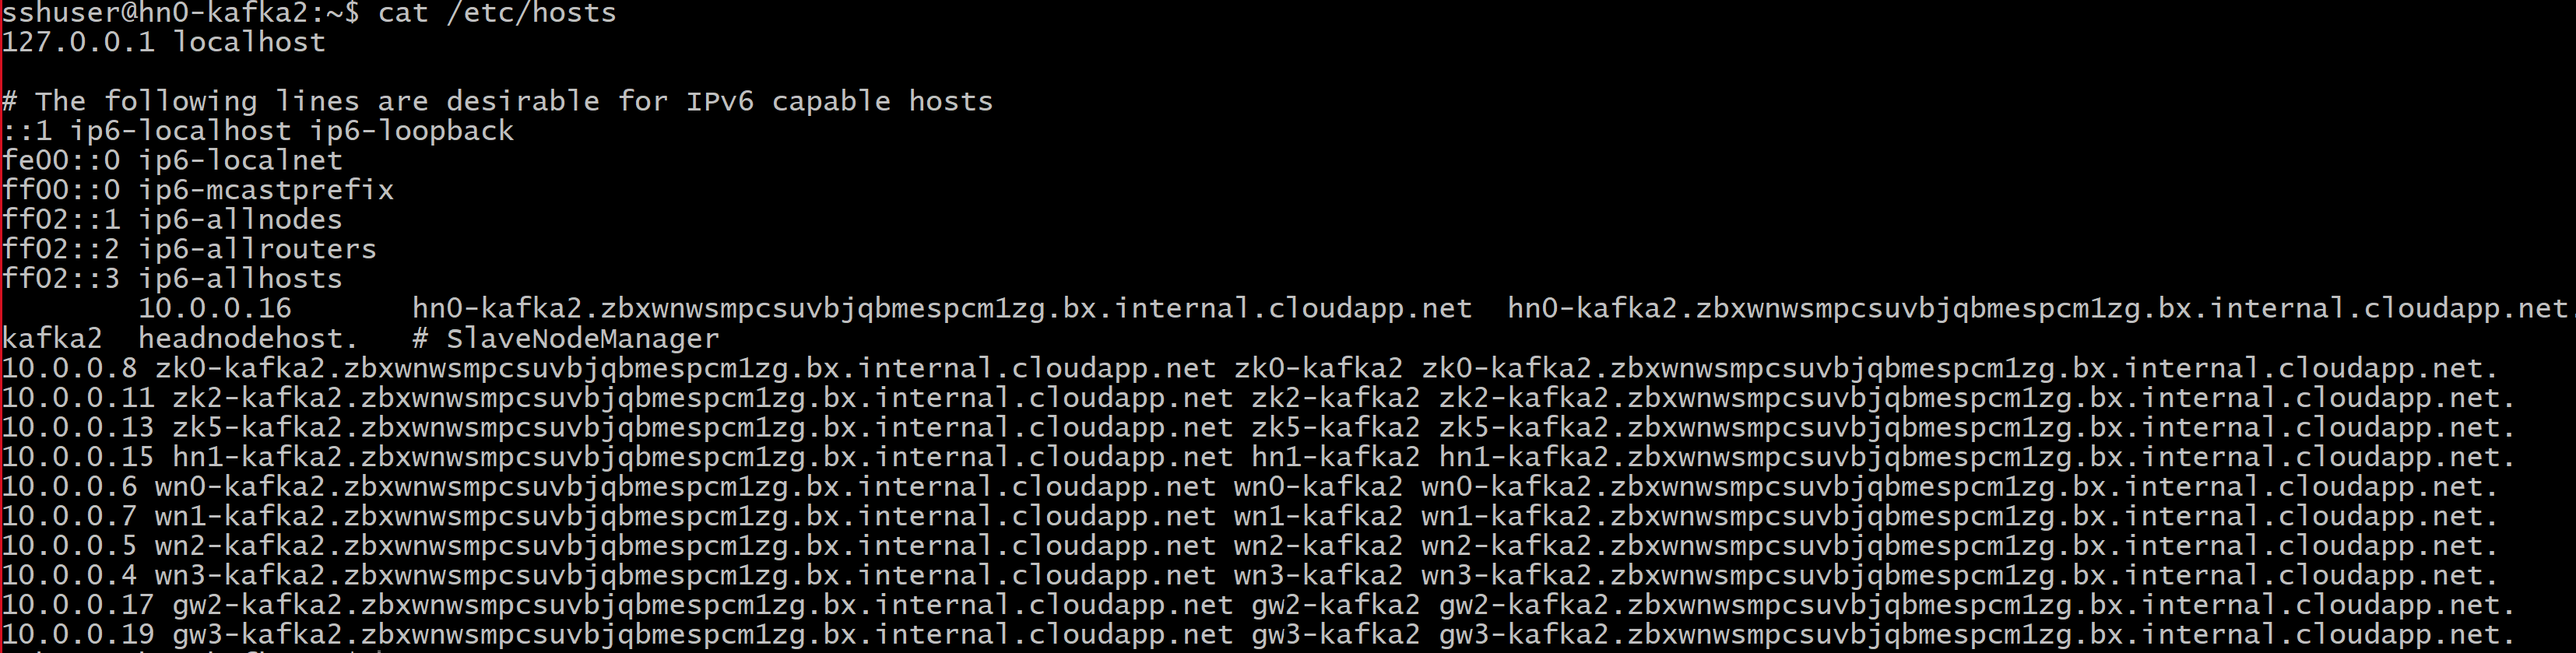
On the CA machine, run the following command to create ca-cert and ca-key files:
openssl req -new -newkey rsa:4096 -days 365 -x509 -subj "/CN=Kafka-Security-CA" -keyout ca-key -out ca-cert -nodesChange to the CA machine and sign all of the received cert signing requests:
openssl x509 -req -CA ca-cert -CAkey ca-key -in wn0-cert-sign-request -out wn0-cert-signed -days 365 -CAcreateserial -passin pass:"MyServerPassword123"
openssl x509 -req -CA ca-cert -CAkey ca-key -in wn1-cert-sign-request -out wn1-cert-signed -days 365 -CAcreateserial -passin pass:"MyServerPassword123"
openssl x509 -req -CA ca-cert -CAkey ca-key -in wn2-cert-sign-request -out wn2-cert-signed -days 365 -CAcreateserial -passin pass:"MyServerPassword123"
Send the signed certificates back to the worker nodes from the CA (headnode0).
scp wn0-cert-signed sshuser@WorkerNode0_Name:~/ssl/cert-signed
scp wn1-cert-signed sshuser@WorkerNode1_Name:~/ssl/cert-signed
scp wn2-cert-signed sshuser@WorkerNode2_Name:~/ssl/cert-signed
Send the public certificate of the CA to each worker node.
scp ca-cert sshuser@WorkerNode0_Name:~/ssl/ca-cert
scp ca-cert sshuser@WorkerNode1_Name:~/ssl/ca-cert
scp ca-cert sshuser@WorkerNode2_Name:~/ssl/ca-cert
On each worker node, add the CAs public certificate to the truststore and keystore. Then add the worker node's own signed certificate to the keystore
keytool -keystore kafka.server.truststore.jks -alias CARoot -import -file ca-cert -storepass "MyServerPassword123" -keypass "MyServerPassword123" -noprompt
keytool -keystore kafka.server.keystore.jks -alias CARoot -import -file ca-cert -storepass "MyServerPassword123" -keypass "MyServerPassword123" -noprompt
keytool -keystore kafka.server.keystore.jks -import -file cert-signed -storepass "MyServerPassword123" -keypass "MyServerPassword123" -noprompt
Update Kafka configuration to use TLS and restart brokers
You have now set up each Kafka broker with a keystore and truststore, and imported the correct certificates. Next, modify related Kafka configuration properties using Ambari and then restart the Kafka brokers.
To complete the configuration modification, do the following steps:
Sign in to the Azure portal and select your Azure HDInsight Apache Kafka cluster.
Go to the Ambari UI by clicking Ambari home under Cluster dashboards.
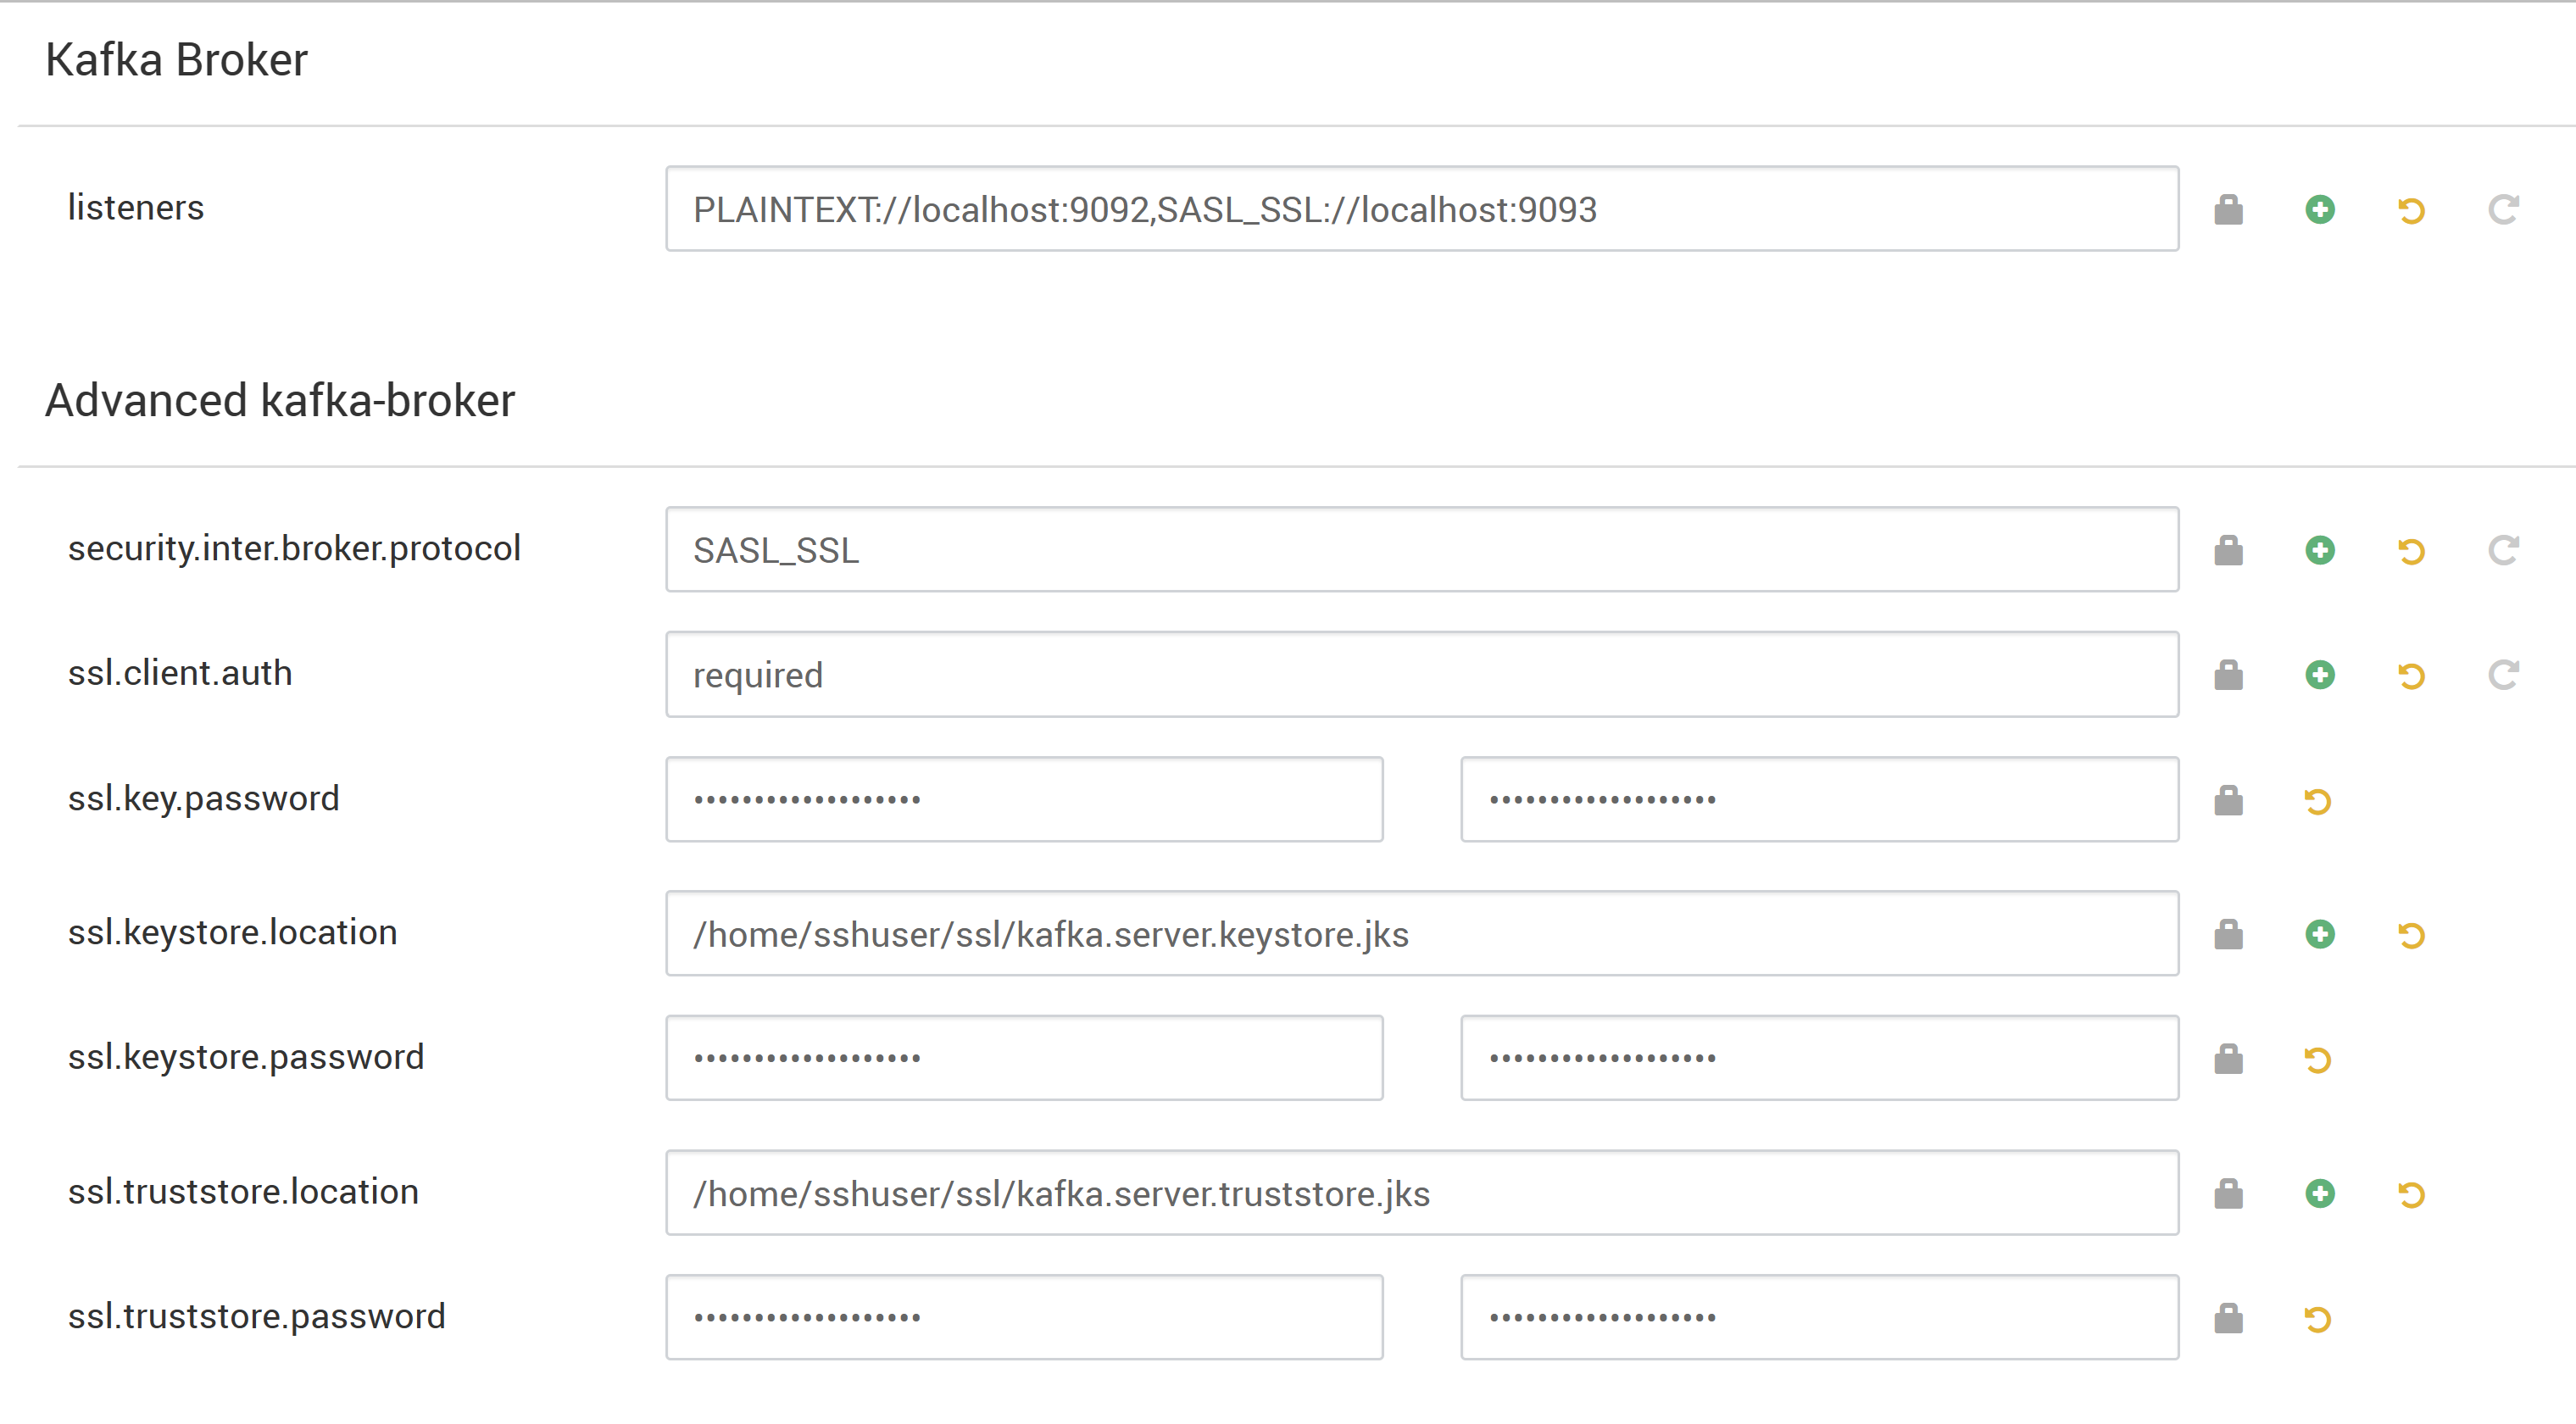
Under Kafka Broker set the listeners property to
PLAINTEXT://localhost:9092,SASL_SSL://localhost:9093Under Advanced kafka-broker set the security.inter.broker.protocol property to
SASL_SSL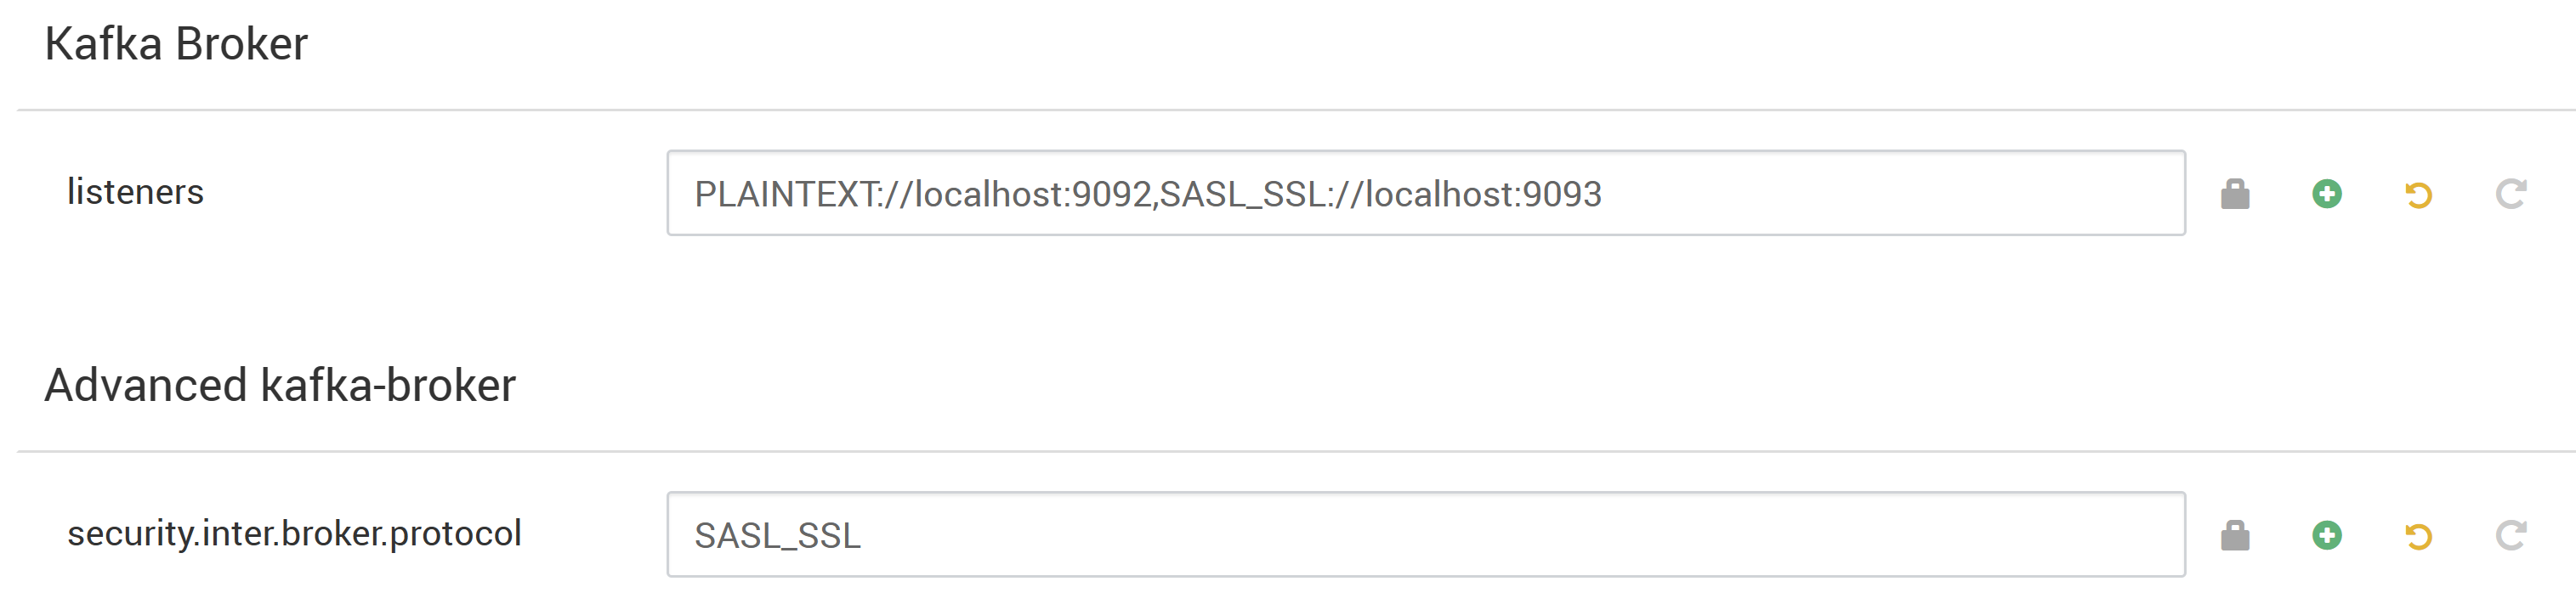
Under Custom kafka-broker set the ssl.client.auth property to
required.Note
This step is only required if you're setting up authentication and encryption.

Here's the screenshot that shows Ambari configuration UI with these changes.
Note
- ssl.keystore.location and ssl.truststore.location is the complete path of your keystore, truststore location in Certificate Authority (hn0)
- ssl.keystore.password and ssl.truststore.password is the password set for the keystore and truststore. In this case as an example,
MyServerPassword123 - ssl.key.password is the key set for the keystore and trust store. In this case as an example,
MyServerPassword123
To Use TLS 1.3 in Kafka, add following configs to the Kafka configs in Ambari.
ssl.enabled.protocols=TLSv1.3ssl.protocol=TLSv1.3
Important
- TLS 1.3 works with HDI 5.1 kafka version only.
- If you use TLS 1.3 at server side, you should use TLS 1.3 configs at client too.
For HDI version 4.0 or 5.0
If you're setting up authentication and encryption, then the screenshot looks like
If you are setting up encryption only, then the screenshot looks like

Restart all Kafka brokers.
Client setup (without authentication)
If you don't need authentication, the summary of the steps to set up only TLS encryption are:
- Sign in to the CA (active head node).
- Copy the CA cert to client machine from the CA machine (wn0).
- Sign in to the client machine (hn1) and navigate to the
~/sslfolder. - Import the CA cert to the truststore.
- Import the CA cert to the keystore.
These steps are detailed in the following code snippets.
Sign in to the CA node.
ssh sshuser@HeadNode0_Name
cd ssl
Copy the ca-cert to the client machine
scp ca-cert sshuser@HeadNode1_Name:~/ssl/ca-certSign in to the client machine (standby head node).
ssh sshuser@HeadNode1_Name
cd ssl
Import the CA certificate to the truststore.
keytool -keystore kafka.client.truststore.jks -alias CARoot -import -file ca-cert -storepass "MyClientPassword123" -keypass "MyClientPassword123" -nopromptImport the CA cert to keystore.
keytool -keystore kafka.client.keystore.jks -alias CARoot -import -file ca-cert -storepass "MyClientPassword123" -keypass "MyClientPassword123" -nopromptCreate the file
client-ssl-auth.propertieson client machine (hn1). It should have the following lines:security.protocol=SASL_SSL sasl.mechanism=GSSAPI sasl.kerberos.service.name=kafka ssl.truststore.location=/home/sshuser/ssl/kafka.client.truststore.jks ssl.truststore.password=MyClientPassword123- To Use TLS 1.3 add following configs to file
client-ssl-auth.properties
ssl.enabled.protocols=TLSv1.3 ssl.protocol=TLSv1.3- To Use TLS 1.3 add following configs to file
Start the admin client with producer and consumer options to verify that both producers and consumers are working on port 9093. Refer to Verification section for steps needed to verify the setup using console producer/consumer.
Client setup (with authentication)
Note
The following steps are required only if you are setting up both TLS encryption and authentication. If you are only setting up encryption, then see Client setup without authentication.
The following four steps summarize the tasks needed to complete the client setup:
- Sign in to the client machine (standby head node).
- Create a Java keystore and get a signed certificate for the broker. Then copy the certificate to the VM where the CA is running.
- Switch to the CA machine (active head node) to sign the client certificate.
- Go to the client machine (standby head node) and navigate to the
~/sslfolder. Copy the signed cert to client machine.
The details of each step are given.
Sign in to the client machine (standby head node).
ssh sshuser@HeadNode1_NameRemove any existing ssl directory.
rm -R ~/ssl
mkdir ssl
cd ssl
Create a Java keystore and create a certificate signing request.
keytool -genkey -keystore kafka.client.keystore.jks -validity 365 -storepass "MyClientPassword123" -keypass "MyClientPassword123" -dname "CN=HEADNODE1_FQDN" -storetype pkcs12

keytool -keystore kafka.client.keystore.jks -certreq -file client-cert-sign-request -storepass "MyClientPassword123" -keypass "MyClientPassword123"
Copy the certificate signing request to the CA
scp client-cert-sign-request sshuser@HeadNode0_Name:~/ssl/client-cert-sign-requestSwitch to the CA machine (active head node) and sign the client certificate.
ssh sshuser@HeadNode0_Name
cd ssl
openssl x509 -req -CA ca-cert -CAkey ca-key -in ~/ssl/client-cert-sign-request -out ~/ssl/client-cert-signed -days 365 -CAcreateserial -passin pass:MyClientPassword123
Copy signed client cert from the CA (active head node) to client machine.
scp client-cert-signed sshuser@HeadNode1_Name:~/ssl/client-signed-certCopy the ca-cert to the client machine
scp ca-cert sshuser@HeadNode1_Name:~/ssl/ca-cert- Sign in to the client machine (standby head node) and navigate to ssl directory.
ssh sshuser@HeadNode1_Name
cd ssl
Create client store with signed certificate, and import CA certificate into the keystore, and truststore on client machine (hn1):
keytool -keystore kafka.client.truststore.jks -alias CARoot -import -file ca-cert -storepass "MyClientPassword123" -keypass "MyClientPassword123" -noprompt

keytool -keystore kafka.client.keystore.jks -alias CARoot -import -file ca-cert -storepass "MyClientPassword123" -keypass "MyClientPassword123" -noprompt

keytool -keystore kafka.client.keystore.jks -import -file client-signed-cert -storepass "MyClientPassword123" -keypass "MyClientPassword123" -noprompt
Create a file
client-ssl-auth.propertieson client machine (hn1). It should have the following lines:security.protocol=SASL_SSL sasl.mechanism=GSSAPI sasl.kerberos.service.name=kafka ssl.truststore.location=/home/sshuser/ssl/kafka.client.truststore.jks ssl.truststore.password=MyClientPassword123 ssl.keystore.location=/home/sshuser/ssl/kafka.client.keystore.jks ssl.keystore.password=MyClientPassword123 ssl.key.password=MyClientPassword123- To Use TLS 1.3 add following configs to file
client-ssl-auth.properties
ssl.enabled.protocols=TLSv1.3 ssl.protocol=TLSv1.3- To Use TLS 1.3 add following configs to file
Verification
Run these steps on the client machine.
Note
If HDInsight 4.0 and Kafka 2.1 is installed, you can use the console producer/consumers to verify your setup. If not, run the Kafka producer on port 9092 and send messages to the topic, and then use the Kafka consumer on port 9093 which uses TLS.
Kafka 2.1 or above
Note
Below commands will work if you're either using kafka user or a custom user which have access to do CRUD operation.
Using Command Line Tool
Make sure you check the local kerberos ticket for custom user you want to use to submit commands.
klistIf ticket is present, then you're good to proceed. Otherwise generate a Kerberos principle and keytab using below command.
ktutilktutil: addent -password -p espkafkauser@TEST.COM -k 1 -e RC4-HMAC Password for espkafkauser@TEST.COM: ktutil: wkt user1.keytab ktutil: q kinit –kt espkafkauser.keytab espkafkauser@TEST.COMklistagain to check kerberos cached ticket.Create a topic if it doesn't exist already.
sudo su kafka –c "/usr/hdp/current/kafka-broker/bin/kafka-topics.sh --zookeeper <ZOOKEEPER_NODE>:2181 --create --topic topic1 --partitions 2 --replication-factor 2"To use a keytab, create a Keytab file with the following content. Be sure to point the Keytab property to your Keytab file and reference the principal used inside the Keytab. Following is a sample JAAS file created and placed in the location in VM: /home/sshuser/kafka_client_jaas_keytab.conf
KafkaClient {
   com.sun.security.auth.module.Krb5LoginModule required
   useKeyTab=true
   storeKey=true
   keyTab="/home/sshuser/espkafkauser.keytab"
   principal="espkafkauser@TEST.COM";
};
Start console producer and provide the path to
client-ssl-auth.propertiesas a configuration file for the producer.export KAFKA_OPTS="-Djava.security.auth.login.config=/home/hdiuser/kafka_client_jaas_keytab.conf" /usr/hdp/current/kafka-broker/bin/kafka-console-producer.sh --broker-list <FQDN_WORKER_NODE>:9093 --topic topic1 --producer.config ~/ssl/client-ssl-auth.propertiesOpen another ssh connection to client machine and start console consumer and provide the path to
client-ssl-auth.propertiesas a configuration file for the consumer.export KAFKA_OPTS="-Djava.security.auth.login.config=/home/sshuser/kafka_client_jaas_keytab.conf" /usr/hdp/current/kafka-broker/bin/kafka-console-consumer.sh --bootstrap-server <FQDN_WORKER_NODE>:9093 --topic topic1 --consumer.config ~/ssl/client-ssl-auth.properties --from-beginning
If you want to use Java client to do CRUD operations, then use following GitHub repository.
Next steps
Feedback
Coming soon: Throughout 2024 we will be phasing out GitHub Issues as the feedback mechanism for content and replacing it with a new feedback system. For more information see: https://aka.ms/ContentUserFeedback.
Submit and view feedback for