How to connect devices with X.509 certificates to IoT Central Application
IoT Central supports both shared access signatures (SAS) and X.509 certificates to secure the communication between a device and your application. The Create and connect a client application to your Azure IoT Central application tutorial uses SAS. In this article, you learn how to modify the code sample to use X.509 certificates. X.509 certificates are recommended in production environments. For more information, see Device authentication concepts.
This guide shows two ways to use X.509 certificates - group enrollments typically used in a production environment, and individual enrollments useful for testing. The article also describes how to roll device certificates to maintain connectivity when certificates expire.
This guide builds on the samples shown in the Create and connect a client application to your Azure IoT Central application tutorial that use C#, Java, JavaScript, and Python. For an example that uses the C programming language, see the Provision multiple X.509 devices using enrollment groups.
Prerequisites
To complete the steps in this how-to guide, you should first complete the Create and connect a client application to your Azure IoT Central application tutorial. You modify the code you used in the tutorial when you follow the steps in this guide.
In this how-to guide, you generate some test X.509 certificates. To be able to generate these certificates, you need:
- A development machine with Node.js version 6 or later installed. You can run
node --versionin the command line to check your version. The instructions in this tutorial assume you're running the node command at the Windows command prompt. However, you can use Node.js on many other operating systems. - A local copy of the Microsoft Azure IoT SDK for Node.js GitHub repository that contains the scripts to generate the test X.509 certificates. Use this link to download a copy of the repository: Download ZIP. Then unzip the file to a suitable location on your local machine.
Use group enrollment
Use X.509 certificates with a group enrollment in a production environment. In a group enrollment, you add a root or intermediate X.509 certificate to your IoT Central application. Devices with leaf certificates derived from the root or intermediate certificate can connect to your application.
Generate root and device certificates
In this section, you use an X.509 certificate to connect a device with a certificate derived from the IoT Central enrollment group's certificate.
Warning
This way of generating X.509 certs is for testing only. For a production environment you should use your official, secure mechanism for certificate generation.
Navigate to the certificate generator script in the Microsoft Azure IoT SDK for Node.js you downloaded. Install the required packages:
cd azure-iot-sdk-node/provisioning/tools
npm install
Create a root certificate and then derive a device certificate by running the script:
node create_test_cert.js root mytestrootcert
node create_test_cert.js device sample-device-01 mytestrootcert
Tip
A device ID can contain letters, numbers, and the
-character.
These commands produce the following root and the device certificates:
| filename | contents |
|---|---|
| mytestrootcert_cert.pem | The public portion of the root X509 certificate |
| mytestrootcert_key.pem | The private key for the root X509 certificate |
| mytestrootcert_fullchain.pem | The entire keychain for the root X509 certificate. |
| mytestrootcert.pfx | The PFX file for the root X509 certificate. |
| sampleDevice01_cert.pem | The public portion of the device X509 certificate |
| sampleDevice01_key.pem | The private key for the device X509 certificate |
| sampleDevice01_fullchain.pem | The entire keychain for the device X509 certificate. |
| sampleDevice01.pfx | The PFX file for the device X509 certificate. |
Make a note of the location of these files. You need it later.
Create a group enrollment
Open your IoT Central application and navigate to Permissions in the left pane and select Device connection groups.
Select + New to create a new enrollment group called MyX509Group with an attestation type of Certificates (X.509). You can create enrollment groups for either IoT devices or IoT Edge devices.
In the enrollment group you created, select Manage primary.
In the Primary certificate panel, select Add certificate.
Upload the root certificate file called mytestrootcert_cert.pem that you generated previously.
If you're using an intermediate or root certificate authority that you trust and know you have full ownership of the certificate, you can self-attest that you verified the certificate by setting certificate status verified on upload to On. Otherwise, set certificate status verified on upload to Off.
If you set certificate status verified on upload to Off, select Generate verification code.
Copy the verification code, copy it, and then create an X.509 verification certificate. For example, at the command prompt:
node create_test_cert.js verification --ca mytestrootcert_cert.pem --key mytestrootcert_key.pem --nonce {verification-code}Select Verify to upload the signed verification certificate verification_cert.pem to complete the verification.
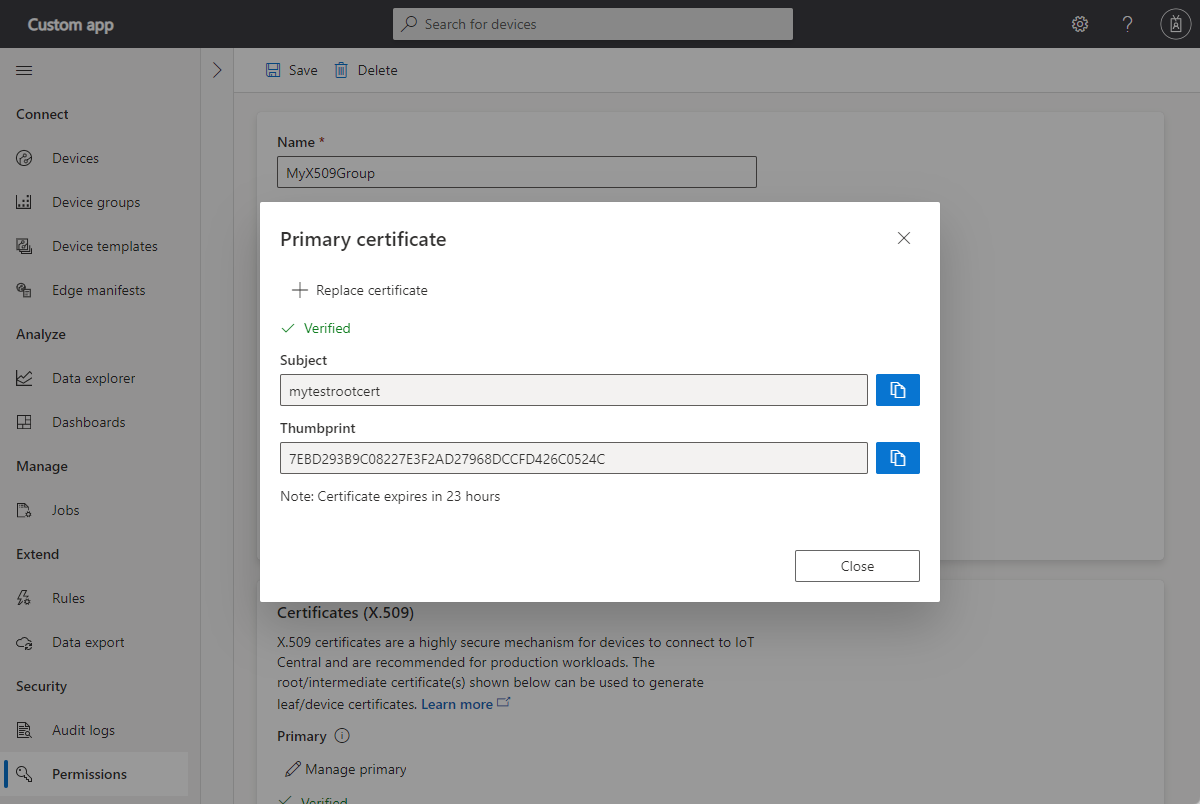
The status of the primary certificate is now Verified:

You can now connect devices that have an X.509 certificate derived from this primary root certificate.
After you save the enrollment group, make a note of the ID scope. You need it later.
Run sample device code
If you're using Windows, the X.509 certificates must be in the Windows certificate store for the sample to work. In Windows Explorer, double-click on the PFX files you generated previously - mytestrootcert.pfx and sampleDevice01.pfx. In the Certificate Import Wizard, select Current User as the store location, enter 1234 as the password, and let the wizard choose the certificate store automatically. The wizard imports the certificates to the current user's personal store.
To modify the sample code to use the X.509 certificates:
In the IoTHubDeviceSamples Visual Studio solution, open the Parameter.cs file in the TemperatureController project.
Add the following two parameter definitions to the class:
[Option(
    'x',
    "CertificatePath",
    HelpText = "(Required if DeviceSecurityType is \"dps\"). \nThe device PFX file to use during device provisioning." +
    "\nDefaults to environment variable \"IOTHUB_DEVICE_X509_CERT\".")]
public string CertificatePath { get; set; } = Environment.GetEnvironmentVariable("IOTHUB_DEVICE_X509_CERT");

[Option(
    'p',
    "CertificatePassword",
    HelpText = "(Required if DeviceSecurityType is \"dps\"). \nThe password of the PFX certificate file." +
    "\nDefaults to environment variable \"IOTHUB_DEVICE_X509_PASSWORD\".")]
public string CertificatePassword { get; set; } = Environment.GetEnvironmentVariable("IOTHUB_DEVICE_X509_PASSWORD");
Save the changes.
In the IoTHubDeviceSamples Visual Studio solution, open the Program.cs file in the TemperatureController project.
Add the following
usingstatements:using System.Security.Cryptography.X509Certificates; using System.IO;Add the following method to the class:
private static X509Certificate2 LoadProvisioningCertificate(Parameters parameters)
{
    var certificateCollection = new X509Certificate2Collection();
    certificateCollection.Import(
        parameters.CertificatePath,
        parameters.CertificatePassword,
        X509KeyStorageFlags.UserKeySet);

    X509Certificate2 certificate = null;

    foreach (X509Certificate2 element in certificateCollection)
    {
        Console.WriteLine($"Found certificate: {element?.Thumbprint} {element?.Subject}; PrivateKey: {element?.HasPrivateKey}");
        if (certificate == null && element.HasPrivateKey)
        {
            certificate = element;
        }
        else
        {
            element.Dispose();
        }
    }

    if (certificate == null)
    {
        throw new FileNotFoundException($"{parameters.CertificatePath} did not contain any certificate with a private key.");
    }

    Console.WriteLine($"Using certificate {certificate.Thumbprint} {certificate.Subject}");

    return certificate;
}
In the
SetupDeviceClientAsyncmethod, replace the block of code forcase "dps"with the following code:case "dps": s_logger.LogDebug($"Initializing via DPS"); Console.WriteLine($"Loading the certificate..."); X509Certificate2 certificate = LoadProvisioningCertificate(parameters); DeviceRegistrationResult dpsRegistrationResult = await ProvisionDeviceAsync(parameters, certificate, cancellationToken); var authMethod = new DeviceAuthenticationWithX509Certificate(dpsRegistrationResult.DeviceId, certificate); deviceClient = InitializeDeviceClient(dpsRegistrationResult.AssignedHub, authMethod); break;Replace the
ProvisionDeviceAsyncmethod with the following code:private static async Task<DeviceRegistrationResult> ProvisionDeviceAsync(Parameters parameters, X509Certificate2 certificate, CancellationToken cancellationToken) { SecurityProvider security = new SecurityProviderX509Certificate(certificate); ProvisioningTransportHandler mqttTransportHandler = new ProvisioningTransportHandlerMqtt(); ProvisioningDeviceClient pdc = ProvisioningDeviceClient.Create(parameters.DpsEndpoint, parameters.DpsIdScope, security, mqttTransportHandler); var pnpPayload = new ProvisioningRegistrationAdditionalData { JsonData = PnpConvention.CreateDpsPayload(ModelId), }; return await pdc.RegisterAsync(pnpPayload, cancellationToken); }Save the changes.
To run the sample:
Add the following environment variables to the project:
IOTHUB_DEVICE_X509_CERT:<full path to folder that contains PFX files>sampleDevice01.pfxIOTHUB_DEVICE_X509_PASSWORD: 1234.
Build and run the application. Verify the device provisions successfully.
To modify the sample code to use the X.509 certificates:
Navigate to the azure-iot-sdk-java/device/iot-device-samples/pnp-device-sample/temperature-controller-device-sample folder that contains the pom.xml file and src folder for the temperature controller device sample.
Edit the pom.xml file to add the following dependency configuration in the
<dependencies>node:<dependency> <groupId>com.microsoft.azure.sdk.iot.provisioning.security</groupId> <artifactId>${x509-provider-artifact-id}</artifactId> <version>${x509-provider-version}</version> </dependency>Save the changes.
Open the src/main/java/samples/com/microsoft/azure/sdk/iot/device/TemperatureController.java file in your text editor.
Replace the
SecurityProviderSymmetricKeyimport with the following imports:import com.microsoft.azure.sdk.iot.provisioning.security.SecurityProvider; import com.microsoft.azure.sdk.iot.provisioning.security.hsm.SecurityProviderX509Cert; import com.microsoft.azure.sdk.iot.provisioning.security.exceptions.SecurityProviderException;Add the following import:
import java.nio.file.*;Add
SecurityProviderExceptionto the list of exceptions that themainmethod throws:public static void main(String[] args) throws IOException, URISyntaxException, ProvisioningDeviceClientException, InterruptedException, SecurityProviderException {Replace the
initializeAndProvisionDevicemethod with the following code:private static void initializeAndProvisionDevice() throws ProvisioningDeviceClientException, IOException, URISyntaxException, InterruptedException, SecurityProviderException { String deviceX509Key = new String(Files.readAllBytes(Paths.get(System.getenv("IOTHUB_DEVICE_X509_KEY")))); String deviceX509Cert = new String(Files.readAllBytes(Paths.get(System.getenv("IOTHUB_DEVICE_X509_CERT")))); SecurityProvider securityProviderX509 = new SecurityProviderX509Cert(deviceX509Cert, deviceX509Key, null); ProvisioningDeviceClient provisioningDeviceClient; ProvisioningStatus provisioningStatus = new ProvisioningStatus(); provisioningDeviceClient = ProvisioningDeviceClient.create(globalEndpoint, scopeId, provisioningProtocol, securityProviderX509); AdditionalData additionalData = new AdditionalData(); additionalData.setProvisioningPayload(com.microsoft.azure.sdk.iot.provisioning.device.plugandplay.PnpHelper.createDpsPayload(MODEL_ID)); provisioningDeviceClient.registerDevice(new ProvisioningDeviceClientRegistrationCallbackImpl(), provisioningStatus, additionalData); while (provisioningStatus.provisioningDeviceClientRegistrationInfoClient.getProvisioningDeviceClientStatus() != ProvisioningDeviceClientStatus.PROVISIONING_DEVICE_STATUS_ASSIGNED) { if (provisioningStatus.provisioningDeviceClientRegistrationInfoClient.getProvisioningDeviceClientStatus() == ProvisioningDeviceClientStatus.PROVISIONING_DEVICE_STATUS_ERROR || provisioningStatus.provisioningDeviceClientRegistrationInfoClient.getProvisioningDeviceClientStatus() == ProvisioningDeviceClientStatus.PROVISIONING_DEVICE_STATUS_DISABLED || provisioningStatus.provisioningDeviceClientRegistrationInfoClient.getProvisioningDeviceClientStatus() == ProvisioningDeviceClientStatus.PROVISIONING_DEVICE_STATUS_FAILED) { provisioningStatus.exception.printStackTrace(); System.out.println("Registration error, bailing out"); break; } System.out.println("Waiting for Provisioning Service to register"); Thread.sleep(MAX_TIME_TO_WAIT_FOR_REGISTRATION); } ClientOptions options = new ClientOptions(); options.setModelId(MODEL_ID); if (provisioningStatus.provisioningDeviceClientRegistrationInfoClient.getProvisioningDeviceClientStatus() == ProvisioningDeviceClientStatus.PROVISIONING_DEVICE_STATUS_ASSIGNED) { System.out.println("IotHUb Uri : " + provisioningStatus.provisioningDeviceClientRegistrationInfoClient.getIothubUri()); System.out.println("Device ID : " + provisioningStatus.provisioningDeviceClientRegistrationInfoClient.getDeviceId()); String iotHubUri = provisioningStatus.provisioningDeviceClientRegistrationInfoClient.getIothubUri(); String deviceId = provisioningStatus.provisioningDeviceClientRegistrationInfoClient.getDeviceId(); log.debug("Opening the device client."); deviceClient = DeviceClient.createFromSecurityProvider(iotHubUri, deviceId, securityProviderX509, IotHubClientProtocol.MQTT, options); deviceClient.open(); } }Save the changes.
To run the sample:
In your shell environment, add the following two environment variables. Make sure that you provide the full path to the PEM files and use the correct path delimiter for your operating system:
set IOTHUB_DEVICE_X509_CERT=<full path to folder that contains PEM files>sampleDevice01_cert.pem
set IOTHUB_DEVICE_X509_KEY=<full path to folder that contains PEM files>sampleDevice01_key.pem
Tip
You set the other required environment variables when you completed the Create and connect a client application to your Azure IoT Central application tutorial.
Build and run the application. Verify the device provisions successfully.
To modify the sample code to use the X.509 certificates:
Navigate to the azure-iot-sdk-node/device/samples/javascript folder that contains the pnp_temperature_controller.js application and run the following command to install the X.509 package:
npm install azure-iot-security-x509 --saveOpen the pnp_temperature_controller.js file in a text editor.
Edit the
requirestatements to include the following code:const fs = require('fs'); const X509Security = require('azure-iot-security-x509').X509Security;Add the following four lines to the "DPS connection information" section to initialize the
deviceCertvariable:const deviceCert = { cert: fs.readFileSync(process.env.IOTHUB_DEVICE_X509_CERT).toString(), key: fs.readFileSync(process.env.IOTHUB_DEVICE_X509_KEY).toString() };Edit the
provisionDevicefunction that creates the client by replacing the first line with the following code:var provSecurityClient = new X509Security(registrationId, deviceCert);In the same function, modify the line that sets the
deviceConnectionStringvariable as follows:deviceConnectionString = 'HostName=' + result.assignedHub + ';DeviceId=' + result.deviceId + ';x509=true';In the
mainfunction, add the following line after the line that callsClient.fromConnectionString:client.setOptions(deviceCert);Save the changes.
To run the sample:
In your shell environment, add the following two environment variables. Make sure that you provide the full path to the PEM files and use the correct path delimiter for your operating system:
set IOTHUB_DEVICE_X509_CERT=<full path to folder that contains PEM files>sampleDevice01_cert.pem
set IOTHUB_DEVICE_X509_KEY=<full path to folder that contains PEM files>sampleDevice01_key.pem
Tip
You set the other required environment variables when you completed the Create and connect a client application to your Azure IoT Central application tutorial.
Execute the script and verify the device provisions successfully:
node pnp_temperature_controller.js
To modify the sample code to use the X.509 certificates:
Navigate to the azure-iot-device/samples/pnp folder and open the temp_controller_with_thermostats.py file in a text editor.
Add the following
fromstatement to import the X.509 functionality:from azure.iot.device import X509Modify the first part of the
provision_devicefunction as follows:async def provision_device(provisioning_host, id_scope, registration_id, x509, model_id): provisioning_device_client = ProvisioningDeviceClient.create_from_x509_certificate( provisioning_host=provisioning_host, registration_id=registration_id, id_scope=id_scope, x509=x509, )In the
mainfunction, replace the line that sets thesymmetric_keyvariable with the following code:x509 = X509( cert_file=os.getenv("IOTHUB_DEVICE_X509_CERT"), key_file=os.getenv("IOTHUB_DEVICE_X509_KEY"), )In the
mainfunction, replace the call to theprovision_devicefunction with the following code:registration_result = await provision_device( provisioning_host, id_scope, registration_id, x509, model_id )In the
mainfunction, replace the call to theIoTHubDeviceClient.create_from_symmetric_keyfunction with the following code:device_client = IoTHubDeviceClient.create_from_x509_certificate( x509=x509, hostname=registration_result.registration_state.assigned_hub, device_id=registration_result.registration_state.device_id, product_info=model_id, )Save the changes.
To run the sample:
In your shell environment, add the following two environment variables. Make sure that you provide the full path to the PEM files and use the correct path delimiter for your operating system:
set IOTHUB_DEVICE_X509_CERT=<full path to folder that contains PEM files>sampleDevice01_cert.pem
set IOTHUB_DEVICE_X509_KEY=<full path to folder that contains PEM files>sampleDevice01_key.pem
Tip
You set the other required environment variables when you completed the Create and connect a client application to your Azure IoT Central application tutorial.
Execute the script and verify the device provisions successfully:
python temp_controller_with_thermostats.py
Verify that telemetry appears on the device view in your IoT Central application:

Use individual enrollment
Use X.509 certificates with an individual enrollment to test your device and solution. In an individual enrollment, there's no root or intermediate X.509 certificate in your IoT Central application. Devices use a self-signed X.509 certificate to connect to your application.
Generate self-signed device certificate
In this section, you use a self-signed X.509 certificate to connect devices for individual enrollment, which are used to enroll a single device. Self-signed certificates are for testing only.
Warning
This way of generating X.509 certs is for testing only. For a production environment you should use your official, secure mechanism for certificate generation.
Create a self-signed X.509 device certificate by running the following commands:
  cd azure-iot-sdk-node/provisioning/tools
  node create_test_cert.js device mytestselfcertprimary
  node create_test_cert.js device mytestselfcertsecondary
Tip
A device ID can contain letters, numbers, and the - character.
These commands produce the following device certificates:
| filename | contents |
|---|---|
| mytestselfcertprimary_cert.pem | The public portion of the primary device X509 certificate |
| mytestselfcertprimary_key.pem | The private key for the primary device X509 certificate |
| mytestselfcertprimary_fullchain.pem | The entire keychain for the primary device X509 certificate. |
| mytestselfcertprimary.pfx | The PFX file for the primary device X509 certificate. |
| mytestselfcertsecondary_cert.pem | The public portion of the secondary device X509 certificate |
| mytestselfcertsecondary_key.pem | The private key for the secondary device X509 certificate |
| mytestselfcertsecondary_fullchain.pem | The entire keychain for the secondary device X509 certificate. |
| mytestselfcertsecondary.pfx | The PFX file for the secondary device X509 certificate. |
Create individual enrollment
In the Azure IoT Central application, select Devices, and create a new device with Device ID as mytestselfcertprimary from the thermostat device template. Make a note of the ID scope, you use it later.
Open the device you created and select Connect.
Select Individual enrollment as the Authentication type and Certificates (X.509) as the Authentication method.
Upload the mytestselfcertprimary_cert.pem file that you generated previously as the primary certificate.
Upload the mytestselfcertsecondary_cert.pem file that you generated previously as the secondary certificate. Then select Save.
The device now has an individual enrollment with X.509 certificates.


Run a sample individual enrollment device
If you're using Windows, the X.509 certificates must be in the Windows certificate store for the sample to work. In Windows Explorer, double-click on the PFX files you generated previously - mytestselfcertprimary.pfx and mytestselfcertsecondary.pfx. In the Certificate Import Wizard, select Current User as the store location, enter 1234 as the password, and let the wizard choose the certificate store automatically. The wizard imports the certificates to the current user's personal store.
To modify the sample code to use the X.509 certificates:
In the IoTHubDeviceSamples Visual Studio solution, open the Parameter.cs file in the TemperatureController project.
Add the following two parameter definitions to the class:
[Option(
    'x',
    "CertificatePath",
    HelpText = "(Required if DeviceSecurityType is \"dps\"). \nThe device PFX file to use during device provisioning." +
    "\nDefaults to environment variable \"IOTHUB_DEVICE_X509_CERT\".")]
public string CertificatePath { get; set; } = Environment.GetEnvironmentVariable("IOTHUB_DEVICE_X509_CERT");

[Option(
    'p',
    "CertificatePassword",
    HelpText = "(Required if DeviceSecurityType is \"dps\"). \nThe password of the PFX certificate file." +
    "\nDefaults to environment variable \"IOTHUB_DEVICE_X509_PASSWORD\".")]
public string CertificatePassword { get; set; } = Environment.GetEnvironmentVariable("IOTHUB_DEVICE_X509_PASSWORD");
Save the changes.
In the IoTHubDeviceSamples Visual Studio solution, open the Program.cs file in the TemperatureController project.
Add the following
usingstatements:using System.Security.Cryptography.X509Certificates; using System.IO;Add the following method to the class:
private static X509Certificate2 LoadProvisioningCertificate(Parameters parameters)
{
    var certificateCollection = new X509Certificate2Collection();
    certificateCollection.Import(
        parameters.CertificatePath,
        parameters.CertificatePassword,
        X509KeyStorageFlags.UserKeySet);

    X509Certificate2 certificate = null;

    foreach (X509Certificate2 element in certificateCollection)
    {
        Console.WriteLine($"Found certificate: {element?.Thumbprint} {element?.Subject}; PrivateKey: {element?.HasPrivateKey}");
        if (certificate == null && element.HasPrivateKey)
        {
            certificate = element;
        }
        else
        {
            element.Dispose();
        }
    }

    if (certificate == null)
    {
        throw new FileNotFoundException($"{parameters.CertificatePath} did not contain any certificate with a private key.");
    }

    Console.WriteLine($"Using certificate {certificate.Thumbprint} {certificate.Subject}");

    return certificate;
}
In the
SetupDeviceClientAsyncmethod, replace the block of code forcase "dps"with the following code:case "dps": s_logger.LogDebug($"Initializing via DPS"); Console.WriteLine($"Loading the certificate..."); X509Certificate2 certificate = LoadProvisioningCertificate(parameters); DeviceRegistrationResult dpsRegistrationResult = await ProvisionDeviceAsync(parameters, certificate, cancellationToken); var authMethod = new DeviceAuthenticationWithX509Certificate(dpsRegistrationResult.DeviceId, certificate); deviceClient = InitializeDeviceClient(dpsRegistrationResult.AssignedHub, authMethod); break;Replace the
ProvisionDeviceAsyncmethod with the following code:private static async Task<DeviceRegistrationResult> ProvisionDeviceAsync(Parameters parameters, X509Certificate2 certificate, CancellationToken cancellationToken) { SecurityProvider security = new SecurityProviderX509Certificate(certificate); ProvisioningTransportHandler mqttTransportHandler = new ProvisioningTransportHandlerMqtt(); ProvisioningDeviceClient pdc = ProvisioningDeviceClient.Create(parameters.DpsEndpoint, parameters.DpsIdScope, security, mqttTransportHandler); var pnpPayload = new ProvisioningRegistrationAdditionalData { JsonData = PnpConvention.CreateDpsPayload(ModelId), }; return await pdc.RegisterAsync(pnpPayload, cancellationToken); }Save the changes.
To run the sample:
Add the following environment variables to the project:
IOTHUB_DEVICE_DPS_DEVICE_ID: mytestselfcertprimaryIOTHUB_DEVICE_X509_CERT:<full path to folder that contains PFX files>mytestselfcertprimary.pfxIOTHUB_DEVICE_X509_PASSWORD: 1234.
Build and run the application. Verify the device provisions successfully.
To modify the sample code to use the X.509 certificates:
Navigate to the azure-iot-sdk-java/device/iot-device-samples/pnp-device-sample/temperature-controller-device-sample folder that contains the pom.xml file and src folder for the temperature controller device sample.
Edit the pom.xml file to add the following dependency configuration in the
<dependencies>node:<dependency> <groupId>com.microsoft.azure.sdk.iot.provisioning.security</groupId> <artifactId>${x509-provider-artifact-id}</artifactId> <version>${x509-provider-version}</version> </dependency>Save the changes.
Open the src/main/java/samples/com/microsoft/azure/sdk/iot/device/TemperatureController.java file in your text editor.
Replace the
SecurityProviderSymmetricKeyimport with the following imports:import com.microsoft.azure.sdk.iot.provisioning.security.SecurityProvider; import com.microsoft.azure.sdk.iot.provisioning.security.hsm.SecurityProviderX509Cert; import com.microsoft.azure.sdk.iot.provisioning.security.exceptions.SecurityProviderException;Add the following import:
import java.nio.file.*;Add
SecurityProviderExceptionto the list of exceptions that themainmethod throws:public static void main(String[] args) throws IOException, URISyntaxException, ProvisioningDeviceClientException, InterruptedException, SecurityProviderException {Replace the
initializeAndProvisionDevicemethod with the following code:private static void initializeAndProvisionDevice() throws ProvisioningDeviceClientException, IOException, URISyntaxException, InterruptedException, SecurityProviderException { String deviceX509Key = new String(Files.readAllBytes(Paths.get(System.getenv("IOTHUB_DEVICE_X509_KEY")))); String deviceX509Cert = new String(Files.readAllBytes(Paths.get(System.getenv("IOTHUB_DEVICE_X509_CERT")))); SecurityProvider securityProviderX509 = new SecurityProviderX509Cert(deviceX509Cert, deviceX509Key, null); ProvisioningDeviceClient provisioningDeviceClient; ProvisioningStatus provisioningStatus = new ProvisioningStatus(); provisioningDeviceClient = ProvisioningDeviceClient.create(globalEndpoint, scopeId, provisioningProtocol, securityProviderX509); AdditionalData additionalData = new AdditionalData(); additionalData.setProvisioningPayload(com.microsoft.azure.sdk.iot.provisioning.device.plugandplay.PnpHelper.createDpsPayload(MODEL_ID)); provisioningDeviceClient.registerDevice(new ProvisioningDeviceClientRegistrationCallbackImpl(), provisioningStatus, additionalData); while (provisioningStatus.provisioningDeviceClientRegistrationInfoClient.getProvisioningDeviceClientStatus() != ProvisioningDeviceClientStatus.PROVISIONING_DEVICE_STATUS_ASSIGNED) { if (provisioningStatus.provisioningDeviceClientRegistrationInfoClient.getProvisioningDeviceClientStatus() == ProvisioningDeviceClientStatus.PROVISIONING_DEVICE_STATUS_ERROR || provisioningStatus.provisioningDeviceClientRegistrationInfoClient.getProvisioningDeviceClientStatus() == ProvisioningDeviceClientStatus.PROVISIONING_DEVICE_STATUS_DISABLED || provisioningStatus.provisioningDeviceClientRegistrationInfoClient.getProvisioningDeviceClientStatus() == ProvisioningDeviceClientStatus.PROVISIONING_DEVICE_STATUS_FAILED) { provisioningStatus.exception.printStackTrace(); System.out.println("Registration error, bailing out"); break; } System.out.println("Waiting for Provisioning Service to register"); Thread.sleep(MAX_TIME_TO_WAIT_FOR_REGISTRATION); } ClientOptions options = new ClientOptions(); options.setModelId(MODEL_ID); if (provisioningStatus.provisioningDeviceClientRegistrationInfoClient.getProvisioningDeviceClientStatus() == ProvisioningDeviceClientStatus.PROVISIONING_DEVICE_STATUS_ASSIGNED) { System.out.println("IotHUb Uri : " + provisioningStatus.provisioningDeviceClientRegistrationInfoClient.getIothubUri()); System.out.println("Device ID : " + provisioningStatus.provisioningDeviceClientRegistrationInfoClient.getDeviceId()); String iotHubUri = provisioningStatus.provisioningDeviceClientRegistrationInfoClient.getIothubUri(); String deviceId = provisioningStatus.provisioningDeviceClientRegistrationInfoClient.getDeviceId(); log.debug("Opening the device client."); deviceClient = DeviceClient.createFromSecurityProvider(iotHubUri, deviceId, securityProviderX509, IotHubClientProtocol.MQTT, options); deviceClient.open(); } }Save the changes.
To run the sample:
In your shell environment, add the following two environment variables. Make sure that you provide the full path to the PEM files and use the correct path delimiter for your operating system:
set IOTHUB_DEVICE_DPS_DEVICE_ID=mytestselfcertprimary
set IOTHUB_DEVICE_X509_CERT=<full path to folder that contains PEM files>mytestselfcertprimary_cert.pem
set IOTHUB_DEVICE_X509_KEY=<full path to folder that contains PEM files>mytestselfcertprimary_key.pem
Tip
You set the other required environment variables when you completed the Create and connect a client application to your Azure IoT Central application tutorial.
Build and run the application. Verify the device provisions successfully.
You can repeat the above steps for mytestselfcertsecondary certificate as well.
To modify the sample code to use the X.509 certificates:
Navigate to the azure-iot-sdk-node/device/samples/javascript folder that contains the pnp_temperature_controller.js application and run the following command to install the X.509 package:
npm install azure-iot-security-x509 --saveOpen the pnp_temperature_controller.js file in a text editor.
Edit the
requirestatements to include the following code:const fs = require('fs'); const X509Security = require('azure-iot-security-x509').X509Security;Add the following four lines to the "DPS connection information" section to initialize the
deviceCertvariable:const deviceCert = { cert: fs.readFileSync(process.env.IOTHUB_DEVICE_X509_CERT).toString(), key: fs.readFileSync(process.env.IOTHUB_DEVICE_X509_KEY).toString() };Edit the
provisionDevicefunction that creates the client by replacing the first line with the following code:var provSecurityClient = new X509Security(registrationId, deviceCert);In the same function, modify the line that sets the
deviceConnectionStringvariable as follows:deviceConnectionString = 'HostName=' + result.assignedHub + ';DeviceId=' + result.deviceId + ';x509=true';In the
mainfunction, add the following line after the line that callsClient.fromConnectionString:client.setOptions(deviceCert);Save the changes.
To run the sample:
In your shell environment, add the following two environment variables. Make sure that you provide the full path to the PEM files and use the correct path delimiter for your operating system:
set IOTHUB_DEVICE_DPS_DEVICE_ID=mytestselfcertprimary
set IOTHUB_DEVICE_X509_CERT=<full path to folder that contains PEM files>mytestselfcertprimary_cert.pem
set IOTHUB_DEVICE_X509_KEY=<full path to folder that contains PEM files>mytestselfcertprimary_key.pem
Tip
You set the other required environment variables when you completed the Create and connect a client application to your Azure IoT Central application tutorial.
Execute the script and verify the device provisions successfully:
node pnp_temperature_controller.js
You can repeat the above steps for mytestselfcertsecondary certificate as well.
To modify the sample code to use the X.509 certificates:
Navigate to the azure-iot-device/samples/pnp folder and open the temp_controller_with_thermostats.py file in a text editor.
Add the following
fromstatement to import the X.509 functionality:from azure.iot.device import X509Modify the first part of the
provision_devicefunction as follows:async def provision_device(provisioning_host, id_scope, registration_id, x509, model_id): provisioning_device_client = ProvisioningDeviceClient.create_from_x509_certificate( provisioning_host=provisioning_host, registration_id=registration_id, id_scope=id_scope, x509=x509, )In the
mainfunction, replace the line that sets thesymmetric_keyvariable with the following code:x509 = X509( cert_file=os.getenv("IOTHUB_DEVICE_X509_CERT"), key_file=os.getenv("IOTHUB_DEVICE_X509_KEY"), )In the
mainfunction, replace the call to theprovision_devicefunction with the following code:registration_result = await provision_device( provisioning_host, id_scope, registration_id, x509, model_id )In the
mainfunction, replace the call to theIoTHubDeviceClient.create_from_symmetric_keyfunction with the following code:device_client = IoTHubDeviceClient.create_from_x509_certificate( x509=x509, hostname=registration_result.registration_state.assigned_hub, device_id=registration_result.registration_state.device_id, product_info=model_id, )Save the changes.
To run the sample:
In your shell environment, add the following two environment variables. Make sure that you provide the full path to the PEM files and use the correct path delimiter for your operating system:
set IOTHUB_DEVICE_DPS_DEVICE_ID=mytestselfcertprimary
set IOTHUB_DEVICE_X509_CERT=<full path to folder that contains PEM files>mytestselfcertprimary_cert.pem
set IOTHUB_DEVICE_X509_KEY=<full path to folder that contains PEM files>mytestselfcertprimary_key.pem
Tip
You set the other required environment variables when you completed the Create and connect a client application to your Azure IoT Central application tutorial.
Execute the script and verify the device provisions successfully:
python temp_controller_with_thermostats.py
You can repeat the above steps for mytestselfcertsecondary certificate as well.
Connect an IoT Edge device
This section assumes you're using a group enrollment to connect your IoT Edge device. Follow the steps in the previous sections to:
To connect the IoT Edge device to IoT Central using the X.509 device certificate:
Copy the device certificate and key files onto your IoT Edge device. In the previous group enrollment example, these files were called sampleDevice01_key.pem and sampleDevice01_cert.pem.
On the IoT Edge device, edit
provisioningsection in the /etc/aziot/config.toml configuration file as follows:# DPS X.509 provisioning configuration provisioning: source: "dps" global_endpoint: "https://global.azure-devices-provisioning.net" scope_id: "<SCOPE_ID>" attestation: method: "x509" # registration_id: "<OPTIONAL REGISTRATION ID. LEAVE COMMENTED OUT TO REGISTER WITH CN OF identity_cert>" identity_cert: "file:///<path>/sampleDevice01_cert.pem" identity_pk: "file:///<path>/sampleDevice01_key.pem" # always_reprovision_on_startup: true # dynamic_reprovisioning: false [provisioning] source = "dps" global_endpoint = "https://global.azure-devices-provisioning.net" id_scope = "<SCOPE_ID>" [provisioning.attestation] method = "x509" registration_id = "env-sens-001" identity_pk = "file:///<path>/envSens001_key.pem" identity_cert = "file:///<path>/envSens001_cert.pem"Tip
You don't need to add a value for the
registration_id. IoT Edge can use the CN value from the X.509 certificate.Run the following command to restart the IoT Edge runtime:
sudo iotedge config apply
To learn more, see Create and provision IoT Edge devices at scale on Linux using X.509 certificates.
Connect a downstream device to IoT Edge
IoT Edge uses X.509 certificates to secure the connection between downstream devices and an IoT Edge device acting as a transparent gateway. To learn more about configuring this scenario, see Connect a downstream device to an Azure IoT Edge gateway.
Roll your X.509 device certificates
During the lifecycle of your IoT Central application, you might need to roll your X.509 certificates. For example:
- If you have a security breach, rolling certificates is a security best practice to help secure your system.
- X.509 certificates have expiry dates. The frequency in which you roll your certificates depends on the security needs of your solution. Customers with solutions involving highly sensitive data might roll certificates daily, while others roll their certificates every couple years.
For uninterrupted connectivity, IoT Central lets you configure primary and secondary X.509 certificates. If the primary and secondary certificates have different expiry dates, you can roll the expired certificate while devices continue to connect with the other certificate.
To learn more, see Assume Breach Methodology.
This section describes how to roll the certificates in IoT Central. When you roll a certificate in IoT Central, you also need to copy the new device certificate to your devices.
Obtain new X.509 certificates
Obtain new X.509 certificates from your certificate provider. You can create your own X.509 certificates using a tool like OpenSSL. This approach is useful for testing X.509 certificates but provides few security guarantees. Only use this approach for testing unless you're prepared to act as your own CA provider.
Enrollment groups and security breaches
To update a group enrollment in response to a security breach, you should use the following approach to update the current certificate immediately. Complete these steps for the primary and secondary certificates if both are compromised:
Navigate to Permissions in the left pane and select Device connection groups.
Select the group name in the list under Enrollment groups.
For certificate update, select Manage primary or Manage Secondary.
Add and verify root X.509 certificate in the enrollment group.
Individual enrollments and security breaches
If you're rolling certificates in response to a security breach, use the following approach to update the current certificate immediately. Complete these steps for the primary and secondary certificates, if both are compromised:
Select Devices, and select the device.
Select Connect, and select connect method as Individual Enrollment
Select Certificates (X.509) as mechanism.
For certificate update, select the folder icon to select the new certificate to be uploaded for the enrollment entry. Select Save.
Enrollment groups and certificate expiration
To handle certificate expirations, use the following approach to update the current certificate immediately:
Navigate to Permissions in the left pane and select Device connection groups.
Select the group name in the list under Enrollment groups.
For certificate update, select Manage Primary.
Add and verify root X.509 certificate in the enrollment group.
Later when the secondary certificate expires, come back and update the secondary certificate.
Individual enrollments and certificate expiration
If you're rolling certificates to handle certificate expirations, you should use the secondary certificate configuration as follows to reduce downtime for devices attempting to provision in your application.
When the secondary certificate nears expiration, and needs to be rolled, you can rotate to using the primary configuration. Rotating between the primary and secondary certificates in this way reduces downtime for devices attempting to provision in your application.
Select Devices, and select the device.
Select Connect, and select connect method as Individual Enrollment
Select Certificates (X.509) as mechanism.
For secondary certificate update, select the folder icon to select the new certificate to be uploaded for the enrollment entry. Select Save.
Later when the primary certificate has expired, come back and update the primary certificate.
Feedback
Coming soon: Throughout 2024 we will be phasing out GitHub Issues as the feedback mechanism for content and replacing it with a new feedback system. For more information see: https://aka.ms/ContentUserFeedback.
Submit and view feedback for