Manage IoT Central organizations
Organizations let you define a hierarchy that you use to manage which users can see which devices in your IoT Central application. The user's role determines their permissions over the devices they see, and the experiences they can access. Use organizations to implement a multi-tenanted application.
Organizations are an optional feature that gives you more control over the users and roles in your application.
Organizations are hierarchical:
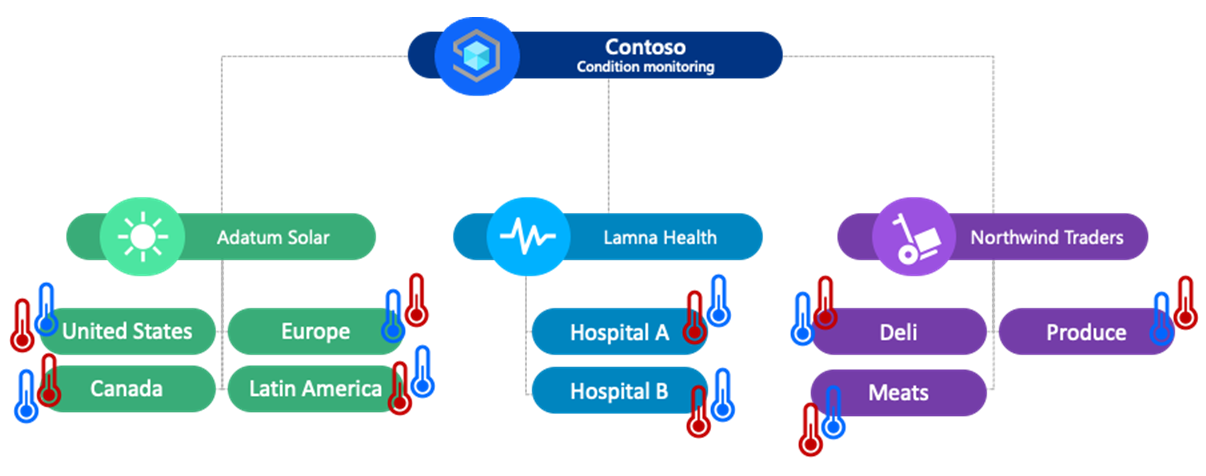
When you create your first organization hierarchy, you see that the name of your application is at the root. Each organization you add becomes a child or leaf organization. Organization hierarchies use inheritance. For example, in the hierarchy shown in the previous diagram:
- Adatum Solar users have access to devices in United States, Canada, Europe, and Latin America.
- Contoso users have access to all devices in all organizations in the hierarchy.
Users in sibling organizations can't see each other's others devices.
When you give users access to your application, the higher in the hierarchy you assign them access, the more they can see and manage. The organization controls the devices the user can see. The role defines what a user can do such as creating, reading, and deleting devices.
The following screenshot shows an organization hierarchy definition in IoT Central:

To learn how to manage organizations by using the IoT Central REST API, see How to use the IoT Central REST API to manage organizations.
Create a hierarchy
To start using organizations, you need to define your organization hierarchy. Each organization in the hierarchy acts as a logical container where you place devices, save dashboards and device groups, and invite users. To create your organizations, go to the Permissions section in your IoT Central application, select the Organizations tab, and select either + New or use the context menu for an existing organization. To create one or many organizations at a time, select + Add another organization:

Tip
The initial setup of organizations must be done by a member of the App Administrator role.
To reassign an organization to a new parent, select Edit and choose a new parent.
To delete an organization, you must delete or move to another organization any associated items such as dashboards, devices, users, device groups, and jobs.
Tip
You can also use the REST API to create and manage organizations.
Assign devices
After you define your organization hierarchy, assign your devices to organizations. Each device belongs to a single organization only, so choose the appropriate organization in the hierarchy.
When you create a new device in your application, assign it to an organization in your hierarchy:

To assign or reassign an existing device to an organization, select the device in the device list and then select Organization:

Tip
You can see which organization a device belongs to in the device list. Use the filter tool in the device list to show devices in a particular organization.
When you reassign a device to another organization, the device's data stays with the organization based on the time of data ingestion. For example:
- A device is part of the Contoso/Customer1 organization from days one to seven, then moved to the Contoso/Customer4 organization on day eight.
- On day nine, Contoso/Customer4 users can see data from days eight and nine.
- On day nine, Contoso/Customer1 users can see data from days one to seven.
Device-first registration
Devices can self-register with your IoT Central application without first being added to the device list. In this case, IoT Central adds the device to the root organization in the hierarchy. You can then reassign the device to a different organization.
Instead, you can use the CSV import feature to bulk register devices with your application and assign them to organizations. To learn more, see Import devices.
Gateways
You assign gateway and downstream devices to organizations. You don't have to assign a gateway and its associated downstream devices to the same organization. If you assign them to different organizations, it's possible that a user can see the gateway but not the downstream devices, or the downstream devices but not the gateway.
Roles
When you create the first organization in your application, IoT Central adds three new roles in your application: Org Administrator, Org Operator, and Org Viewer. These roles are necessary because an organization user can't access certain application-wide capabilities such as: pricing plans, branding and colors, API tokens, and application-wide enrollment group information.

You can use these roles when you invite users to an organization in your application.
Custom organization roles
To create a custom role for your organization users, create a new role and choose the Organization role type:

Then select the permissions for the role.
Invite users
After you've created your organization hierarchy and assigned devices to organizations, invite users to your application and assign them to organizations.
To invite a user, navigate to Permissions > Users. Enter their email address, the organization they're assigned to, and the role or roles they're a member of. The organization you select filters the list of available roles to make sure you assign the user to a valid role:

You can assign the same user to multiple organizations. The user can have a different role in each organization they're assigned to:
| Name | Role | Organization |
|---|---|---|
| user1@contoso.com | Org Administrator | Custom app |
| user1@contoso.com | Org Viewer | Custom app |
When you invite a new user, you need to share the application URL with them and ask them to sign in. After the user has signed in for the first time, the application appears on the user's My apps page.
To access the application for the first time, an invited user must first navigate to the application using the link they receive from the administrator. The application isn't visible on the My apps page on the Azure IoT Central site until then.
Use organizations
After you've created your organization hierarchy, you can use organizations in areas of your application such as:
- Organization dashboards that show information to users about devices in their organization.
- Device groups for devices in specific organizations.
- IoT Edge deployment manifests for deployment manifests associated with specific organizations.
- Analytics for devices in specific organizations.
- Jobs that bulk manage devices in specific organizations.
Default organization
Tip
This is a personal preference that only applies to you.
You can set an organization as the default organization to use in your application as a personal preference. The default organization becomes the default option whenever you choose an organization, such as when you add a new user or add a device to your IoT Central application.
To set the default organization, select Settings on the top menu bar:

Add organizations to an existing application
An application may contain devices, users, and experiences such as dashboards, device groups, and jobs before you add an organization hierarchy.
When you start adding organizations, all existing devices, users, and experiences remain associated with the root organization in the application:
- You can reassign devices to a new organization.
- You can assign users to a new organization and unassign them from the root.
- You can recreate experience such as dashboards, device groups, and jobs and associate them with organizations in the hierarchy.
Limits
The following limits apply to organizations:
- The hierarchy can't be more than five levels deep.
- The total number of organizations can't be more than 200. Each node in the hierarchy counts as an organization.
Next steps
Now that you've learned how to manage Azure IoT Central organizations, the suggested next step is to learn how to Export IoT data to cloud destinations using Blob Storage.
Feedback
Coming soon: Throughout 2024 we will be phasing out GitHub Issues as the feedback mechanism for content and replacing it with a new feedback system. For more information see: https://aka.ms/ContentUserFeedback.
Submit and view feedback for