Manage devices in bulk in your Azure IoT Central application
You can use Azure IoT Central to manage your connected devices at scale through jobs. Jobs let you do bulk updates to device and cloud properties and run commands. This article shows you how to use jobs in your own application and how to use the import and export features.
To learn how to manage jobs by using the IoT Central REST API, see How to use the IoT Central REST API to manage devices.
Tip
When you create a recurring job, sign in to your application using a Microsoft account or Microsoft Entra account. If you sign in using a Microsoft Entra group, it's possible that the Microsoft Entra token associated with the group will expire at some point in the future and cause the job to fail.
Create and run a job
The following example shows you how to create and run a job to set the light threshold for a group of devices. You use the job wizard to create and run jobs. You can save a job to run later:
On the left pane, select Jobs.
Select + New.
On the Configure your job page, enter a name and description to identify the job you're creating.
If your application uses organizations, select the organization to associate the job to. Only users in the organization can view or modify the job. The user's role determines the permissions the user has.
Select the target device group that you want your job to apply to. If your application uses organizations, the selected organization determines the available device groups. You can see how many devices your job configuration applies to below your Device group selection.
Choose Cloud property, Property, Command, Change device template, or Change edge deployment manifest as the Job type. To configure a:
- Property job, select a property and set its new value. A property job can set multiple properties.
- Command job, choose the command to run.
- Change device template job, select the device template to assign to the devices in the device group.
- Change edge deployment manifest job, select the IoT Edge deployment manifest to assign to the IoT Edge devices in the device group.
Select Save and exit to add the job to the list of saved jobs on the Jobs page. You can later return to a job from the list of saved jobs.
Select Next to move to the Delivery Options page. The Delivery Options page lets you set the Batches and Cancellation threshold delivery options for this job:
Batches let you stagger jobs for large numbers of devices. The job is divided into multiple batches and each batch contains a subset of the devices. The batches are queued and run in sequence.
The cancellation threshold lets you automatically cancel a job if the number of errors exceeds your set limit. The threshold can apply to all the devices in the job, or to individual batches.
Select Next to move to the Schedule page. The Schedule page lets you enable a schedule to run the job in the future.
Choose a recurrence option for the schedule. You can set up a job to run:
- One-time
- Daily
- Weekly
Set a start date and time for a scheduled job. The date and time is specific to your time zone, and not to the device's local time.
To end a recurring schedule, choose:
- On this day to set an end date for the schedule.
- After to set the number of times to run the job.
Scheduled jobs always run on the devices in a device group, even if the device group membership changes over time.
Select Next to move to the Review page. The Review page shows the job configuration details. Select Schedule to schedule the job:

The job details page shows information about scheduled jobs. When the scheduled job executes, you see a list of the job instances. The scheduled job execution is also be part of the Last 30-day job list.
On this page, you can Unschedule the job or Edit the scheduled job. You can return to a scheduled job from the list of scheduled jobs.
In the job wizard, you can choose to not schedule a job, and run it immediately.
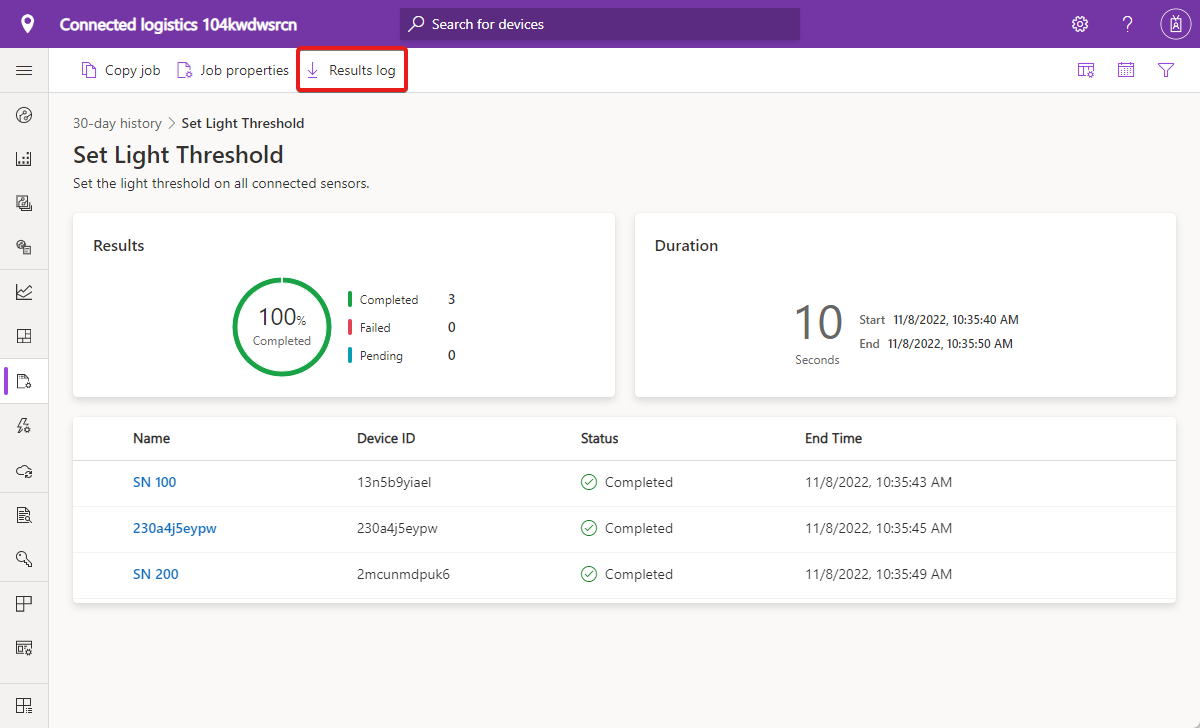
A job goes through pending, running, and completed phases. The job execution details contain result metrics, duration details, and a device list grid.
When the job is complete, you can select Results log to download a CSV file of your job details, including the devices and their status values. This information can be useful for troubleshooting:
The job now appears in Last 30 days list on the Jobs page. This page shows currently running jobs and the history of any previously run or saved jobs.
Note
You can view 30 days of history for your previously run jobs.


Manage jobs
To stop a running job, open it and select Stop. The job status changes to reflect that the job is stopped. The Summary section shows which devices have completed, have failed, or are still pending.
When a job is in a stopped state, you can select Continue to resume running the job. The job status changes to reflect that the job is now running again. The Summary section continues to update with the latest progress.
Copy a job
To copy an existing job, select an executed job. Select Copy on the job results page or jobs details page. A copy of the job configuration opens for you to edit, and Copy is appended to the job name.
View job status
After a job is created, the Status column updates with the latest job status message. The following table lists the possible job status values:
| Status message | Status meaning |
|---|---|
| Completed | This job ran on all devices. |
| Failed | This job failed and didn't fully run on devices. |
| Pending | This job hasn't yet begun running on devices. |
| Running | This job is currently running on devices. |
| Stopped | A user has manually stopped this job. |
| Canceled | This job was canceled because the threshold set on the Delivery options page was exceeded. |
The status message is followed by an overview of the devices in the job. The following table lists the possible device status values:
| Status message | Status meaning |
|---|---|
| Succeeded | The number of devices that the job successfully ran on. |
| Failed | The number of devices that the job has failed to run on. |
To view the status of the job and all the affected devices, open the job. Next to each device name, you see one of the following status messages:
| Status message | Status meaning |
|---|---|
| Completed | The job ran on this device. |
| Failed | The job failed to run on this device. The error message shows more information. |
| Pending | The job hasn't yet run on this device. |
To download a CSV file that includes the job details and the list of devices and their status values, select Results log.
Filter the device list
You can filter the device list on the Job details page by selecting the filter icon. You can filter on the Device ID or Status field:

Customize columns in the device list
You can add columns to the device list by selecting the column options icon:

Use the Column options dialog box to choose the device list columns. Select the columns that you want to display, select the right arrow, and then select OK. To select all the available columns, choose Select all. The selected columns appear in the device list.
Selected columns persist across a user session or across user sessions that have access to the application.
Rerun jobs
You can rerun a job that has failed devices. Select Rerun on failed.
Enter a job name and description, and then select Rerun job. A new job is submitted to retry the action on failed devices.
Note
You can't run more than five jobs at the same time from an Azure IoT Central application.
When a job is complete and you delete a device that's in the job's device list, the device entry appears as deleted in the device name. The details link isn't available for the deleted device.
Import devices
To register a large number of devices to your application, you can bulk import devices from a CSV file. You can find an example CSV file in the Azure Samples repository. The CSV file should include the following column headers:
| Column | Description |
|---|---|
| IOTC_DEVICEID | The device ID is a unique identified this device will use to connect. The device ID can contain letters, numbers, and the - character without any spaces. The maximum length is 128 characters. |
| IOTC_DEVICENAME | Optional. The device name is a friendly name that will be displayed throughout the application. If not specified, the device name is the same as the device ID. The maximum length is 148 characters. |
To bulk-register devices in your application:
Choose Devices on the left pane.
On the left panel, choose the device template for which you want to bulk create the devices.
Note
If you don't have a device template yet then you can import devices under All devices and register them without a template. After devices have been imported, you can then migrate them to a template.
Select Import.
Select an organization to assign the devices to. All the devices you're importing are assigned to the same organization. To assign devices to different organizations, create multiple import files, one for each organization. Alternatively, upload them all to the root organization and then in the UI reassign them to the correct organizations.
Select the CSV file that has the list of device IDs to be imported.
Device import starts once the file has been uploaded. You can track the import status in the Device Operations panel. This panel appears automatically after the import starts or you can access it through the bell icon in the top right-hand corner.
Once the import completes, a success message is shown in the Device Operations panel.


If the device import operation fails, you see an error message on the Device Operations panel. A log file capturing all the errors is generated that you can download.
If your devices use SAS tokens to authenticate, export a CSV file from your IoT Central application. The exported CSV file includes the device IDs and the SAS keys.
If your devices use X.509 certificates to authenticate, generate X.509 leaf certificates for your devices using the root or intermediate certificate in your X.509 enrollment group. Use the device IDs you imported as the CNAME value in the leaf certificates.
Export devices
To connect a real device to IoT Central, you need its connection string. You can export device details in bulk to get the information you need to create device connection strings. The export process creates a CSV file with the device identity, device name, and keys for all the selected devices.
To bulk export devices from your application:
Choose Devices on the left pane.
On the left pane, choose the device template from which you want to export the devices.
Select the devices that you want to export and then select the Export action.
The export process starts. You can track the status using the Device Operations panel.
When the export completes, a success message is shown along with a link to download the generated file.
Select the Download File link to download the file to a local folder on the disk.

The exported CSV file contains the following columns: device ID, device name, device keys, and X509 certificate thumbprints:
- IOTC_DEVICEID
- IOTC_DEVICENAME
- IOTC_SASKEY_PRIMARY
- IOTC_SASKEY_SECONDARY
- IOTC_X509THUMBPRINT_PRIMARY
- IOTC_X509THUMBPRINT_SECONDARY

For more information about connecting real devices to your IoT Central application, see How devices connect.
Next steps
Now that you've learned how to manage devices in bulk in your Azure IoT Central application, a suggested next step is to learn how to Edit a device template.
Feedback
Coming soon: Throughout 2024 we will be phasing out GitHub Issues as the feedback mechanism for content and replacing it with a new feedback system. For more information see: https://aka.ms/ContentUserFeedback.
Submit and view feedback for