Tutorial: Create and connect a client application to your Azure IoT Central application
This tutorial shows you how to connect a client application to your Azure IoT Central application. The application simulates the behavior of a temperature controller device. When the application connects to IoT Central, it sends the model ID of the temperature controller device model. IoT Central uses the model ID to retrieve the device model and create a device template for you. You add views to the device template to enable an operator to interact with a device.
In this tutorial, you learn how to:
- Create and run the device code and see it connect to your IoT Central application.
- View the simulated telemetry sent from the device.
- Add custom views to a device template.
- Publish the device template.
- Use a view to manage device properties.
- Call a command to control the device.

Prerequisites
To complete the steps in this tutorial, you need:
An active Azure subscription. If you don't have an Azure subscription, create a free account before you begin.
An IoT Central application created from the Custom application template. To learn more, see Create an IoT Central application and About your application.
You can run this tutorial on Linux or Windows. The shell commands in this tutorial follow the Linux convention for path separators '/', if you're following along on Windows be sure to swap these separators for '\'.
The prerequisites differ by operating system:
Linux
This tutorial assumes you're using Ubuntu Linux. The steps in this tutorial were tested using Ubuntu 18.04.
To complete this tutorial on Linux, install the following software on your local Linux environment:
Install GCC, Git, cmake, and all the required dependencies using the apt-get command:
sudo apt-get update
sudo apt-get install -y git cmake build-essential curl libcurl4-openssl-dev libssl-dev uuid-dev
Verify the version of cmake is greater than 2.8.12 and the version of GCC is greater than 4.4.7.
cmake --version
gcc --version
Windows
To complete this tutorial on Windows, install the following software on your local Windows environment:
- Visual Studio (Community, Professional, or Enterprise) - make sure you include the Desktop Development with C++ workload when you install Visual Studio.
- Git.
- CMake.
Download the code
In this tutorial, you prepare a development environment you can use to clone and build the Azure IoT Hub Device C SDK.
Open a command prompt in the directory of your choice. Execute the following command to clone the Azure IoT C SDKs and Libraries GitHub repository into this location:
git clone https://github.com/Azure/azure-iot-sdk-c.git
cd azure-iot-sdk-c
git submodule update --init
Expect this operation to take several minutes to complete.
Review the code
In the copy of the Microsoft Azure IoT SDK for C you downloaded previously, open the azure-iot-sdk-c/iothub_client/samples/pnp/pnp_temperature_controller/pnp_temperature_controller.c and azure-iot-sdk-c/iothub_client/samples/pnp/pnp_temperature_controller/pnp_thermostat_component.c files in a text editor.
The sample implements the multiple-component Temperature Controller Digital Twin Definition Language model.
When you run the sample to connect to IoT Central, it uses the Device Provisioning Service (DPS) to register the device and generate a connection string. The sample retrieves the DPS connection information it needs from the command-line environment.
In pnp_temperature_controller.c, the main function first calls CreateDeviceClientAndAllocateComponents to:
- Set the
dtmi:com:example:Thermostat;1model ID. IoT Central uses the model ID to identify or generate the device template for this device. To learn more, see Assign a device to a device template. - Use DPS to provision and register the device.
- Create a device client handle, and connect to your IoT Central application.
- Creates a handler for commands in the temperature controller component.
- Creates a handler for property updates in the temperature controller component.
- Creates the two thermostat components.
The main function next:
- Reports some initial property values for all the components.
- Starts a loop to send telemetry from all the components.
The main function then starts a thread to send telemetry periodically.
int main(void)
{
    IOTHUB_DEVICE_CLIENT_LL_HANDLE deviceClient = NULL;

    g_pnpDeviceConfiguration.modelId = g_temperatureControllerModelId;
    g_pnpDeviceConfiguration.enableTracing = g_hubClientTraceEnabled;

    // First determine the IoT Hub / credentials / device to use.
    if (GetConnectionSettingsFromEnvironment(&g_pnpDeviceConfiguration) == false)
    {
        LogError("Cannot read required environment variable(s)");
    }
    // Creates the thermostat subcomponents defined by this model.  Since everything
    // is simulated, this setup stage just creates simulated objects in memory.
    else if (AllocateThermostatComponents() == false)
    {
        LogError("Failure allocating thermostat components");
    }
    // Create a handle to device client handle.  Note that this call may block
    // for extended periods of time when using DPS.
    else if ((deviceClient = CreateAndConfigureDeviceClientHandleForPnP()) == NULL)
    {
        LogError("Failure creating Iot Hub device client");
        PnP_ThermostatComponent_Destroy(g_thermostatHandle1);
        PnP_ThermostatComponent_Destroy(g_thermostatHandle2);
    }
    else
    {
        LogInfo("Successfully created device client.  Hit Control-C to exit program\n");

        int numberOfIterations = 0;

        // During startup, send what DTDLv2 calls "read-only properties" to indicate initial device state.
        PnP_TempControlComponent_ReportSerialNumber_Property(deviceClient);
        PnP_DeviceInfoComponent_Report_All_Properties(g_deviceInfoComponentName, deviceClient);
        PnP_TempControlComponent_Report_MaxTempSinceLastReboot_Property(g_thermostatHandle1, deviceClient);
        PnP_TempControlComponent_Report_MaxTempSinceLastReboot_Property(g_thermostatHandle2, deviceClient);

        while (true)
        {
            // Wake up periodically to poll.  Even if we do not plan on sending telemetry, we still need to poll periodically in order to process
            // incoming requests from the server and to do connection keep alives.
            if ((numberOfIterations % g_sendTelemetryPollInterval) == 0)
            {
                PnP_TempControlComponent_SendWorkingSet(deviceClient);
                PnP_ThermostatComponent_SendCurrentTemperature(g_thermostatHandle1, deviceClient);
                PnP_ThermostatComponent_SendCurrentTemperature(g_thermostatHandle2, deviceClient);
            }

            IoTHubDeviceClient_LL_DoWork(deviceClient);
            ThreadAPI_Sleep(g_sleepBetweenPollsMs);
            numberOfIterations++;
        }

        // The remainder of the code is used for cleaning up our allocated resources. It won't be executed in this
        // sample (because the loop above is infinite and is only broken out of by Control-C of the program), but
        // it is included for reference.

        // Free the memory allocated to track simulated thermostat.
        PnP_ThermostatComponent_Destroy(g_thermostatHandle1);
        PnP_ThermostatComponent_Destroy(g_thermostatHandle2);

        // Clean up the IoT Hub SDK handle.
        IoTHubDeviceClient_LL_Destroy(deviceClient);
        // Free all IoT Hub subsystem.
        IoTHub_Deinit();
    }

    return 0;
}
In pnp_thermostat_component.c, the PnP_ThermostatComponent_SendCurrentTemperature function shows how the device sends the temperature telemetry from a component to IoT Central:
void PnP_ThermostatComponent_SendCurrentTemperature(PNP_THERMOSTAT_COMPONENT_HANDLE pnpThermostatComponentHandle, IOTHUB_DEVICE_CLIENT_LL_HANDLE deviceClient)
{
    PNP_THERMOSTAT_COMPONENT* pnpThermostatComponent = (PNP_THERMOSTAT_COMPONENT*)pnpThermostatComponentHandle;
    IOTHUB_MESSAGE_HANDLE messageHandle = NULL;
    IOTHUB_MESSAGE_RESULT messageResult;
    IOTHUB_CLIENT_RESULT iothubClientResult;

    char temperatureStringBuffer[CURRENT_TEMPERATURE_BUFFER_SIZE];

    // Create the telemetry message body to send.
    if (snprintf(temperatureStringBuffer, sizeof(temperatureStringBuffer), g_temperatureTelemetryBodyFormat, pnpThermostatComponent->currentTemperature) < 0)
    {
        LogError("snprintf of current temperature telemetry failed");
    }
    // Create the message handle and specify its metadata.
    else if ((messageHandle = IoTHubMessage_CreateFromString(temperatureStringBuffer)) == NULL)
    {
        LogError("IoTHubMessage_PnP_CreateFromString failed");
    }
    else if ((messageResult = IoTHubMessage_SetContentTypeSystemProperty(messageHandle, g_jsonContentType)) != IOTHUB_MESSAGE_OK)
    {
        LogError("IoTHubMessage_SetContentTypeSystemProperty failed, error=%d", messageResult);
    }
    else if ((messageResult = IoTHubMessage_SetContentEncodingSystemProperty(messageHandle, g_utf8EncodingType)) != IOTHUB_MESSAGE_OK)
    {
        LogError("IoTHubMessage_SetContentEncodingSystemProperty failed, error=%d", messageResult);
    }
    else if ((messageResult = IoTHubMessage_SetComponentName(messageHandle, pnpThermostatComponent->componentName)) != IOTHUB_MESSAGE_OK)
    {
        LogError("IoTHubMessage_SetContentEncodingSystemProperty failed, error=%d", messageResult);
    }
    // Send the telemetry message.
    else if ((iothubClientResult = IoTHubDeviceClient_LL_SendTelemetryAsync(deviceClient, messageHandle, NULL, NULL)) != IOTHUB_CLIENT_OK)
    {
        LogError("Unable to send telemetry message, error=%d", iothubClientResult);
    }

    IoTHubMessage_Destroy(messageHandle);
}
In pnp_thermostat_component.c, the PnP_TempControlComponent_Report_MaxTempSinceLastReboot_Property function sends a maxTempSinceLastReboot property update from the component to IoT Central:
void PnP_TempControlComponent_Report_MaxTempSinceLastReboot_Property(PNP_THERMOSTAT_COMPONENT_HANDLE pnpThermostatComponentHandle, IOTHUB_DEVICE_CLIENT_LL_HANDLE deviceClient)
{
    PNP_THERMOSTAT_COMPONENT* pnpThermostatComponent = (PNP_THERMOSTAT_COMPONENT*)pnpThermostatComponentHandle;
    char maximumTemperatureAsString[MAX_TEMPERATURE_SINCE_REBOOT_BUFFER_SIZE];
    IOTHUB_CLIENT_RESULT iothubClientResult;

    if (snprintf(maximumTemperatureAsString, sizeof(maximumTemperatureAsString), g_maxTempSinceLastRebootPropertyFormat, pnpThermostatComponent->maxTemperature) < 0)
    {
        LogError("Unable to create max temp since last reboot string for reporting result");
    }
    else
    {
        IOTHUB_CLIENT_PROPERTY_REPORTED maxTempProperty;
        maxTempProperty.structVersion = IOTHUB_CLIENT_PROPERTY_REPORTED_STRUCT_VERSION_1;
        maxTempProperty.name = g_maxTempSinceLastRebootPropertyName;
        maxTempProperty.value =  maximumTemperatureAsString;

        unsigned char* propertySerialized = NULL;
        size_t propertySerializedLength;

        // The first step of reporting properties is to serialize IOTHUB_CLIENT_PROPERTY_WRITABLE_RESPONSE into JSON for sending.
        if ((iothubClientResult = IoTHubClient_Properties_Serializer_CreateReported(&maxTempProperty, 1, pnpThermostatComponent->componentName, &propertySerialized, &propertySerializedLength)) != IOTHUB_CLIENT_OK)
        {
            LogError("Unable to serialize reported state, error=%d", iothubClientResult);
        }
        // The output of IoTHubClient_Properties_Serializer_CreateReported is sent to IoTHubDeviceClient_LL_SendPropertiesAsync to perform network I/O.
        else if ((iothubClientResult = IoTHubDeviceClient_LL_SendPropertiesAsync(deviceClient, propertySerialized, propertySerializedLength,  NULL, NULL)) != IOTHUB_CLIENT_OK)
        {
            LogError("Unable to send reported state, error=%d", iothubClientResult);
        }
        else
        {
            LogInfo("Sending %s property to IoTHub for component %s", g_maxTempSinceLastRebootPropertyName, pnpThermostatComponent->componentName);
        }
        IoTHubClient_Properties_Serializer_Destroy(propertySerialized);
    }
}
In pnp_thermostat_component.c, the PnP_ThermostatComponent_ProcessPropertyUpdate function handles writable property updates from IoT Central:
void PnP_ThermostatComponent_ProcessPropertyUpdate(PNP_THERMOSTAT_COMPONENT_HANDLE pnpThermostatComponentHandle, IOTHUB_DEVICE_CLIENT_LL_HANDLE deviceClient, const char* propertyName, const char* propertyValue, int version)
{
    PNP_THERMOSTAT_COMPONENT* pnpThermostatComponent = (PNP_THERMOSTAT_COMPONENT*)pnpThermostatComponentHandle;

    if (strcmp(propertyName, g_targetTemperaturePropertyName) != 0)
    {
        LogError("Property %s was requested to be changed but is not part of the thermostat interface definition", propertyName);
    }
    else
    {
        char* next;
        double targetTemperature = strtod(propertyValue, &next);
        if ((propertyValue == next) || (targetTemperature == HUGE_VAL) || (targetTemperature == (-1*HUGE_VAL)))
        {
            LogError("Property %s is not a valid number", propertyValue);
            SendTargetTemperatureResponse(pnpThermostatComponent, deviceClient, propertyValue, PNP_STATUS_BAD_FORMAT, version, g_temperaturePropertyResponseDescriptionNotInt);
        }
        else
        {
            LogInfo("Received targetTemperature %f for component %s", targetTemperature, pnpThermostatComponent->componentName);

            bool maxTempUpdated = false;
            UpdateTemperatureAndStatistics(pnpThermostatComponent, targetTemperature, &maxTempUpdated);

            // The device needs to let the service know that it has received the targetTemperature desired property.
            SendTargetTemperatureResponse(pnpThermostatComponent, deviceClient, propertyValue, PNP_STATUS_SUCCESS, version, NULL);

            if (maxTempUpdated)
            {
                // If the maximum temperature has been updated, we also report this as a property.
                PnP_TempControlComponent_Report_MaxTempSinceLastReboot_Property(pnpThermostatComponent, deviceClient);
            }
        }
    }
}
In pnp_thermostat_component.c, the PnP_ThermostatComponent_ProcessCommand function handles commands called from IoT Central:
void PnP_ThermostatComponent_ProcessCommand(PNP_THERMOSTAT_COMPONENT_HANDLE pnpThermostatComponentHandle, const char *pnpCommandName, JSON_Value* commandJsonValue, IOTHUB_CLIENT_COMMAND_RESPONSE* commandResponse)
{
    PNP_THERMOSTAT_COMPONENT* pnpThermostatComponent = (PNP_THERMOSTAT_COMPONENT*)pnpThermostatComponentHandle;
    const char* sinceStr;

    if (strcmp(pnpCommandName, g_getMaxMinReportCommandName) != 0)
    {
        LogError("Command %s is not supported on thermostat component", pnpCommandName);
        commandResponse->statusCode = PNP_STATUS_NOT_FOUND;
    }
    // See caveats section in ../readme.md; we don't actually respect this sinceStr to keep the sample simple,
    // but want to demonstrate how to parse out in any case.
    else if ((sinceStr = json_value_get_string(commandJsonValue)) == NULL)
    {
        LogError("Cannot retrieve JSON string for command");
        commandResponse->statusCode = PNP_STATUS_BAD_FORMAT;
    }
    else if (BuildMaxMinCommandResponse(pnpThermostatComponent, commandResponse) == false)
    {
        LogError("Unable to build response for component %s", pnpThermostatComponent->componentName);
        commandResponse->statusCode = PNP_STATUS_INTERNAL_ERROR;
    }
    else
    {
        LogInfo("Returning success from command request for component %s", pnpThermostatComponent->componentName);
        commandResponse->statusCode = PNP_STATUS_SUCCESS;
    }
}
Build the code
You use the device SDK to build the included sample code:
Create a cmake subdirectory in the root folder of the device SDK, and navigate to that folder:
cd azure-iot-sdk-c
mkdir cmake
cd cmake
Run the following commands to build the SDK and samples:
cmake -Duse_prov_client=ON -Dhsm_type_symm_key=ON -Drun_e2e_tests=OFF ..
cmake --build .
Get connection information
When you run the sample device application later in this tutorial, you need the following configuration values:
- ID scope: In your IoT Central application, navigate to Permissions > Device connection groups. Make a note of the ID scope value.
- Group primary key: In your IoT Central application, navigate to Permissions > Device connection groups > SAS-IoT-Devices. Make a note of the shared access signature Primary key value.
Use the Azure Cloud Shell to generate a device key from the group primary key you retrieved:
az extension add --name azure-iot
az iot central device compute-device-key --device-id sample-device-01 --pk <the group primary key value>
Make a note of the generated device key, you use it later in this tutorial.
Note
To run this sample, you don't need to register the device in advance in your IoT Central application. The sample uses the IoT Central capability to automatically register devices when they connect for the first time.
Run the code
To run the sample application, open a command-line environment and navigate to the folder azure-iot-sdk-c\cmake.
Set the environment variables to configure the sample. The following snippet shows how set the environment variables at the Windows command prompt. If you're using a bash shell, replace the set commands with export commands:
set IOTHUB_DEVICE_SECURITY_TYPE=DPS
set IOTHUB_DEVICE_DPS_ID_SCOPE=<The ID scope you made a note of previously>
set IOTHUB_DEVICE_DPS_DEVICE_ID=sample-device-01
set IOTHUB_DEVICE_DPS_DEVICE_KEY=<The generated device key you made a note of previously>
set IOTHUB_DEVICE_DPS_ENDPOINT=global.azure-devices-provisioning.net
To run the sample:
# Bash
cd iothub_client/samples/pnp/pnp_temperature_controller/
./pnp_temperature_controller
REM Windows
cd iothub_client\samples\pnp\pnp_temperature_controller\Debug
.\pnp_temperature_controller.exe
The following output shows the device registering and connecting to IoT Central. The sample starts sending telemetry:
Info: Initiating DPS client to retrieve IoT Hub connection information
-> 09:43:27 CONNECT | VER: 4 | KEEPALIVE: 0 | FLAGS: 194 | USERNAME: 0ne0026656D/registrations/sample-device-01/api-version=2019-03-31&ClientVersion=1.6.0 | PWD: XXXX | CLEAN: 1
<- 09:43:28 CONNACK | SESSION_PRESENT: false | RETURN_CODE: 0x0
-> 09:43:29 SUBSCRIBE | PACKET_ID: 1 | TOPIC_NAME: $dps/registrations/res/# | QOS: 1
<- 09:43:30 SUBACK | PACKET_ID: 1 | RETURN_CODE: 1
-> 09:43:30 PUBLISH | IS_DUP: false | RETAIN: 0 | QOS: DELIVER_AT_MOST_ONCE | TOPIC_NAME: $dps/registrations/PUT/iotdps-register/?$rid=1 | PAYLOAD_LEN: 102
<- 09:43:31 PUBLISH | IS_DUP: false | RETAIN: 0 | QOS: DELIVER_AT_LEAST_ONCE | TOPIC_NAME: $dps/registrations/res/202/?$rid=1&retry-after=3 | PACKET_ID: 2 | PAYLOAD_LEN: 94
-> 09:43:31 PUBACK | PACKET_ID: 2
-> 09:43:33 PUBLISH | IS_DUP: false | RETAIN: 0 | QOS: DELIVER_AT_MOST_ONCE | TOPIC_NAME: $dps/registrations/GET/iotdps-get-operationstatus/?$rid=2&operationId=4.2f792ade0a5c3e68.baf0e879-d88a-4153-afef-71aff51fd847 | PAYLOAD_LEN: 102
<- 09:43:34 PUBLISH | IS_DUP: false | RETAIN: 0 | QOS: DELIVER_AT_LEAST_ONCE | TOPIC_NAME: $dps/registrations/res/202/?$rid=2&retry-after=3 | PACKET_ID: 2 | PAYLOAD_LEN: 173
-> 09:43:34 PUBACK | PACKET_ID: 2
-> 09:43:36 PUBLISH | IS_DUP: false | RETAIN: 0 | QOS: DELIVER_AT_MOST_ONCE | TOPIC_NAME: $dps/registrations/GET/iotdps-get-operationstatus/?$rid=3&operationId=4.2f792ade0a5c3e68.baf0e879-d88a-4153-afef-71aff51fd847 | PAYLOAD_LEN: 102
<- 09:43:37 PUBLISH | IS_DUP: false | RETAIN: 0 | QOS: DELIVER_AT_LEAST_ONCE | TOPIC_NAME: $dps/registrations/res/200/?$rid=3 | PACKET_ID: 2 | PAYLOAD_LEN: 478
-> 09:43:37 PUBACK | PACKET_ID: 2
Info: Provisioning callback indicates success.  iothubUri=iotc-60a....azure-devices.net, deviceId=sample-device-01
-> 09:43:37 DISCONNECT
Info: DPS successfully registered.  Continuing on to creation of IoTHub device client handle.
Info: Successfully created device client.  Hit Control-C to exit program

Info: Sending serialNumber property to IoTHub
Info: Sending device information property to IoTHub.  propertyName=swVersion, propertyValue="1.0.0.0"
Info: Sending device information property to IoTHub.  propertyName=manufacturer, propertyValue="Sample-Manufacturer"
Info: Sending device information property to IoTHub.  propertyName=model, propertyValue="sample-Model-123"
Info: Sending device information property to IoTHub.  propertyName=osName, propertyValue="sample-OperatingSystem-name"
Info: Sending device information property to IoTHub.  propertyName=processorArchitecture, propertyValue="Contoso-Arch-64bit"
Info: Sending device information property to IoTHub.  propertyName=processorManufacturer, propertyValue="Processor Manufacturer(TM)"
Info: Sending device information property to IoTHub.  propertyName=totalStorage, propertyValue=10000
Info: Sending device information property to IoTHub.  propertyName=totalMemory, propertyValue=200
Info: Sending maximumTemperatureSinceLastReboot property to IoTHub for component=thermostat1
Info: Sending maximumTemperatureSinceLastReboot property to IoTHub for component=thermostat2
-> 09:43:44 CONNECT | VER: 4 | KEEPALIVE: 240 | FLAGS: 192 | USERNAME: iotc-60a576a2-eec7-48e2-9306-9e7089a79995.azure-devices.net/sample-device-01/?api-version=2020-09-30&DeviceClientType=iothubclient%2f1.6.0%20(native%3b%20Linux%3b%20x86_64)&model-id=dtmi%3acom%3aexample%3aTemperatureController%3b1 | PWD: XXXX | CLEAN: 0
<- 09:43:44 CONNACK | SESSION_PRESENT: false | RETURN_CODE: 0x0
-> 09:43:44 SUBSCRIBE | PACKET_ID: 2 | TOPIC_NAME: $iothub/twin/res/# | QOS: 0 | TOPIC_NAME: $iothub/methods/POST/# | QOS: 0
-> 09:43:44 PUBLISH | IS_DUP: false | RETAIN: 0 | QOS: DELIVER_AT_LEAST_ONCE | TOPIC_NAME: devices/sample-device-01/messages/events/ | PACKET_ID: 3 | PAYLOAD_LEN: 19
-> 09:43:44 PUBLISH | IS_DUP: false | RETAIN: 0 | QOS: DELIVER_AT_LEAST_ONCE | TOPIC_NAME: devices/sample-device-01/messages/events/%24.sub=thermostat1 | PACKET_ID: 4 | PAYLOAD_LEN: 21
-> 09:43:44 PUBLISH | IS_DUP: false | RETAIN: 0 | QOS: DELIVER_AT_LEAST_ONCE | TOPIC_NAME: devices/sample-device-01/messages/events/%24.sub=thermostat2 | PACKET_ID: 5 | PAYLOAD_LEN: 21
As an operator in your Azure IoT Central application, you can:
View the telemetry sent by the two thermostat components on the Overview page:
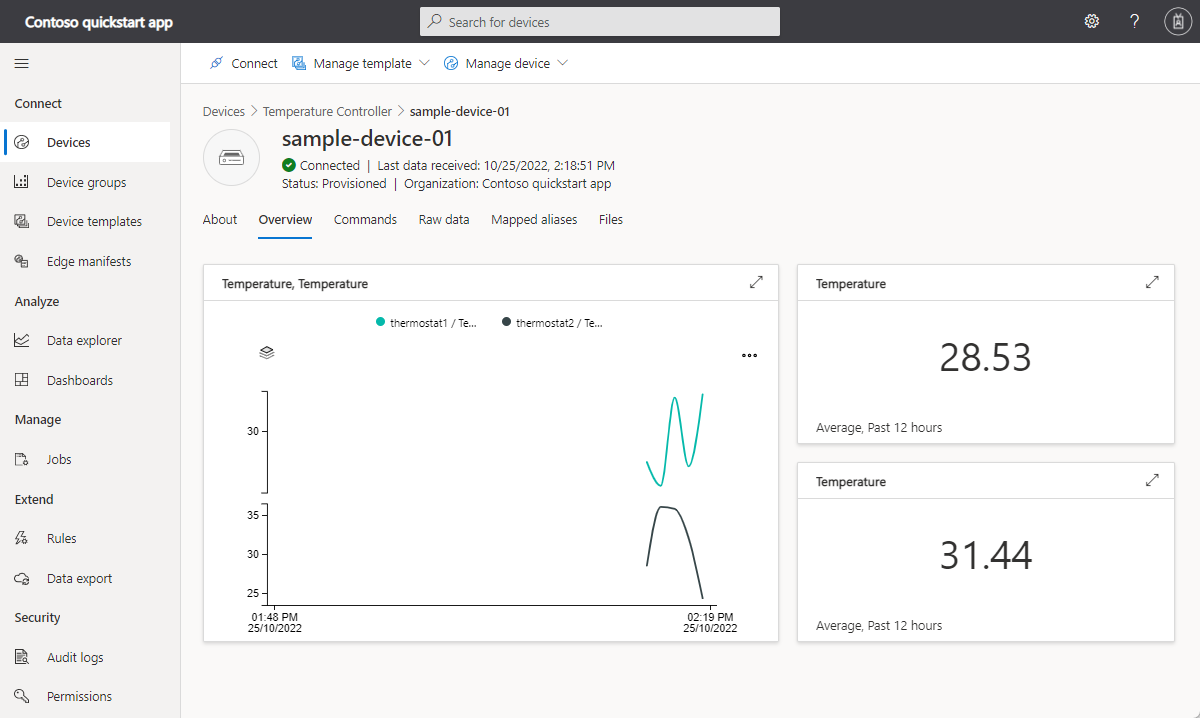
View the device properties on the About page. This page shows the properties from the device information component and the two thermostat components:


Customize the device template
As a solution developer, you can customize the device template that IoT Central created automatically when the temperature controller device connected.
To add a cloud property to store the customer name associated with the device:
In your IoT Central application, navigate to the Temperature Controller device template on the Device templates page.
In the Temperature Controller model, select +Add capability.
Enter Customer name as the Display name, select Cloud property as the capability type, expand the entry and choose String as the Schema. Then select Save.
To customize how the Get Max-Min report commands display in your IoT Central application:
Navigate to the Temperature Controller device template on the Device templates page.
For getMaxMinReport (thermostat1), replace Get Max-Min report. with Get thermostat1 status report.
For getMaxMinReport (thermostat2), replace Get Max-Min report. with Get thermostat2 status report.
Select Save.
To customize how the Target Temperature writable properties display in your IoT Central application:
Navigate to the Temperature Controller device template on the Device templates page.
For targetTemperature (thermostat1), replace Target Temperature with Target Temperature (1).
For targetTemperature (thermostat2), replace Target Temperature with Target Temperature (2).
Select Save.
The thermostat components in the Temperature Controller model include the Target Temperature writable property, the device template includes the Customer Name cloud property. Create a view an operator can use to edit these properties:
Select Views and then select the Editing device and cloud data tile.
Enter Properties as the form name.
Select the Target Temperature (1), Target Temperature (2), and Customer Name properties. Then select Add section.
Save your changes.

Publish the device template
Before an operator can see and use the customizations you made, you must publish the device template.
From the Thermostat device template, select Publish. On the Publish this device template to the application panel, select Publish.
An operator can now use the Properties view to update the property values, and call commands called Get thermostat1 status report and Get thermostat2 status report on the device commands page:
Update writable property values on the Properties page:

Call the commands from the Commands page. If you run the status report command, select a date and time for the Since parameter before you run it:

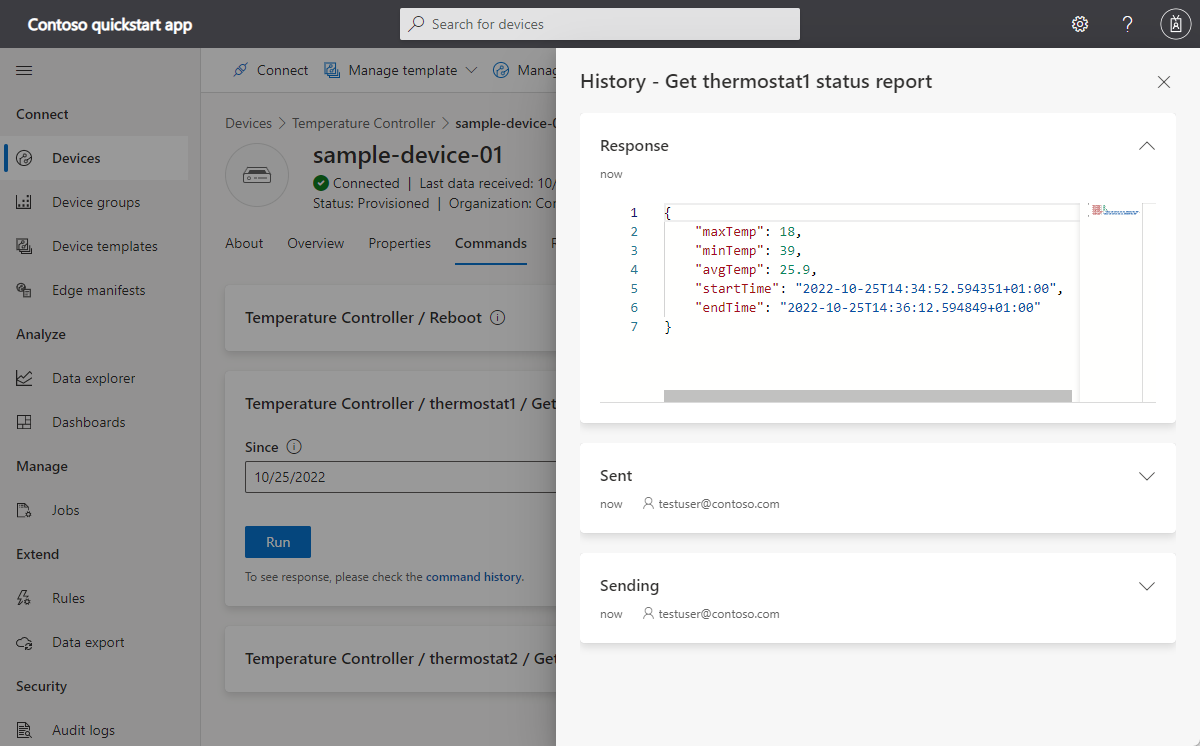


You can see how the device responds to commands and property updates:
<- 09:49:03 PUBLISH | IS_DUP: false | RETAIN: 0 | QOS: DELIVER_AT_MOST_ONCE | TOPIC_NAME: $iothub/methods/POST/thermostat1*getMaxMinReport/?$rid=1 | PAYLOAD_LEN: 26
Info: Received PnP command for component=thermostat1, command=getMaxMinReport
Info: Returning success from command request for component=thermostat1
-> 09:49:03 PUBLISH | IS_DUP: false | RETAIN: 0 | QOS: DELIVER_AT_MOST_ONCE | TOPIC_NAME: $iothub/methods/res/200/?$rid=1 | PAYLOAD_LEN: 117

...

<- 09:50:04 PUBLISH | IS_DUP: false | RETAIN: 0 | QOS: DELIVER_AT_MOST_ONCE | TOPIC_NAME: $iothub/twin/PATCH/properties/desired/?$version=2 | PAYLOAD_LEN: 63
Info: Received targetTemperature=67.000000 for component=thermostat2
Info: Sending acknowledgement of property to IoTHub for component=thermostat2
Prerequisites
To complete the steps in this article, you need the following resources:
An active Azure subscription. If you don't have an Azure subscription, create a free account before you begin.
An IoT Central application created from the Custom application template. To learn more, see Create an IoT Central application and About your application.
A development machine with Visual Studio (Community, Professional, or Enterprise).
A local copy of the Microsoft Azure IoT SDK for C# (.NET) GitHub repository that contains the sample code. Use this link to download a copy of the repository: Download ZIP. Then unzip the file to a suitable location on your local machine.
Review the code
In the copy of the Microsoft Azure IoT SDK for C# repository you downloaded previously, open the azure-iot-sdk-csharp-main\azureiot.sln solution file in Visual Studio. In Solution Explorer, expand the PnpDeviceSamples > TemperatureController folder and open the Program.cs and TemperatureControllerSample.cs files to view the code for this sample.
The sample implements the multiple-component Temperature Controller Digital Twin Definition Language model.
When you run the sample to connect to IoT Central, it uses the Device Provisioning Service (DPS) to register the device and generate a connection string. The sample retrieves the DPS connection information it needs from the environment.
In Program.cs, the Main method calls SetupDeviceClientAsync to:
- Use the model ID
dtmi:com:example:TemperatureController;2when it provisions the device with DPS. IoT Central uses the model ID to identify or generate the device template for this device. To learn more, see Assign a device to a device template. - Create a DeviceClient instance to connect to IoT Central.
private static async Task<DeviceClient> SetupDeviceClientAsync(Parameters parameters, CancellationToken cancellationToken)
{
  DeviceClient deviceClient;
  switch (parameters.DeviceSecurityType.ToLowerInvariant())
  {
    case "dps":
      DeviceRegistrationResult dpsRegistrationResult = await ProvisionDeviceAsync(parameters, cancellationToken);
      var authMethod = new DeviceAuthenticationWithRegistrySymmetricKey(dpsRegistrationResult.DeviceId, parameters.DeviceSymmetricKey);
      deviceClient = InitializeDeviceClient(dpsRegistrationResult.AssignedHub, authMethod);
      break;

    case "connectionstring":
      // ...

    default:
      // ...
  }
  return deviceClient;
}
The main method then creates a TemperatureControllerSample instance and calls the PerformOperationsAsync method to handle the interactions with IoT Central.
In TemperatureControllerSample.cs, the PerformOperationsAsync method:
- Sets a handler for the reboot command on the default component.
- Sets handlers for the getMaxMinReport commands on the two thermostat components.
- Sets handlers to receive target temperature property updates on the two thermostat components.
- Sends initial device information property updates.
- Periodically sends temperature telemetry from the two thermostat components.
- Periodically sends working set telemetry from the default component.
- Sends the maximum temperature since the last reboot whenever a new maximum temperature is reached in the two thermostat components.
public async Task PerformOperationsAsync(CancellationToken cancellationToken)
{
  await _deviceClient.SetMethodHandlerAsync("reboot", HandleRebootCommandAsync, _deviceClient, cancellationToken);

  // For a component-level command, the command name is in the format "<component-name>*<command-name>".
  await _deviceClient.SetMethodHandlerAsync("thermostat1*getMaxMinReport", HandleMaxMinReportCommand, Thermostat1, cancellationToken);
  await _deviceClient.SetMethodHandlerAsync("thermostat2*getMaxMinReport", HandleMaxMinReportCommand, Thermostat2, cancellationToken);

  await _deviceClient.SetDesiredPropertyUpdateCallbackAsync(SetDesiredPropertyUpdateCallback, null, cancellationToken);
  _desiredPropertyUpdateCallbacks.Add(Thermostat1, TargetTemperatureUpdateCallbackAsync);
  _desiredPropertyUpdateCallbacks.Add(Thermostat2, TargetTemperatureUpdateCallbackAsync);

  await UpdateDeviceInformationAsync(cancellationToken);
  await SendDeviceSerialNumberAsync(cancellationToken);

  bool temperatureReset = true;
  _maxTemp[Thermostat1] = 0d;
  _maxTemp[Thermostat2] = 0d;

  while (!cancellationToken.IsCancellationRequested)
  {
    if (temperatureReset)
    {
      // Generate a random value between 5.0°C and 45.0°C for the current temperature reading for each "Thermostat" component.
      _temperature[Thermostat1] = Math.Round(s_random.NextDouble() * 40.0 + 5.0, 1);
      _temperature[Thermostat2] = Math.Round(s_random.NextDouble() * 40.0 + 5.0, 1);
    }

    await SendTemperatureAsync(Thermostat1, cancellationToken);
    await SendTemperatureAsync(Thermostat2, cancellationToken);
    await SendDeviceMemoryAsync(cancellationToken);

    temperatureReset = _temperature[Thermostat1] == 0 && _temperature[Thermostat2] == 0;
    await Task.Delay(5 * 1000);
  }
}
The SendTemperatureAsync method shows how the device sends the temperature telemetry from a component to IoT Central. The SendTemperatureTelemetryAsync method uses the PnpConvention class to build the message:
private async Task SendTemperatureAsync(string componentName, CancellationToken cancellationToken)
{
  await SendTemperatureTelemetryAsync(componentName, cancellationToken);

  double maxTemp = _temperatureReadingsDateTimeOffset[componentName].Values.Max<double>();
  if (maxTemp > _maxTemp[componentName])
  {
    _maxTemp[componentName] = maxTemp;
    await UpdateMaxTemperatureSinceLastRebootAsync(componentName, cancellationToken);
  }
}

private async Task SendTemperatureTelemetryAsync(string componentName, CancellationToken cancellationToken)
{
  const string telemetryName = "temperature";
  double currentTemperature = _temperature[componentName];
  using Message msg = PnpConvention.CreateMessage(telemetryName, currentTemperature, componentName);

  await _deviceClient.SendEventAsync(msg, cancellationToken);

  if (_temperatureReadingsDateTimeOffset.ContainsKey(componentName))
  {
    _temperatureReadingsDateTimeOffset[componentName].TryAdd(DateTimeOffset.UtcNow, currentTemperature);
  }
  else
  {
    _temperatureReadingsDateTimeOffset.TryAdd(
      componentName,
      new Dictionary<DateTimeOffset, double>
      {
        { DateTimeOffset.UtcNow, currentTemperature },
      });
  }
}
The UpdateMaxTemperatureSinceLastRebootAsync method sends a maxTempSinceLastReboot property update to IoT Central. This method uses the PnpConvention class to create the patch:
private async Task UpdateMaxTemperatureSinceLastRebootAsync(string componentName, CancellationToken cancellationToken)
{
  const string propertyName = "maxTempSinceLastReboot";
  double maxTemp = _maxTemp[componentName];
  TwinCollection reportedProperties = PnpConvention.CreateComponentPropertyPatch(componentName, propertyName, maxTemp);

  await _deviceClient.UpdateReportedPropertiesAsync(reportedProperties, cancellationToken);
}
The TargetTemperatureUpdateCallbackAsync method handles the writable target temperature property update from IoT Central. This method uses the PnpConvention class to read the property update message and construct the response:
private async Task TargetTemperatureUpdateCallbackAsync(TwinCollection desiredProperties, object userContext)
{
  const string propertyName = "targetTemperature";
  string componentName = (string)userContext;

  bool targetTempUpdateReceived = PnpConvention.TryGetPropertyFromTwin(
    desiredProperties,
    propertyName,
    out double targetTemperature,
    componentName);
  if (!targetTempUpdateReceived)
  {
      return;
  }

  TwinCollection pendingReportedProperty = PnpConvention.CreateComponentWritablePropertyResponse(
      componentName,
      propertyName,
      targetTemperature,
      (int)StatusCode.InProgress,
      desiredProperties.Version);

  await _deviceClient.UpdateReportedPropertiesAsync(pendingReportedProperty);

  // Update Temperature in 2 steps
  double step = (targetTemperature - _temperature[componentName]) / 2d;
  for (int i = 1; i <= 2; i++)
  {
      _temperature[componentName] = Math.Round(_temperature[componentName] + step, 1);
      await Task.Delay(6 * 1000);
  }

  TwinCollection completedReportedProperty = PnpConvention.CreateComponentWritablePropertyResponse(
      componentName,
      propertyName,
      _temperature[componentName],
      (int)StatusCode.Completed,
      desiredProperties.Version,
      "Successfully updated target temperature");

  await _deviceClient.UpdateReportedPropertiesAsync(completedReportedProperty);
}
The HandleMaxMinReportCommand method handles the commands for the components called from IoT Central:
private Task<MethodResponse> HandleMaxMinReportCommand(MethodRequest request, object userContext)
{
    try
    {
        string componentName = (string)userContext;
        DateTime sinceInUtc = JsonConvert.DeserializeObject<DateTime>(request.DataAsJson);
        var sinceInDateTimeOffset = new DateTimeOffset(sinceInUtc);

        if (_temperatureReadingsDateTimeOffset.ContainsKey(componentName))
        {

            Dictionary<DateTimeOffset, double> allReadings = _temperatureReadingsDateTimeOffset[componentName];
            Dictionary<DateTimeOffset, double> filteredReadings = allReadings.Where(i => i.Key > sinceInDateTimeOffset)
                .ToDictionary(i => i.Key, i => i.Value);

            if (filteredReadings != null && filteredReadings.Any())
            {
                var report = new
                {
                    maxTemp = filteredReadings.Values.Max<double>(),
                    minTemp = filteredReadings.Values.Min<double>(),
                    avgTemp = filteredReadings.Values.Average(),
                    startTime = filteredReadings.Keys.Min(),
                    endTime = filteredReadings.Keys.Max(),
                };

                byte[] responsePayload = Encoding.UTF8.GetBytes(JsonConvert.SerializeObject(report));
                return Task.FromResult(new MethodResponse(responsePayload, (int)StatusCode.Completed));
            }

            return Task.FromResult(new MethodResponse((int)StatusCode.NotFound));
        }

        return Task.FromResult(new MethodResponse((int)StatusCode.NotFound));
    }
    catch (JsonReaderException ex)
    {
        // ...
    }
}
Get connection information
When you run the sample device application later in this tutorial, you need the following configuration values:
- ID scope: In your IoT Central application, navigate to Permissions > Device connection groups. Make a note of the ID scope value.
- Group primary key: In your IoT Central application, navigate to Permissions > Device connection groups > SAS-IoT-Devices. Make a note of the shared access signature Primary key value.
Use the Azure Cloud Shell to generate a device key from the group primary key you retrieved:
az extension add --name azure-iot
az iot central device compute-device-key --device-id sample-device-01 --pk <the group primary key value>
Make a note of the generated device key, you use it later in this tutorial.
Note
To run this sample, you don't need to register the device in advance in your IoT Central application. The sample uses the IoT Central capability to automatically register devices when they connect for the first time.
Run the code
Note
Set up TemperatureController as startup project before you run the code.
To run the sample application in Visual Studio:
In Solution Explorer, select the PnpDeviceSamples > TemperatureController project file.
Navigate to Project > TemperatureController Properties > Debug. Then add the following environment variables to the project:
Name Value IOTHUB_DEVICE_SECURITY_TYPE DPS IOTHUB_DEVICE_DPS_ENDPOINT global.azure-devices-provisioning.net IOTHUB_DEVICE_DPS_ID_SCOPE The ID scope value you made a note of previously. IOTHUB_DEVICE_DPS_DEVICE_ID sample-device-01 IOTHUB_DEVICE_DPS_DEVICE_KEY The generated device key value you made a note of previously.
You can now run and debug the sample in Visual Studio.
The following output shows the device registering and connecting to IoT Central. The sample starts sending telemetry:
[03/31/2021 14:43:17]info: Microsoft.Azure.Devices.Client.Samples.TemperatureControllerSample[0]
      Press Control+C to quit the sample.
[03/31/2021 14:43:17]dbug: Microsoft.Azure.Devices.Client.Samples.TemperatureControllerSample[0]
      Set up the device client.
[03/31/2021 14:43:18]dbug: Microsoft.Azure.Devices.Client.Samples.TemperatureControllerSample[0]
      Initializing via DPS
[03/31/2021 14:43:27]dbug: Microsoft.Azure.Devices.Client.Samples.TemperatureControllerSample[0]
      Set handler for 'reboot' command.
[03/31/2021 14:43:27]dbug: Microsoft.Azure.Devices.Client.Samples.TemperatureControllerSample[0]
      Connection status change registered - status=Connected, reason=Connection_Ok.
[03/31/2021 14:43:28]dbug: Microsoft.Azure.Devices.Client.Samples.TemperatureControllerSample[0]
      Set handler for "getMaxMinReport" command.
[03/31/2021 14:43:28]dbug: Microsoft.Azure.Devices.Client.Samples.TemperatureControllerSample[0]
      Set handler to receive 'targetTemperature' updates.
[03/31/2021 14:43:28]dbug: Microsoft.Azure.Devices.Client.Samples.TemperatureControllerSample[0]
      Property: Update - component = 'deviceInformation', properties update is complete.
[03/31/2021 14:43:28]dbug: Microsoft.Azure.Devices.Client.Samples.TemperatureControllerSample[0]
      Property: Update - { "serialNumber": "SR-123456" } is complete.
[03/31/2021 14:43:29]dbug: Microsoft.Azure.Devices.Client.Samples.TemperatureControllerSample[0]
      Telemetry: Sent - component="thermostat1", { "temperature": 34.2 } in °C.
[03/31/2021 14:43:29]dbug: Microsoft.Azure.Devices.Client.Samples.TemperatureControllerSample[0]
      Property: Update - component="thermostat1", { "maxTempSinceLastReboot": 34.2 } in °C is complete.
[03/31/2021 14:43:29]dbug: Microsoft.Azure.Devices.Client.Samples.TemperatureControllerSample[0]
      Telemetry: Sent - component="thermostat2", { "temperature": 25.1 } in °C.
[03/31/2021 14:43:29]dbug: Microsoft.Azure.Devices.Client.Samples.TemperatureControllerSample[0]
      Property: Update - component="thermostat2", { "maxTempSinceLastReboot": 25.1 } in °C is complete.
[03/31/2021 14:43:29]dbug: Microsoft.Azure.Devices.Client.Samples.TemperatureControllerSample[0]
      Telemetry: Sent - {"workingSet":31412} in KB.
As an operator in your Azure IoT Central application, you can:
View the telemetry sent by the two thermostat components on the Overview page:
View the device properties on the About page. This page shows the properties from the device information component and the two thermostat components:
Customize the device template
As a solution developer, you can customize the device template that IoT Central created automatically when the temperature controller device connected.
To add a cloud property to store the customer name associated with the device:
In your IoT Central application, navigate to the Temperature Controller device template on the Device templates page.
In the Temperature Controller model, select +Add capability.
Enter Customer name as the Display name, select Cloud property as the capability type, expand the entry and choose String as the Schema. Then select Save.
To customize how the Get Max-Min report commands display in your IoT Central application:
Navigate to the Temperature Controller device template on the Device templates page.
For getMaxMinReport (thermostat1), replace Get Max-Min report. with Get thermostat1 status report.
For getMaxMinReport (thermostat2), replace Get Max-Min report. with Get thermostat2 status report.
Select Save.
To customize how the Target Temperature writable properties display in your IoT Central application:
Navigate to the Temperature Controller device template on the Device templates page.
For targetTemperature (thermostat1), replace Target Temperature with Target Temperature (1).
For targetTemperature (thermostat2), replace Target Temperature with Target Temperature (2).
Select Save.
The thermostat components in the Temperature Controller model include the Target Temperature writable property, the device template includes the Customer Name cloud property. Create a view an operator can use to edit these properties:
Select Views and then select the Editing device and cloud data tile.
Enter Properties as the form name.
Select the Target Temperature (1), Target Temperature (2), and Customer Name properties. Then select Add section.
Save your changes.
Publish the device template
Before an operator can see and use the customizations you made, you must publish the device template.
From the Thermostat device template, select Publish. On the Publish this device template to the application panel, select Publish.
An operator can now use the Properties view to update the property values, and call commands called Get thermostat1 status report and Get thermostat2 status report on the device commands page:
Update writable property values on the Properties page:
Call the commands from the Commands page. If you run the status report command, select a date and time for the Since parameter before you run it:
You can see how the device responds to commands and property updates:
[03/31/2021 14:47:00]dbug: Microsoft.Azure.Devices.Client.Samples.TemperatureControllerSample[0]
      Command: Received - component="thermostat2", generating max, min and avg temperature report since 31/03/2021 06:00:00.
[03/31/2021 14:47:00]dbug: Microsoft.Azure.Devices.Client.Samples.TemperatureControllerSample[0]
      Command: component="thermostat2", MaxMinReport since 31/03/2021 06:00:00: maxTemp=36.4, minTemp=36.4, avgTemp=36.4, startTime=31/03/2021 14:46:33, endTime=31/03/2021 14:46:55

...

[03/31/2021 14:46:36]dbug: Microsoft.Azure.Devices.Client.Samples.TemperatureControllerSample[0]
      Property: Received - component="thermostat1", { "targetTemperature": 67°C }.
[03/31/2021 14:46:36]dbug: Microsoft.Azure.Devices.Client.Samples.TemperatureControllerSample[0]
      Property: Update - component="thermostat1", {"targetTemperature": 67 } in °C is InProgress.
[03/31/2021 14:46:49]dbug: Microsoft.Azure.Devices.Client.Samples.TemperatureControllerSample[0]
      Property: Update - component="thermostat1", {"targetTemperature": 67 } in °C is Completed
[03/31/2021 14:46:49]dbug: Microsoft.Azure.Devices.Client.Samples.TemperatureControllerSample[0]
      Telemetry: Sent - component="thermostat1", { "temperature": 67 } in °C.
Prerequisites
To complete the steps in this article, you need the following resources:
An active Azure subscription. If you don't have an Azure subscription, create a free account before you begin.
An IoT Central application created from the Custom application template. To learn more, see Create an IoT Central application and About your application.
A development machine with Java SE Development Kit 8 or later. For more information, see Install the JDK.
A local copy of the Microsoft Azure IoT SDK for Java GitHub repository that contains the sample code. Use this link to download a copy of the repository: Download ZIP. Then unzip the file to a suitable location on your local machine.
Review the code
In the copy of the Microsoft Azure IoT SDK for Java you downloaded previously, open the azure-iot-sdk-java/iothub/device/iot-device-samples/pnp-device-sample/temperature-controller-device-sample/src/main/java/samples/com/microsoft/azure/sdk/iot/device/TemperatureController.java file in a text editor.
The sample implements the multiple-component Temperature Controller Digital Twin Definition Language model.
When you run the sample to connect to IoT Central, it uses the Device Provisioning Service (DPS) to register the device and generate a connection string. The sample retrieves the DPS connection information it needs from the command-line environment.
The main method:
- Calls
initializeAndProvisionDeviceto set thedtmi:com:example:TemperatureController;2model ID, use DPS to provision and register the device, create a DeviceClient instance, and connect to your IoT Central application. IoT Central uses the model ID to identify or generate the device template for this device. To learn more, see Assign a device to a device template. - Creates command handlers for the
getMaxMinReportandrebootcommands. - Creates property update handlers for the writable
targetTemperatureproperties. - Sends initial values for the properties in the Device Information interface and the Device Memory and Serial Number properties.
- Starts a thread to send temperature telemetry from the two thermostats and update the
maxTempSinceLastRebootproperty every five seconds.
public static void main(String[] args) throws Exception {

  // ...

  switch (deviceSecurityType.toLowerCase())
  {
    case "dps":
    {
      if (validateArgsForDpsFlow())
      {
        initializeAndProvisionDevice();
        break;
      }
      throw new IllegalArgumentException("Required environment variables are not set for DPS flow, please recheck your environment.");
    }
    case "connectionstring":
    {
      // ...
    }
    default:
    {
      // ...
    }
  }

  deviceClient.subscribeToMethods(new MethodCallback(), null);

  deviceClient.subscribeToDesiredPropertiesAsync(
  {
  (twin, context) ->
      TwinCollection desiredProperties = twin.getDesiredProperties();
      for (String desiredPropertyKey : desiredProperties.keySet())
      {
          TargetTemperatureUpdateCallback.onPropertyChanged(new Property(desiredPropertyKey, desiredProperties.get(desiredPropertyKey)), null);
      }
  },
  null,
  (exception, context) ->
  {
      if (exception == null)
      {
          log.info("Successfully subscribed to desired properties. Getting initial state");
          deviceClient.getTwinAsync(
              (twin, getTwinException, getTwinContext) ->
              {
                  log.info("Initial twin state received");
                  log.info(twin.toString());
              },
              null);
      }
      else
      {
          log.info("Failed to subscribe to desired properties. Error code {}", exception.getStatusCode());
          System.exit(-1);
      }
  },
  null);

  updateDeviceInformation();
  sendDeviceMemory();
  sendDeviceSerialNumber();

  final AtomicBoolean temperatureReset = new AtomicBoolean(true);
  maxTemperature.put(THERMOSTAT_1, 0.0d);
  maxTemperature.put(THERMOSTAT_2, 0.0d);

  new Thread(new Runnable() {
    @SneakyThrows({InterruptedException.class, IOException.class})
    @Override
    public void run() {
      while (true) {
        if (temperatureReset.get()) {
          // Generate a random value between 5.0°C and 45.0°C for the current temperature reading for each "Thermostat" component.
          temperature.put(THERMOSTAT_1, BigDecimal.valueOf(random.nextDouble() * 40 + 5).setScale(1, RoundingMode.HALF_UP).doubleValue());
          temperature.put(THERMOSTAT_2, BigDecimal.valueOf(random.nextDouble() * 40 + 5).setScale(1, RoundingMode.HALF_UP).doubleValue());
        }

        sendTemperatureReading(THERMOSTAT_1);
        sendTemperatureReading(THERMOSTAT_2);

        temperatureReset.set(temperature.get(THERMOSTAT_1) == 0 && temperature.get(THERMOSTAT_2) == 0);
        Thread.sleep(5 * 1000);
      }
    }
  }).start();
}
The initializeAndProvisionDevice method shows how the device uses DPS to register and connect to IoT Central. The payload includes the model ID that IoT Central uses to assign a device to a device template:
private static void initializeAndProvisionDevice() throws Exception {
  SecurityProviderSymmetricKey securityClientSymmetricKey = new SecurityProviderSymmetricKey(deviceSymmetricKey.getBytes(), registrationId);
  ProvisioningDeviceClient provisioningDeviceClient;
  ProvisioningStatus provisioningStatus = new ProvisioningStatus();

  provisioningDeviceClient = ProvisioningDeviceClient.create(globalEndpoint, scopeId, provisioningProtocol, securityClientSymmetricKey);

  AdditionalData additionalData = new AdditionalData();
  additionalData.setProvisioningPayload(com.microsoft.azure.sdk.iot.provisioning.device.plugandplay.PnpHelper.createDpsPayload(MODEL_ID));

  ProvisioningDeviceClientRegistrationResult registrationResult = provisioningDeviceClient.registerDeviceSync(additionalData);

    ClientOptions options = ClientOptions.builder().modelId(MODEL_ID).build();
    if (registrationResult.getProvisioningDeviceClientStatus() == ProvisioningDeviceClientStatus.PROVISIONING_DEVICE_STATUS_ASSIGNED) {
        System.out.println("IotHUb Uri : " + registrationResult.getIothubUri());
        System.out.println("Device ID : " + registrationResult.getDeviceId());
        String iotHubUri = registrationResult.getIothubUri();
        String deviceId = registrationResult.getDeviceId();
        log.debug("Opening the device client.");
        deviceClient = new DeviceClient(iotHubUri, deviceId, securityClientSymmetricKey, IotHubClientProtocol.MQTT, options);
        deviceClient.open(true);
    }
}
The sendTemperatureTelemetry method shows how the device sends the temperature telemetry from a component to IoT Central. This method uses the PnpConvention class to create the message:
  private static void sendTemperatureTelemetry(String componentName) {
    String telemetryName = "temperature";
    double currentTemperature = temperature.get(componentName);

    Message message = PnpConvention.createIotHubMessageUtf8(telemetryName, currentTemperature, componentName);
    deviceClient.sendEventAsync(message, new MessageIotHubEventCallback(), message);

    // Add the current temperature entry to the list of temperature readings.
    Map<Date, Double> currentReadings;
    if (temperatureReadings.containsKey(componentName)) {
      currentReadings = temperatureReadings.get(componentName);
    } else {
      currentReadings = new HashMap<>();
    }
    currentReadings.put(new Date(), currentTemperature);
    temperatureReadings.put(componentName, currentReadings);
  }
The updateMaxTemperatureSinceLastReboot method sends a maxTempSinceLastReboot property update from a component to IoT Central. This method uses the PnpConvention class to create the patch:
private static void updateMaxTemperatureSinceLastReboot(String componentName) throws IOException {
  String propertyName = "maxTempSinceLastReboot";
  double maxTemp = maxTemperature.get(componentName);

  TwinCollection reportedProperty = PnpConvention.createComponentPropertyPatch(propertyName, maxTemp, componentName);
  deviceClient.updateReportedPropertiesAsync(reportedProperty, sendReportedPropertiesResponseCallback, null);
  log.debug("Property: Update - {\"{}\": {}°C} is {}.", propertyName, maxTemp, StatusCode.COMPLETED);
}
The TargetTemperatureUpdateCallback class contains the onPropertyChanged method to handle writable property updates to a component from IoT Central. This method uses the PnpConvention class to create the response:
private static class TargetTemperatureUpdateCallback
{
    final static String propertyName = "targetTemperature";
    @SneakyThrows(InterruptedException.class)
    public static void onPropertyChanged(Property property, Object context) {
        String componentName = (String) context;
        if (property.getKey().equalsIgnoreCase(componentName)) {
            double targetTemperature = (double) ((TwinCollection) property.getValue()).get(propertyName);
            log.debug("Property: Received - component=\"{}\", {\"{}\": {}°C}.", componentName, propertyName, targetTemperature);
            TwinCollection pendingPropertyPatch = PnpConvention.createComponentWritablePropertyResponse(
                    propertyName,
                    targetTemperature,
                    componentName,
                    StatusCode.IN_PROGRESS.value,
                    property.getVersion().longValue(),
                    null);
            deviceClient.updateReportedPropertiesAsync(pendingPropertyPatch, sendReportedPropertiesResponseCallback, null);
            log.debug("Property: Update - component=\"{}\", {\"{}\": {}°C} is {}", componentName, propertyName, targetTemperature, StatusCode.IN_PROGRESS);
            // Update temperature in 2 steps
            double step = (targetTemperature - temperature.get(componentName)) / 2;
            for (int i = 1; i <=2; i++) {
                temperature.put(componentName, BigDecimal.valueOf(temperature.get(componentName) + step).setScale(1, RoundingMode.HALF_UP).doubleValue());
                Thread.sleep(5 * 1000);
            }
            TwinCollection completedPropertyPatch = PnpConvention.createComponentWritablePropertyResponse(
                    propertyName,
                    temperature.get(componentName),
                    componentName,
                    StatusCode.COMPLETED.value,
                    property.getVersion().longValue(),
                    "Successfully updated target temperature.");
            deviceClient.updateReportedPropertiesAsync(completedPropertyPatch, sendReportedPropertiesResponseCallback, null);
            log.debug("Property: Update - {\"{}\": {}°C} is {}", propertyName, temperature.get(componentName), StatusCode.COMPLETED);
        } else {
            log.debug("Property: Received an unrecognized property update from service.");
        }
    }
}
The MethodCallback class contains the onMethodInvoked method to handle component commands called from IoT Central:
private static class MethodCallback implements com.microsoft.azure.sdk.iot.device.twin.MethodCallback
{
    final String reboot = "reboot";
    final String getMaxMinReport1 = "thermostat1*getMaxMinReport";
    final String getMaxMinReport2 = "thermostat2*getMaxMinReport";
    @SneakyThrows(InterruptedException.class)
    @Override
    public DirectMethodResponse onMethodInvoked(String methodName, DirectMethodPayload methodData, Object context) {
        String jsonRequest = methodData.getPayload(String.class);
        switch (methodName) {
            case reboot:
                int delay = getCommandRequestValue(jsonRequest, Integer.class);
                log.debug("Command: Received - Rebooting thermostat (resetting temperature reading to 0°C after {} seconds).", delay);
                Thread.sleep(delay * 1000L);
                temperature.put(THERMOSTAT_1, 0.0d);
                temperature.put(THERMOSTAT_2, 0.0d);
                maxTemperature.put(THERMOSTAT_1, 0.0d);
                maxTemperature.put(THERMOSTAT_2, 0.0d);
                temperatureReadings.clear();
                return new DirectMethodResponse(StatusCode.COMPLETED.value, null);
            case getMaxMinReport1:
            case getMaxMinReport2:
                String[] words = methodName.split("\\*");
                String componentName = words[0];
                if (temperatureReadings.containsKey(componentName)) {
                    Date since = getCommandRequestValue(jsonRequest, Date.class);
                    log.debug("Command: Received - component=\"{}\", generating min, max, avg temperature report since {}", componentName, since);
                    Map<Date, Double> allReadings = temperatureReadings.get(componentName);
                    Map<Date, Double> filteredReadings = allReadings.entrySet().stream()
                            .filter(map -> map.getKey().after(since))
                            .collect(Collectors.toMap(Entry::getKey, Entry::getValue));
                    if (!filteredReadings.isEmpty()) {
                        SimpleDateFormat sdf = new SimpleDateFormat("yyyy-MM-dd'T'HH:mm:ss'Z'");
                        double maxTemp = Collections.max(filteredReadings.values());
                        double minTemp = Collections.min(filteredReadings.values());
                        double avgTemp = filteredReadings.values().stream().mapToDouble(Double::doubleValue).average().orElse(Double.NaN);
                        String startTime =  sdf.format(Collections.min(filteredReadings.keySet()));
                        String endTime =  sdf.format(Collections.max(filteredReadings.keySet()));
                        String responsePayload = String.format(
                                "{\"maxTemp\": %.1f, \"minTemp\": %.1f, \"avgTemp\": %.1f, \"startTime\": \"%s\", \"endTime\": \"%s\"}",
                                maxTemp,
                                minTemp,
                                avgTemp,
                                startTime,
                                endTime);
                        log.debug("Command: MaxMinReport since {}: \"maxTemp\": {}°C, \"minTemp\": {}°C, \"avgTemp\": {}°C, \"startTime\": {}, \"endTime\": {}",
                                since,
                                maxTemp,
                                minTemp,
                                avgTemp,
                                startTime,
                                endTime);
                        return new DirectMethodResponse(StatusCode.COMPLETED.value, responsePayload);
                    }
                    log.debug("Command: component=\"{}\", no relevant readings found since {}, cannot generate any report.", componentName, since);
                    return new DirectMethodResponse(StatusCode.NOT_FOUND.value, null);
                }
                log.debug("Command: component=\"{}\", no temperature readings sent yet, cannot generate any report.", componentName);
                return new DirectMethodResponse(StatusCode.NOT_FOUND.value, null);
            default:
                log.debug("Command: command=\"{}\" is not implemented, no action taken.", methodName);
                return new DirectMethodResponse(StatusCode.NOT_FOUND.value, null);
        }
    }
}
Get connection information
When you run the sample device application later in this tutorial, you need the following configuration values:
- ID scope: In your IoT Central application, navigate to Permissions > Device connection groups. Make a note of the ID scope value.
- Group primary key: In your IoT Central application, navigate to Permissions > Device connection groups > SAS-IoT-Devices. Make a note of the shared access signature Primary key value.
Use the Azure Cloud Shell to generate a device key from the group primary key you retrieved:
az extension add --name azure-iot
az iot central device compute-device-key --device-id sample-device-01 --pk <the group primary key value>
Make a note of the generated device key, you use it later in this tutorial.
Note
To run this sample, you don't need to register the device in advance in your IoT Central application. The sample uses the IoT Central capability to automatically register devices when they connect for the first time.
On Windows, navigate to the root folder of the Azure IoT SDK for Java repository you downloaded.
Run the following command to build the sample application:
mvn install -T 2C -DskipTests
Run the code
To run the sample application, open a command-line environment and navigate to the folder azure-iot-sdk-java/iothub/device/iot-device-samples/pnp-device-sample/temperature-controller-device-sample folder that contains the src folder with the TemperatureController.java sample file.
Set the environment variables to configure the sample. The following snippet shows how set the environment variables at the Windows command prompt. If you're using a bash shell, replace the set commands with export commands:
set IOTHUB_DEVICE_SECURITY_TYPE=DPS
set IOTHUB_DEVICE_DPS_ID_SCOPE=<The ID scope you made a note of previously>
set IOTHUB_DEVICE_DPS_DEVICE_ID=sample-device-01
set IOTHUB_DEVICE_DPS_DEVICE_KEY=<The generated device key you made a note of previously>
set IOTHUB_DEVICE_DPS_ENDPOINT=global.azure-devices-provisioning.net
Run the sample:
mvn exec:java -Dexec.mainClass="samples.com.microsoft.azure.sdk.iot.device.TemperatureController"
The following output shows the device registering and connecting to IoT Central. The sample starts sending telemetry:
2021-03-30 15:33:25.138 DEBUG TemperatureController:123 - Initialize the device client.
Waiting for Provisioning Service to register
Waiting for Provisioning Service to register
IotHUb Uri : iotc-60a.....azure-devices.net
Device ID : sample-device-01
2021-03-30 15:33:38.294 DEBUG TemperatureController:247 - Opening the device client.
2021-03-30 15:33:38.307 INFO  ExponentialBackoffWithJitter:98 - NOTE: A new instance of ExponentialBackoffWithJitter has been created with the following properties. Retry Count: 2147483647, Min Backoff Interval: 100, Max Backoff Interval: 10000, Max Time Between Retries: 100, Fast Retry Enabled: true
2021-03-30 15:33:38.321 INFO  ExponentialBackoffWithJitter:98 - NOTE: A new instance of ExponentialBackoffWithJitter has been created with the following properties. Retry Count: 2147483647, Min Backoff Interval: 100, Max Backoff Interval: 10000, Max Time Between Retries: 100, Fast Retry Enabled: true
2021-03-30 15:33:38.427 DEBUG MqttIotHubConnection:274 - Opening MQTT connection...
2021-03-30 15:33:38.427 DEBUG Mqtt:123 - Sending MQTT CONNECT packet...
2021-03-30 15:33:44.628 DEBUG Mqtt:126 - Sent MQTT CONNECT packet was acknowledged
2021-03-30 15:33:44.630 DEBUG Mqtt:256 - Sending MQTT SUBSCRIBE packet for topic devices/sample-device-01/messages/devicebound/#
2021-03-30 15:33:44.731 DEBUG Mqtt:261 - Sent MQTT SUBSCRIBE packet for topic devices/sample-device-01/messages/devicebound/# was acknowledged
2021-03-30 15:33:44.733 DEBUG MqttIotHubConnection:279 - MQTT connection opened successfully
2021-03-30 15:33:44.733 DEBUG IotHubTransport:302 - The connection to the IoT Hub has been established
2021-03-30 15:33:44.734 INFO  IotHubTransport:1429 - Updating transport status to new status CONNECTED with reason CONNECTION_OK
2021-03-30 15:33:44.735 DEBUG IotHubTransport:1439 - Invoking connection status callbacks with new status details
2021-03-30 15:33:44.739 DEBUG IotHubTransport:394 - Client connection opened successfully
2021-03-30 15:33:44.740 INFO  DeviceClient:438 - Device client opened successfully
2021-03-30 15:33:44.740 DEBUG TemperatureController:152 - Set handler for "reboot" command.
2021-03-30 15:33:44.742 DEBUG TemperatureController:153 - Set handler for "getMaxMinReport" command.
2021-03-30 15:33:44.774 INFO  IotHubTransport:489 - Message was queued to be sent later ( Message details: Correlation Id [029d30d4-acbd-462d-b155-82d53ce7786c] Message Id [1b2adf93-ba81-41e4-b8c7-7c90c8b0d6a1] Device Operation Type [DEVICE_OPERATION_METHOD_SUBSCRIBE_REQUEST] )
2021-03-30 15:33:44.774 DEBUG TemperatureController:156 - Set handler to receive "targetTemperature" updates.
2021-03-30 15:33:44.775 INFO  IotHubTransport:1344 - Sending message ( Message details: Correlation Id [029d30d4-acbd-462d-b155-82d53ce7786c] Message Id [1b2adf93-ba81-41e4-b8c7-7c90c8b0d6a1] Device Operation Type [DEVICE_OPERATION_METHOD_SUBSCRIBE_REQUEST] )
2021-03-30 15:33:44.779 DEBUG Mqtt:256 - Sending MQTT SUBSCRIBE packet for topic $iothub/methods/POST/#
2021-03-30 15:33:44.793 INFO  IotHubTransport:489 - Message was queued to be sent later ( Message details: Correlation Id [f2f9ed95-9778-44f2-b9ec-f60c84061251] Message Id [0d5abdb2-6460-414c-a10e-786ee24cacff] Device Operation Type [DEVICE_OPERATION_TWIN_SUBSCRIBE_DESIRED_PROPERTIES_REQUEST] )
2021-03-30 15:33:44.794 INFO  IotHubTransport:489 - Message was queued to be sent later ( Message details: Correlation Id [417d659a-7324-43fa-84eb-8a3f3d07963c] Message Id [55532cad-8a5a-489f-9aa8-8f0e5bc21541] Request Id [0] Device Operation Type [DEVICE_OPERATION_TWIN_GET_REQUEST] )
2021-03-30 15:33:44.819 INFO  IotHubTransport:489 - Message was queued to be sent later ( Message details: Correlation Id [d46a0d8a-8a18-4014-abeb-768bd9b17ad2] Message Id [780abc81-ce42-4e5f-aa80-e4785883604e] Device Operation Type [DEVICE_OPERATION_TWIN_SUBSCRIBE_DESIRED_PROPERTIES_REQUEST] )
2021-03-30 15:33:44.881 DEBUG Mqtt:261 - Sent MQTT SUBSCRIBE packet for topic $iothub/methods/POST/# was acknowledged
2021-03-30 15:33:44.882 INFO  IotHubTransport:1344 - Sending message ( Message details: Correlation Id [f2f9ed95-9778-44f2-b9ec-f60c84061251] Message Id [0d5abdb2-6460-414c-a10e-786ee24cacff] Device Operation Type [DEVICE_OPERATION_TWIN_SUBSCRIBE_DESIRED_PROPERTIES_REQUEST] )
2021-03-30 15:33:44.882 DEBUG Mqtt:256 - Sending MQTT SUBSCRIBE packet for topic $iothub/twin/res/#
2021-03-30 15:33:44.893 INFO  IotHubTransport:489 - Message was queued to be sent later ( Message details: Correlation Id [a77b1c02-f043-4477-b610-e31a774772c0] Message Id [2e2f6bee-c480-42cf-ac31-194118930846] Request Id [1] Device Operation Type [DEVICE_OPERATION_TWIN_UPDATE_REPORTED_PROPERTIES_REQUEST] )
2021-03-30 15:33:44.904 DEBUG TemperatureController:423 - Property: Update - component = "deviceInformation" is COMPLETED.
2021-03-30 15:33:44.915 INFO  IotHubTransport:489 - Message was queued to be sent later ( Message details: Correlation Id [bbb7e3cf-3550-4fdf-90f9-0787740f028a] Message Id [e06ac385-ae0d-46dd-857a-d9725707527a] )
2021-03-30 15:33:44.915 DEBUG TemperatureController:434 - Telemetry: Sent - {"workingSet": 1024.0KiB }
2021-03-30 15:33:44.915 INFO  IotHubTransport:489 - Message was queued to be sent later ( Message details: Correlation Id [6dbef765-cc9a-4e72-980a-2fe5b0cd77e1] Message Id [49bbad33-09bf-417a-9d6e-299ba7b7c562] Request Id [2] Device Operation Type [DEVICE_OPERATION_TWIN_UPDATE_REPORTED_PROPERTIES_REQUEST] )
2021-03-30 15:33:44.916 DEBUG TemperatureController:442 - Property: Update - {"serialNumber": SR-123456} is COMPLETED
2021-03-30 15:33:44.927 INFO  IotHubTransport:489 - Message was queued to be sent later ( Message details: Correlation Id [86787c32-87a5-4c49-9083-c7f2b17446a7] Message Id [0a45fa0c-a467-499d-b214-9bb5995772ba] )
2021-03-30 15:33:44.927 DEBUG TemperatureController:461 - Telemetry: Sent - {"temperature": 5.8°C} with message Id 0a45fa0c-a467-499d-b214-9bb5995772ba.
As an operator in your Azure IoT Central application, you can:
View the telemetry sent by the two thermostat components on the Overview page:
View the device properties on the About page. This page shows the properties from the device information component and the two thermostat components:
Customize the device template
As a solution developer, you can customize the device template that IoT Central created automatically when the temperature controller device connected.
To add a cloud property to store the customer name associated with the device:
In your IoT Central application, navigate to the Temperature Controller device template on the Device templates page.
In the Temperature Controller model, select +Add capability.
Enter Customer name as the Display name, select Cloud property as the capability type, expand the entry and choose String as the Schema. Then select Save.
To customize how the Get Max-Min report commands display in your IoT Central application:
Navigate to the Temperature Controller device template on the Device templates page.
For getMaxMinReport (thermostat1), replace Get Max-Min report. with Get thermostat1 status report.
For getMaxMinReport (thermostat2), replace Get Max-Min report. with Get thermostat2 status report.
Select Save.
To customize how the Target Temperature writable properties display in your IoT Central application:
Navigate to the Temperature Controller device template on the Device templates page.
For targetTemperature (thermostat1), replace Target Temperature with Target Temperature (1).
For targetTemperature (thermostat2), replace Target Temperature with Target Temperature (2).
Select Save.
The thermostat components in the Temperature Controller model include the Target Temperature writable property, the device template includes the Customer Name cloud property. Create a view an operator can use to edit these properties:
Select Views and then select the Editing device and cloud data tile.
Enter Properties as the form name.
Select the Target Temperature (1), Target Temperature (2), and Customer Name properties. Then select Add section.
Save your changes.
Publish the device template
Before an operator can see and use the customizations you made, you must publish the device template.
From the Thermostat device template, select Publish. On the Publish this device template to the application panel, select Publish.
An operator can now use the Properties view to update the property values, and call commands called Get thermostat1 status report and Get thermostat2 status report on the device commands page:
Update writable property values on the Properties page:
Call the commands from the Commands page. If you run the status report command, select a date and time for the Since parameter before you run it:
You can see how the device responds to commands and property updates:
2021-03-30 15:43:57.133 DEBUG TemperatureController:309 - Command: Received - component="thermostat1", generating min, max, avg temperature report since Tue Mar 30 06:00:00 BST 2021
2021-03-30 15:43:57.153 DEBUG TemperatureController:332 - Command: MaxMinReport since Tue Mar 30 06:00:00 BST 2021: "maxTemp": 35.6°C, "minTemp": 35.6°C, "avgTemp": 35.6°C, "startTime": 2021-03-30T15:43:41Z, "endTime": 2021-03-30T15:43:56Z
2021-03-30 15:43:57.394 DEBUG TemperatureController:502 - Command - Response from IoT Hub: command name=null, status=OK_EMPTY


...

2021-03-30 15:48:47.808 DEBUG TemperatureController:372 - Property: Received - component="thermostat2", {"targetTemperature": 67.0°C}.
2021-03-30 15:48:47.837 DEBUG TemperatureController:382 - Property: Update - component="thermostat2", {"targetTemperature": 67.0°C} is IN_PROGRESS
Prerequisites
To complete the steps in this article, you need the following resources:
An active Azure subscription. If you don't have an Azure subscription, create a free account before you begin.
An IoT Central application created from the Custom application template. To learn more, see Create an IoT Central application and About your application.
A development machine with Node.js version 6 or later installed. You can run
node --versionin the command line to check your version. The instructions in this tutorial assume you're running the node command at the Windows command prompt. However, you can use Node.js on many other operating systems.A local copy of the Microsoft Azure IoT SDK for Node.js GitHub repository that contains the sample code. Use this link to download a copy of the repository: Download ZIP. Then unzip the file to a suitable location on your local machine.
Review the code
In the copy of the Microsoft Azure IoT SDK for Node.js you downloaded previously, open the azure-iot-sdk-node/device/samples/javascript/pnp_temperature_controller.js file in a text editor.
The sample implements the multiple-component Temperature Controller Digital Twin Definition Language model.
When you run the sample to connect to IoT Central, it uses the Device Provisioning Service (DPS) to register the device and generate a connection string. The sample retrieves the DPS connection information it needs from the command-line environment.
The main method:
- Creates a
clientobject and sets thedtmi:com:example:TemperatureController;2model ID before it opens the connection. IoT Central uses the model ID to identify or generate the device template for this device. To learn more, see Assign a device to a device template. - Creates command handlers for three commands.
- Starts a loop for each thermostat component to send temperature telemetry every 5 seconds.
- Starts a loop for the default component to send working set size telemetry every 6 seconds.
- Sends the
maxTempSinceLastRebootproperty for each thermostat component. - Sends the device information properties.
- Creates writable properties handlers for the three components.
async function main() {
  // ...

  // fromConnectionString must specify a transport, coming from any transport package.
  const client = Client.fromConnectionString(deviceConnectionString, Protocol);
  console.log('Connecting using connection string: ' + deviceConnectionString);
  let resultTwin;

  try {
    // Add the modelId here
    await client.setOptions(modelIdObject);
    await client.open();
    console.log('Enabling the commands on the client');
    client.onDeviceMethod(commandNameGetMaxMinReport1, commandHandler);
    client.onDeviceMethod(commandNameGetMaxMinReport2, commandHandler);
    client.onDeviceMethod(commandNameReboot, commandHandler);

    // Send Telemetry after some interval
    let index1 = 0;
    let index2 = 0;
    let index3 = 0;
    intervalToken1 = setInterval(() => {
      const data = JSON.stringify(thermostat1.updateSensor().getCurrentTemperatureObject());
      sendTelemetry(client, data, index1, thermostat1ComponentName).catch((err) => console.log('error ', err.toString()));
      index1 += 1;
    }, 5000);

    intervalToken2 = setInterval(() => {
      const data = JSON.stringify(thermostat2.updateSensor().getCurrentTemperatureObject());
      sendTelemetry(client, data, index2, thermostat2ComponentName).catch((err) => console.log('error ', err.toString()));
      index2 += 1;
    }, 5500);


    intervalToken3 = setInterval(() => {
      const data = JSON.stringify({ workingset: 1 + (Math.random() * 90) });
      sendTelemetry(client, data, index3, null).catch((err) => console.log('error ', err.toString()));
      index3 += 1;
    }, 6000);

    // attach a standard input exit listener
    exitListener(client);

    try {
      resultTwin = await client.getTwin();
      // Only report readable properties
      const patchRoot = helperCreateReportedPropertiesPatch({ serialNumber: serialNumber }, null);
      const patchThermostat1Info = helperCreateReportedPropertiesPatch({
        maxTempSinceLastReboot: thermostat1.getMaxTemperatureValue(),
      }, thermostat1ComponentName);

      const patchThermostat2Info = helperCreateReportedPropertiesPatch({
        maxTempSinceLastReboot: thermostat2.getMaxTemperatureValue(),
      }, thermostat2ComponentName);

      const patchDeviceInfo = helperCreateReportedPropertiesPatch({
        manufacturer: 'Contoso Device Corporation',
        model: 'Contoso 47-turbo',
        swVersion: '10.89',
        osName: 'Contoso_OS',
        processorArchitecture: 'Contoso_x86',
        processorManufacturer: 'Contoso Industries',
        totalStorage: 65000,
        totalMemory: 640,
      }, deviceInfoComponentName);

      // the below things can only happen once the twin is there
      updateComponentReportedProperties(resultTwin, patchRoot, null);
      updateComponentReportedProperties(resultTwin, patchThermostat1Info, thermostat1ComponentName);
      updateComponentReportedProperties(resultTwin, patchThermostat2Info, thermostat2ComponentName);
      updateComponentReportedProperties(resultTwin, patchDeviceInfo, deviceInfoComponentName);
      desiredPropertyPatchListener(resultTwin, [thermostat1ComponentName, thermostat2ComponentName, deviceInfoComponentName]);
    } catch (err) {
      console.error('could not retrieve twin or report twin properties\n' + err.toString());
    }
  } catch (err) {
    console.error('could not connect Plug and Play client or could not attach interval function for telemetry\n' + err.toString());
  }
}
The provisionDevice function shows how the device uses DPS to register and connect to IoT Central. The payload includes the model ID that IoT Central uses to Assign a device to a device template:
async function provisionDevice(payload) {
  var provSecurityClient = new SymmetricKeySecurityClient(registrationId, symmetricKey);
  var provisioningClient = ProvisioningDeviceClient.create(provisioningHost, idScope, new ProvProtocol(), provSecurityClient);

  if (payload) {
    provisioningClient.setProvisioningPayload(payload);
  }

  try {
    let result = await provisioningClient.register();
    deviceConnectionString = 'HostName=' + result.assignedHub + ';DeviceId=' + result.deviceId + ';SharedAccessKey=' + symmetricKey;
    console.log('registration succeeded');
    console.log('assigned hub=' + result.assignedHub);
    console.log('deviceId=' + result.deviceId);
    console.log('payload=' + JSON.stringify(result.payload));
  } catch (err) {
    console.error("error registering device: " + err.toString());
  }
}
The sendTelemetry function shows how the device sends the temperature telemetry to IoT Central. For telemetry from components, it adds a property called $.sub with the component name:
async function sendTelemetry(deviceClient, data, index, componentName) {
  if componentName) {
    console.log('Sending telemetry message %d from component: %s ', index, componentName);
  } else {
    console.log('Sending telemetry message %d from root interface', index);
  }
  const msg = new Message(data);
  if (componentName) {
    msg.properties.add(messageSubjectProperty, componentName);
  }
  msg.contentType = 'application/json';
  msg.contentEncoding = 'utf-8';
  await deviceClient.sendEvent(msg);
}
The main method uses a helper method called helperCreateReportedPropertiesPatch to create property update messages. This method takes an optional parameter to specify the component sending the property:
const helperCreateReportedPropertiesPatch = (propertiesToReport, componentName) => {
  let patch;
  if (!!(componentName)) {
    patch = { };
    propertiesToReport.__t = 'c';
    patch[componentName] = propertiesToReport;
  } else {
    patch = { };
    patch = propertiesToReport;
  }
  if (!!(componentName)) {
    console.log('The following properties will be updated for component: ' + componentName);
  } else {
    console.log('The following properties will be updated for root interface.');
  }
  console.log(patch);
  return patch;
};
The main method uses the following method to handle updates to writable properties from IoT Central. Notice how the method builds the response with the version and status code:
const desiredPropertyPatchListener = (deviceTwin, componentNames) => {
  deviceTwin.on('properties.desired', (delta) => {
    console.log('Received an update for device with value: ' + JSON.stringify(delta));
    Object.entries(delta).forEach(([key, values]) => {
      const version = delta.$version;
      if (!!(componentNames) && componentNames.includes(key)) { // then it is a component we are expecting
        const componentName = key;
        const patchForComponents = { [componentName]: {} };
        Object.entries(values).forEach(([propertyName, propertyValue]) => {
          if (propertyName !== '__t' && propertyName !== '$version') {
            console.log('Will update property: ' + propertyName + ' to value: ' + propertyValue + ' of component: ' + componentName);
            const propertyContent = { value: propertyValue };
            propertyContent.ac = 200;
            propertyContent.ad = 'Successfully executed patch';
            propertyContent.av = version;
            patchForComponents[componentName][propertyName] = propertyContent;
          }
        });
        updateComponentReportedProperties(deviceTwin, patchForComponents, componentName);
      }
      else if  (key !== '$version') { // individual property for root
        const patchForRoot = { };
        console.log('Will update property: ' + key + ' to value: ' + values + ' for root');
        const propertyContent = { value: values };
        propertyContent.ac = 200;
        propertyContent.ad = 'Successfully executed patch';
        propertyContent.av = version;
        patchForRoot[key] = propertyContent;
        updateComponentReportedProperties(deviceTwin, patchForRoot, null);
      }
    });
  });
};
The main method uses the following methods to handle commands from IoT Central:
const commandHandler = async (request, response) => {
  helperLogCommandRequest(request);
  switch (request.methodName) {
  case commandNameGetMaxMinReport1: {
    await sendCommandResponse(request, response, 200, thermostat1.getMaxMinReportObject());
    break;
  }
  case commandNameGetMaxMinReport2: {
    await sendCommandResponse(request, response, 200, thermostat2.getMaxMinReportObject());
    break;
  }
  case commandNameReboot: {
    await sendCommandResponse(request, response, 200, 'reboot response');
    break;
  }
  default:
    await sendCommandResponse(request, response, 404, 'unknown method');
    break;
  }
};

const sendCommandResponse = async (request, response, status, payload) => {
  try {
    await response.send(status, payload);
    console.log('Response to method: ' + request.methodName + ' sent successfully.' );
  } catch (err) {
    console.error('An error occurred when sending a method response:\n' + err.toString());
  }
};
Get connection information
When you run the sample device application later in this tutorial, you need the following configuration values:
- ID scope: In your IoT Central application, navigate to Permissions > Device connection groups. Make a note of the ID scope value.
- Group primary key: In your IoT Central application, navigate to Permissions > Device connection groups > SAS-IoT-Devices. Make a note of the shared access signature Primary key value.
Use the Azure Cloud Shell to generate a device key from the group primary key you retrieved:
az extension add --name azure-iot
az iot central device compute-device-key --device-id sample-device-01 --pk <the group primary key value>
Make a note of the generated device key, you use it later in this tutorial.
Note
To run this sample, you don't need to register the device in advance in your IoT Central application. The sample uses the IoT Central capability to automatically register devices when they connect for the first time.
Run the code
To run the sample application, open a command-line environment and navigate to the folder azure-iot-sdk-node/device/samples/javascript folder that contains the pnp_temperature_controller.js sample file.
Set the environment variables to configure the sample. The following snippet shows how set the environment variables at the Windows command prompt. If you're using a bash shell, replace the set commands with export commands:
set IOTHUB_DEVICE_SECURITY_TYPE=DPS
set IOTHUB_DEVICE_DPS_ID_SCOPE=<The ID scope you made a note of previously>
set IOTHUB_DEVICE_DPS_DEVICE_ID=sample-device-01
set IOTHUB_DEVICE_DPS_DEVICE_KEY=<The generated device key you made a note of previously>
set IOTHUB_DEVICE_DPS_ENDPOINT=global.azure-devices-provisioning.net
Install the required packages:
npm install
Run the sample:
node pnp_temperature_controller.js
The following output shows the device registering and connecting to IoT Central. The sample then sends the maxTempSinceLastReboot property from the two thermostat components before it starts sending telemetry:
registration succeeded
assigned hub=iotc-....azure-devices.net
deviceId=sample-device-01
payload=undefined
Connecting using connection string: HostName=iotc-....azure-devices.net;DeviceId=sample-device-01;SharedAccessKey=qdv...IpAo=
Enabling the commands on the client
Please enter q or Q to exit sample.
The following properties will be updated for root interface.
{ serialNumber: 'alwinexlepaho8329' }
The following properties will be updated for component: thermostat1
{ thermostat1: { maxTempSinceLastReboot: 1.5902294191855972, __t: 'c' } }
The following properties will be updated for component: thermostat2
{ thermostat2: { maxTempSinceLastReboot: 16.181771928614545, __t: 'c' } }
The following properties will be updated for component: deviceInformation
{ deviceInformation:
   { manufacturer: 'Contoso Device Corporation',
     model: 'Contoso 47-turbo',
     swVersion: '10.89',
     osName: 'Contoso_OS',
     processorArchitecture: 'Contoso_x86',
     processorManufacturer: 'Contoso Industries',
     totalStorage: 65000,
     totalMemory: 640,
     __t: 'c' } }
executed sample
Received an update for device with value: {"$version":1}
Properties have been reported for component: thermostat1
Properties have been reported for component: thermostat2
Properties have been reported for component: deviceInformation
Properties have been reported for root interface.
Sending telemetry message 0 from component: thermostat1
Sending telemetry message 0 from component: thermostat2
Sending telemetry message 0 from root interface
As an operator in your Azure IoT Central application, you can:
View the telemetry sent by the two thermostat components on the Overview page:
View the device properties on the About page. This page shows the properties from the device information component and the two thermostat components:
Customize the device template
As a solution developer, you can customize the device template that IoT Central created automatically when the temperature controller device connected.
To add a cloud property to store the customer name associated with the device:
In your IoT Central application, navigate to the Temperature Controller device template on the Device templates page.
In the Temperature Controller model, select +Add capability.
Enter Customer name as the Display name, select Cloud property as the capability type, expand the entry and choose String as the Schema. Then select Save.
To customize how the Get Max-Min report commands display in your IoT Central application:
Navigate to the Temperature Controller device template on the Device templates page.
For getMaxMinReport (thermostat1), replace Get Max-Min report. with Get thermostat1 status report.
For getMaxMinReport (thermostat2), replace Get Max-Min report. with Get thermostat2 status report.
Select Save.
To customize how the Target Temperature writable properties display in your IoT Central application:
Navigate to the Temperature Controller device template on the Device templates page.
For targetTemperature (thermostat1), replace Target Temperature with Target Temperature (1).
For targetTemperature (thermostat2), replace Target Temperature with Target Temperature (2).
Select Save.
The thermostat components in the Temperature Controller model include the Target Temperature writable property, the device template includes the Customer Name cloud property. Create a view an operator can use to edit these properties:
Select Views and then select the Editing device and cloud data tile.
Enter Properties as the form name.
Select the Target Temperature (1), Target Temperature (2), and Customer Name properties. Then select Add section.
Save your changes.
Publish the device template
Before an operator can see and use the customizations you made, you must publish the device template.
From the Thermostat device template, select Publish. On the Publish this device template to the application panel, select Publish.
An operator can now use the Properties view to update the property values, and call commands called Get thermostat1 status report and Get thermostat2 status report on the device commands page:
Update writable property values on the Properties page:
Call the commands from the Commands page. If you run the status report command, select a date and time for the Since parameter before you run it:
You can see how the device responds to commands and property updates. The getMaxMinReport command is in the thermostat2 component, the reboot command is in the default component. The targetTemperature writable property was set for the thermostat2 component:
Received command request for command name: thermostat2*getMaxMinReport
The command request payload is:
2021-03-26T06:00:00.000Z
Response to method: thermostat2*getMaxMinReport sent successfully.

...

Received command request for command name: reboot
The command request payload is:
10
Response to method: reboot sent successfully.

...

Received an update for device with value: {"thermostat2":{"targetTemperature":76,"__t":"c"},"$version":2}
Will update property: targetTemperature to value: 76 of component: thermostat2
Properties have been reported for component: thermostat2
Prerequisites
To complete the steps in this article, you need the following resources:
An active Azure subscription. If you don't have an Azure subscription, create a free account before you begin.
An IoT Central application created from the Custom application template. To learn more, see Create an IoT Central application and About your application.
A development machine with Python installed. Check the Azure IoT Python SDK for current Python version requirements. You can run
python --versionat the command line to check your version. Python is available for a wide variety of operating systems. The instructions in this tutorial assume you're running the python command at the Windows command prompt.A local copy of the Microsoft Azure IoT SDK for Python GitHub repository that contains the sample code. Use this link to download a copy of the repository: Download ZIP. Then unzip the file to a suitable location on your local machine.
Review the code
In the copy of the Microsoft Azure IoT SDK for Python you downloaded previously, open the azure-iot-sdk-python/samples/pnp/temp_controller_with_thermostats.py file in a text editor.
The sample implements the multiple-component Temperature Controller Digital Twin Definition Language model.
When you run the sample to connect to IoT Central, it uses the Device Provisioning Service (DPS) to register the device and generate a connection string. The sample retrieves the DPS connection information it needs from the command-line environment.
The main function:
- Uses DPS to provision the device. The provisioning information includes the model ID. IoT Central uses the model ID to identify or generate the device template for this device. To learn more, see Assign a device to a device template.
- Creates a
Device_clientobject and sets thedtmi:com:example:TemperatureController;2model ID before it opens the connection. - Sends initial property values to IoT Central. It uses the
pnp_helperto create the patches. - Creates listeners for the
getMaxMinReportandrebootcommands. Each thermostat component has its owngetMaxMinReportcommand. - Creates property listener, to listen for writable property updates.
- Starts a loop to send temperature telemetry from the two thermostat components and working set telemetry from the default component every 8 seconds.
async def main():
    switch = os.getenv("IOTHUB_DEVICE_SECURITY_TYPE")
    if switch == "DPS":
        provisioning_host = (
            os.getenv("IOTHUB_DEVICE_DPS_ENDPOINT")
            if os.getenv("IOTHUB_DEVICE_DPS_ENDPOINT")
            else "global.azure-devices-provisioning.net"
        )
        id_scope = os.getenv("IOTHUB_DEVICE_DPS_ID_SCOPE")
        registration_id = os.getenv("IOTHUB_DEVICE_DPS_DEVICE_ID")
        symmetric_key = os.getenv("IOTHUB_DEVICE_DPS_DEVICE_KEY")

        registration_result = await provision_device(
            provisioning_host, id_scope, registration_id, symmetric_key, model_id
        )

        if registration_result.status == "assigned":
            print("Device was assigned")
            print(registration_result.registration_state.assigned_hub)
            print(registration_result.registration_state.device_id)
            device_client = IoTHubDeviceClient.create_from_symmetric_key(
                symmetric_key=symmetric_key,
                hostname=registration_result.registration_state.assigned_hub,
                device_id=registration_result.registration_state.device_id,
                product_info=model_id,
            )
        else:
            raise RuntimeError(
                "Could not provision device. Aborting Plug and Play device connection."
            )

    elif switch == "connectionString":
        # ...

    # Connect the client.
    await device_client.connect()

    ################################################
    # Update readable properties from various components

    properties_root = pnp_helper.create_reported_properties(serialNumber=serial_number)
    properties_thermostat1 = pnp_helper.create_reported_properties(
        thermostat_1_component_name, maxTempSinceLastReboot=98.34
    )
    properties_thermostat2 = pnp_helper.create_reported_properties(
        thermostat_2_component_name, maxTempSinceLastReboot=48.92
    )
    properties_device_info = pnp_helper.create_reported_properties(
        device_information_component_name,
        swVersion="5.5",
        manufacturer="Contoso Device Corporation",
        model="Contoso 4762B-turbo",
        osName="Mac Os",
        processorArchitecture="x86-64",
        processorManufacturer="Intel",
        totalStorage=1024,
        totalMemory=32,
    )

    property_updates = asyncio.gather(
        device_client.patch_twin_reported_properties(properties_root),
        device_client.patch_twin_reported_properties(properties_thermostat1),
        device_client.patch_twin_reported_properties(properties_thermostat2),
        device_client.patch_twin_reported_properties(properties_device_info),
    )

    ################################################
    # Get all the listeners running
    print("Listening for command requests and property updates")

    global THERMOSTAT_1
    global THERMOSTAT_2
    THERMOSTAT_1 = Thermostat(thermostat_1_component_name, 10)
    THERMOSTAT_2 = Thermostat(thermostat_2_component_name, 10)

    listeners = asyncio.gather(
        execute_command_listener(
            device_client, method_name="reboot", user_command_handler=reboot_handler
        ),
        execute_command_listener(
            device_client,
            thermostat_1_component_name,
            method_name="getMaxMinReport",
            user_command_handler=max_min_handler,
            create_user_response_handler=create_max_min_report_response,
        ),
        execute_command_listener(
            device_client,
            thermostat_2_component_name,
            method_name="getMaxMinReport",
            user_command_handler=max_min_handler,
            create_user_response_handler=create_max_min_report_response,
        ),
        execute_property_listener(device_client),
    )

    ################################################
    # Function to send telemetry every 8 seconds

    async def send_telemetry():
        print("Sending telemetry from various components")

        while True:
            curr_temp_ext = random.randrange(10, 50)
            THERMOSTAT_1.record(curr_temp_ext)

            temperature_msg1 = {"temperature": curr_temp_ext}
            await send_telemetry_from_temp_controller(
                device_client, temperature_msg1, thermostat_1_component_name
            )

            curr_temp_int = random.randrange(10, 50)  # Current temperature in Celsius
            THERMOSTAT_2.record(curr_temp_int)

            temperature_msg2 = {"temperature": curr_temp_int}

            await send_telemetry_from_temp_controller(
                device_client, temperature_msg2, thermostat_2_component_name
            )

            workingset_msg3 = {"workingSet": random.randrange(1, 100)}
            await send_telemetry_from_temp_controller(device_client, workingset_msg3)

    send_telemetry_task = asyncio.ensure_future(send_telemetry())

    # ...
The provision_device function uses DPS to provision the device and register it with IoT Central. The function includes the device model ID, which IoT Central uses to assign a device to a device template, in the provisioning payload:
async def provision_device(provisioning_host, id_scope, registration_id, symmetric_key, model_id):
    provisioning_device_client = ProvisioningDeviceClient.create_from_symmetric_key(
        provisioning_host=provisioning_host,
        registration_id=registration_id,
        id_scope=id_scope,
        symmetric_key=symmetric_key,
    )

    provisioning_device_client.provisioning_payload = {"modelId": model_id}
    return await provisioning_device_client.register()
The execute_command_listener function handles command requests, runs the max_min_handler function when the device receives the getMaxMinReport command for the thermostat components and the reboot_handler function when the device receives the reboot command. It uses the pnp_helper module to build the response:
async def execute_command_listener(
    device_client,
    component_name=None,
    method_name=None,
    user_command_handler=None,
    create_user_response_handler=None,
):
    while True:
        if component_name and method_name:
            command_name = component_name + "*" + method_name
        elif method_name:
            command_name = method_name
        else:
            command_name = None

        command_request = await device_client.receive_method_request(command_name)
        print("Command request received with payload")
        values = command_request.payload
        print(values)

        if user_command_handler:
            await user_command_handler(values)
        else:
            print("No handler provided to execute")

        (response_status, response_payload) = pnp_helper.create_response_payload_with_status(
            command_request, method_name, create_user_response=create_user_response_handler
        )

        command_response = MethodResponse.create_from_method_request(
            command_request, response_status, response_payload
        )

        try:
            await device_client.send_method_response(command_response)
        except Exception:
            print("responding to the {command} command failed".format(command=method_name))
The async def execute_property_listener handles writable property updates such as targetTemperature for the thermostat components and generates the JSON response. It uses the pnp_helper module to build the response:
async def execute_property_listener(device_client):
    while True:
        patch = await device_client.receive_twin_desired_properties_patch()  # blocking call
        print(patch)
        properties_dict = pnp_helper.create_reported_properties_from_desired(patch)

        await device_client.patch_twin_reported_properties(properties_dict)
The send_telemetry_from_temp_controller function sends the telemetry messages from the thermostat components to IoT Central. It uses the pnp_helper module to build the messages:
async def send_telemetry_from_temp_controller(device_client, telemetry_msg, component_name=None):
    msg = pnp_helper.create_telemetry(telemetry_msg, component_name)
    await device_client.send_message(msg)
    print("Sent message")
    print(msg)
    await asyncio.sleep(5)
Get connection information
When you run the sample device application later in this tutorial, you need the following configuration values:
- ID scope: In your IoT Central application, navigate to Permissions > Device connection groups. Make a note of the ID scope value.
- Group primary key: In your IoT Central application, navigate to Permissions > Device connection groups > SAS-IoT-Devices. Make a note of the shared access signature Primary key value.
Use the Azure Cloud Shell to generate a device key from the group primary key you retrieved:
az extension add --name azure-iot
az iot central device compute-device-key --device-id sample-device-01 --pk <the group primary key value>
Make a note of the generated device key, you use it later in this tutorial.
Note
To run this sample, you don't need to register the device in advance in your IoT Central application. The sample uses the IoT Central capability to automatically register devices when they connect for the first time.
Run the code
To run the sample application, open a command-line environment and navigate to the folder azure-iot-sdk-python-2/samples/pnp folder that contains the temp_controller_with_thermostats.py sample file.
Set the environment variables to configure the sample. The following snippet shows how set the environment variables at the Windows command prompt. If you're using a bash shell, replace the set commands with export commands:
set IOTHUB_DEVICE_SECURITY_TYPE=DPS
set IOTHUB_DEVICE_DPS_ID_SCOPE=<The ID scope you made a note of previously>
set IOTHUB_DEVICE_DPS_DEVICE_ID=sample-device-01
set IOTHUB_DEVICE_DPS_DEVICE_KEY=<The generated device key you made a note of previously>
set IOTHUB_DEVICE_DPS_ENDPOINT=global.azure-devices-provisioning.net
Install the required packages:
pip install azure-iot-device
Run the sample:
python temp_controller_with_thermostats.py
The following output shows the device registering and connecting to IoT Central. The sample sends the maxTempSinceLastReboot properties from the two thermostat components before it starts sending telemetry:
Device was assigned
iotc-60a.....azure-devices.net
sample-device-01
Updating pnp properties for root interface
{'serialNumber': 'alohomora'}
Updating pnp properties for thermostat1
{'thermostat1': {'maxTempSinceLastReboot': 98.34, '__t': 'c'}}
Updating pnp properties for thermostat2
{'thermostat2': {'maxTempSinceLastReboot': 48.92, '__t': 'c'}}
Updating pnp properties for deviceInformation
{'deviceInformation': {'swVersion': '5.5', 'manufacturer': 'Contoso Device Corporation', 'model': 'Contoso 4762B-turbo', 'osName': 'Mac Os', 'processorArchitecture': 'x86-64', 'processorManufacturer': 'Intel', 'totalStorage': 1024, 'totalMemory': 32, '__t': 'c'}}
Listening for command requests and property updates
Press Q to quit
Sending telemetry from various components
Sent message
{"temperature": 27}
Sent message
{"temperature": 17}
Sent message
{"workingSet": 13}
As an operator in your Azure IoT Central application, you can:
View the telemetry sent by the two thermostat components on the Overview page:
View the device properties on the About page. This page shows the properties from the device information component and the two thermostat components:
Customize the device template
As a solution developer, you can customize the device template that IoT Central created automatically when the temperature controller device connected.
To add a cloud property to store the customer name associated with the device:
In your IoT Central application, navigate to the Temperature Controller device template on the Device templates page.
In the Temperature Controller model, select +Add capability.
Enter Customer name as the Display name, select Cloud property as the capability type, expand the entry and choose String as the Schema. Then select Save.
To customize how the Get Max-Min report commands display in your IoT Central application:
Navigate to the Temperature Controller device template on the Device templates page.
For getMaxMinReport (thermostat1), replace Get Max-Min report. with Get thermostat1 status report.
For getMaxMinReport (thermostat2), replace Get Max-Min report. with Get thermostat2 status report.
Select Save.
To customize how the Target Temperature writable properties display in your IoT Central application:
Navigate to the Temperature Controller device template on the Device templates page.
For targetTemperature (thermostat1), replace Target Temperature with Target Temperature (1).
For targetTemperature (thermostat2), replace Target Temperature with Target Temperature (2).
Select Save.
The thermostat components in the Temperature Controller model include the Target Temperature writable property, the device template includes the Customer Name cloud property. Create a view an operator can use to edit these properties:
Select Views and then select the Editing device and cloud data tile.
Enter Properties as the form name.
Select the Target Temperature (1), Target Temperature (2), and Customer Name properties. Then select Add section.
Save your changes.
Publish the device template
Before an operator can see and use the customizations you made, you must publish the device template.
From the Thermostat device template, select Publish. On the Publish this device template to the application panel, select Publish.
An operator can now use the Properties view to update the property values, and call commands called Get thermostat1 status report and Get thermostat2 status report on the device commands page:
Update writable property values on the Properties page:
Call the commands from the Commands page. If you run the status report command, select a date and time for the Since parameter before you run it:
You can see how the device responds to commands and property updates:
{'thermostat1': {'targetTemperature': 67, '__t': 'c'}, '$version': 2}
the data in the desired properties patch was: {'thermostat1': {'targetTemperature': 67, '__t': 'c'}, '$version': 2}
Values received are :-
{'targetTemperature': 67, '__t': 'c'}
Sent message

...

Command request received with payload
2021-03-31T05:00:00.000Z
Will return the max, min and average temperature from the specified time 2021-03-31T05:00:00.000Z to the current time
Done generating
{"avgTemp": 4.0, "endTime": "2021-03-31T12:29:48.322427", "maxTemp": 18, "minTemp": null, "startTime": "2021-03-31T12:28:28.322381"}
View raw data
You can use the Raw data view to examine the raw data your device is sending to IoT Central:

On this view, you can select the columns to display and set a time range to view. The Unmodeled data column shows device data that doesn't match any property or telemetry definitions in the device template.
Clean up resources
If you don't plan to complete any further IoT Central quickstarts or tutorials, you can delete your IoT Central application:
- In your IoT Central application, navigate to Application > Management.
- Select Delete and then confirm your action.
Next steps
If you'd prefer to continue through the set of IoT Central tutorials and learn more about building an IoT Central solution, see:
Feedback
Coming soon: Throughout 2024 we will be phasing out GitHub Issues as the feedback mechanism for content and replacing it with a new feedback system. For more information see: https://aka.ms/ContentUserFeedback.
Submit and view feedback for