Tutorial: Deploy and walk through the water quality monitoring application
Traditional water quality monitoring relies on manual sampling techniques and field laboratory analysis, which is time consuming and costly. Remote water quality monitoring lets you manage water quality issues before citizens are affected. With advanced analytics, water utilities and environmental agencies can act on early warnings of potential water quality issues and plan for water treatment in advance.
The water quality monitoring application template helps you kickstart your IoT solution development and enables water utilities to digitally monitor water quality in smart cities.
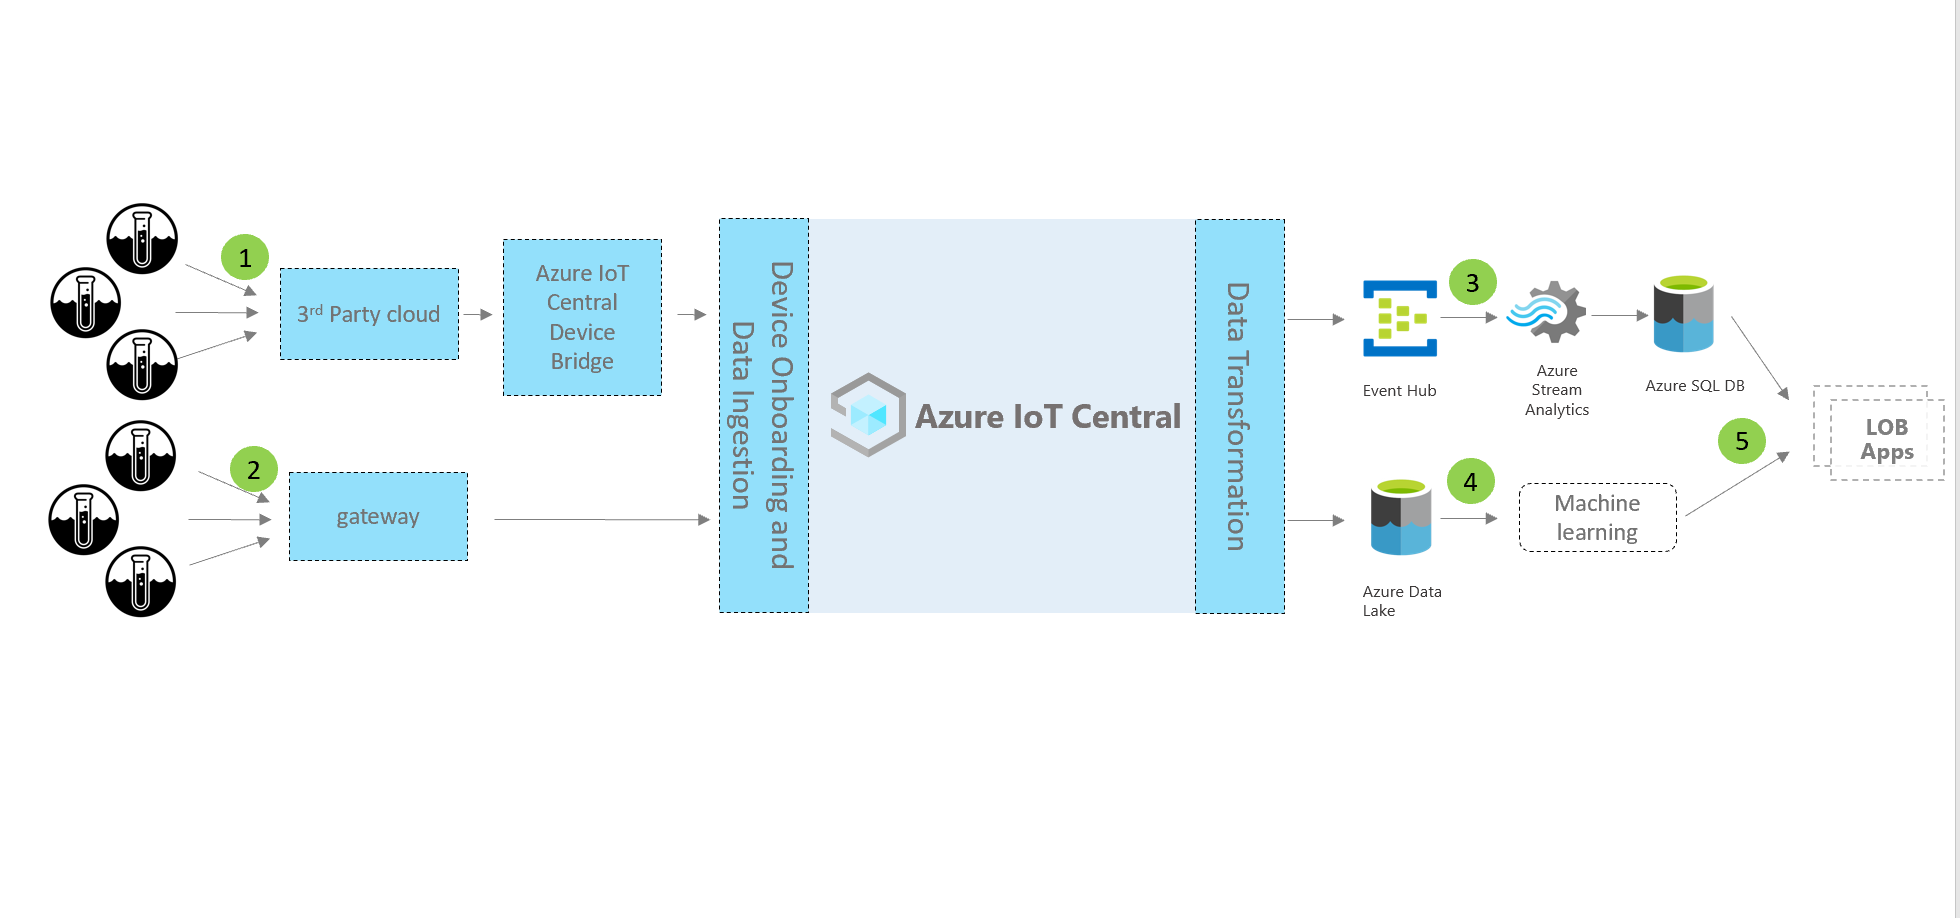
Devices and connectivity (1,2)
Water management solutions use smart water devices such as flow meters, water quality monitors, smart valves, leak detectors.
Devices in smart water solutions may connect through low-power wide area networks (LPWAN) or through a third-party network operator. For these types of devices, use the Azure IoT Central Device Bridge to send your device data to your IoT application in Azure IoT Central. You can also use an IP capable device gateway that connects directly to your IoT Central application.
IoT Central
When you build an IoT solution, Azure IoT Central simplifies the build process and helps to reduce the burden and costs of IoT management, operations, and development. You can brand, customize, and integrate your solution with third-party services.
When you connect your smart water devices to IoT Central, the application provides:
- Device command and control.
- Monitoring and alerting.
- A user interface with built-in role-based access controls.
- Configurable dashboards.
- Extensibility options.
Extensibility and integrations (3,4)
You can extend your IoT application in IoT Central and optionally:
- Transform and integrate your IoT data for advanced analytics through data export from your IoT Central application.
- Automate workflows in other systems by triggering actions using Power Automate or webhooks from IoT Central application.
- Programmatically access your IoT Central application by using the IoT Central REST APIs.
Business applications (5)
You can use IoT data to power various business applications within a water utility. In your IoT Central water consumption monitoring application you can configure rules and actions, and set them to create alerts in Connected Field Service. Configure Power Automate in IoT Central rules to automate workflows across applications and services. Additionally, based on service activities in Connected Field Service, information can be sent back to Azure IoT Central.
In this tutorial, you learn to:
- Use the Water quality monitoring template to create a water quality monitoring application.
- Explore and customize an dashboard.
- Explore a water quality monitoring device template.
- Explore simulated devices.
- Explore and configure rules.
- Configure jobs.
- Customize application branding by using white labeling.
Prerequisites
An active Azure subscription. If you don't have an Azure subscription, create a free account before you begin.
Create water quality monitoring application
To create your IoT Central application:
Navigate to the Create IoT Central Application page in the Azure portal. If prompted, sign in with your Azure account.
Enter the following information:
Field Description Subscription The Azure subscription you want to use. Resource group The resource group you want to use. You can create a new resource group or use an existing one. Resource name A valid Azure resource name. Application URL The URL subdomain for your application. The URL for an IoT Central application looks like https://yoursubdomain.azureiotcentral.com.Template Water Consumption Monitoring Region The Azure region you want to use. Pricing plan The pricing plan you want to use. Select Review + create. Then select Create.
When the app is ready, you can navigate to it from the Azure portal:
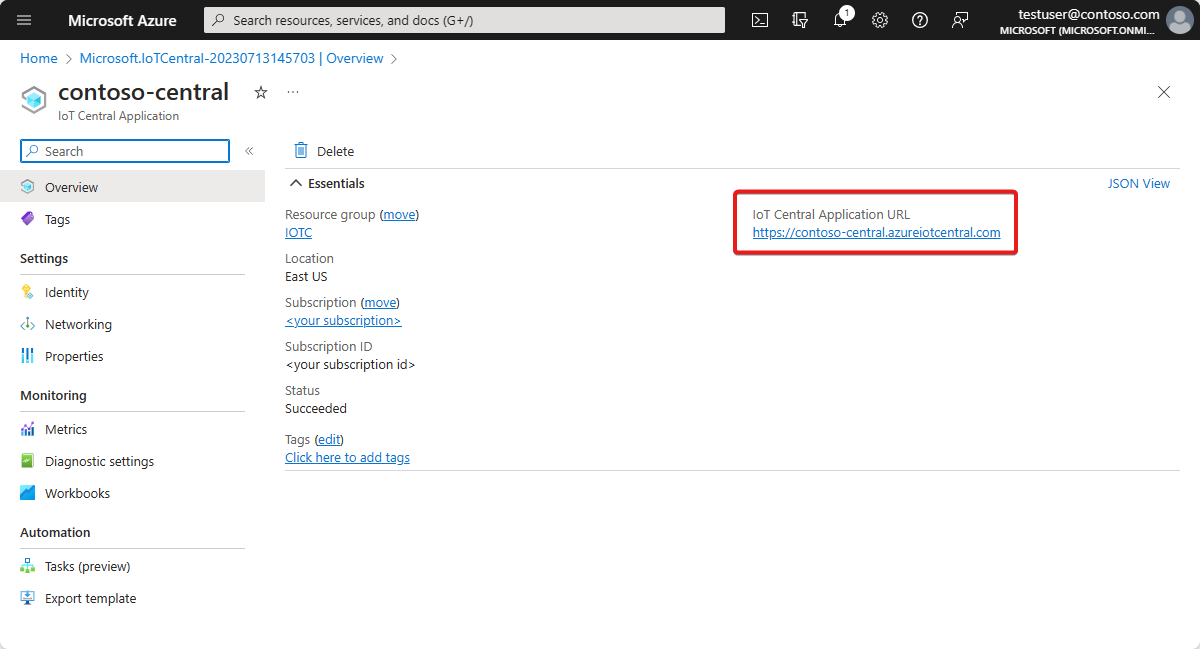
To learn more, see Create an Azure IoT Central application.
Walk through the application
The following sections walk you through the key features of the application:
Dashboard
After you create the application, the Wide World water quality dashboard pane opens.

As a builder, you can create and customize views on the dashboard for use by operators. Explore the provided dashboard before you start on any customization.
All data shown in the dashboard is based on simulated device data, which is discussed in the next section.
The dashboard includes the following types of tiles:
Wide World water utility image tile: The first tile in the upper-left corner of the dashboard is an image that shows the fictitious utility named Wide World. You can customize the tile to use your own image, or you can remove the tile.
Average pH KPI tiles: KPI tiles like Average pH in the last 30 minutes are at the top of the dashboard pane. You can customize KPI tiles and set each to a different type and time range.
Water monitoring area map: Azure IoT Central uses Azure Maps, which you can directly set in your application to show device location. You can also map location information from your application to your device and then use Azure Maps to show the information on a map. Hover over the map and try the controls.
Average pH distribution heat-map chart: You can select different visualizations to show device telemetry in the way that is most appropriate for your application.
Critical quality indicators line chart: You can visualize device telemetry plotted as a line chart over a time range.
Concentration of chemical agents bar chart: You can visualize device telemetry in a bar chart.
Reset sensors parameters tile: The dashboard includes a tile for actions that an operator can initiate directly from the monitoring dashboard such as resetting a device's properties.
Property list tiles: The dashboard has multiple property tiles that represent threshold information, device health information, and maintenance information.
Customize the dashboard
As a builder, you can customize the dashboards for use by operators:
Select Edit to customize the Wide World water quality dashboard pane. You can customize the dashboard by selecting commands on the Edit menu. After the dashboard is in edit mode, you can add new tiles, or you can configure the existing files.
Select + New to create a new dashboard that you can configure. You can have multiple dashboards and can navigate among them from the dashboard menu.
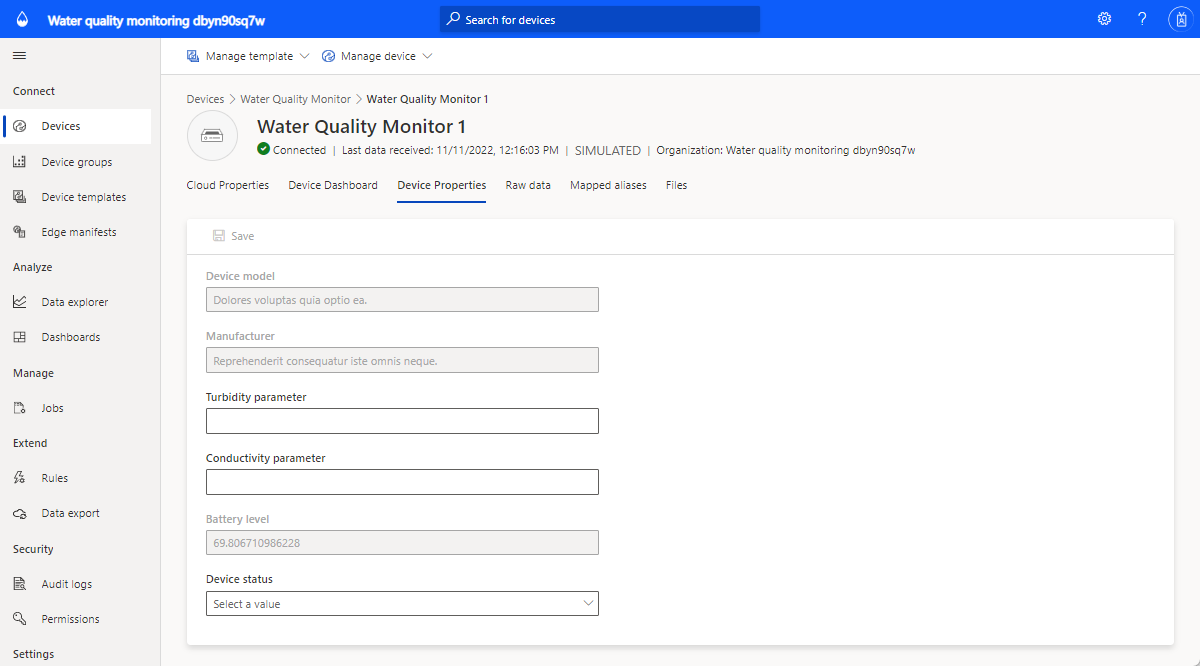
Explore a water quality monitoring device template
A device template in Azure IoT Central defines the capabilities of a device. Available capabilities are telemetry, properties, and commands. As a builder, you can define device templates in Azure IoT Central that represent the capabilities of the connected devices. You can also create simulated devices to test your device template and application.
The water quality monitoring application you created comes with a water quality monitoring device template.
To view the device template:
- Select Device templates on the leftmost pane of your application in Azure IoT Central.
- From the list of device templates, select Water Quality Monitor to open that device template.

Customize the device template
Practice customizing the following device template settings:
- Navigate to the Water Quality Monitor device template.
- Go to the Temperature telemetry type.
- Change the Display name value to Reported temperature.
- Change the unit of measurement, or set Min value and Max value.
- Select Save.
Add a cloud property
- Navigate to the Water Quality Monitor device template, and select + Add capability.
- In Azure IoT Central, you can add a property that is relevant to a device but that doesn't come from the device. One example of such a property is an alert threshold specific to installation area, asset information, or maintenance information.
- Enter Installation area as the Display name, select Cloud property as the Capability type and choose String as the Schema.
- Select Save.
Explore views
The water quality monitoring device template comes with predefined views. The views define how operators see the device data and set cloud properties. Explore the views and practice making changes.
Publish the device template
If you make any changes, be sure to select Publish to publish the device template.
Create a new device template
- On the Device templates page, select + New to create a new device template and follow the creation process.
- Create a custom device template or choose a device template from the device catalog.
Explore simulated devices
The water quality monitoring application you created from the application template has two simulated devices. These devices map to the water quality monitoring device template.
View the devices
Select Devices on the leftmost pane of your application.
Select a simulated device.
On the Cloud Properties tab, change the Acidity (pH) threshold value to 9 and select Save.
Explore the Device Properties tab and the Device Dashboard tab.

Note
All tabs have been configured from Device template views.
Add new devices
- On the Devices tab, select + New to add a new device.
- Use the suggested Device ID or enter your own. You can also enter a Device name for your new device.
- Select Water Quality Monitor as the Device template.
- Make sure the Simulate this device is set to Yes if you want to create a simulated device.
- Select Create.
Explore and configure rules
In Azure IoT Central, you can create rules that automatically monitor device telemetry. These rules trigger an action when any of their conditions are met. One possible action is to send email notifications. Other possibilities include a Power Automate action or a webhook action to send data to other services.
The water quality monitoring application you created has two preconfigured rules.
View rules
Select Rules on the leftmost pane of your application.
Select High pH alert, which is one of the preconfigured rules in the application.
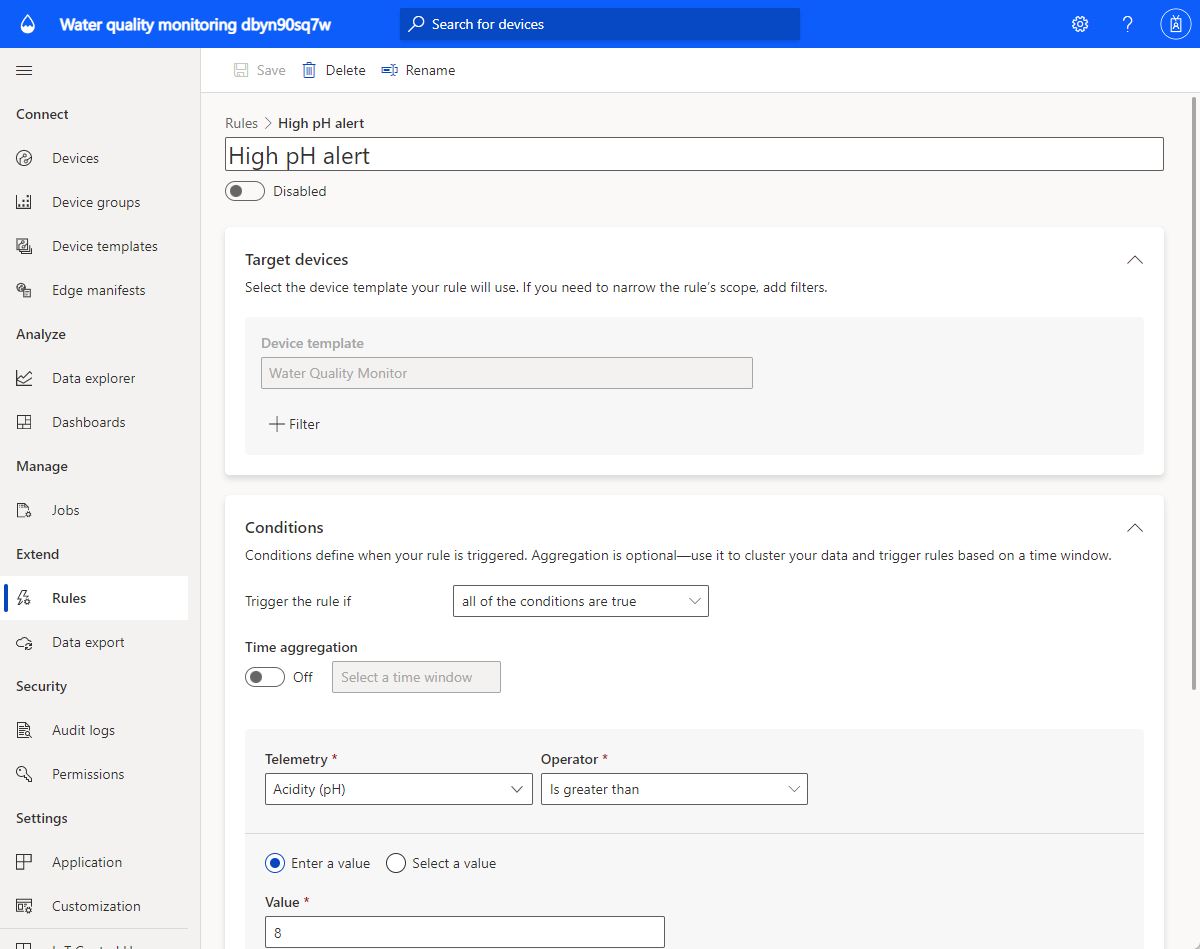
The High pH alert rule is configured to check the condition of acidity (pH) being greater than 8.

Next, add an email action to the rule:
- Select + Email.
- In the Display name box, enter High pH alert.
- In the To box, enter the email address associated with your Azure IoT Central account.
- Optionally, enter a note to include in the text of the email.
- Select Done to complete the action.
- Set the rule to Enabled and select Save.
Within a few minutes, you should receive email when the configured condition is met.
Note
The application sends email each time a condition is met. Select Disable for a rule to stop receiving automated email from that rule.
To create a new rule, select Rules on the leftmost pane of your application and then select +New.
Configure jobs
With Azure IoT Central jobs, you can trigger updates to device or cloud properties on multiple devices. You can also use jobs to trigger device commands on multiple devices. Azure IoT Central automates the workflow for you.
- Select Jobs on the leftmost pane of your application.
- Select +New job and configure one or more jobs.
Customize your application
As an administrator, you can change settings to customize the user experience in your application.
Select Customization > Appearance, and then:
- To set the masthead logo image, select Change.
- To set the browser icon image that appears on browser tabs, select Change.
- Under Browser colors, you can replace the default browser colors by adding HTML hexadecimal color codes. For more information about color notation for HEX values, see the W3Schools HTML Colors tutorial.
You can change the application image on the Application > Management page.
Clean up resources
If you don't plan to continue using this application, you can delete it:
- In your Azure IoT Central application, go to Application > Management.
- Select Delete, and then confirm your action.
Feedback
Coming soon: Throughout 2024 we will be phasing out GitHub Issues as the feedback mechanism for content and replacing it with a new feedback system. For more information see: https://aka.ms/ContentUserFeedback.
Submit and view feedback for