Create and provision an IoT Edge device on Windows using symmetric keys
Applies to: ![]() IoT Edge 1.1
IoT Edge 1.1
Important
IoT Edge 1.1 end of support date was December 13, 2022. Check the Microsoft Product Lifecycle for information about how this product, service, technology, or API is supported. For more information about updating to the latest version of IoT Edge, see Update IoT Edge.
This article provides end-to-end instructions for registering and provisioning a Windows IoT Edge device.
Note
Azure IoT Edge with Windows containers will not be supported starting with version 1.2 of Azure IoT Edge.
Consider using the new method for running IoT Edge on Windows devices, Azure IoT Edge for Linux on Windows.
If you want to use Azure IoT Edge for Linux on Windows, you can follow the steps in the equivalent how-to guide.
Every device that connects to an IoT hub has a device ID that's used to track cloud-to-device or device-to-cloud communications. You configure a device with its connection information, which includes the IoT hub hostname, the device ID, and the information the device uses to authenticate to IoT Hub.
The steps in this article walk through a process called manual provisioning, where you connect a single device to its IoT hub. For manual provisioning, you have two options for authenticating IoT Edge devices:
Symmetric keys: When you create a new device identity in IoT Hub, the service creates two keys. You place one of the keys on the device, and it presents the key to IoT Hub when authenticating.
This authentication method is faster to get started, but not as secure.
X.509 self-signed: You create two X.509 identity certificates and place them on the device. When you create a new device identity in IoT Hub, you provide thumbprints from both certificates. When the device authenticates to IoT Hub, it presents one certificate and IoT Hub verifies that the certificate matches its thumbprint.
This authentication method is more secure and recommended for production scenarios.
This article covers using symmetric keys as your authentication method. If you want to use X.509 certificates, see Create and provision an IoT Edge device on Windows using X.509 certificates.
Note
If you have many devices to set up and don't want to manually provision each one, use one of the following articles to learn how IoT Edge works with the IoT Hub device provisioning service:
Prerequisites
This article covers registering your IoT Edge device and installing IoT Edge on it. These tasks have different prerequisites and utilities used to accomplish them. Make sure you have all the prerequisites covered before proceeding.
Device management tools
You can use the Azure portal, Visual Studio Code, or Azure CLI for the steps to register your device. Each utility has its own prerequisites:
A free or standard IoT hub in your Azure subscription.
Device requirements
A Windows device.
IoT Edge with Windows containers requires Windows version 1809/build 17763, which is the latest Windows long term support build. Be sure to review the supported systems list for a list of supported SKUs.
Note that the Windows versions on both the container and host must match. For more information, see Could not start module due to OS mismatch.
Register your device
You can use the Azure portal, Visual Studio Code, or Azure CLI to register your device, depending on your preference.
In your IoT hub in the Azure portal, IoT Edge devices are created and managed separately from IoT devices that are not edge enabled.
Sign in to the Azure portal and navigate to your IoT hub.
In the left pane, select Devices from the menu, then select Add Device.
On the Create a device page, provide the following information:
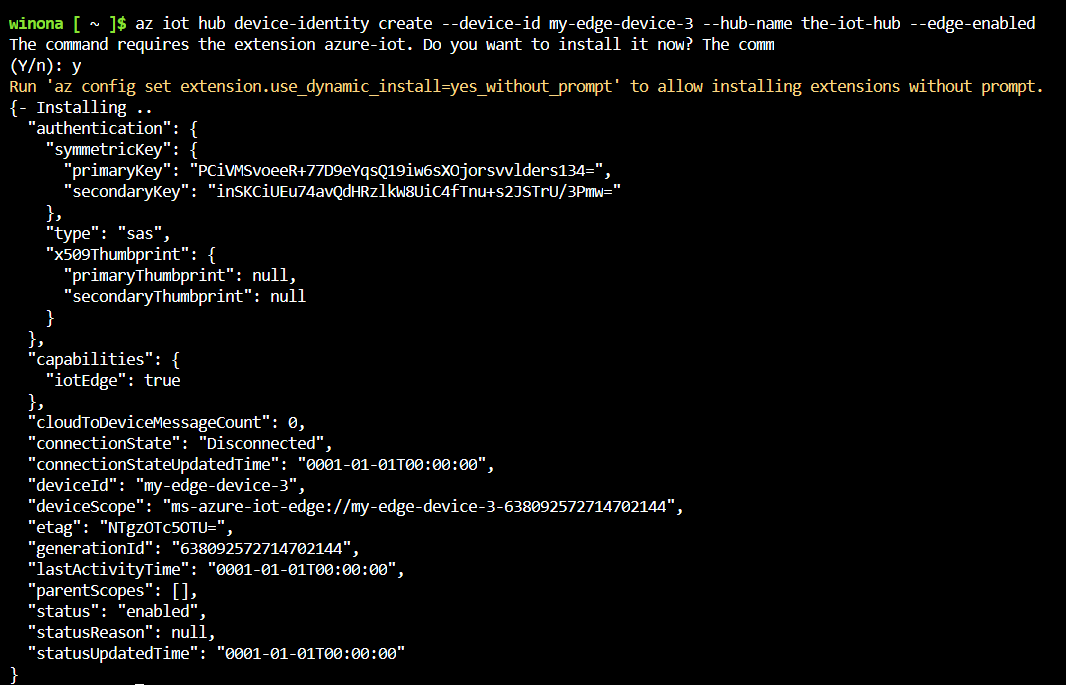
- Create a descriptive device ID. Make a note of this device ID, as you'll use it later.
- Check the IoT Edge Device checkbox.
- Select Symmetric key as the authentication type.
- Use the default settings to auto-generate authentication keys and connect the new device to your hub.
Select Save.

Now that you have a device registered in IoT Hub, retrieve the information that you use to complete installation and provisioning of the IoT Edge runtime.
View registered devices and retrieve provisioning information
Devices that use symmetric key authentication need their connection strings to complete installation and provisioning of the IoT Edge runtime.
The edge-enabled devices that connect to your IoT hub are listed on the Devices page. You can filter the list by type Iot Edge Device.
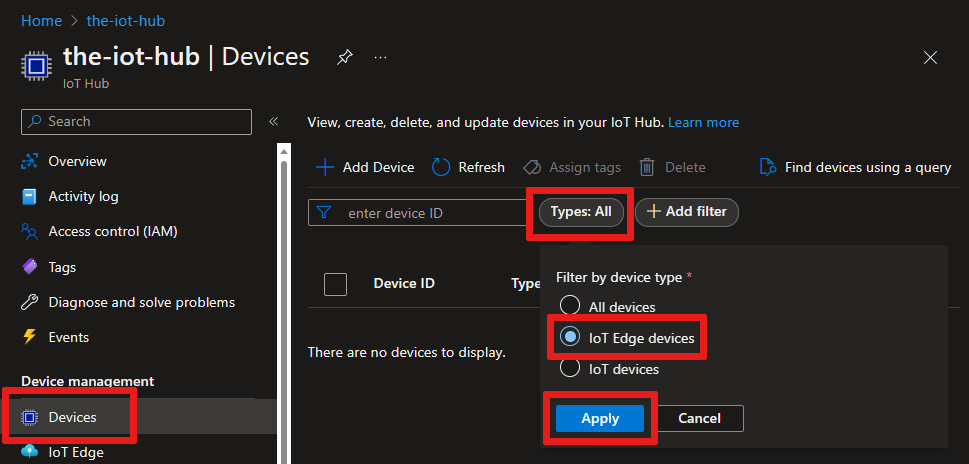
When you're ready to set up your device, you need the connection string that links your physical device with its identity in the IoT hub.
Devices that authenticate with symmetric keys have their connection strings available to copy in the portal.
- From the Devices page in the portal, select the IoT Edge device ID from the list.
- Copy the value of either Primary Connection String or Secondary Connection String.

Install IoT Edge
In this section, you prepare your Windows VM or physical device for IoT Edge. Then, you install IoT Edge.
Azure IoT Edge relies on an OCI-compatible container runtime. Moby, a Moby-based engine, is included in the installation script, which means there are no additional steps to install the engine.
To install the IoT Edge runtime:
Run PowerShell as an administrator.
Use an AMD64 session of PowerShell, not PowerShell(x86). If you're unsure which session type you're using, run the following command:
(Get-Process -Id $PID).StartInfo.EnvironmentVariables["PROCESSOR_ARCHITECTURE"]Run the Deploy-IoTEdge command, which performs the following tasks:
- Checks that your Windows machine is on a supported version
- Turns on the containers feature
- Downloads the moby engine and the IoT Edge runtime
. {Invoke-WebRequest -useb https://aka.ms/iotedge-win} | Invoke-Expression; `
Deploy-IoTEdge
Restart your device if prompted.
When you install IoT Edge on a device, you can use additional parameters to modify the process including:
- Direct traffic to go through a proxy server
- Point the installer to a local directory for offline installation
For more information about these additional parameters, see PowerShell scripts for IoT Edge with Windows containers.
Provision the device with its cloud identity
Now that the container engine and the IoT Edge runtime are installed on your device, you're ready for the next step, which is to set up the device with its cloud identity and authentication information.
On the IoT Edge device, run PowerShell as an administrator.
Use the Initialize-IoTEdge command to configure the IoT Edge runtime on your machine. The command defaults to manual provisioning with Windows containers.
. {Invoke-WebRequest -useb https://aka.ms/iotedge-win} | Invoke-Expression; `
Initialize-IoTEdge -ManualConnectionString -ContainerOs Windows
If you downloaded the IoTEdgeSecurityDaemon.ps1 script onto your device for offline or specific version installation, be sure to reference the local copy of the script.
. <path>/IoTEdgeSecurityDaemon.ps1
Initialize-IoTEdge -ManualConnectionString -ContainerOs Windows
When prompted, provide the device connection string that you retrieved in the previous section. The device connection string associates the physical device with a device ID in IoT Hub and provides authentication information.
The device connection string takes the following format, and should not include quotation marks:
HostName={IoT_hub_name}.azure-devices.net;DeviceId={device_name};SharedAccessKey={key}
When you provision a device manually, you can use additional parameters to modify the process including:
- Direct traffic to go through a proxy server
- Declare a specific edgeAgent container image, and provide credentials if it's in a private registry
For more information about these additional parameters, see PowerShell scripts for IoT Edge with Windows containers.
Verify successful configuration
Verify that the runtime was successfully installed and configured on your IoT Edge device.
Check the status of the IoT Edge service.
Get-Service iotedge
Examine service logs.
. {Invoke-WebRequest -useb aka.ms/iotedge-win} | Invoke-Expression; Get-IoTEdgeLog
List running modules.
iotedge list
Offline or specific version installation (optional)
The steps in this section are for scenarios not covered by the standard installation steps. This may include:
- Install IoT Edge while offline
- Install a release candidate version
- Install a version other than the latest
During installation three files are downloaded:
- A PowerShell script, which contains the installation instructions
- Microsoft Azure IoT Edge cab, which contains the IoT Edge security daemon (iotedged), Moby container engine, and Moby CLI
- Visual C++ redistributable package (VC runtime) installer
If your device will be offline during installation, or if you want to install a specific version of IoT Edge, you can download these files ahead of time to the device. When it's time to install, point the installation script at the directory that contains the downloaded files. The installer checks that directory first, and then only downloads components that aren't found. If all the files are available offline, you can install with no internet connection.
For the latest IoT Edge installation files along with previous versions, see Azure IoT Edge releases.
Find the version that you want to install, and download the following files from the Assets section of the release notes onto your IoT device:
- IoTEdgeSecurityDaemon.ps1
- Microsoft-Azure-IoTEdge-amd64.cab from 1.1 release channel.
It's important to use the PowerShell script from the same release as the .cab file that you use because the functionality changes to support the features in each release.
If the .cab file you downloaded has an architecture suffix on it, rename the file to just Microsoft-Azure-IoTEdge.cab.
Optionally, download an installer for Visual C++ redistributable. For example, the PowerShell script uses this version: vc_redist.x64.exe. Save the installer in the same folder on your IoT device as the IoT Edge files.
To install with offline components, dot source the local copy of the PowerShell script.
Run the Deploy-IoTEdge command with the
-OfflineInstallationPathparameter. Provide the absolute path to the file directory. For example,. path_to_powershell_module_here\IoTEdgeSecurityDaemon.ps1 Deploy-IoTEdge -OfflineInstallationPath path_to_file_directory_hereThe deployment command will use any components found in the local file directory provided. If either the .cab file or the Visual C++ installer is missing, it will attempt to download them.
Uninstall IoT Edge
If you want to remove the IoT Edge installation from your Windows device, use the Uninstall-IoTEdge command from an administrative PowerShell window. This command removes the IoT Edge runtime, along with your existing configuration and the Moby engine data.
. {Invoke-WebRequest -useb aka.ms/iotedge-win} | Invoke-Expression; `
Uninstall-IoTEdge
For more information about uninstallation options, use the command Get-Help Uninstall-IoTEdge -full.
Next steps
Continue to deploy IoT Edge modules to learn how to deploy modules onto your device.