Tutorial: Connect an IoT Plug and Play multiple component device applications running on Linux or Windows to IoT Hub
This tutorial shows you how to build a sample IoT Plug and Play device application with components, connect it to your IoT hub, and use the Azure IoT explorer tool to view the information it sends to the hub. The sample application is written in C and is included in the Azure IoT device SDK for C. A solution builder can use the Azure IoT explorer tool to understand the capabilities of an IoT Plug and Play device without the need to view any device code.

In this tutorial, you:
- Download the sample code.
- Build the sample code.
- Run the sample device application and validate that it connects to your IoT hub.
- Review the source code.
Prerequisites
Before you continue, make sure you've set up your environment, including your IoT hub.
You can complete this tutorial on Linux or Windows. The shell commands in this tutorial follow the Linux convention for path separators '/', if you're following along on Windows be sure to swap these separators for '\'.
The prerequisites differ by operating system:
Linux
This tutorial assumes you're using Ubuntu Linux. The steps in this tutorial were tested using Ubuntu 18.04.
To complete this tutorial on Linux, install the following software on your local Linux environment:
Install GCC, Git, cmake, and all the required dependencies using the apt-get command:
sudo apt-get update
sudo apt-get install -y git cmake build-essential curl libcurl4-openssl-dev libssl-dev uuid-dev
Verify the version of cmake is above 2.8.12 and the version of GCC is above 4.4.7.
cmake --version
gcc --version
Windows
To complete this tutorial on Windows, install the following software on your local Windows environment:
- Visual Studio (Community, Professional, or Enterprise) - make sure you include the Desktop Development with C++ workload when you install Visual Studio.
- Git.
- CMake.
Download the code
If you completed the Tutorial: Connect a sample IoT Plug and Play device application running on Linux or Windows to IoT Hub (C) you've already downloaded the code.
In this tutorial, you prepare a development environment you can use to clone and build the Azure IoT Hub Device C SDK.
Open a command prompt in a folder of your choice. Execute the following command to clone the Azure IoT C SDKs and Libraries GitHub repository into this location:
git clone https://github.com/Azure/azure-iot-sdk-c.git
cd azure-iot-sdk-c
git submodule update --init
Expect this operation to take several minutes to complete.
Build and run the code
You can build and run the code using Visual Studio or cmake at the command line.
Use Visual Studio
Open the root folder of the cloned repository. After a couple of seconds, the CMake support in Visual Studio creates all you need to run and debug the project.
When Visual Studio is ready, in Solution Explorer, navigate to the sample iothub_client/samples/pnp/pnp_temperature_controller/.
Right-click on the pnp_temperature_controller.c file and select Add Debug Configuration. Select Default.
Visual Studio opens the launch.vs.json file. Edit this file as shown in the following snippet to set the required environment variables. You made a note of the scope ID and enrollment primary key when you completed Set up your environment for the IoT Plug and Play quickstarts and tutorials:
{
  "version": "0.2.1",
  "defaults": {},
  "configurations": [
    {
      "type": "default",
      "project": "iothub_client\\samples\\pnp\\pnp_temperature_controller\\pnp_temperature_controller.c",
      "projectTarget": "",
      "name": "pnp_temperature_controller.c",
      "env": {
        "IOTHUB_DEVICE_SECURITY_TYPE": "DPS",
        "IOTHUB_DEVICE_DPS_ID_SCOPE": "<Your ID scope>",
        "IOTHUB_DEVICE_DPS_DEVICE_ID": "my-pnp-device",
        "IOTHUB_DEVICE_DPS_DEVICE_KEY": "<Your enrollment primary key>"
      }
    }
  ]
}
Right-click on the pnp_temperature_controller.c file and select Set as Startup Item.
To trace the code execution in Visual Studio, add a breakpoint to the
mainfunction in the pnp_temperature_controller.c file.You can now run and debug the sample from the Debug menu.
The device is now ready to receive commands and property updates, and has started sending telemetry data to the hub. Keep the sample running as you complete the next steps.
Use cmake at the command line
To build the sample:
Create a cmake subfolder in the root folder of the cloned device SDK, and navigate to that folder:
cd azure-iot-sdk-c
mkdir cmake
cd cmake
Run the following commands to generate and build the project files for SDK and samples:
cmake ..
cmake --build .
In Set up your environment, you created four environment variables to configure the sample to use the Device Provisioning Service (DPS) to connect to your IoT hub:
- IOTHUB_DEVICE_SECURITY_TYPE with the value
DPS - IOTHUB_DEVICE_DPS_ID_SCOPE with the DPS ID scope.
- IOTHUB_DEVICE_DPS_DEVICE_ID with the value
my-pnp-device. - IOTHUB_DEVICE_DPS_DEVICE_KEY with the enrollment primary key.
- IOTHUB_DEVICE_DPS_ENDPOINT with the value
global.azure-devices-provisioning.net.
To learn more about the sample configuration, see the sample readme.
To run the sample:
From the cmake folder, navigate to the folder that contains the executable file and run it:
# Bash
cd iothub_client/samples/pnp/pnp_temperature_controller
./pnp_temperature_controller
REM Windows cd iothub_client\samples\pnp\pnp_temperature_controller\Debug pnp_temperature_controller.exe
The device is now ready to receive commands and property updates, and has started sending telemetry data to the hub. Keep the sample running as you complete the next steps.
Use the Azure IoT explorer to validate the code
After the device client sample starts, use the Azure IoT explorer tool to verify it's working.
Open Azure IoT explorer.
On the IoT hubs page, if you haven't already added a connection to your IoT hub, select + Add connection. Enter the connection string for the IoT hub you created previously and select Save.
On the IoT Plug and Play Settings page, select + Add > Local folder and select the local models folder where you saved your model files.
On the IoT hubs page, click on the name of the hub you want to work with. You see a list of devices registered to the IoT hub.
Click on the Device ID of the device you created previously.
The menu on the left shows the different types of information available for the device.
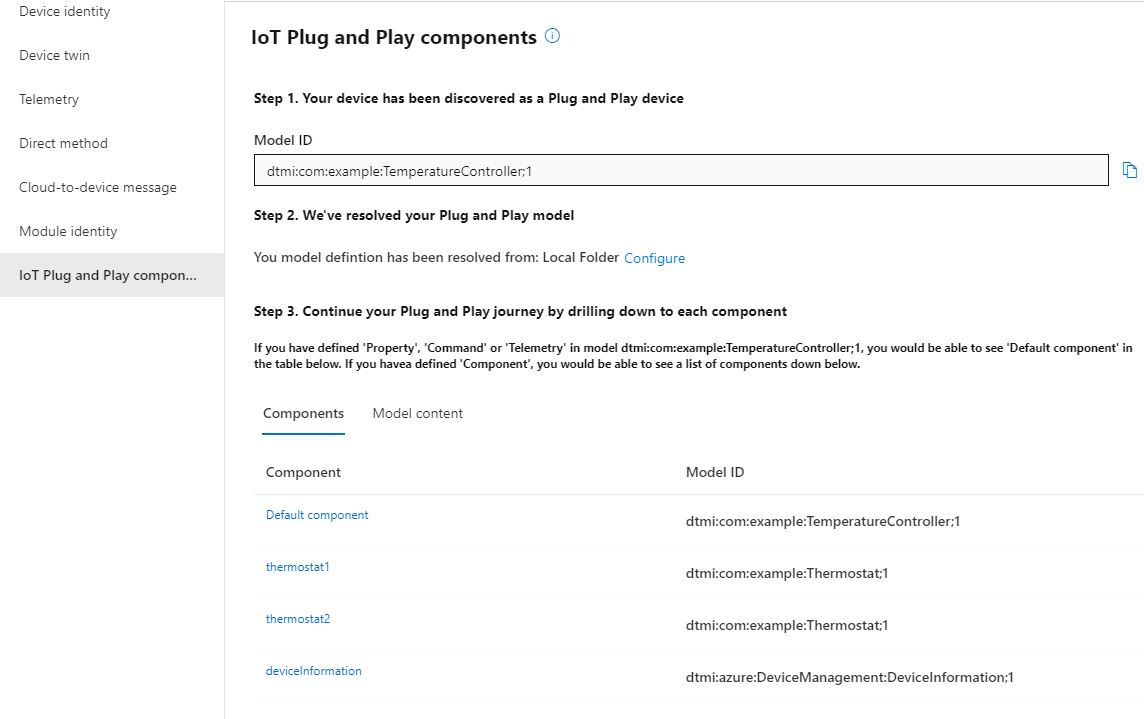
Select IoT Plug and Play components to view the model information for your device.
You can view the different components of the device. The default component and any extra ones. Select a component to work with.
Select the Telemetry page and then select Start to view the telemetry data the device is sending for this component.
Select the Properties (read-only) page to view the read-only properties reported for this component.
Select the Properties (writable) page to view the writable properties you can update for this component.
Select a property by it's name, enter a new value for it, and select Update desired value.
To see the new value show up select the Refresh button.
Select the Commands page to view all the commands for this component.
Select the command you want to test set the parameter if any. Select Send command to call the command on the device. You can see your device respond to the command in the command prompt window where the sample code is running.
Review the code
This sample implements an IoT Plug and Play temperature controller device. This sample implements a model with multiple components. The Digital Twins Definition Language (DTDL) V2 model file for the temperature device defines the telemetry, properties, and commands the device implements.
IoT Plug and Play helper functions
For this sample, the code uses some helper functions from the /common folder:
pnp_device_client_ll contains the connect method for IoT Plug and Play with the model-id included as a parameter: PnP_CreateDeviceClientLLHandle.
pnp_protocol: contains the IoT Plug and Play helper functions:
PnP_CreateReportedPropertyPnP_CreateReportedPropertyWithStatusPnP_ParseCommandNamePnP_CreateTelemetryMessageHandlePnP_ProcessTwinDataPnP_CopyPayloadToStringPnP_CreateDeviceClientLLHandle_ViaDps
These helper functions are generic enough to use in your own project. This sample uses them in the three files that correspond to each component in the model:
- pnp_deviceinfo_component
- pnp_temperature_controller
- pnp_thermostat_component
For example, in the pnp_deviceinfo_component file, the SendReportedPropertyForDeviceInformation function uses two of the helper functions:
if ((jsonToSend = PnP_CreateReportedProperty(componentName, propertyName, propertyValue)) == NULL)
{
    LogError("Unable to build reported property response for propertyName=%s, propertyValue=%s", propertyName, propertyValue);
}
else
{
    const char* jsonToSendStr = STRING_c_str(jsonToSend);
    size_t jsonToSendStrLen = strlen(jsonToSendStr);

    if ((iothubClientResult = IoTHubDeviceClient_LL_SendReportedState(deviceClientLL, (const unsigned char*)jsonToSendStr, jsonToSendStrLen, NULL, NULL)) != IOTHUB_CLIENT_OK)
    {
        LogError("Unable to send reported state for property=%s, error=%d", propertyName, iothubClientResult);
    }
    else
    {
        LogInfo("Sending device information property to IoTHub.  propertyName=%s, propertyValue=%s", propertyName, propertyValue);
    }
}
Each component in the sample follows this pattern.
Code flow
The main function initializes the connection and sends the model ID:
deviceClient = CreateDeviceClientAndAllocateComponents();
The code uses PnP_CreateDeviceClientLLHandle to connect to the IoT hub, set modelId as an option, and set up the device method and device twin callback handlers for direct methods and device twin updates:
g_pnpDeviceConfiguration.deviceMethodCallback = PnP_TempControlComponent_DeviceMethodCallback;
g_pnpDeviceConfiguration.deviceTwinCallback = PnP_TempControlComponent_DeviceTwinCallback;
g_pnpDeviceConfiguration.modelId = g_temperatureControllerModelId;
...

deviceClient = PnP_CreateDeviceClientLLHandle(&g_pnpDeviceConfiguration);
&g_pnpDeviceConfiguration also contains the connection information. The environment variable IOTHUB_DEVICE_SECURITY_TYPE determines whether the sample uses a connection string or the device provisioning service to connect to the IoT hub.
When the device sends a model ID, it becomes an IoT Plug and Play device.
With the callback handlers in place, the device reacts to twin updates and direct method calls:
For the device twin callback, the
PnP_TempControlComponent_DeviceTwinCallbackcalls thePnP_ProcessTwinDatafunction to process the data.PnP_ProcessTwinDatauses the visitor pattern to parse the JSON and then visit each property, callingPnP_TempControlComponent_ApplicationPropertyCallbackon each element.For the commands callback, the
PnP_TempControlComponent_DeviceMethodCallbackfunction uses the helper function to parse the command and component names:PnP_ParseCommandName(methodName, &componentName, &componentNameSize, &pnpCommandName);The
PnP_TempControlComponent_DeviceMethodCallbackfunction then calls the command on the component:LogInfo("Received PnP command for component=%.*s, command=%s", (int)componentNameSize, componentName, pnpCommandName); if (strncmp((const char*)componentName, g_thermostatComponent1Name, g_thermostatComponent1Size) == 0) { result = PnP_ThermostatComponent_ProcessCommand(g_thermostatHandle1, pnpCommandName, rootValue, response, responseSize); } else if (strncmp((const char*)componentName, g_thermostatComponent2Name, g_thermostatComponent2Size) == 0) { result = PnP_ThermostatComponent_ProcessCommand(g_thermostatHandle2, pnpCommandName, rootValue, response, responseSize); } else { LogError("PnP component=%.*s is not supported by TemperatureController", (int)componentNameSize, componentName); result = PNP_STATUS_NOT_FOUND; }
The main function initializes the read-only properties sent to the IoT hub:
PnP_TempControlComponent_ReportSerialNumber_Property(deviceClient);
PnP_DeviceInfoComponent_Report_All_Properties(g_deviceInfoComponentName, deviceClient);
PnP_TempControlComponent_Report_MaxTempSinceLastReboot_Property(g_thermostatHandle1, deviceClient);
PnP_TempControlComponent_Report_MaxTempSinceLastReboot_Property(g_thermostatHandle2, deviceClient);
The main function enters a loop to update event and telemetry data for each component:
while (true)
{
    PnP_TempControlComponent_SendWorkingSet(deviceClient);
    PnP_ThermostatComponent_SendTelemetry(g_thermostatHandle1, deviceClient);
    PnP_ThermostatComponent_SendTelemetry(g_thermostatHandle2, deviceClient);
}
The PnP_ThermostatComponent_SendTelemetry function shows you how to use the PNP_THERMOSTAT_COMPONENT struct. The sample uses this struct to store information about the two thermostats in the temperature controller. The code uses the PnP_CreateTelemetryMessageHandle function to prepare the message and send it:
messageHandle = PnP_CreateTelemetryMessageHandle(pnpThermostatComponent->componentName, temperatureStringBuffer);
...
iothubResult = IoTHubDeviceClient_LL_SendEventAsync(deviceClientLL, messageHandle, NULL, NULL);
The main function finally destroys the different components and closes the connection to the hub.
This tutorial shows you how to build a sample IoT Plug and Play device application with components, connect it to your IoT hub, and use the Azure IoT explorer tool to view the information it sends to the hub. The sample application is written in C# and is included in the Azure IoT device SDK for C#. A solution builder can use the Azure IoT explorer tool to understand the capabilities of an IoT Plug and Play device without the need to view any device code.
In this tutorial, you:
- Download the sample code.
- Build the sample code.
- Run the sample device application and validate that it connects to your IoT hub.
- Review the source code.
Prerequisites
Before you continue, make sure you've set up your environment, including your IoT hub.
You can run this tutorial on Linux or Windows. The shell commands in this tutorial follow the Linux convention for path separators '/', if you're following along on Windows be sure to swap these separators for '\'.
Clone the SDK repository with the sample code
If you completed Tutorial: Connect a sample IoT Plug and Play device application running on Windows to IoT Hub (C#), you've already cloned the repository.
Clone the samples from the Azure IoT Samples for C# GitHub repository. Open a command prompt in a folder of your choice. Run the following command to clone the Microsoft Azure IoT SDK for .NET GitHub repository:
git clone https://github.com/Azure/azure-iot-sdk-csharp.git
Build the code
You can now build the sample and run it. Run the following commands to build the sample:
cd azure-iot-sdk-csharp/iothub/device/samples/solutions/PnpDeviceSamples/TemperatureController
dotnet build
Run the device sample
To run the sample, run the following command:
dotnet run
The device is now ready to receive commands and property updates, and has started sending telemetry data to the hub. Keep the sample running as you complete the next steps.
Use Azure IoT explorer to validate the code
After the device client sample starts, use the Azure IoT explorer tool to verify it's working.
Open Azure IoT explorer.
On the IoT hubs page, if you haven't already added a connection to your IoT hub, select + Add connection. Enter the connection string for the IoT hub you created previously and select Save.
On the IoT Plug and Play Settings page, select + Add > Local folder and select the local models folder where you saved your model files.
On the IoT hubs page, click on the name of the hub you want to work with. You see a list of devices registered to the IoT hub.
Click on the Device ID of the device you created previously.
The menu on the left shows the different types of information available for the device.
Select IoT Plug and Play components to view the model information for your device.
You can view the different components of the device. The default component and any extra ones. Select a component to work with.
Select the Telemetry page and then select Start to view the telemetry data the device is sending for this component.
Select the Properties (read-only) page to view the read-only properties reported for this component.
Select the Properties (writable) page to view the writable properties you can update for this component.
Select a property by it's name, enter a new value for it, and select Update desired value.
To see the new value show up select the Refresh button.
Select the Commands page to view all the commands for this component.
Select the command you want to test set the parameter if any. Select Send command to call the command on the device. You can see your device respond to the command in the command prompt window where the sample code is running.
Review the code
This sample implements an IoT Plug and Play temperature controller device. The model this sample implements uses multiple components. The Digital Twins Definition Language (DTDL) V2 model file for the temperature device defines the telemetry, properties, and commands the device implements.
The device code connects to your IoT hub using the standard CreateFromConnectionString method. The device sends the model ID of the DTDL model it implements in the connection request. A device that sends a model ID is an IoT Plug and Play device:
private static DeviceClient InitializeDeviceClient(string hostname, IAuthenticationMethod authenticationMethod)
{
    var options = new ClientOptions
    {
        ModelId = ModelId,
    };

    var deviceClient = DeviceClient.Create(hostname, authenticationMethod, TransportType.Mqtt, options);
    deviceClient.SetConnectionStatusChangesHandler((status, reason) =>
    {
        s_logger.LogDebug($"Connection status change registered - status={status}, reason={reason}.");
    });

    return deviceClient;
}
The model ID is stored in the code as shown in the following snippet:
private const string ModelId = "dtmi:com:example:TemperatureController;1";
After the device connects to your IoT hub, the code registers the command handlers. The reboot command is defined in the default component. The getMaxMinReport command is defined in each of the two thermostat components:
await _deviceClient.SetMethodHandlerAsync("reboot", HandleRebootCommandAsync, _deviceClient, cancellationToken);
await _deviceClient.SetMethodHandlerAsync("thermostat1*getMaxMinReport", HandleMaxMinReportCommandAsync, Thermostat1, cancellationToken);
await _deviceClient.SetMethodHandlerAsync("thermostat2*getMaxMinReport", HandleMaxMinReportCommandAsync, Thermostat2, cancellationToken);
There are separate handlers for the desired property updates on the two thermostat components:
_desiredPropertyUpdateCallbacks.Add(Thermostat1, TargetTemperatureUpdateCallbackAsync);
_desiredPropertyUpdateCallbacks.Add(Thermostat2, TargetTemperatureUpdateCallbackAsync);
The sample code sends telemetry from each thermostat component:
await SendTemperatureAsync(Thermostat1, cancellationToken);
await SendTemperatureAsync(Thermostat2, cancellationToken);
The SendTemperatureTelemetryAsync method uses the PnpHhelper class to create messages for each component:
using Message msg = PnpHelper.CreateIothubMessageUtf8(telemetryName, JsonConvert.SerializeObject(currentTemperature), componentName);
The PnpHelper class contains other sample methods that you can use with a multiple component model.
Use the Azure IoT explorer tool to view the telemetry and properties from the two thermostat components:
You can also use the Azure IoT explorer tool to call commands in either of the two thermostat components, or in the default component.
This tutorial shows you how to build a sample IoT Plug and Play device application with components, connect it to your IoT hub, and use the Azure IoT explorer tool to view the information it sends to the hub. The sample application is written in Java and is included in the Azure IoT device SDK for Java. A solution builder can use the Azure IoT explorer tool to understand the capabilities of an IoT Plug and Play device without the need to view any device code.
In this tutorial, you:
- Download the sample code.
- Build the sample code.
- Run the sample device application and validate that it connects to your IoT hub.
- Review the source code.
Prerequisites
Before you continue, make sure you've set up your environment, including your IoT hub.
You can run this tutorial on Linux or Windows. The shell commands in this tutorial follow the Linux convention for path separators '/', if you're following along on Windows be sure to swap these separators for '\'.
To complete this tutorial, install the following software in your local development environment:
Download the code
If you completed Tutorial: Connect a sample IoT Plug and Play device application to IoT Hub (Java), you've already cloned the repository.
Open a command prompt in the directory of your choice. Execute the following command to clone the Azure IoT Java SDKs and Libraries GitHub repository into this location:
git clone https://github.com/Azure/azure-iot-sdk-java.git
Expect this operation to take several minutes to complete.
Build the code
Navigate to the root folder of the temperature controller sample in the cloned Java SDK repository and build it:
cd azure-iot-sdk-java/device/iot-device-samples/pnp-device-sample/temperature-controller-device-sample
mvn clean package
Run the device sample
In Set up your environment, you created four environment variables to configure the sample to use the Device Provisioning Service (DPS) to connect to your IoT hub:
- IOTHUB_DEVICE_SECURITY_TYPE with the value
DPS - IOTHUB_DEVICE_DPS_ID_SCOPE with the DPS ID scope.
- IOTHUB_DEVICE_DPS_DEVICE_ID with the value
my-pnp-device. - IOTHUB_DEVICE_DPS_DEVICE_KEY with the enrollment primary key.
- IOTHUB_DEVICE_DPS_ENDPOINT with the value
global.azure-devices-provisioning.net.
To run the sample application, navigate to the /device/iot-device-samples/pnp-device-sample/temperature-controller-device-sample folder and run the following command:
mvn exec:java -Dexec.mainClass="samples.com.microsoft.azure.sdk.iot.device.TemperatureController"
The device is now ready to receive commands and property updates, and has started sending telemetry data to the hub. Keep the sample running as you complete the next steps.
Use Azure IoT explorer to validate the code
After the device client sample starts, use the Azure IoT explorer tool to verify it's working.
Open Azure IoT explorer.
On the IoT hubs page, if you haven't already added a connection to your IoT hub, select + Add connection. Enter the connection string for the IoT hub you created previously and select Save.
On the IoT Plug and Play Settings page, select + Add > Local folder and select the local models folder where you saved your model files.
On the IoT hubs page, click on the name of the hub you want to work with. You see a list of devices registered to the IoT hub.
Click on the Device ID of the device you created previously.
The menu on the left shows the different types of information available for the device.
Select IoT Plug and Play components to view the model information for your device.
You can view the different components of the device. The default component and any extra ones. Select a component to work with.
Select the Telemetry page and then select Start to view the telemetry data the device is sending for this component.
Select the Properties (read-only) page to view the read-only properties reported for this component.
Select the Properties (writable) page to view the writable properties you can update for this component.
Select a property by it's name, enter a new value for it, and select Update desired value.
To see the new value show up select the Refresh button.
Select the Commands page to view all the commands for this component.
Select the command you want to test set the parameter if any. Select Send command to call the command on the device. You can see your device respond to the command in the command prompt window where the sample code is running.
Review the code
This sample implements an IoT Plug and Play temperature controller device. The model this sample implements uses multiple components. The Digital Twins Definition Language (DTDL) V2 model file for the temperature device defines the telemetry, properties, and commands the device implements.
The device code uses the standard DeviceClient class to connect to your IoT hub. The device sends the model ID of the DTDL model it implements in the connection request. A device that sends a model ID is an IoT Plug and Play device:
private static void initializeDeviceClient() throws URISyntaxException, IOException {
    ClientOptions options = new ClientOptions();
    options.setModelId(MODEL_ID);
    deviceClient = new DeviceClient(deviceConnectionString, protocol, options);

    deviceClient.registerConnectionStatusChangeCallback((status, statusChangeReason, throwable, callbackContext) -> {
        log.debug("Connection status change registered: status={}, reason={}", status, statusChangeReason);

        if (throwable != null) {
            log.debug("The connection status change was caused by the following Throwable: {}", throwable.getMessage());
            throwable.printStackTrace();
        }
    }, deviceClient);

    deviceClient.open();
}
The model ID is stored in the code as shown in the following snippet:
private static final String MODEL_ID = "dtmi:com:example:Thermostat;1";
After the device connects to your IoT hub, the code registers the command handlers.
deviceClient.subscribeToDeviceMethod(new MethodCallback(), null, new MethodIotHubEventCallback(), null);
There are separate handlers for the desired property updates on the two thermostat components:
deviceClient.startDeviceTwin(new TwinIotHubEventCallback(), null, new GenericPropertyUpdateCallback(), null);
Map<Property, Pair<TwinPropertyCallBack, Object>> desiredPropertyUpdateCallback = Stream.of(
        new AbstractMap.SimpleEntry<Property, Pair<TwinPropertyCallBack, Object>>(
                new Property(THERMOSTAT_1, null),
                new Pair<>(new TargetTemperatureUpdateCallback(), THERMOSTAT_1)),
        new AbstractMap.SimpleEntry<Property, Pair<TwinPropertyCallBack, Object>>(
                new Property(THERMOSTAT_2, null),
                new Pair<>(new TargetTemperatureUpdateCallback(), THERMOSTAT_2))
).collect(Collectors.toMap(AbstractMap.SimpleEntry::getKey, AbstractMap.SimpleEntry::getValue));

deviceClient.subscribeToTwinDesiredProperties(desiredPropertyUpdateCallback);
The sample code sends telemetry from each thermostat component:
sendTemperatureReading(THERMOSTAT_1);
sendTemperatureReading(THERMOSTAT_2);
The sendTemperatureReading method uses the PnpHhelper class to create messages for each component:
Message message = PnpHelper.createIotHubMessageUtf8(telemetryName, currentTemperature, componentName);
The PnpHelper class contains other sample methods that you can use with a multiple component model.
Use the Azure IoT explorer tool to view the telemetry and properties from the two thermostat components:

You can also use the Azure IoT explorer tool to call commands in either of the two thermostat components, or in the default component.
This tutorial shows you how to build a sample IoT Plug and Play device application with components, connect it to your IoT hub, and use the Azure IoT explorer tool to view the information it sends to the hub. The sample application is written for Node.js and is included in the Azure IoT Hub Device SDK for Node.js. A solution builder can use the Azure IoT explorer tool to understand the capabilities of an IoT Plug and Play device without the need to view any device code.
In this tutorial, you:
- Download the sample code.
- Run the sample device application and validate that it connects to your IoT hub.
- Review the source code.
Prerequisites
Before you continue, make sure you've set up your environment, including your IoT hub.
To complete this tutorial, you need Node.js on your development machine. You can download the latest recommended version for multiple platforms from nodejs.org.
You can verify the current version of Node.js on your development machine using the following command:
node --version
Download the code
If you completed Tutorial: Connect a sample IoT Plug and Play device application running on Windows to IoT Hub (Node), you've already cloned the repository.
Open a command prompt in the directory of your choice. Execute the following command to clone the Microsoft Azure IoT SDK for Node.js GitHub repository into this location:
git clone https://github.com/Azure/azure-iot-sdk-node
Install required libraries
You use the device SDK to build the included sample code. The application you build simulates a Plug and Play device with multiple components that connects to an IoT hub. The application sends telemetry and properties and receives commands.
- In a local terminal window, go to the folder of your cloned repository and navigate to the /azure-iot-sdk-node/device/samples/javascript folder. Then run the following command to install the required libraries:
npm install
This command installs the relevant npm files required to run the samples in the folder.
Review the code
Navigate to the azure-iot-sdk-node/device/samples/javascript folder.
The azure-iot-sdk-node/device/samples/javascript folder contains the sample code for the IoT Plug and Play temperature controller device.
The code in the pnp_temperature_controller.js file implements an IoT Plug and Play temperature controller device. The model this sample implements uses multiple components. The Digital Twins Definition Language (DTDL) V2 model file for the temperature device defines the telemetry, properties, and commands the device implements.
Open the pnp_temperature_controller.js file in a code editor of your choice. The sample code shows how to:
Define the
modelIdthat's the DTMI for the device you're implementing. This DTMI is user-defined and must match the DTMI of the temperature controller DTDL model.Implement the components defined in the temperature controller DTDL model. The components in a real temperature controller should implement these two interfaces. These two interfaces are already published in a central repository. In this sample, the two interfaces are:
- Thermostat
- Device information developed by Azure
Define component names. This sample has two thermostats and one device information component.
Define command names for the commands the device responds to.
Define the
serialNumberconstant. TheserialNumberis fixed any given device.Define the command handlers.
Define the functions to send command responses.
Define helper functions to log command requests.
Define a helper function to create the properties.
Define a listener for property updates.
Define a function to send telemetry from this device. Both thermostats and the default component send telemetry. This function receives the component name as parameter.
Define a
mainfunction that:Uses the device SDK to create a device client and connect to your IoT hub. The device supplies the
modelIdso that IoT Hub can identify the device as an IoT Plug and Play device.Starts listening for command requests using the
onDeviceMethodfunction. The function sets up a listener for command requests from the service:- The device DTDL defines the
rebootandgetMaxMinReportcommands. - The
commandHandlerfunction defines how the device responds to a command.
- The device DTDL defines the
Starts sending telemetry by using
setIntervalandsendTelemetry.Uses the
helperCreateReportedPropertiesPatchfunction to create the properties and theupdateComponentReportedPropertiesto update the properties.Uses
desiredPropertyPatchListenerto listen for property updates.Disables all the listeners and tasks, and exits the loop when you press Q or q.
In Set up your environment, you created four environment variables to configure the sample to use the Device Provisioning Service (DPS) to connect to your IoT hub:
- IOTHUB_DEVICE_SECURITY_TYPE with the value
DPS - IOTHUB_DEVICE_DPS_ID_SCOPE with the DPS ID scope.
- IOTHUB_DEVICE_DPS_DEVICE_ID with the value
my-pnp-device. - IOTHUB_DEVICE_DPS_DEVICE_KEY with the enrollment primary key.
- IOTHUB_DEVICE_DPS_ENDPOINT with the value
global.azure-devices-provisioning.net.
To learn more about the sample configuration, see the sample readme.
Now that you've seen the code, use the following command to run the sample:
node pnp_temperature_controller.js
You see the following output, indicating the device has begun sending telemetry data to the hub, and is now ready to receive commands and property updates.

Keep the sample running as you complete the next steps.
Use Azure IoT explorer to validate the code
After the device client sample starts, use the Azure IoT explorer tool to verify it's working.
Open Azure IoT explorer.
On the IoT hubs page, if you haven't already added a connection to your IoT hub, select + Add connection. Enter the connection string for the IoT hub you created previously and select Save.
On the IoT Plug and Play Settings page, select + Add > Local folder and select the local models folder where you saved your model files.
On the IoT hubs page, click on the name of the hub you want to work with. You see a list of devices registered to the IoT hub.
Click on the Device ID of the device you created previously.
The menu on the left shows the different types of information available for the device.
Select IoT Plug and Play components to view the model information for your device.
You can view the different components of the device. The default component and any extra ones. Select a component to work with.
Select the Telemetry page and then select Start to view the telemetry data the device is sending for this component.
Select the Properties (read-only) page to view the read-only properties reported for this component.
Select the Properties (writable) page to view the writable properties you can update for this component.
Select a property by it's name, enter a new value for it, and select Update desired value.
To see the new value show up select the Refresh button.
Select the Commands page to view all the commands for this component.
Select the command you want to test set the parameter if any. Select Send command to call the command on the device. You can see your device respond to the command in the command prompt window where the sample code is running.
This tutorial shows you how to build a sample IoT Plug and Play device application with components, connect it to your IoT hub, and use the Azure IoT explorer tool to view the information it sends to the hub. The sample application is written in Python and is included in the Azure IoT device SDK for Python. A solution builder can use the Azure IoT explorer tool to understand the capabilities of an IoT Plug and Play device without the need to view any device code.
In this tutorial, you:
- Download the sample code.
- Run the sample device application and validate that it connects to your IoT hub.
- Review the source code.
Prerequisites
Before you continue, make sure you've set up your environment, including your IoT hub.
You can run this tutorial on Linux or Windows. The shell commands in this tutorial follow the Linux convention for path separators '/', if you're following along on Windows be sure to swap these separators for '\'.
To complete this tutorial, you need Python installed on your development machine. Check the Azure IoT Python SDK for current Python version requirements. You can check your Python version with the following command:
python --version
You can download the latest recommended version for multiple platforms from python.org.
Download the code
The azure-iot-device package is published as a PIP.
In your local Python environment, install the package as follows:
pip install azure-iot-device
If you completed Tutorial: Connect a sample IoT Plug and Play device application running on Windows to IoT Hub (Python), you've already cloned the repository.
Clone the Python SDK IoT repository:
git clone --branch v2 https://github.com/Azure/azure-iot-sdk-python
Review the code
This sample implements an IoT Plug and Play temperature controller device. The model this sample implements uses multiple components. The Digital Twins Definition Language (DTDL) V2 model file for the temperature device defines the telemetry, properties, and commands the device implements.
The azure-iot-sdk-python/samples/pnp folder contains the sample code for the IoT Plug and Play device. The files for the temperature controller sample are:
- temp_controller_with_thermostats.py
- pnp_helper.py
Temperature controller has multiple components and a default component, based on the temperature controller DTDL model.
Open the temp_controller_with_thermostats.py file in an editor of your choice. The code in this file:
Imports
pnp_helper.pyto get access to helper methods.Defines two digital twin model identifiers (DTMIs) that uniquely represent two different interfaces, defined in the DTDL model. The components in a real temperature controller should implement these two interfaces. These two interfaces are already published in a central repository. These DTMIs must be known to the user and vary dependent on the scenario of device implementation. For the current sample, these two interfaces represent:
- A thermostat
- Device information developed by Azure.
Defines the DTMI
model_idfor the device that's being implemented. The DTMI is user-defined and must match the DTMI in the DTDL model file.Defines the names given to the components in the DTDL file. There are two thermostats in the DTDL and one device information component. A constant called
serial_numberis also defined in the default component. Aserial_numbercan't change for a device.Defines command handler implementations. These handlers define what the device does when it receives command requests.
Defines functions to create a command response. These functions define how the device responds with to command requests. You create command response functions if a command needs to send a custom response back to the IoT hub. If a response function for a command isn't provided, a generic response is sent. In this sample, only the getMaxMinReport command has a custom response.
Defines a function to send telemetry from this device. Both the thermostats and the default component send telemetry. This function has an optional component name parameter to enable it to identify which component sent the telemetry.
Defines a listener for command requests.
Defines a listener for desired property updates.
Has a
mainfunction that:Uses the device SDK to create a device client and connect to your IoT hub. The device sends the
model_idso that the IoT hub can identify the device as an IoT Plug and Play device.Uses the
create_reported_propertiesfunction in the helper file to create the properties. Pass the component name, and the properties as key value pairs to this function.Updates the readable properties for its components by calling
patch_twin_reported_properties.Starts listening for command requests using the
execute_command_listenerfunction. The function sets up a listener for command requests from the service. When you set up the listener, you provide amethod_name,user_command_handler, and an optionalcreate_user_response_handleras parameters.- The
method_namedefines the command request. In this sample, the model defines the commands reboot, and getMaxMinReport. - The
user_command_handlerfunction defines what the device should do when it receives a command. - The
create_user_response_handlerfunction creates a response to be sent to your IoT hub when a command executes successfully. You can view this response in the portal. If this function isn't provided, a generic response is sent to the service.
- The
Uses
execute_property_listenerto listen for property updates.Starts sending telemetry using
send_telemetry. The sample code uses a loop to call three telemetry sending functions. Each one is called every eight secondsDisables all the listeners and tasks, and exits the loop when you press Q or q.
In Set up your environment, you created four environment variables to configure the sample to use the Device Provisioning Service (DPS) to connect to your IoT hub:
- IOTHUB_DEVICE_SECURITY_TYPE with the value
DPS - IOTHUB_DEVICE_DPS_ID_SCOPE with the DPS ID scope.
- IOTHUB_DEVICE_DPS_DEVICE_ID with the value
my-pnp-device. - IOTHUB_DEVICE_DPS_DEVICE_KEY with the enrollment primary key.
- IOTHUB_DEVICE_DPS_ENDPOINT with the value
global.azure-devices-provisioning.net.
To learn more about the sample configuration, see the sample readme.
Use the following command to run the sample:
python temp_controller_with_thermostats.py
The sample device sends telemetry messages every few seconds to your IoT hub.
You see the following output, which indicates the device is sending telemetry data to the hub, and is now ready to receive commands and property updates.

Keep the sample running as you complete the next steps.
Use Azure IoT explorer to validate the code
After the device client sample starts, use the Azure IoT explorer tool to verify it's working.
Open Azure IoT explorer.
On the IoT hubs page, if you haven't already added a connection to your IoT hub, select + Add connection. Enter the connection string for the IoT hub you created previously and select Save.
On the IoT Plug and Play Settings page, select + Add > Local folder and select the local models folder where you saved your model files.
On the IoT hubs page, click on the name of the hub you want to work with. You see a list of devices registered to the IoT hub.
Click on the Device ID of the device you created previously.
The menu on the left shows the different types of information available for the device.
Select IoT Plug and Play components to view the model information for your device.
You can view the different components of the device. The default component and any extra ones. Select a component to work with.
Select the Telemetry page and then select Start to view the telemetry data the device is sending for this component.
Select the Properties (read-only) page to view the read-only properties reported for this component.
Select the Properties (writable) page to view the writable properties you can update for this component.
Select a property by it's name, enter a new value for it, and select Update desired value.
To see the new value show up select the Refresh button.
Select the Commands page to view all the commands for this component.
Select the command you want to test set the parameter if any. Select Send command to call the command on the device. You can see your device respond to the command in the command prompt window where the sample code is running.
Clean up resources
If you plan to continue with more device developer articles, you can keep and reuse the resources you used in this article. Otherwise, you can delete the resources you created in this article to avoid more charges.
You can delete both the hub and registered device at once by deleting the entire resource group with the following Azure CLI command. Don't use this command if these resources are sharing a resource group with other resources you want to keep.
az group delete --name <YourResourceGroupName>
To delete just the IoT hub, run the following command using Azure CLI:
az iot hub delete --name <YourIoTHubName>
To delete just the device identity you registered with your IoT hub, run the following command using Azure CLI:
az iot hub device-identity delete --hub-name <YourIoTHubName> --device-id <YourDeviceID>
You may also want to remove the cloned sample files from your development machine.
Next steps
In this tutorial, you've learned how to connect an IoT Plug and Play device with components to an IoT hub. To learn more about IoT Plug and Play device models, see:
Feedback
Coming soon: Throughout 2024 we will be phasing out GitHub Issues as the feedback mechanism for content and replacing it with a new feedback system. For more information see: https://aka.ms/ContentUserFeedback.
Submit and view feedback for