Synchronize multiple Azure Kinect DK devices
Each Azure Kinect DK device includes 3.5-mm synchronization ports (Sync in and Sync out) that you can use to link multiple devices together. After you connect the devices, your software can coordinate the trigger timing between them.
This article how to connect and synchronize the devices.
Benefits of using multiple Azure Kinect DK devices
There are many reasons to use multiple Azure Kinect DK devices, including the following:
- Fill in occlusions. Although the Azure Kinect DK data transformations produce a single image, the two cameras (depth and RGB) are actually a small distance apart. The offset makes occlusions possible. An occlusion occurs when a foreground object blocks the view of part of a background object for one of the two cameras on a device. In the resulting color image, the foreground object seems to cast a shadow on the background object.
For example, in the following diagram, the left-side camera sees the gray pixel "P2." However, the white foreground object blocks the right-side camera IR beam. The right-side camera has no data for "P2."
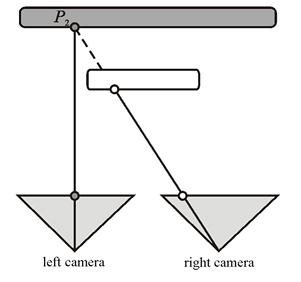
Additional synchronized devices can provide the occluded data. - Scan objects in three dimensions.
- Increase the effective frame rate to a value that's greater than 30 frames per second (FPS).
- Capture multiple 4K color images of the same scene, all aligned within 100 microseconds (μs) of the center of exposure.
- Increase camera coverage within the space.
Plan your multi-device configuration
Before you start, make sure that you review Azure Kinect DK hardware specifications and Azure Kinect DK depth camera.
Note
Remove the outer plastic cover to expose the Sync In and Sync Out jacks.
Select a device configuration
You can use either of the following approaches for your device configuration:
- Daisy-chain configuration. Synchronize one master device and up to eight subordinate devices.
- Star configuration. Synchronize one master device and up to two subordinate devices.

Using an external sync trigger
In both configurations, the master device provides the triggering signal for the subordinate devices. However, you can use a custom external source for the synchronization trigger. For example, you can use this option to synchronize image captures with other equipment. In either the daisy-chain configuration or the star configuration, the external trigger source connects to the master device.
Your external trigger source must function in the same manner as the master device. It must deliver a sync signal that has the following characteristics:
- Active high
- Pulse width: Greater than 8μs
- 5V TTL/CMOS
- Maximum driving capacity: No less than 8 milliamps (mA)
- Frequency support: Exactly 30 FPS, 15 FPS, and 5 FPS (the frequency of the color camera master VSYNC signal)
The trigger source must deliver the signal to the master device Sync in port by using a 3.5-mm audio cable. You can use a stereo or mono cable. The Azure Kinect DK shorts all the sleeves and rings of the audio cable connector together, and grounds them. As shown in the following diagram, the device receives the sync signal from the connector tip only.

For more information about how to work with external equipment, see Use Azure Kinect recorder with external synchronized devices
Note
Sync Out is the VSync for the RGB camera. The timestamps for all devices are set to zero and count up. Microsoft has not characterized the min and max width of the sync pulse, and recommend mimicking the pulse generated by Sync Out of an Azure Kinect DK.
Plan your camera settings and software configuration
For information about how to set up your software to control the cameras and use the image data, see the Azure Kinect Sensor SDK.
This section discusses several factors that affect synchronized devices (but not single devices). Your software should consider these factors.
Exposure considerations
If you want to control the precise timing of each device, we recommend that you use a manual exposure setting. Under the automatic exposure setting, each color camera can dynamically change the actual exposure. Because the exposure affects the timing, such changes quickly push the cameras out of sync.
In the image capture loop, avoid repeatedly setting the same exposure setting. Call the API only one time when it's needed.
Avoiding interference between multiple depth cameras
When multiple depth cameras are imaging overlapping fields of view, each camera must image its own associated laser. To prevent the lasers from interfering with one another, the camera captures should be offset from one another by 160μs or more.
For each depth camera capture, the laser turns on nine times and is active for only 125μs each time. The laser is then idle for either 1450μs or 2390μs, depending on the mode of operation. This behavior means that the starting point for the offset calculation is 125μs.
Additionally, differences between the camera clock and the device firmware clock increase the minimum offset to 160μs. To calculate a more precise offset for your configuration, note the depth mode that you are using and refer to the depth sensor raw timing table. By using the data from this table, you can calculate the minimum offset (the exposure time of each camera) by using the following equation:
Exposure Time = (IR Pulses × Pulse Width) + (Idle Periods × Idle Time)
When you use an offset of 160μs, you can configure up to nine additional depth cameras so that each laser turns on while the other lasers are idle.
In your software, use depth_delay_off_color_usec or subordinate_delay_off_master_usec to make sure that each IR laser fires in its own 160μs window or has a different field of view.
Note
The actual pulse width is 125μs however we state 160us to provide for some leeway. Taking NFOV UNBINNED as an example, each 125μs pulse is followed by 1450μs idle. Totaling these up - (9 x 125) + (8 x 1450) - yields the exposure time of 12.8ms. The closet you can interleave the exposure of 2 devices is to have the first pulse of the second camera to fall in the first idle period of the first camera. The delay between the first and second cameras could be as little as 125μs (the width of a pulse) however we recommend some leeway hence the 160μs. Given 160μs you can interleave the exposure periods of a maximum of 10 cameras.
Prepare your devices and other hardware
In addition to multiple Azure Kinect DK devices, you may have to get additional host computers and other hardware in order to support the configuration that you want to build. Use the information in this section to make sure that all devices and hardware are ready before you start to set up.
Azure Kinect DK devices
For each Azure Kinect DK device that you want to synchronize, do the following:
- Make sure that the latest firmware is installed on the device. For more information about how to update your devices, go to Update Azure Kinect DK firmware.
- Remove the device cover to reveal the sync ports.
- Note the serial number for each device. You will use this number later in the setup process.
Host computers
Typically, each Azure Kinect DK uses its own host computer. You can use a dedicated host controller, depending on how you use the device and how much data is transferred over the USB connection.
Make sure that the Azure Kinect Sensor SDK is installed on each host computer. For more information about how to install the Sensor SDK, go to Quickstart: Set up your Azure Kinect DK.
Linux computers: USB memory on Ubuntu
By default, Linux-based host computers allocate the USB controller only 16 MB of kernel memory to handle USB transfers. This amount is usually enough to support a single Azure Kinect DK. However, to support multiple devices, the USB controller has to have more memory. To increase the memory, follow these steps:
- Edit /etc/default/grub.
- Locate the following line:
Replace it by using this line:GRUB_CMDLINE_LINUX_DEFAULT="quiet splash"GRUB_CMDLINE_LINUX_DEFAULT="quiet splash usbcore.usbfs_memory_mb=32"Note
These commands set the USB memory to 32 MB. This is an example setting at two times the default value. You can set a much larger value, as appropriate for your solution.
- Run sudo update-grub.
- Restart the computer.
Cables
To connect the devices to one another and to the host computers, you have to use 3.5-mm male-to-male cables (also known as 3.5-mm audio cable). The cables should be less than 10 meters long, and can be stereo or mono.
The number of cables that you must have depends on the number of devices that you use and also the specific device configuration. The Azure Kinect DK box does not include cables. You must purchase them separately.
If you connect the devices in the star configuration, you must also have one headphone splitter.
Connect your devices
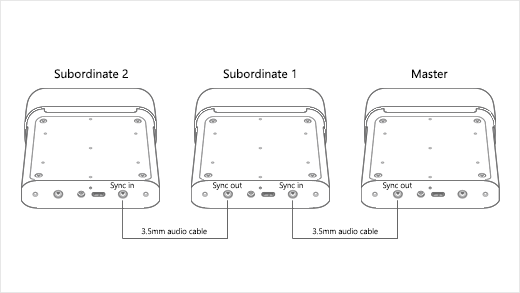
To connect Azure Kinect DK devices in a daisy chain configuration
- Connect each Azure Kinect DK to power.
- Connect each device to its host PC.
- Select one device to be the master device, and plug a 3.5-mm audio cable into its Sync out port.
- Plug the other end of the cable into the Sync in port of the first subordinate device.
- To connect another device, plug another cable into the Sync out port of the first subordinate device, and into the Sync in port of the next device.
- Repeat the previous step until all the devices are connected. The last device should have only one cable connection. Its Sync out port should be empty.
To connect Azure Kinect DK devices in a star configuration
- Connect each Azure Kinect DK to power.
- Connect each device to its host PC.
- Select one device to be the master device, and plug the single end of the headphone splitter into its Sync out port.
- Connect 3.5-mm audio cables to the "split" ends of the headphone splitter.
- Plug the other end of each cable into the Sync in port of one of the subordinate devices.
Verify that the devices are connected and communicating
To verify that the devices are connected correctly, use Azure Kinect Viewer. Repeat this procedure as necessary to test each subordinate device in combination with the master device
Important
For this procedure, you must know the serial number of each Azure Kinect DK.
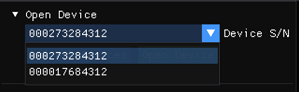
- Open two instances of Azure Kinect Viewer.
- Under Open Device, select the serial number of the subordinate device that you want to test.
Important
To get precise image capture alignment between all devices, you have to start the master device last.
- Under External Sync, select Sub.
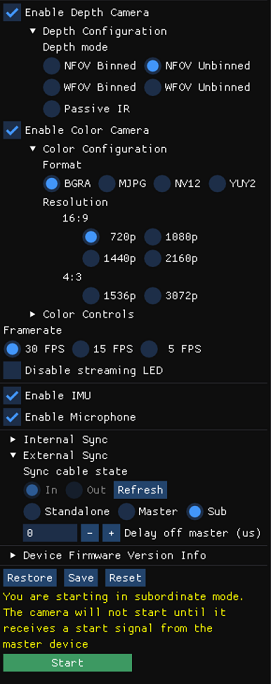
- Select Start.
Note
Because this is a subordinate device, Azure Kinect Viewer does not display an image after the device starts. No image is displayed until the subordinate device receives a sync signal from the master device.
- After the subordinate device has started, use the other instance of Azure Kinect Viewer to open the master device.
- Under External Sync, select Master.
- Select Start.
When the master Azure Kinect Device starts, both instances of Azure Kinect Viewer should display images.
Calibrate the devices as a synchronized set
After you verify that the devices are communicating correctly, you're ready to calibrate them to produce images in a single domain.
In a single device, the depth and RGB cameras are factory calibrated to work together. However, when multiple devices have to work together, they have to be calibrated in order to determine how to transform an image from the domain of the camera that captured it to the domain of the camera you want to use to process images.
There are multiple options for cross-calibrating devices. Microsoft provides the GitHub green screen code sample, which uses the OpenCV method. The Readme file for this code sample provides more details and instructions for calibrating the devices.
For more information about calibration, see Use Azure Kinect calibration functions.
Next steps
After you set up synchronized devices, you can also learn how to use the
Related topics
Feedback
Coming soon: Throughout 2024 we will be phasing out GitHub Issues as the feedback mechanism for content and replacing it with a new feedback system. For more information see: https://aka.ms/ContentUserFeedback.
Submit and view feedback for