Set up a lab for big data analytics in Azure Lab Services using Docker deployment of HortonWorks Data Platform
Note
This article references features available in lab plans, which replaced lab accounts.
This article shows you how to set up a lab to teach a big data analytics class. A big data analytics class teaches users how to handle large volumes of data. It also teaches them to apply machine and statistical learning algorithms to derive data insights. A key objective is to learn how to use data analytics tools, such as Apache Hadoop's open-source software package. The software package provides tools for storing, managing, and processing big data.
In this lab, lab users work with a popular commercial version of Hadoop provided by Cloudera, called Hortonworks Data Platform (HDP). Specifically, lab users use HDP Sandbox 3.0.1 that's a simplified, easy-to-use version of the platform. HDP Sandbox 3.0.1 is also free of cost and is intended for learning and experimentation. Although this class may use either Windows or Linux virtual machines (VM) with HDP Sandbox deployed. This article shows you how to use Windows.
Another interesting aspect is that you deploy the HDP Sandbox on the lab VMs using Docker containers. Each Docker container provides its own isolated environment for software applications to run inside. Conceptually, Docker containers are like nested VMs and can be used to easily deploy and run a wide variety of software applications based on container images provided on Docker Hub. Cloudera's deployment script for HDP Sandbox automatically pulls the HDP Sandbox 3.0.1 Docker image from Docker Hub and runs two Docker containers:
- sandbox-hdp
- sandbox-proxy
Prerequisites
To set up this lab, you need access to an Azure subscription. Discuss with your organization's administrator to see if you can get access to an existing Azure subscription. If you don't have an Azure subscription, create a free account before you begin.
Lab configuration
Lab plan settings
After you have an Azure subscription, you can create a lab plan in Azure Lab Services. For more information about creating a new lab plan, see Quickstart: Set up resources to create labs. You can also use an existing lab plan.
This lab uses a Windows 10 Pro Azure Marketplace images as the base VM image. You first need to enable this image in your lab plan. This lets lab creators then select the image as a base image for their lab.
Follow these steps to enable these Azure Marketplace images available to lab creators. Select one of the Windows 10 Azure Marketplace images.
Lab settings
Create a lab for your lab plan. For instructions on how to create a lab, see Tutorial: Set up a lab. Use the following settings when creating the lab.
| Lab settings | Value/instructions |
|---|---|
| Virtual Machine Size | Medium (Nested Virtualization). This VM size is best suited for relational databases, in-memory caching, and analytics. The size also supports nested virtualization. |
| Virtual Machine Image | Windows 10 Pro |
Note
Use the Medium (Nested Virtualization) VM size because the HDP Sandbox using Docker requires Windows Hyper-V with nested virtualization and at least 10 GB of RAM.
Template machine configuration
To set up the template machine:
- Install Docker
- Deploy HDP Sandbox
- Use PowerShell and Windows Task Scheduler to automatically start the Docker containers
Install Docker
The steps in this section are based on Cloudera's instructions for deploying with Docker containers.
To use Docker containers, you must first install Docker Desktop on the template VM:
Follow the steps in the Prerequisites section to install Docker for Windows.
Important
Ensure that the Use Windows containers instead of Linux containers configuration option is left unchecked.
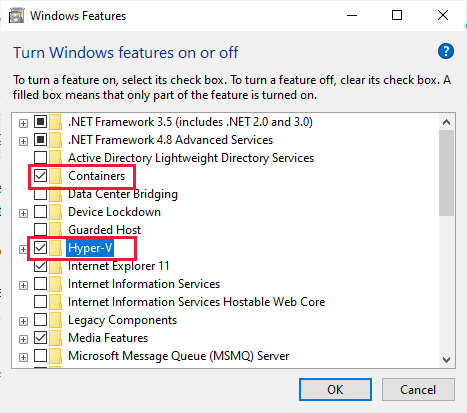
Ensure that Windows Containers and Hyper-V features are turned on.
Follow the steps in the Memory for Windows section to configure Docker's memory configuration.
Warning
If you inadvertently check the Use Windows containers instead of Linux containers option when installing Docker, you won't see the memory configuration settings. To fix this, you can switch to using Linux containers by clicking on the Docker icon in Windows System tray; when the Docker Desktop menu opens, select Switch to Linux containers.
Deploy HDP Sandbox
Next, deploy HDP Sandbox and then access HDP Sandbox using the browser.
Ensure that you have installed Git Bash as listed in the Prerequisites section of the guide. It's recommended for completing the next steps.
Using Cloudera's Deployment and Install Guide for Docker, complete the steps in the following sections:
- Deploy HDP Sandbox
- Verify HDP Sandbox
Warning
When you download the latest .zip file for HDP, ensure that you don't save the .zip file in a directory path that includes whitespace.
Note
If you receive an exception during deployment stating Drive has not been shared, you need to share your C drive with Docker so that HDP's Linux containers can access local Windows files. To fix this, click on the Docker icon in Windows System tray to open the Docker Desktop menu and select Settings. When Docker's Settings dialog opens, select Resources > File Sharing and check the C drive. You can then repeat the steps to deploy HDP Sandbox.
When the Docker containers for HDP Sandbox are deployed and running, you can access the environment by launching your browser. Follow Cloudera's instructions for opening the Sandbox Welcome Page and launching the HDP Dashboard.
Note
These instructions assume that you have first mapped the local IP address of the sandbox environment to the sandbox-hdp.hortonworks.com in the host file on your template VM. If you don't do this mapping, you can access the Sandbox Welcome page by navigating to
http://localhost:8080.
Automatically start Docker containers when lab users sign in
To provide an easy-to-use experience for lab users, create a PowerShell script that automatically:
- Starts the HDP Sandbox Docker containers when a lab user starts and connects to their lab VM.
- Launches the browser and navigates to the Sandbox Welcome page.
Use Windows Task Scheduler to automatically run this script when a lab user logs into their VM. To set up a Task Scheduler, follow these steps: Big Data Analytics scripting.
Cost estimate
This section provides a cost estimate for running this class for 25 lab users. There are 20 hours of scheduled class time. Also, each user gets 10 hours quota for homework or assignments outside scheduled class time. The virtual machine size we chose was Medium (Nested Virtualization), which is 55 lab units.
- 25 lab users × (20 scheduled hours + 10 quota hours) × 55 lab units
Important
The cost estimate is for example purposes only. For current pricing information, see Azure Lab Services pricing.
Conclusion
This article walked you through the steps necessary to create a lab for a big data analytics class. The big data analytics class uses the Hortonworks Data Platform deployed with Docker. The setup for this class type might be used for similar data analytics classes. This setup might also be applicable to other types of classes that use Docker for deployment.
Next steps
The template image can now be published to the lab. For more information, see Publish the template VM.
As you set up your lab, see the following articles:
Feedback
Coming soon: Throughout 2024 we will be phasing out GitHub Issues as the feedback mechanism for content and replacing it with a new feedback system. For more information see: https://aka.ms/ContentUserFeedback.
Submit and view feedback for