Partition and Sample component
This article describes a component in Azure Machine Learning designer.
Use the Partition and Sample component to perform sampling on a dataset or to create partitions from your dataset.
Sampling is an important tool in machine learning because it lets you reduce the size of a dataset while maintaining the same ratio of values. This component supports several related tasks that are important in machine learning:
Dividing your data into multiple subsections of the same size.
You might use the partitions for cross-validation, or to assign cases to random groups.
Separating data into groups and then working with data from a specific group.
After you randomly assign cases to different groups, you might need to modify the features that are associated with only one group.
Sampling.
You can extract a percentage of the data, apply random sampling, or choose a column to use for balancing the dataset and perform stratified sampling on its values.
Creating a smaller dataset for testing.
If you have a lot of data, you might want to use only the first n rows while setting up the pipeline, and then switch to using the full dataset when you build your model. You can also use sampling to create a smaller dataset for use in development.
Configure the component
This component supports the following methods for dividing your data into partitions or for sampling. Choose the method first, and then set additional options that the method requires.
- Head
- Sampling
- Assign to folds
- Pick fold
Get TOP N rows from a dataset
Use this mode to get only the first n rows. This option is useful if you want to test a pipeline on a small number of rows, and you don't need the data to be balanced or sampled in any way.
Add the Partition and Sample component to your pipeline in the interface, and connect the dataset.
Partition or sample mode: Set this option to Head.
Number of rows to select: Enter the number of rows to return.
The number of rows must be a non-negative integer. If the number of selected rows is larger than the number of rows in the dataset, the entire dataset is returned.
Submit the pipeline.
The component outputs a single dataset that contains only the specified number of rows. The rows are always read from the top of the dataset.
Create a sample of data
This option supports simple random sampling or stratified random sampling. It's useful if you want to create a smaller representative sample dataset for testing.
Add the Partition and Sample component to your pipeline, and connect the dataset.
Partition or sample mode: Set this option to Sampling.
Rate of sampling: Enter a value between 0 and 1. this value specifies the percentage of rows from the source dataset that should be included in the output dataset.
For example, if you want only half of the original dataset, enter
0.5to indicate that the sampling rate should be 50 percent.The rows of the input dataset are shuffled and selectively placed in the output dataset, according to the specified ratio.
Random seed for sampling: Optionally, enter an integer to use as a seed value.
This option is important if you want the rows to be divided the same way every time. The default value is 0, meaning that a starting seed is generated based on the system clock. This value can lead to slightly different results each time you run the pipeline.
Stratified split for sampling: Select this option if it's important that the rows in the dataset are divided evenly by some key column before sampling.
For Stratification key column for sampling, select a single strata column to use when dividing the dataset. The rows in the dataset are then divided as follows:
All input rows are grouped (stratified) by the values in the specified strata column.
Rows are shuffled within each group.
Each group is selectively added to the output dataset to meet the specified ratio.
Submit the pipeline.
With this option, the component outputs a single dataset that contains a representative sampling of the data. The remaining, unsampled portion of the dataset is not output.
Split data into partitions
Use this option when you want to divide the dataset into subsets of the data. This option is also useful when you want to create a custom number of folds for cross-validation, or to split rows into several groups.
Add the Partition and Sample component to your pipeline, and connect the dataset.
For Partition or sample mode, select Assign to Folds.
Use replacement in the partitioning: Select this option if you want the sampled row to be put back into the pool of rows for potential reuse. As a result, the same row might be assigned to several folds.
If you don't use replacement (the default option), the sampled row is not put back into the pool of rows for potential reuse. As a result, each row can be assigned to only one fold.
Randomized split: Select this option if you want rows to be randomly assigned to folds.
If you don't select this option, rows are assigned to folds through the round-robin method.
Random seed: Optionally, enter an integer to use as the seed value. This option is important if you want the rows to be divided the same way every time. Otherwise, the default value of 0 means that a random starting seed will be used.
Specify the partitioner method: Indicate how you want data to be apportioned to each partition, by using these options:
Partition evenly: Use this option to place an equal number of rows in each partition. To specify the number of output partitions, enter a whole number in the Specify number of folds to split evenly into box.
Partition with customized proportions: Use this option to specify the size of each partition as a comma-separated list.
For example, assume that you want to create three partitions. The first partition will contain 50 percent of the data. The remaining two partitions will each contain 25 percent of the data. In the List of proportions separated by comma box, enter these numbers: .5, .25, .25.
The sum of all partition sizes must add up to exactly 1.
If you enter numbers that add up to less than 1, an extra partition is created to hold the remaining rows. For example, if you enter the values .2 and .3, a third partition is created to hold the remaining 50 percent of all rows.
If you enter numbers that add up to more than 1, an error is raised when you run the pipeline.
Stratified split: Select this option if you want the rows to be stratified when split, and then choose the strata column.
Submit the pipeline.
With this option, the component outputs multiple datasets. The datasets are partitioned according to the rules that you specified.
Use data from a predefined partition
Use this option when you have divided a dataset into multiple partitions and now want to load each partition in turn for further analysis or processing.
Add the Partition and Sample component to the pipeline.
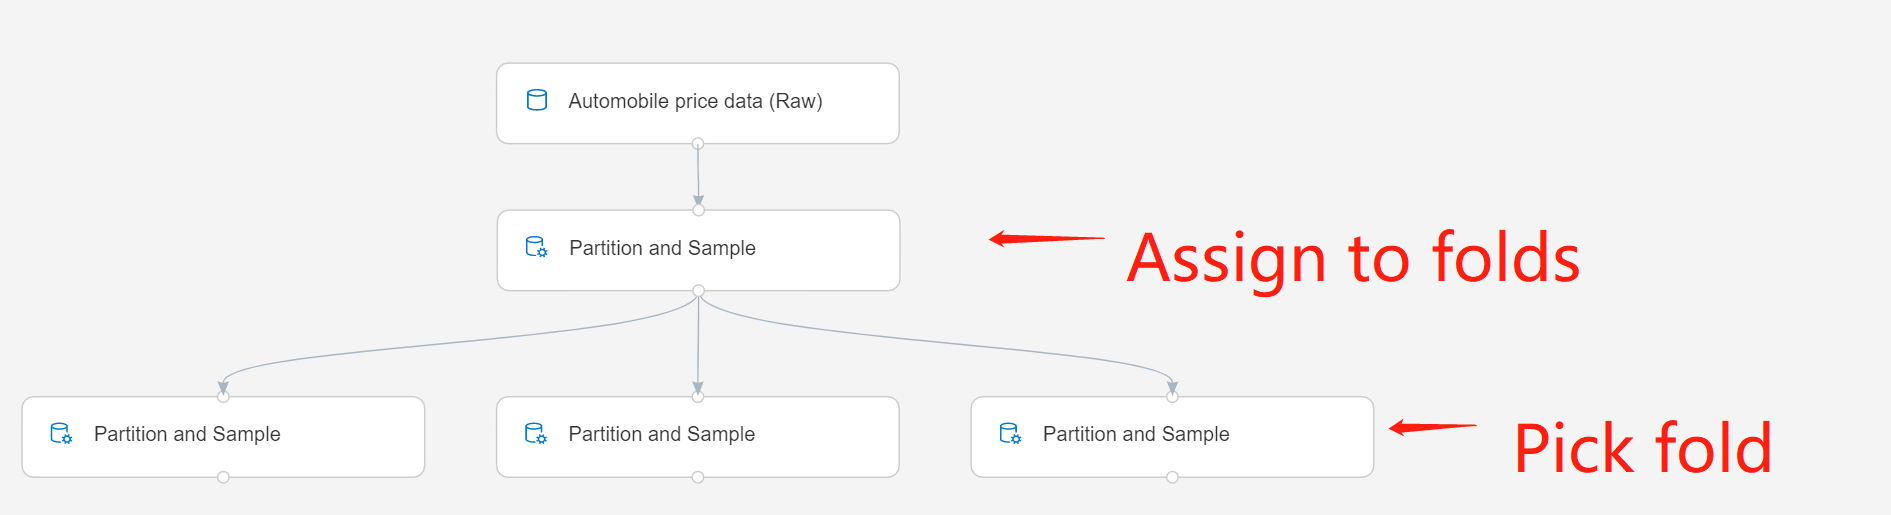
Connect the component to the output of a previous instance of Partition and Sample. That instance must have used the Assign to Folds option to generate some number of partitions.
Partition or sample mode: Select Pick Fold.
Specify which fold to be sampled from: Select a partition to use by entering its index. Partition indices are 1-based. For example, if you divided the dataset into three parts, the partitions would have the indices 1, 2, and 3.
If you enter an invalid index value, a design-time error is raised: "Error 0018: Dataset contains invalid data."
In addition to grouping the dataset by folds, you can separate the dataset into two groups: a target fold, and everything else. To do this, enter the index of a single fold, and then select the option Pick complement of the selected fold to get everything but the data in the specified fold.
If you're working with multiple partitions, you must add more instances of the Partition and Sample component to handle each partition.
For example, the Partition and Sample component in the second row is set to Assign to Folds, and the component in the third row is set to Pick Fold.
Submit the pipeline.
With this option, the component outputs a single dataset that contains only the rows assigned to that fold.
Note
You can't view the fold designations directly. They're present only in the metadata.
Next steps
See the set of components available to Azure Machine Learning.
Feedback
Coming soon: Throughout 2024 we will be phasing out GitHub Issues as the feedback mechanism for content and replacing it with a new feedback system. For more information see: https://aka.ms/ContentUserFeedback.
Submit and view feedback for