Create a virtual machine using your own image
This article describes how to publish a virtual machine (VM) image that you built on your premises.
Bring your image into Azure
Upload your VHD to an Azure Compute Gallery (formerly know as Shared Image Gallery).
- On the Azure portal, search for Azure Compute Galleries.
- Create or use an existing Azure Compute Gallery. We suggest you create a separate Azure Compute Gallery for images being published to the Marketplace.
- Create or use an existing image definition.
- Select Create a version.
- Choose the region and image version.
- If your VHD isn't yet uploaded to Azure portal, choose Storage blobs (VHDs) as the Source, then Browse. You can create a storage account and storage container if you haven’t created one before. Upload your VHD.
- Select Review + create. Once validation finishes, select Create.
Tip
Publisher account must have “Owner” access to publish the Azure Compute Gallery Image. If required, follow the steps in the following section, Set the right permissions, to grant access.
Set the right permissions
If your Partner Center account is the owner of the subscription hosting an Azure Compute Gallery, nothing further is needed for permissions. If you aren't sure, refer to these steps to confirm the right permissions are set. If you only have read access to the subscription, use one of the following two options.
Note
If you receive an error that indicates that we were unable to access your gallery image upon publishing or when selecting an image version from your compute gallery in Partner Center, then you will need to follow the steps below.
Option one – Ask the owner to grant owner permission
Steps for the owner to grant owner permission:
- Log in to the Azure subscription that contains your Azure compute gallery and associated images.
- Search for Azure compute galleries and select the gallery that hosts your images.
- In the Overview page of your Azure compute gallery, click on the link to your subscription.
- Select Access control (IAM) on the left panel.
- Go to the Role assignments tab.
- Click on +Add -> Add role assignment.
- Select Add, then Add role assignment.
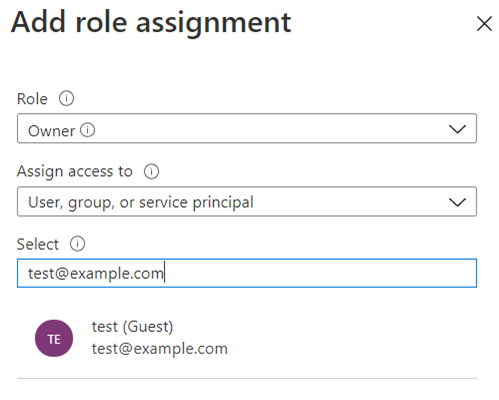
- For Role, select Owner and click Next.
- For Assign access to, select User, group, or service principal.
- For Members, click +Select members and add the email of the person or group that will be publishing the image through Partner Center.
- Select Next -> Review + assign.
Tip
If you experience any issues granting permissions via Azure portal, try option 2 detailed below.
Option Two – Run a command
Ask the owner to run either one of these commands. Regardless of which command you use, be sure to specify the SusbscriptionId with the subscription that contains your Azure compute gallery).
az login
az provider register --namespace Microsoft.PartnerCenterIngestion --subscription {subscriptionId}
Connect-AzAccount
Select-AzSubscription -SubscriptionId {subscriptionId}
Register-AzResourceProvider -ProviderNamespace Microsoft.PartnerCenterIngestion
Confirm your permissions
Run the following command in Azure CLI to verify your permissions are correctly set.
az login
az provider show --namespace Microsoft.PartnerCenterIngestion --subscription {subscriptionId}
Upon running the above command, ensure that the RegistrationState says “Registered”.
"namespace": "Microsoft.PartnerCenterIngestion",
"registrationPolicy": "RegistrationRequired",
"registrationState": "Registered",
Next steps
- Test your VM image to ensure it meets Azure Marketplace publishing requirements (optional).
- If you don't want to test your VM image, sign in to Partner Center and publish the Azure Compute Gallery Image.
- If you encountered difficulty creating your new Azure-based VHD, see VM FAQ for Azure Marketplace.
Feedback
Coming soon: Throughout 2024 we will be phasing out GitHub Issues as the feedback mechanism for content and replacing it with a new feedback system. For more information see: https://aka.ms/ContentUserFeedback.
Submit and view feedback for