Set up an appliance with a script
Follow this article to deploy an Azure Migrate appliance using a PowerShell script for:
- discovery, assessment and agentless replication of servers running in VMware environment
- discovery and assessment of servers running in Hyper-V environment.
You can deploy the appliance for servers on VMware and on Hyper-V by either using a script, or using a template (OVA/VHD) that you download from the Azure portal. Using a script is useful if you're unable to create an appliance using the downloaded template.
- To use a template, follow the tutorials for VMware and Hyper-V.
- To set up an appliance for physical servers, you can only use a script. Follow this article.
- To set up an appliance in an Azure Government cloud, you can only use a script. Follow this article.
Prerequisites
You can use the script to deploy the Azure Migrate appliance on an existing server in your VMware or Hyper-V environment.
- The server that hosts the appliance must meet the following hardware and OS requirements:
| Scenario | Requirements |
|---|---|
| VMware | Windows Server 2019 or Windows Server 2022, with 32 GB of memory, eight vCPUs, around 80 GB of disk storage. |
| Hyper-V | Windows Server 2019 or Windows Server 2022, with 16 GB of memory, eight vCPUs, around 80 GB of disk storage. |
The server also needs an external virtual switch. It requires a static or dynamic IP address.
Before you deploy the appliance, review detailed appliance requirements for VMware and Hyper-V.
If you run the script on a server with Azure Migrate appliance already set up, you can choose to clean up the existing configuration and set up a fresh appliance of the desired configuration. When you execute the script, you will get a notification as shown below:

Set up the appliance for VMware
- To set up the appliance, you download the zipped file named AzureMigrateInstaller.zip either from the portal or from here.
- Extract the contents on the server where you want to deploy the appliance.
- Execute the PowerShell script to launch the appliance configuration manager.
- Set up the appliance and configure it for the first time.
Verify security
Check that the zipped file is secure, before you deploy it.
- On the server to which you downloaded the file, open an administrator command window.
- Run the following command to generate the hash for the zipped file:
C:\>CertUtil -HashFile <file_location> [Hashing Algorithm]- Example usage:
C:\>CertUtil -HashFile C:\Users\administrator\Desktop\AzureMigrateInstaller.zip SHA256
- Verify the latest appliance version and hash value:
| Download | Hash value |
|---|---|
| Latest version | a551f3552fee62ca5c7ea11648960a09a89d226659febd26314e222a37c7d857 |
Note
The same script can be used to set up VMware appliance for either Azure public or Azure Government cloud.
Run the script
- Extract the zipped file to a folder on the server that will host the appliance.
Note
Make sure you don't run the script on a server with an existing Azure Migrate appliance. Running the script on the Azure Migrate appliance will remove the working configuration and replace it with newly defined configuration.
Launch PowerShell on the above server with administrative (elevated) privilege.
Change the PowerShell directory to the folder where the contents have been extracted from the downloaded zipped file.
Run the script named AzureMigrateInstaller.ps1 by running the following command:
PS C:\Users\administrator\Desktop\AzureMigrateInstaller> .\AzureMigrateInstaller.ps1Select from the scenario, cloud and connectivity options to deploy an appliance with the desired configuration. For instance, the selection shown below sets up an appliance to discover, assess and migrate servers running in your VMware environment to an Azure Migrate project with default (public endpoint) connectivity on Azure public cloud.

The installer script does the following:

- Installs agents and a web application.
- Install Windows roles, including Windows Activation Service, IIS, and PowerShell ISE.
- Download and installs an IIS rewritable module.
- Updates a registry key (HKLM) with persistent setting details for Azure Migrate.
- Creates the following files under the path:
- Config Files:
%ProgramData%\Microsoft Azure\Config - Log Files:
%ProgramData%\Microsoft Azure\Logs
- Config Files:
After the script has executed successfully, the appliance configuration manager will be launched automatically.
Note
If you come across any issues, you can access the script logs at C:\ProgramData\Microsoft Azure\Logs\AzureMigrateScenarioInstaller_Timestamp.log for troubleshooting.
Verify access
Make sure that the appliance can connect to Azure URLs for the public cloud.
Set up the appliance for Hyper-V
- To set up the appliance, you download the zipped file named AzureMigrateInstaller.zip either from the portal or from here.
- Extract the contents on the server where you want to deploy the appliance.
- Execute the PowerShell script to launch the appliance configuration manager.
- Set up the appliance and configure it for the first time.
Verify security
Check that the zipped file is secure, before you deploy it.
- On the server to which you downloaded the file, open an administrator command window.
- Run the following command to generate the hash for the zipped file:
C:\>CertUtil -HashFile <file_location> [Hashing Algorithm]- Example usage:
C:\>CertUtil -HashFile C:\Users\administrator\Desktop\AzureMigrateInstaller.zip SHA256
- Verify the latest appliance version and hash value:
| Download | Hash value |
|---|---|
| Latest version | a551f3552fee62ca5c7ea11648960a09a89d226659febd26314e222a37c7d857 |
Note
The same script can be used to set up Hyper-V appliance for either Azure public or Azure Government cloud.
Run the script
- Extract the zipped file to a folder on the server that will host the appliance.
Note
Make sure you don't run the script on an existing Azure Migrate appliance. Running the script on the Azure Migrate appliance will remove the working configuration and replace it with newly defined configuration.
Launch PowerShell on the above server with administrative (elevated) privilege.
Change the PowerShell directory to the folder where the contents have been extracted from the downloaded zipped file.
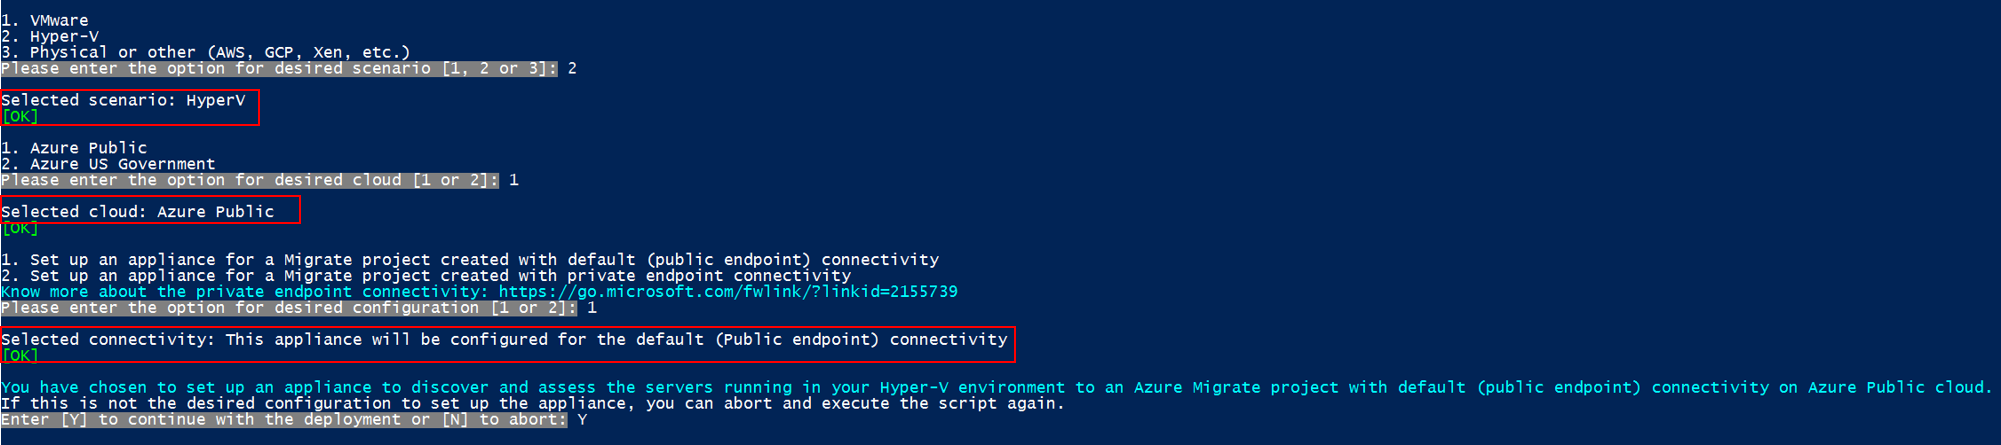
Run the script named
AzureMigrateInstaller.ps1by running the following command:PS C:\Users\administrator\Desktop\AzureMigrateInstaller> .\AzureMigrateInstaller.ps1Select from the scenario, cloud and connectivity options to deploy an appliance with the desired configuration. For instance, the selection shown below sets up an appliance to discover and assess servers running in your Hyper-V environment to an Azure Migrate project with default (public endpoint) connectivity on Azure public cloud.
The installer script does the following:
- Installs agents and a web application.
- Install Windows roles, including Windows Activation Service, IIS, and PowerShell ISE.
- Download and installs an IIS rewritable module.
- Updates a registry key (HKLM) with persistent setting details for Azure Migrate.
- Creates the following files under the path:
- Config Files: %Programdata%\Microsoft Azure\Config
- Log Files: %Programdata%\Microsoft Azure\Logs

After the script has executed successfully, the appliance configuration manager will be launched automatically.
Note
If you come across any issues, you can access the script logs at C:\ProgramData\Microsoft Azure\Logs\AzureMigrateScenarioInstaller_Timestamp.log for troubleshooting.
Verify access
Make sure that the appliance can connect to Azure URLs for the public cloud.
Next steps
After deploying the appliance, you need to configure it for the first time, and register it with project.
Feedback
Coming soon: Throughout 2024 we will be phasing out GitHub Issues as the feedback mechanism for content and replacing it with a new feedback system. For more information see: https://aka.ms/ContentUserFeedback.
Submit and view feedback for