Tutorial: Create a Power Automate flow app with Azure Database for MySQL - Flexible Server
APPLIES TO:  Azure Database for MySQL - Flexible Server
Power Automate is a service that helps you create automated workflows between your favorite apps and services to synchronize files, get notifications, collect data, and more. Here are a few examples of what you can do with Power Automate.
- Automate business processes
- Move business data between systems on a schedule
- Connect to more than 500 data sources or any publicly available API
- Perform CRUD (create, read, update, delete) operations on data
This quickstart shows how to create an automated workflow using Power automate flow with Azure Database for MySQL flexible server connector (Preview).
Prerequisites
An account on make.powerautomate.com.
An Azure account and subscription. If you don't have a subscription, sign up for a free Azure account.
- Create an Azure Database for MySQL flexible server instance using Azure portal
or Azure CLI if you don't have one. - Populate the Azure Database for MySQL flexible server database with this sample data.
Overview of cloud flows
Create a cloud flow when you want your automation to be triggered either automatically, instantly, or via a schedule. Here are types of flows you can create and then use with Azure Database for MySQL flexible server connector.
| Flow type | Use case | Automation target |
|---|---|---|
| Automated cloud flows | Create an automation that is triggered by an event such as arrival of an email from a specific person, or a mention of your company in social media. | Connectors for cloud or on-premises services connect your accounts and enable them to talk to each other. |
| Instant cloud flows | Start an automation with a click of a button. You can automate for repetitive tasks from your Desktop or Mobile devices. For example, instantly send a reminder to the team with a push of a button from your mobile device. | Wide range of tasks such as requesting an approval, an action in Teams or SharePoint. |
| Scheduled flows | Schedule an automation such as daily data upload to SharePoint or a database. | Tasks that need to be automated on a schedule. |
For this tutorial, we'll use instant cloud flow that can be triggered manually from any device, easy-to-share instant flows automate tasks so you don’t have to repeat yourself.
Specify an event to start the flow
Follow the steps to create an instant cloud flow with a manual trigger.
In Power Automate, select Create from the navigation bar on the left.
Under *Start from blank, select Instant cloud flow.
Give your flow a name in the **Flow name" field and select Manually trigger a flow.
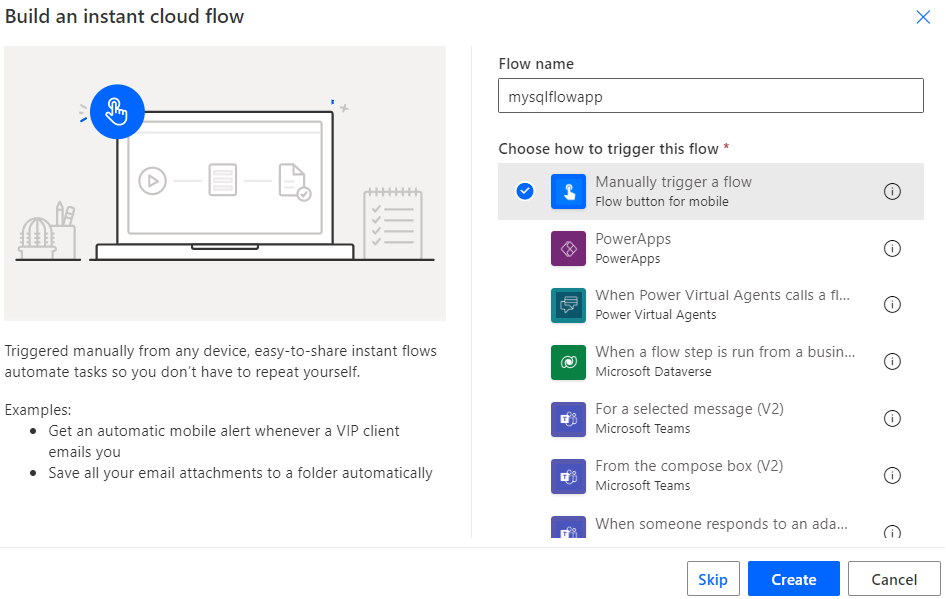
Select the Create button at the bottom of the screen.
Create a MySQL operation
An operation is an action. Power Automate flow allows you to add one or more advanced options and multiple actions for the same trigger. For example, add an advanced option that sends an email message as high priority. In addition to sending mail when an item is added to a list created in Microsoft Lists, create a file in Dropbox that contains the same information.
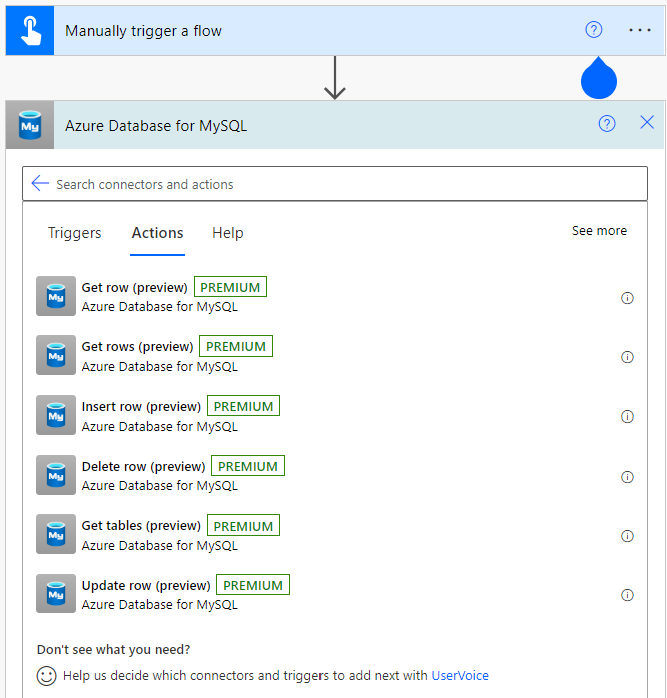
Once the flow app is created, select Next Step to create an operation.
In the box that shows Search connectors and actions, enter Azure Database for MySQL.
Select Azure Database for MySQL connector and then select Get Rows operation. Get rows operation allows you to get all the rows from a table or query.
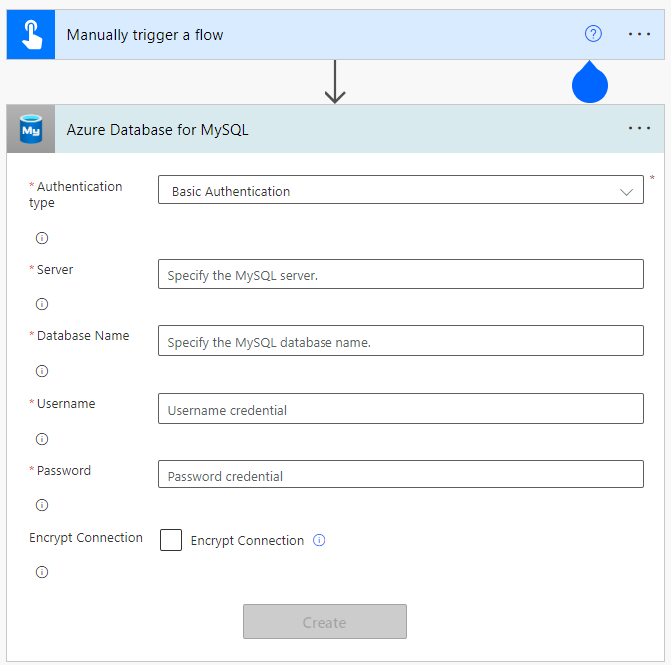
Add a new Azure Database for MySQL flexible server connection and enter the authentication type,server name, database name, username, password. Select encrypt connection if SSL is enabled on your MySQL server.
Note
If you get an error Test connection failed. Details: Authentication to host
'servername'for user'username'using method 'mysql_native_password' failed with message: Access denied for user'username'@'IP address'(using password: YES), please update the firewall rules on the Azure Database for MySQL flexible server instance in the Azure protal with this IP address.After the connection is successfully added, provide the servername, database name and table name parameters for Get Rows operation using the newly added connection. Select advanced options to add more filters or limit the number of rows returned.

Select Save.
Test and run your flow
After saving the flow, we need to test it and run the flow app.
Select Flow checker to see if there are any errors that need to be resolved.
Select Test and then select Manually to test the trigger.
Select Run flow.
When the flow is successfully executed, you can select click to download in the output section to see the JSON response received.

Triggers
Azure Database for MySQL flexible server connector supports triggers for when an item is created in Azure Database for MySQL flexible server or when an item is modified. A trigger is just an event that starts a cloud flow. Before using triggers, make sure your table schema has "created_at" and "updated_at" columns which are of type timestamp. The trigger use these columns to understand when a new item was create or modified and initiate the automated flow.
| Trigger | Description |
|---|---|
| When an item is created | Triggers a flow when an item is created in Azure Database for MySQL flexible server (Available only for Power Automate.) |
| When an item is modified | Triggers a flow when an item is modified in Azure Database for MySQL flexible server. (Available only for Power Automate.) |
Next steps
Azure Database for MySQL flexible server connector reference
Feedback
Coming soon: Throughout 2024 we will be phasing out GitHub Issues as the feedback mechanism for content and replacing it with a new feedback system. For more information see: https://aka.ms/ContentUserFeedback.
Submit and view feedback for