Migrate MySQL on-premises to Azure Database for MySQL: Data Migration with MySQL Workbench
APPLIES TO:  Azure Database for MySQL - Single Server
Azure Database for MySQL - Flexible Server
Azure Database for MySQL - Single Server
Azure Database for MySQL - Flexible Server
Prerequisites
Setup
Follow all the steps in the Setup guide to create an environment to support the following steps.
Configuring server parameters (Source)
Depending on the type of migration You've chosen (offline vs. online), you want to evaluate if you are going to modify the server parameters to support a fast egress of the data. If you are doing online, it may not be necessary to do anything to server parameters as you are likely to perform a binlog replication and have the data syncing on its own. However, if you are doing an offline migration, once you stop application traffic, you can switch the server parameters from supporting the workload to supporting the export.
Configuring server parameters (Target)
Review the server parameters before starting the import process into Azure Database for MySQL. Server parameters can be retrieved and set using the Azure portal or by calling the Azure PowerShell for MySQL cmdlets to make the changes.
Execute the following PowerShell script to get all parameters:
\[Net.ServicePointManager\]::SecurityProtocol = \[Net.SecurityProtocolType\]::Tls
12

Install-Module -Name Az.MySql
Connect-AzAccount
$rgName = "{RESOURCE\_GROUP\_NAME}";
$serverName = "{SERVER\_NAME}";
Get-AzMySqlConfiguration -ResourceGroupName $rgName -ServerName $serverName
To do the same with the mysql tool, download the CA root certification to c:\temp (make this directory).
Note
The certificate is subject to change. Reference Configure SSL connectivity in your application to securely connect to Azure Database for MySQL for the latest certificate information.
Run the following in a command prompt, be sure to update the tokens:
mysql --host {servername}.mysql.database.azure.com --database mysql --user
{u sername}@{servername} -p --ssl-ca=c:\\temp\\BaltimoreCyberTrustRoot.crt.cer
-A -e "SHOW GLOBAL VARIABLES;" \> c:\\temp\\settings\_azure.txt
In the new `settings_azure.txt` file, you can see the default Azure Database for MySQL server parameters as shown in the appendix.
To support the migration, set the target MySQL instance parameters to allow for a faster ingress. The following server parameters should be set before starting the data migration:
max\_allowed\_packet– set the parameter to1073741824(that is, 1 GB) or the largest size of a row in the database to prevent any overflow issue due to long rows. Consider adjusting this parameter if there are large BLOB rows that need to be pulled out (or read).innodb\_buffer\_pool\_size– Scale up the server to 32 vCore Memory Optimized SKU from the Pricing tier of the portal during migration to increase the innodb_buffer_pool_size. Innodb_buffer_pool_size can only be increased by scaling up compute for Azure Database for MySQL server. Reference Server parameters in Azure Database for MySQL for the max value for the tier. The maximum value in a Memory Optimized 32 vCore system is132070244352.innodb\_io\_capacity&innodb\_io\_capacity\_max- Change the parameter to9000to improve the IO utilization to optimize for migration speed.max\_connections- If using a tool that generates multiple threads to increase throughput, increase the connections to support that tool. Default is151, max is5000.Note
Take care when performing scaling. Some operations can't be undone, such as storage scaling.
These settings can be updated using the Azure PowerShell cmdlets below:
Install-Module -Name Az.MySql
$rgName = " {RESOURCE\_GROUP\_NAME}";
$serverName = "{SERVER\_NAME}";

Select-AzSubscription -Subscription "{SUBSCRIPTION\_ID}"
Update-AzMySqlConfiguration -Name max\_allowed\_packet -ResourceGroupName
$rgna me -ServerName $serverName -Value 1073741824
Update-AzMySqlConfiguration -Name innodb\_buffer\_pool\_size -ResourceGroupName
$rgname -ServerName $serverName -Value 16106127360
Update-AzMySqlConfiguration -Name innodb\_io\_capacity -ResourceGroupName
$rgna me -ServerName $serverName -Value 9000
Update-AzMySqlConfiguration -Name innodb\_io\_capacity\_max -ResourceGroupName
$ rgname -ServerName $serverName -Value 9000

\#required if You've functions

Update-AzMySqlConfiguration -Name log\_bin\_trust\_function\_creators
-ResourceGr oupName $rgname -ServerName $serverName -Value ON
Data
Tool choice
With the database objects and users from the source system migrated, the migration can begin. Databases running on MySQL version 8.0 can't use Azure DMS to migrate the workload. Instead, migration users should use MySQL Workbench.
Manual import and export steps
Open MySQL Workbench and connect as the local database’s root user.
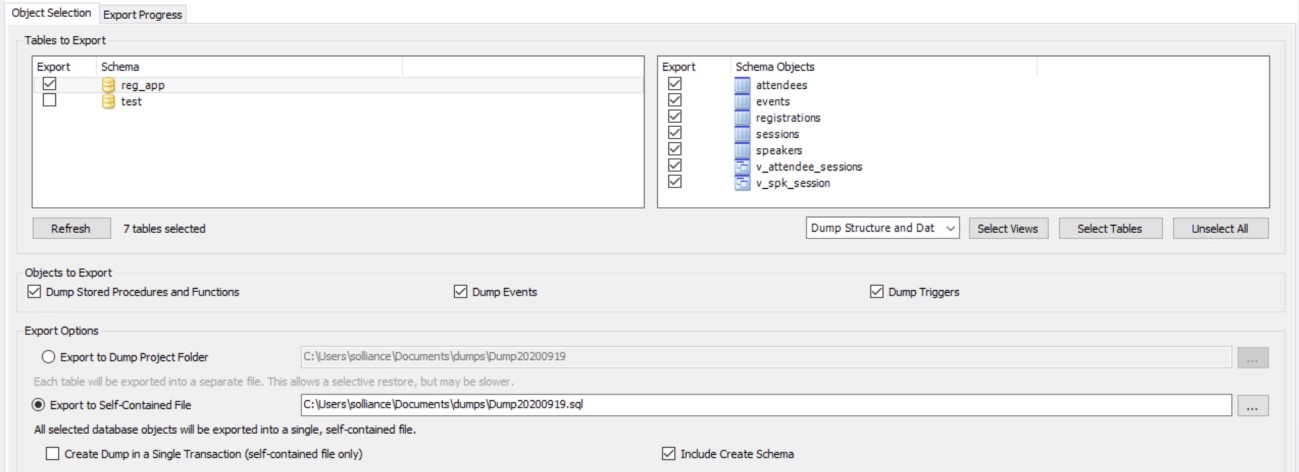
Under **Management**, select **Data Export**. Select the reg_app schema.
In Objects to Export, select Dump Stored Procedures and Functions, Dump Events and Dump Triggers.
Under Export Options, select Export to Self-Contained File.
Also, select the Include Create Schema checkbox. Refer to the image below to observe the correct mysqldump configuration.
Test
If any of these options appear unavailable, they're likely obstructed by the Output pane. Just change the editor layout.
Test
Select the Export Progress tab.
Select Start Export, notice MySQL Workbench makes calls to the
mysqldumptool.Open the newly created export script.
Find any
DEFINERstatements and either change to a valid user or remove them completely.
Note
This can be done by passing the --skip-definer in the mysqldump command. This is not an option in the MySQL Workbench; therefore, the lines need to be manually removed in the export commands. Although we point out four items to remove here, there can be other items that could fail when migrating from one MySQL version to another (such as new reserved words).
Find
SET GLOBALstatements and either change to a valid user or remove them completely.Ensure
sql\_modeisn’t set toNO\_AUTO\_CREATE\_USER.Remove the
hello\_worldfunction.In MySQL Workbench, create a new connection to the Azure Database for MySQL.
For Hostname, enter the full server DNS (ex:
servername.mysql.database.azure.com).Enter the username (ex:
sqlroot@servername).Select the SSL tab.
For the SSL CA File, browse to the BaltimoreCyberTrustRoot.crt.cer key file.
Select Test Connection, ensure the connection completes.
Select OK.
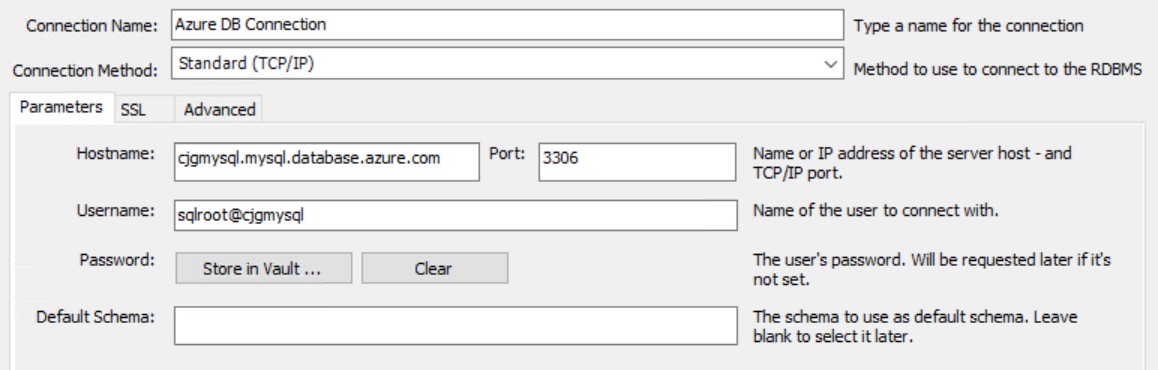
MySQL connection dialog box is displayed.
Select File->Open SQL Script.
Browse to the dump file, select Open.
Select Execute.
Update applications to support SSL
Switch to the Java Server API in Visual Studio code.
Open the launch.json file.
Update the DB_CONNECTION_URL to
jdbc:mysql://serverDNSname:3306/reg\_app?useUnicode=true\&useJDBCCompliantT imezoneShift=true\&useLegacyDatetimeCode=false\&serverTimezone=UTC\&verifySe rverCertificate=true\&useSSL=true\&requireSSL=true\&noAccessToProcedureBodie s=true.Note the additional SSL parameters.Update DB_USER_NAME to conferenceuser@servername.
Start the debug configuration, and ensure that the application works locally with the new database.
Revert server parameters
The following parameters can be changed on the Azure Database for MySQL target instance. These parameters can be set through the Azure portal or by using the Azure PowerShell for MySQL cmdlets.
$rgName = "YourRGName";
$serverName = "servername";
Update-AzMySqlConfiguration -Name max\_allowed\_packet -ResourceGroupName
$rgna me -ServerName $serverName -Value 536870912
Update-AzMySqlConfiguration -Name innodb\_buffer\_pool\_size -ResourceGroupName
$rgname -ServerName $serverName -Value 16106127360
Update-AzMySqlConfiguration -Name innodb\_io\_capacity -ResourceGroupName $rgna
me -ServerName $serverName -Value 200
Update-AzMySqlConfiguration -Name innodb\_io\_capacity\_max -ResourceGroupName
$ rgname -ServerName $serverName -Value 2000
Change connection string for the Java API
- Use the following commands to change the connection string for the App Service Java API
$rgName = "YourRGName";
$app_name = "servername";
az webapp config appsettings set -g $rgName -n $app_name
--settings DB_CONNECTION_URL={DB_CONNECTION_URL}
Note
Remember that you can use the Portal to set the connection string.
- Restart the App Service API
az webapp restart -g $rgName -n $app\_name
You've successfully completed an on-premises to Azure Database for MySQL migration!
Next steps
Feedback
Coming soon: Throughout 2024 we will be phasing out GitHub Issues as the feedback mechanism for content and replacing it with a new feedback system. For more information see: https://aka.ms/ContentUserFeedback.
Submit and view feedback for