Send notifications to Android and iOS applications
This article provides an overview of the Azure Notification Hub sample application built to demonstrate the capabilities of Azure Notification Hub on multiple platforms. The application uses a land survey scenario, in which the desktop Contoso Land Survey application sends notifications, which both Android and iOS Contoso applications can receive.
You can download the complete sample from GitHub.
Prerequisites
To build the sample, you need the following prerequisites:
- An Azure subscription. If you don't have an Azure subscription, create a free Azure account before you begin.
- Microsoft Visual Studio 2019 or later. This sample uses Visual Studio 2019.
- Visual Studio 2019 with the following workloads installed:
- .NET 5.0 SDK
- ASP.NET and web development
- Azure development
- Node.js development
- UWP app-development tools
- Firebase account to enable push notifications for Android.
- Apple developer account to enable push notifications for iOS.
- A SQL Server database instance, hosted on Azure.
- An Azure Notification Hub namespace and hub.
Sample architecture
The solution consists of the following components:
- Azure Notification Hub instance: an ANH namespace and hub configured on the Azure portal.
- SQL Server database: A SQL Server database instance, configured on the Azure portal.
- ASP.NET app back-end: a web API back-end built on .NET 5.0, which connects with the notification hub, and is hosted as an Azure App Service.
- Windows UWP application: a UWP application built using React Native, and acting as a "manager" application that dispatches news and survey information to various users and survey groups. The application also helps to create new users and to edit groups a user is assigned to.
- Android and iOS client apps: "Land Survey" applications built using React Native. These apps show users the information dispatched by the UWP manager application.
Sample folder structure
The sample application on GitHub contains the following folders:
- NotificationHub.Sample.API: A Visual Studio 2019 ASP.NET web API solution that acts as a back end.
- app: A cross-platform React Native application that enables dispatching notifications with a manager login, and to then receive notifications with a survey user login.
- azure-template: Azure Resource Manager templates (
parameters.jsonandtemplate.json) that you can use to deploy all the necessary resources to configure this deployment in your Azure subscription. For more information about Resource Manager template deployment, see Create and deploy ARM templates using the Azure portal.
Sample overview
The following sections provide an overview of the components that comprise the sample.
Controllers
Authentication
The following methods in AuthenticateController.cs are used to authenticate a logged-in user:
[HttpPost]
[Route("login")]
public async Task<IActionResult> Login([FromBody] LoginModel model)
{
   var user = await userManager.FindByNameAsync(model.Username);
    if (user != null && await userManager.CheckPasswordAsync(user, model.Password))
    {
        var userRoles = await userManager.GetRolesAsync(user);

        var authClaims = new List<Claim>
        {
            new Claim(ClaimTypes.Name, user.UserName),
            new Claim(JwtRegisteredClaimNames.Jti, Guid.NewGuid().ToString()),
        };

        foreach (var userRole in userRoles)
        {
            authClaims.Add(new Claim(ClaimTypes.Role, userRole));
        }

        var authSigningKey = new SymmetricSecurityKey(Encoding.UTF8.GetBytes(_configuration["JWT:Secret"]));

        var token = new JwtSecurityToken(
            issuer: _configuration["JWT:ValidIssuer"],
            audience: _configuration["JWT:ValidAudience"],
            expires: DateTime.Now.AddHours(3),
            claims: authClaims,
            signingCredentials: new SigningCredentials(authSigningKey, SecurityAlgorithms.HmacSha256)
            );

        UserDetails userDetails = new UserDetails();
        userDetails.FirstName = model.Username;
        userDetails.LastName = model.Username;
        userDetails.UserName = model.Username;

        return Ok(new
        {
            token = new JwtSecurityTokenHandler().WriteToken(token),
            expiration = token.ValidTo,
            username = model.Username,
            email = user.Email,
            role = userRoles != null ? userRoles[0] : "Site-Manager",
            user = userDetails
        });
    }
    return Unauthorized();
}

[HttpPost]
[Route("register")]
public async Task<IActionResult> Register([FromBody] RegisterModel model)
{
    var userExists = await userManager.FindByNameAsync(model.Username);
    if (userExists != null)
        return StatusCode(StatusCodes.Status500InternalServerError, new Response { Status = "Error", Message = "User already exists!" });

    ApplicationUser user = new ApplicationUser()
    {
        Email = model.Email,
        SecurityStamp = Guid.NewGuid().ToString(),
        UserName = model.Username
    };
    var result = await userManager.CreateAsync(user, model.Password);
    if (!result.Succeeded)
        return StatusCode(StatusCodes.Status500InternalServerError, new Response { Status = "Error", Message = "User creation failed! Please check user details and try again." });

    if (!await roleManager.RoleExistsAsync(UserRoles.SiteManager))
        await roleManager.CreateAsync(new IdentityRole(UserRoles.SiteManager));

    if (await roleManager.RoleExistsAsync(UserRoles.SiteManager))
    {
        await userManager.AddToRoleAsync(user, UserRoles.SiteManager);
    }

    return Ok(new Response { Status = "Success", Message = "User created successfully!" });
}
Dashboard
The dashboard controller in DashboardController.cs returns all notification information:
public class DashboardController : ControllerBase
{
    private readonly ApplicationDbContext _db;
    private readonly INotificationService _notificationService;

    public DashboardController(ApplicationDbContext dbContext, INotificationService notificationService)
    {
        _db = dbContext;
        _notificationService = notificationService;
    }

    [HttpGet("insights")]
    public async Task<IActionResult> GetDashboardInsight(string duration)
    {
        DashboardInsight dashboardInsight = new DashboardInsight();

        dashboardInsight.DeviceTrends = await _notificationService.GetAllRegistrationInfoAsync();

        var notificationMessages = _db.NotificationMessages.ToList();

        switch (duration)
        {
            case "Daily":
                {
                    dashboardInsight.NotificationTrends = _db.NotificationMessages
                                                            .GroupBy(m => m.SentTime.Date)
                                                            .Select(m => new NotificationTrend()
                                                            {
                                                                Timestamp = m.Key.ToShortDateString(),
                                                                NotificationsSent = m.Count()
                                                            }).ToList();
                }
                break;
            case "Weekly":
                {
                    dashboardInsight.NotificationTrends = notificationMessages
                                                            .GroupBy(m => WeekNumber(m.SentTime.Date))
                                                            .Select(m => new NotificationTrend()
                                                            {
                                                                Timestamp = FirstDateOfWeekISO8601(DateTime.Now.Year, m.Key).ToShortDateString(),
                                                                NotificationsSent = m.Count()
                                                            }).ToList();
                }
                break;
            case "Monthly":
                {
                    dashboardInsight.NotificationTrends = _db.NotificationMessages
                                                            .GroupBy(m => m.SentTime.Date.Month)
                                                            .Select(m => new NotificationTrend()
                                                            {
                                                                Timestamp = m.Key + "-" + DateTime.Now.Year,
                                                                NotificationsSent = m.Count()
                                                            }).ToList();
                }
                break;
            default:
                break;
        }

        dashboardInsight.TotalGroups = _db.SurveyGroups.Count();
        dashboardInsight.TotalUsers = _db.Users.Count();
        dashboardInsight.TotalNotificationsSent = _db.NotificationMessages.Count();

        return Ok(dashboardInsight);
    }
Front end
To call any backend API, the sample creates the notification.service.js service, which makes actual API call. This code is located in app\data\services\notification.service.js:
export const sendNotificationAPI = async (userInfo) => {
  let url = `${api}notification/send`;
  let authHeader = await getAuthHeaders();
  return await post(url, userInfo, { ...authHeader });
};

export const getNotificationsAPI = async () => {
  let url = `${api}notification/get`;
  let authHeader = await getAuthHeaders();
  return await get(url, { ...authHeader });
};
Manager application
This sample has a UWP application built using React Native, which acts as a "manager" application that dispatches news and survey information to various users and survey groups. The application also helps to create new users and edit groups to which a user is assigned.
For the manager login, use the following endpoint and POST body to generate user credentials of your choice. You can use any HTTP REST client of your choice:
Endpoint
POST {{endpoint}}api/authenticate/register-admin
Body
{
  "username": "<USER_NAME>",
  "email": "<EMAIL>",
  "password": "<PASSWORD>"
}
Once registered, you should be able to sign in to the UWP application with the same credentials.
Notification controller
The following code, in NotificationController.cs, gets and sends notifications:
[Produces("application/json")]
[Consumes("application/json")]
[HttpPost("send")]
public async Task<ActionResult> SendNotification([FromBody] NotificationMessage notificationMessage)
{
    try
    {
        List<string> tags = new List<string>();

        // attach survey group and user information with notificationMessage
        notificationMessage.SurveyGroupTags.ForEach(surveyGroupId =>
        {
            var group = _db.SurveyGroups.Where(g => g.Id == surveyGroupId).FirstOrDefault();
            if (group != null)
            {
                notificationMessage.SurveyGroups.Add(group);
                tags.Add($"group:{group.GroupName.Replace(' ', '-')}");
            }
        });

        notificationMessage.UserTags.ForEach(userId =>
        {
            var user = _db.Users.Where(u => u.Id == userId).FirstOrDefault();
            if (user != null)
            {
                notificationMessage.Users.Add(user);
                tags.Add($"username:{user.UserName}");
            }
        });
        _db.NotificationMessages.Add(notificationMessage);

        // send template notification
        var notification = new Dictionary<string, string>();
        notification.Add("title", notificationMessage.NotificationTitle);
        notification.Add("message", notificationMessage.NotificationDescription);

        var res = await _notificationService.RequestNotificationAsync(notificationMessage, tags, HttpContext.RequestAborted);

        await _db.SaveChangesAsync();
        return Ok(notificationMessage);
    }
    catch (Exception ex)
    {
        return BadRequest(ex.Message);
    }
}

[Produces("application/json")]
[HttpGet("get")]
public async Task<ActionResult> Get()
{
    try
    {
        var surveyGroups = _db.NotificationMessages.Include(message => message.SurveyGroups).Include(message => message.Users).ToList();
        return Ok(surveyGroups);
    }
    catch (Exception ex)
    {
        return BadRequest();
    }
}
Notification service
The notification service located in NotificationHub.Sample.API/NotificationHub.Sample.API/Services/Notifications/INotificationService.cs has methods to create and delete the installation. There is also a method to send notifications to all registered users, and to get all registration information:
public interface INotificationService
{
   Task<bool> CreateOrUpdateInstallationAsync(DeviceInstallation deviceInstallation, CancellationToken cancellationToken);
   Task<bool> DeleteInstallationByIdAsync(string installationId, CancellationToken cancellationToken);
   Task<bool> RequestNotificationAsync(NotificationMessage notificationMessage, IList<string> tags, CancellationToken cancellationToken);
   Task<List<DeviceTrend>> GetAllRegistrationInfoAsync();
}
Deploy the solution
To run the sample, the following prerequisites are required:
- An Azure subscription. If you don't have an Azure subscription, create a free Azure account.
- Firebase account to set up push notifications for Android.
- Apple developer account to set up push notifications for iOS.
- A Windows computer with Visual Studio 2019 installed, along with ASP.NET Core and UWP application development support.
- The Android SDK and Android Studio on your development machine if running the Android application.
- A Mac OSX machine with XCode and the latest iOS SDK, if running the iOS application.
Deploy resources
- Azure Notification Hub instance: a notification hub configured on Azure.
- SQL Server database instance: A SQL Server database hosted on Azure.
- ASP.NET app backend: Web API backend built over .NET 5.0, which connects with Azure Notification Hub hosted as Azure App Service. For more information, see Quickstart: Deploy an ASP.NET web app.
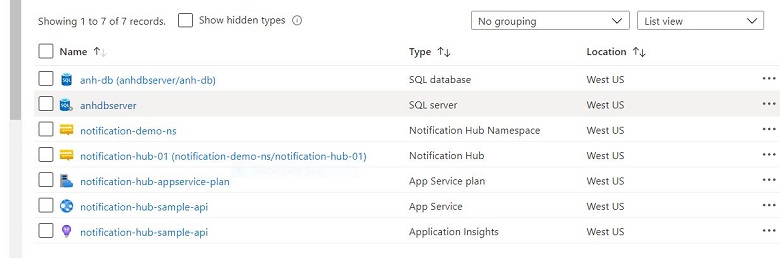
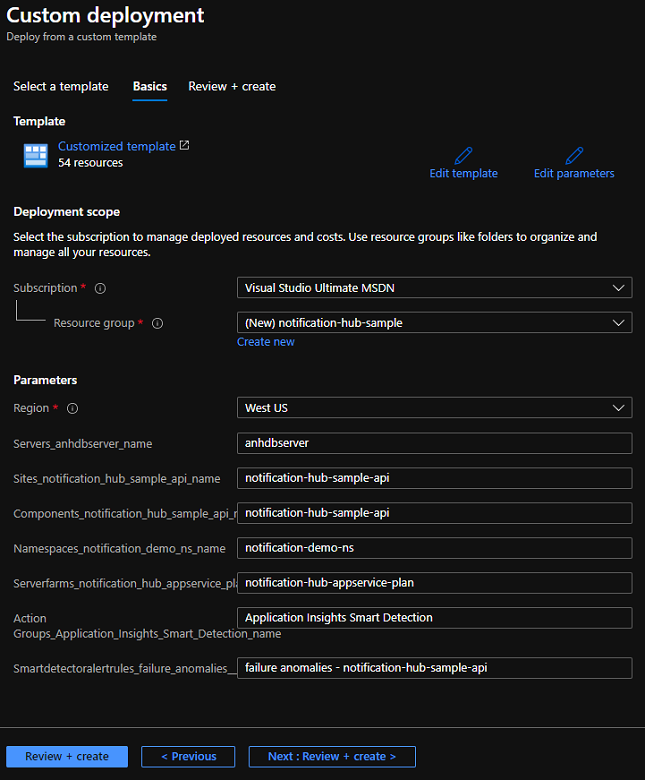
If you don't want to deploy all the resources manually, you can use the Azure Resource Manager template.json file provided in the GitHub repository to deploy all the necessary instances in one step. The template file is available in the repo in /azure-template. For more information about how to use Resource Manager templates, see Tutorial: Use Azure Quickstart templates.
Set up notifications for Android and iOS
- Firebase: To receive notifications on Android, configure the Firebase service and connect it with your Azure notification hub instance. For more information, see Configure Google Firebase settings.
- Apple Push Notification Service (APNS): To receive notifications on iOS, configure the APNS service using your Apple developer account and connect it with your Azure notification hub instance. For more information, see Configure Apple Push Notification Service settings.
Build the solution
To build the sample, follow these steps.
Create resource: SQL database
Create a SQL Server database instance in the Azure portal. For example:
Create resource: notification hub
Create a notification hub in the Azure portal as follows:
Sign in to the Azure portal.
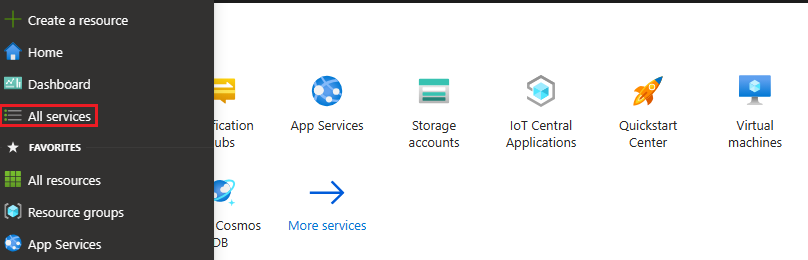
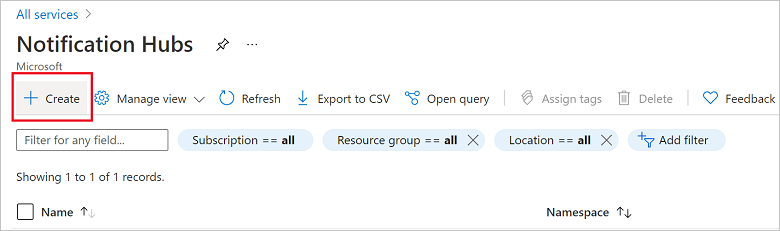
Select All services on the left menu.
Type Notification Hubs in the Filter services text box. Select the star icon next to the service name to add the service to the FAVORITES section on the left menu. Select Notification Hubs.
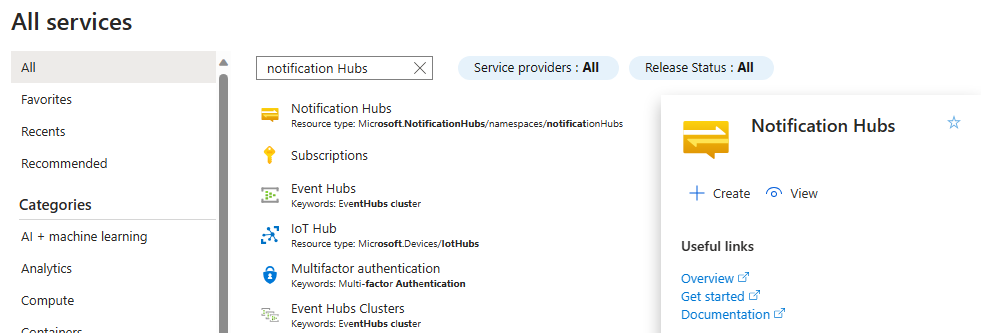
On the Notification Hubs page, select Create on the toolbar.
In the Basics tab on the Notification Hub page, do the following steps:
In Subscription, select the name of the Azure subscription you want to use, and then select an existing resource group, or create a new one.
Enter a unique name for the new namespace in Namespace Details.
A namespace contains one or more notification hubs, so type a name for the hub in Notification Hub Details.
Select a value from the Location drop-down list box. This value specifies the location in which you want to create the hub.
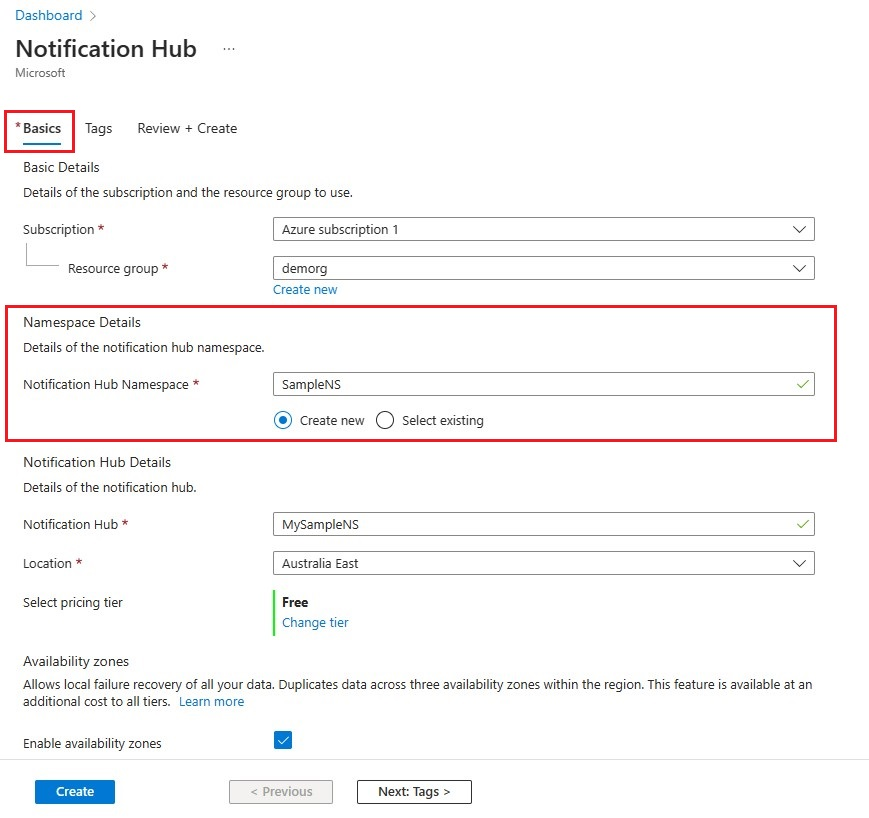
Review the Availability Zones option. If you chose a region that has availability zones, the check box is selected by default. Availability Zones is a paid feature, so an additional fee is added to your tier.
Choose a Disaster recovery option: None, Paired recovery region, or Flexible recovery region. If you choose Paired recovery region, the failover region is displayed. If you select Flexible recovery region, use the drop-down to choose from a list of recovery regions.
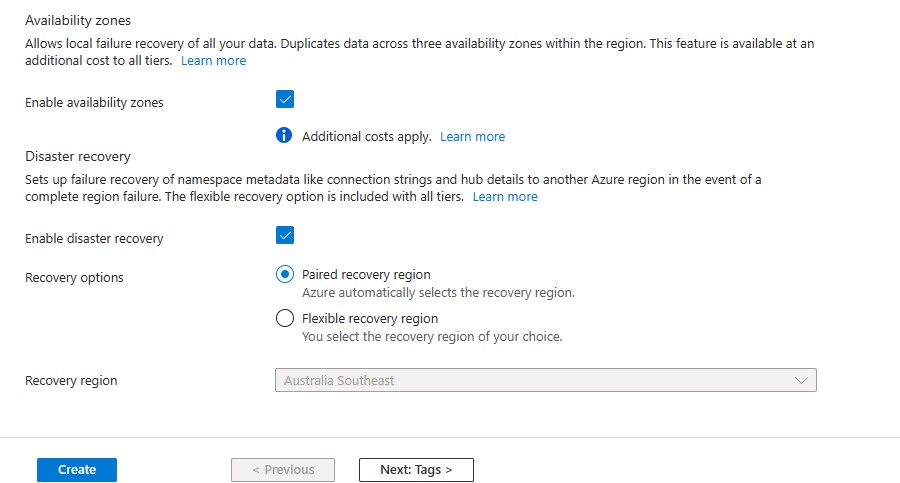
Select Create.
When the deployment is complete select Go to resource.


Configure backend
To configure the app backend, locate the /NotificationHub.Sample.API/appsettings.json file and configure the SQL Server connection string:
"ConnectionStrings": {
    "SQLServerConnectionString": "Server=tcp:<SERVER_NAME>,1433;Initial Catalog=<DB_NAME>;Persist Security Info=False;User ID=<DB_USER_NAME>;Password=<PASSWORD>;MultipleActiveResultSets=False;Encrypt=True;TrustServerCertificate=False;Connection Timeout=30;"
  },
Replace <SERVER_NAME> with the name of your SQL server, <DB_NAME> with your deployed database URL, <DB_USER_NAME> with configured username, and <PASSWORD> with the configured password.
You can run the API solution locally or on any IIS server, or deploy it as an Azure Web App Service. Keep the URL of the API handy.
Build the NotificationHub.Sample.API application
In Visual Studio, load the /NotificationHubSample/NotificationHub.Sample.API/NotificationHub.Sample.API.sln solution.
From the Build menu, select Build Solution.
Publish the solution to Azure: in Solution Explorer, right-click the NotificationHub.Sample.API project, then select Publish.
In the Publish dialog, select Azure (first option), then select Next.
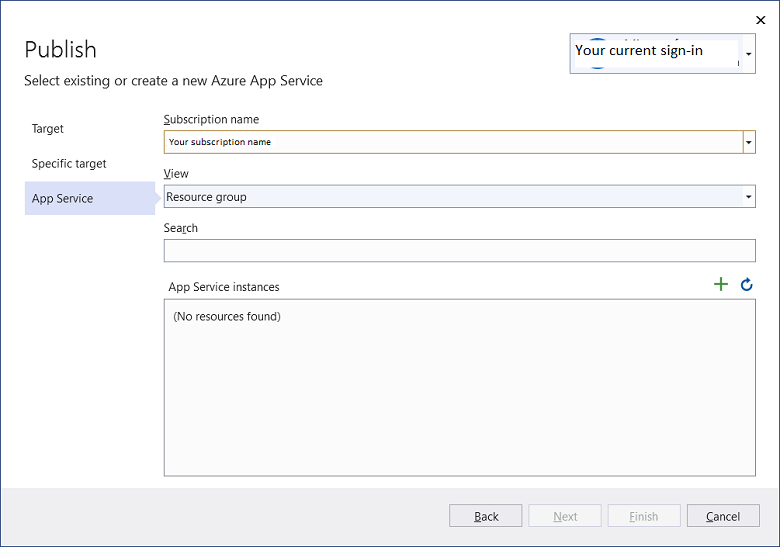
Select Azure App Service (Windows), then select Next.
You are redirected to the following dialog, from which you can select the appropriate subscription name and AppService instances. Your backend will be deployed to Azure, and you will be redirected to a new URL.
Once the backend is published, add the generated URL into config.js, located under the /app folder. Be sure to append
/api/after the URL.
Run React native frontend application for Windows
The application requires both the mobile application (either Android or iOS) and UWP manager application running simultaneously. Follow these steps to run both of them:
Open the app folder in your preferred terminal or shell window. Then, do the following:
Windows
- Run
npm installto install all the package dependencies. - Run
npm run startto start the metro server in one console window. - Open another terminal window, and run
npx react-native run-windowsto run the UWP application. - If the deployment or build fails, see the troubleshooting guide.
Android
- Configure Firebase on your React-Native project to make sure you are able to use the notification capabilities.
- After you have successfully configured the Firebase project, download the google-services.json file from the Firebase portal.
- Replace ./app/android/app/google-services.json with this new file. Make sure the application package name matches the one configured in Firebase. The package name is configured in the AndroidManifest.xml file.
- For more information about how to configure notifications in a React Native application, see Tutorial: Send push notifications to React Native.
- After the notifications are configured, run
npm run startto start the metro server in one console window. If your Windows application is already running, you can skip this step. - In a new console window, run
npx react-native run-androidto run the Android application.
iOS
- Configure APNS on your React-Native project to make sure you are able to use the notification capabilities.
- In iOS, notifications can only be received by applications signed and installed via the App Store or TestFlight. You must create an application in your Apple developer account. The application's bundle identifier configured in your Apple developer account should be configured in your application's Info.plist and Entitlements.plist files.
- For more information about how to configure notifications in a React Native application, see Tutorial: Send push notifications to React Native.
- After the notifications are configured, run
npm run startto start the metro server in one console window. If your Windows application is already running, you can skip this step. - In a new console window, run
npx react-native run-iosto run the iOS application. As previously mentioned, the notifications won't work on iOS if deployed locally. You cannot receive notifications in the iOS simulator.
Troubleshooting
You might get the following error while running the React Native for Windows application:
error MSB4057: The target "Deploy" does not exist in the project
This is a known issue with React Native for Windows. To fix this, unload the .csproj file for the CheckboxWindows and ReactNativeAsyncStorage projects in Visual Studio after opening app.sln in the app/windows folder. Then, in the app.csproj file add the following line just before ...</Project>, then reload the project:
<Target Name="Deploy"/>
Next steps
Feedback
Coming soon: Throughout 2024 we will be phasing out GitHub Issues as the feedback mechanism for content and replacing it with a new feedback system. For more information see: https://aka.ms/ContentUserFeedback.
Submit and view feedback for