Connect to and manage SAP Business Warehouse in Microsoft Purview
This article outlines how to register SAP Business Warehouse (BW), and how to authenticate and interact with SAP BW in Microsoft Purview. For more information about Microsoft Purview, read the introductory article.
Supported capabilities
| Metadata Extraction | Full Scan | Incremental Scan | Scoped Scan | Classification | Labeling | Access Policy | Lineage | Data Sharing | Live view |
|---|---|---|---|---|---|---|---|---|---|
| Yes | Yes | No | No | No | No | No | No | No | No |
The supported SAP BW versions are 7.3 to 7.5. SAP BW/4HANA isn't supported.
When scanning SAP BW source, Microsoft Purview supports extracting technical metadata including:
- Instance
- InfoArea
- InfoSet
- InfoSet query
- Classic InfoSet
- InfoObject including unit of measurement, time characteristic, navigation attribute, data packet characteristic, currency, characteristic, field, and key figure
- Data store object (DSO) including its schema of InfoObject attributes and primary keys
- Advanced data store object (ADSO) including its schema of InfoObject attributes and primary keys
- Aggregation level
- Open hub destination
- Query including the query condition
- Query view
- HybridProvider
- MultiProvider
- InfoCube
- Aggregate
- Dimension
- Time dimension
Known limitations
- When object is deleted from the data source, currently the subsequent scan won't automatically remove the corresponding asset in Microsoft Purview.
- Only the sap_bw_query_condition can be extracted under the sap_bw_query.
Prerequisites
An Azure account with an active subscription. Create an account for free.
An active Microsoft Purview resource.
You need Data Source Administrator and Data Reader permissions to register a source and manage it in the Microsoft Purview governance portal. For more information about permissions, see Access control in Microsoft Purview.
When you create a scan for the first time, you need to create a function module in your SAP server. Microsoft Purview provides some code in the asset page in the Microsoft Purview Data Map to create the module. To download this code, you need to have Data Source Administrator permissions on the root collection in your data map.
Set up the latest self-hosted integration runtime. For more information, see the create and configure a self-hosted integration runtime guide. The minimal supported Self-hosted Integration Runtime version is 5.15.8079.1.
Ensure JDK 11 is installed on the machine where the self-hosted integration runtime is installed. Restart the machine after you newly install the JDK for it to take effect.
Ensure Visual C++ Redistributable (version Visual Studio 2012 Update 4 or newer) is installed on the self-hosted integration runtime machine. If you don't have this update installed, you can download it here.
The connector reads metadata from SAP using the SAP Java Connector (JCo) 3.0 API. Make sure the Java Connector is available on your machine where self-hosted integration runtime is installed. Make sure that you use the correct JCo distribution for your environment, and the sapjco3.jar and sapjco3.dll files are available.
Note
The driver should be accessible to all accounts in the machine. Don't put it in a path under user account.
Self-hosted integration runtime communicates with the SAP server over dispatcher port 32NN and gateway port 33NN, where NN is your SAP instance number from 00 to 99. Make sure the outbound traffic is allowed on your firewall.
Deploy the metadata extraction ABAP function module on the SAP server by following the steps mentioned in ABAP functions deployment guide. You need an ABAP developer account to create the RFC function module on the SAP server. For scan execution, the user account requires sufficient permissions to connect to the SAP server and execute the following RFC function modules:
- STFC_CONNECTION (check connectivity)
- RFC_SYSTEM_INFO (check system information)
- OCS_GET_INSTALLED_COMPS (check software versions)
- Z_MITI_BW_DOWNLOAD (main metadata import, the function module you create following the Purview guide)
The underlying SAP Java Connector (JCo) libraries may call additional RFC function modules e.g. RFC_PING, RFC_METADATA_GET, etc., refer to SAP support note 460089 for details.
Register
This section describes how to register SAP BW in Microsoft Purview using the Microsoft Purview governance portal.
Authentication for registration
The only supported authentication for SAP BW source is Basic authentication.
Steps to register
Open the Microsoft Purview governance portal by:
- Browsing directly to https://web.purview.azure.com and selecting your Microsoft Purview account.
- Opening the Azure portal, searching for and selecting the Microsoft Purview account. Selecting the the Microsoft Purview governance portal button.
Select Data Map on the left navigation.
Select Register.
In Register sources, select SAP BW > Continue.
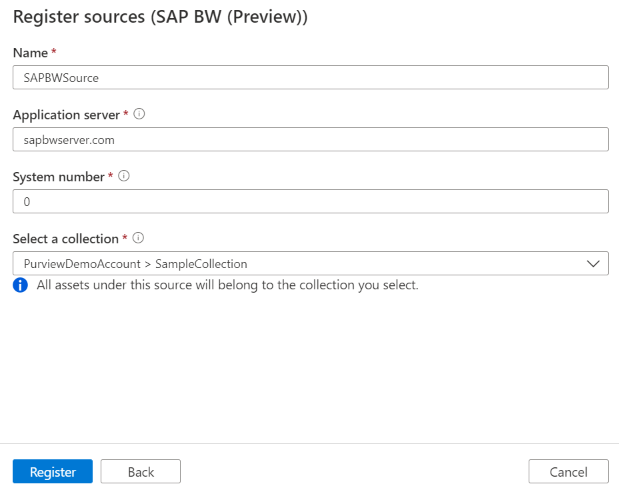
On the Register sources (SAP BW) screen, do the following:
Enter a Name that the data source will be listed within the Catalog.
Enter the Application server name to connect to SAP BW source. It can also be an IP address of the SAP application server host.
Enter the SAP System number. It's an integer between 0 and 99.
Select a collection from the list.
Finish to register the data source.
Scan
Follow the steps below to scan SAP BW to automatically identify assets. For more information about scanning in general, see our introduction to scans and ingestion.
Important
When you create a scan for the first time, you need to create a function module in your SAP server. Microsoft Purview provides some code in the asset page in the Microsoft Purview Data Map to create the module. To download this code, you need to have Data Source Administrator permissions on the root collection in your data map.
Create and run scan
In the Management Center, select Integration runtimes. Make sure a self-hosted integration runtime is set up. If it isn't set up, use the steps mentioned here to create a self-hosted integration runtime.
Navigate to Sources
Select the registered SAP BW source.
Select + New scan
Provide the below details:
Name: The name of the scan
Connect via integration runtime: Select the configured self-hosted integration runtime.
Credential: Select the credential to connect to your data source. Make sure to:
- Select Basic Authentication while creating a credential.
- Provide a user ID to connect to SAP server in the User name input field.
- Store the user password used to connect to SAP server in the secret key.
Client ID: Enter the SAP Client ID. It's a three-digit numeric number from 000 to 999.
JCo library path: Specify the directory path where the JCo libraries are located, e.g.
D:\Drivers\SAPJCo. Make sure the path is accessible by the self-hosted integration runtime, learn more from prerequisites section.Maximum memory available: Maximum memory (in GB) available on the Self-hosted Integration Runtime machine to be used by scanning processes. This is dependent on the size of SAP BW source to be scanned.

Select Test connection.
Select Continue.
Choose your scan trigger. You can set up a schedule or ran the scan once.
Review your scan and select Save and Run.
View your scans and scan runs
To view existing scans:
- Go to the Microsoft Purview portal. On the left pane, select Data map.
- Select the data source. You can view a list of existing scans on that data source under Recent scans, or you can view all scans on the Scans tab.
- Select the scan that has results you want to view. The pane shows you all the previous scan runs, along with the status and metrics for each scan run.
- Select the run ID to check the scan run details.
Manage your scans
To edit, cancel, or delete a scan:
Go to the Microsoft Purview portal. On the left pane, select Data Map.
Select the data source. You can view a list of existing scans on that data source under Recent scans, or you can view all scans on the Scans tab.
Select the scan that you want to manage. You can then:
- Edit the scan by selecting Edit scan.
- Cancel an in-progress scan by selecting Cancel scan run.
- Delete your scan by selecting Delete scan.
Note
- Deleting your scan does not delete catalog assets created from previous scans.
Next steps
Now that you've registered your source, follow the below guides to learn more about Microsoft Purview and your data.
Feedback
Coming soon: Throughout 2024 we will be phasing out GitHub Issues as the feedback mechanism for content and replacing it with a new feedback system. For more information see: https://aka.ms/ContentUserFeedback.
Submit and view feedback for