How to submit a circuit with Cirq to Azure Quantum
Learn how to submit a Cirq quantum circuit using the azure-quantum Python package. You can submit Cirq circuits to Azure Quantum using the Azure Quantum notebook, which have built-in azure-quantum Python package, or from your local machine.
For more information, see Quantum circuits.
Note
The Microsoft Quantum Development Kit (Classic QDK) will no longer be supported after June 30, 2024. If you are an existing QDK developer, we recommend that you transition to the new Azure Quantum Development Kit (Modern QDK) to continue developing quantum solutions. For more information, see Migrate your Q# code to the Modern QDK.
Prerequisites
For installation details, see Installing the Modern QDK on VS Code.
An Azure Quantum workspace in your Azure subscription. To create a workspace, see Create an Azure Quantum workspace.
A Python environment with Python and Pip installed.
VS Code with the Azure Quantum Development Kit, Python, and Jupyter extensions installed.
The Azure Quantum
azure-quantumpackage with the [cirq] tag, and theqsharpand theipykernelpackages.python -m pip install --upgrade azure-quantum[cirq] qsharp ipykernelNote
If the Jupyter Python kernel
ipykernelis not detected, VS Code will prompt you to install it.
Create a new Jupyter Notebook
- In VS Code, select View > Command palette and select Create: New Jupyter Notebook.
- In the top-right, VS Code will detect and display the version of Python and the virtual Python environment that was selected for the notebook. If you have multiple Python environments, you may need to select a kernel using the kernel picker in the top right. If no environment was detected, see Jupyter Notebooks in VS Code for setup information.
Load the required imports
In the first cell of your notebook, run the following code to load the required imports:
import azure.quantum
from azure.quantum.cirq import AzureQuantumService
Connect to the Azure Quantum service
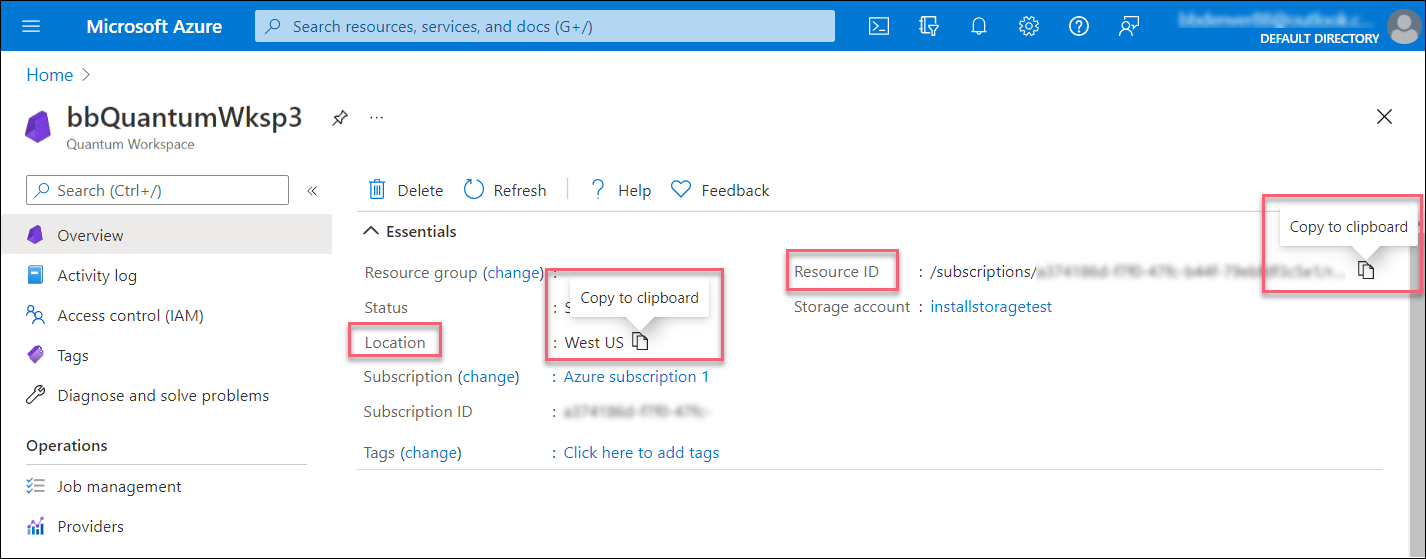
To connect to the Azure Quantum service, your program will need the resource ID and the location of your Azure Quantum workspace. Log in to your Azure account, https://portal.azure.com, navigate to your Azure Quantum workspace, and copy the values from the header.
Add a new cell and use your account information to create Workspace and AzureQuantumService objects to connect to your Azure Quantum workspace.
workspace = Workspace(
    resource_id = "", # Add the resourceID of your workspace
    location = "" # Add the location of your workspace (for example "westus")
    )

service = AzureQuantumService(workspace)
List all targets
Use the targets()method to list all the targets in your workspace that can run your circuit, including the
current queue time and availability.
Note
All the targets in your workspace may not be listed - only the targets that can accept a Cirq or OpenQASM circuit will be listed here.
print(service.targets())
[<Target name="quantinuum.qpu.h1-1", avg. queue time=0 s, Degraded>,
<Target name="quantinuum.sim.h1-1sc", avg. queue time=1 s, Available>,
<Target name="quantinuum.sim.h1-1e", avg. queue time=40 s, Available>,
<Target name="ionq.qpu", avg. queue time=229 s, Available>,
<Target name="ionq.simulator", avg. queue time=3 s, Available>,
<Target name="ionq.qpu.aria-1", avg. queue time=1136774 s, Available>]
Create a simple circuit
Next, create a simple Cirq circuit to run. This circuit uses the square root of X gate, native to the IonQ hardware system.
import cirq

q0, q1 = cirq.LineQubit.range(2)
circuit = cirq.Circuit(
    cirq.X(q0)**0.5,             # Square root of X
    cirq.CX(q0, q1),              # CNOT
    cirq.measure(q0, q1, key='b') # Measure both qubits
)
print(circuit)
0: ───X^0.5───@───M────────
              │   │
1: ───────────X───M────────
Select a target to run your program
Run on IonQ simulator
You can now run the program via the Azure Quantum service and get the result. The following cell submits a job (to the default IonQ simulator) that runs the circuit with 100 shots, waits until the job is complete, and returns the results.
result = service.run(program=circuit, repetitions=100, target="ionq.simulator")
This returns a cirq.Result object.
print(result)
b=1001100101100001000011011101000011010100010111100011001000100100010000001110010010101110110000011010, 1001100101100001000011011101000011010100010111100011001000100100010000001110010010101110110000011010
Estimate job cost
Before running a job on the QPU, you can estimate how much it will cost to run. To estimate the cost of running a job on the QPU, you can use the estimate_cost method:
cost = service.estimate_cost(
    program=circuit,
    repetitions=100,
    target="ionq.qpu"
)

print(f"Estimated cost: {cost.estimated_total}")
This prints the estimated cost in USD.
For the most current pricing details, see IonQ Pricing, or find your workspace and view pricing options in the "Provider" tab of your workspace via: aka.ms/aq/myworkspaces.
Run on IonQ QPU
The previous job ran on the default simulator, "ionq.simulator". However, you can also run it on IonQ's hardware processor (a Quantum Processor Unit (QPU)). To run on the IonQ QPU, provide "ionq.qpu" as the
target argument:
result = service.run(
    program=circuit,
    repetitions=100,
    target="ionq.qpu",
    timeout_seconds=500 # Set timeout to accommodate queue time on QPU
)
Again, this returns a cirq.Result object.
print(result)
b=0101011011011111100001011101101011011110100010000000011110111000100100110110101100110001001111101111, 0101011011011111100001011101101011011110100010000000011110111000100100110110101100110001001111101111
Asynchronous model using Jobs
For long-running circuits, it can be useful to run them asynchronously.
The service.create_job method returns a Job object, which you can use to
get the results after the job has run successfully.
job = service.create_job(
    program=circuit,
    repetitions=100,
    target="ionq.simulator"
)
To check on the job status, use job.status():
print(job.status())
'completed'
To wait for the job to complete and then get the results, use the blocking
call job.results():
result = job.results()
print(result)
00: 0.5
11: 0.5
Note that this does not return a cirq.Result object. Instead it
returns a result object that is specific to the IonQ simulator and uses
state probabilities instead of shot data.
type(result)
cirq_ionq.results.SimulatorResult
To convert this to a cirq.Result object, use result.to_cirq_result():
print(result.to_cirq_result())
b=1110101111111110111000011101011111001100010000001011011101001111001111001101100111010000001100011100, 1110101111111110111000011101011111001100010000001011011101001111001111001101100111010000001100011100
Prerequisites
- An Azure account with an active subscription. If you don’t have an Azure account, register for free and sign up for a pay-as-you-go subscription.
- An Azure Quantum workspace. For more information, see Create an Azure Quantum workspace.
Create a new notebook in your workspace
- Log in to the Azure portal and select the workspace from the previous step.
- In the left blade, select Notebooks.
- Click My Notebooks and click Add New.
- Type a name for the file, for example Cirq.ipynb, and click Create file.
When your new notebook opens, it automatically creates the code for the first cell, based on your subscription and workspace information.
from azure.quantum import Workspace
workspace = Workspace (
resource_id = "", # Add your resource_id
location = "" # Add your workspace location (for example, "westus")
)
Note
Unless otherwise noted, you should run each cell in order as you create it to avoid any compilation issues.
Click the triangular "play" icon to the left of the cell to run the code.
Load the required imports
First, you'll need to import an additional module.
Click + Code to add a new cell, then add and run the following code:
from azure.quantum.cirq import AzureQuantumService
Connect to the Azure Quantum service
Next, create an AzureQuantumService object using the workspace object from the previous cell to connect to your Azure Quantum workspace. Add a new cell with the following code:
provider = AzureQuantumService(workspace)
Define a simple circuit
Next, create a simple Cirq circuit to run. This circuit uses the square root of X gate, native to the IonQ hardware system.
import cirq
q0, q1 = cirq.LineQubit.range(2)
circuit = cirq.Circuit(
cirq.X(q0)**0.5, # Square root of X
cirq.CX(q0, q1), # CNOT
cirq.measure(q0, q1, key='b') # Measure both qubits
)
print(circuit)
0: ───X^0.5───@───M────────
│ │
1: ───────────X───M────────
List all targets
Use the targets()method to list all the targets in your workspace that can run your circuit, including the
current queue time and availability.
Note
All the targets in your workspace may not be listed - only the targets that can accept a Cirq or OpenQASM circuit will be listed here.
print("This workspace's targets:")
for target in service.targets():
print(target)
This workspace's targets:
<Target name="quantinuum.qpu.h1-1", avg. queue time=0 s, Degraded>
<Target name="quantinuum.sim.h1-1sc", avg. queue time=1 s, Available>
<Target name="quantinuum.sim.h1-1e", avg. queue time=40 s, Available>
<Target name="ionq.qpu", avg. queue time=229 s, Available>
<Target name="ionq.simulator", avg. queue time=3 s, Available>
<Target name="ionq.qpu.aria-1", avg. queue time=1136774 s, Available>
Note
The full list of target may be different for your workspace.
Select a target to run your program
Run on the IonQ simulator
To check your circuit before running it on actual quantum hardware, you can use the IonQ simulator, ionq.simulator.
The following cell submits a job that runs the circuit with 100 shots, waits until the job is complete, and returns the results.
result = service.run(
program=circuit,
repetitions=100,
target="ionq.simulator"
)
This returns a cirq.Result object.
print(result)
b=1001100101100001000011011101000011010100010111100011001000100100010000001110010010101110110000011010, 1001100101100001000011011101000011010100010111100011001000100100010000001110010010101110110000011010
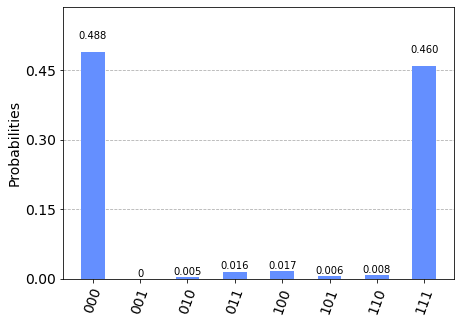
You can plot the results in a histogram:
import pylab as pl

pl.hist(result.data)
pl.ylabel("Counts")
pl.xlabel("Result")
Estimate job cost
Before running a job on actual quantum hardware, or a quantum processing unit (QPU), you can estimate how much it will cost to run. To estimate the cost of running a job on the QPU, you can use the estimate_cost method:
cost = service.estimate_cost(
program=circuit,
repetitions=100,
target="ionq.qpu"
)
print(f"Estimated cost: {cost.estimated_total}")
Estimated cost: 1
This prints the estimated cost in USD.
For the most current pricing details, see IonQ Pricing, or view pricing options in the Providers blade of your workspace. To see your current credit status and usage, select Credits and quotas.
Run on IonQ QPU
The previous job ran on the default simulator, ionq.simulator. However, you can also run it on IonQ's hardware processor, or Quantum Processor Unit (QPU). To run on the IonQ QPU, provide ionq.qpu as the
target argument:
result = service.run(
program=circuit,
repetitions=100,
target="ionq.qpu",
timeout_seconds=500 # Set timeout to accommodate queue time on QPU
)
Note
The time required to run a circuit on the QPU depends on current queue times. You can view the average queue time for a target by selecting the Providers blade of your workspace.
Again, this returns a cirq.Result object.
print(result)
b=1001100101100001000011011101000011010100010111100011001000100100010000001110010010101110110000011010, 1001100101100001000011011101000011010100010111100011001000100100010000001110010010101110110000011010
Asynchronous model using Jobs
For long-running circuits, it can be useful to run them asynchronously.
The service.create_job method returns a Job object, which you can use to
get the results after the job has run successfully.
job = service.create_job(
program=circuit,
repetitions=100,
target="ionq.simulator"
)
To check on the job status, use job.status():
print(job.status())
'completed'
To wait for the job to complete and then get the results, use the blocking
call job.results():
result = job.results()
print(result)
00: 0.5
11: 0.5
Note
The job.results() function does not return a cirq.Result object. Instead it returns a result object that is specific to the IonQ simulator and uses
state probabilities instead of shot data.
type(result)
cirq_ionq.results.SimulatorResult
To convert this to a cirq.Result object, use result.to_cirq_result():
print(result.to_cirq_result())
b=1110101111111110111000011101011111001100010000001011011101001111001111001101100111010000001100011100, 1110101111111110111000011101011111001100010000001011011101001111001111001101100111010000001100011100
Important
Submitting multiple circuits on a single job is currently not supported. As a workaround you can call the backend.run method to submit each circuit asynchronously, then fetch the results of each job. For example:
jobs = []
for circuit in circuits:
    jobs.append(backend.run(circuit, shots=N))

results = []
for job in jobs:
    results.append(job.result())
Next steps
Feedback
Coming soon: Throughout 2024 we will be phasing out GitHub Issues as the feedback mechanism for content and replacing it with a new feedback system. For more information see: https://aka.ms/ContentUserFeedback.
Submit and view feedback for