Security filters for trimming Azure AI Search results using Microsoft Entra tenants and identities
This article demonstrates how to use Microsoft Entra security identities together with filters in Azure AI Search to trim search results based on user group membership.
This article covers the following tasks:
- Create Microsoft Entra groups and users
- Associate the user with the group you have created
- Cache the new groups
- Index documents with associated groups
- Issue a search request with group identifiers filter
Prerequisites
Your index in Azure AI Search must have a security field to store the list of group identities having read access to the document. This use case assumes a one-to-one correspondence between a securable item (such as an individual's college application) and a security field specifying who has access to that item (admissions personnel).
You must have Microsoft Entra administrator permissions (Owner or administrator) to create users, groups, and associations.
Your application must also be registered with Microsoft Entra ID as a multitenant app, as described in the following procedure.
Register your application with Microsoft Entra ID
This step integrates your application with Microsoft Entra ID for the purpose of accepting sign-ins of user and group accounts. If you aren't a tenant admin in your organization, you might need to create a new tenant to perform the following steps.
In Azure portal, find the Microsoft Entra ID tenant.
On the left, under Manage, select App registrations, and then select New registration.
Give the registration a name, perhaps a name that's similar to the search application name. Refer to this article for information about other optional properties.
Select Register.
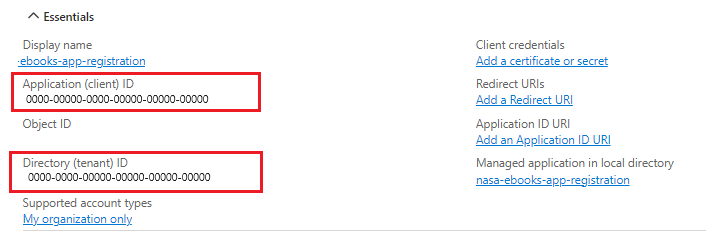
Once the app registration is created, copy the Application (client) ID. You'll need to provide this string to your application.
If you're stepping through the DotNetHowToSecurityTrimming, paste this value into the app.config file.
Copy the Directory (tenant) ID.
On the left, select API permissions and then select Add a permission.
Select Microsoft Graph and then select Delegated permissions.
Search for and then add the following delegated permissions:
- Directory.ReadWrite.All
- Group.ReadWrite.All
- User.ReadWrite.All
Microsoft Graph provides an API that allows programmatic access to Microsoft Entra ID through a REST API. The code sample for this walkthrough uses the permissions to call the Microsoft Graph API for creating groups, users, and associations. The APIs are also used to cache group identifiers for faster filtering.
Select Grant admin consent for tenant to complete the consent process.
Create users and groups
If you're adding search to an established application, you might have existing user and group identifiers in Microsoft Entra ID. In this case, you can skip the next three steps.
However, if you don't have existing users, you can use Microsoft Graph APIs to create the security principals. The following code snippets demonstrate how to generate identifiers, which become data values for the security field in your Azure AI Search index. In our hypothetical college admissions application, this would be the security identifiers for admissions staff.
User and group membership might be very fluid, especially in large organizations. Code that builds user and group identities should run often enough to pick up changes in organization membership. Likewise, your Azure AI Search index requires a similar update schedule to reflect the current status of permitted users and resources.
Step 1: Create Group
private static Dictionary<Group, List<User>> CreateGroupsWithUsers(string tenant)
{
    Group group = new Group()
    {
        DisplayName = "My First Prog Group",
        SecurityEnabled = true,
        MailEnabled = false,
        MailNickname = "group1"
    };
Step 2: Create User
User user1 = new User()
{
    GivenName = "First User",
    Surname = "User1",
    MailNickname = "User1",
    DisplayName = "First User",
    UserPrincipalName = String.Format("user1@{0}", tenant),
    PasswordProfile = new PasswordProfile() { Password = "********" },
    AccountEnabled = true
};
Step 3: Associate user and group
List<User> users = new List<User>() { user1, user2 };
Dictionary<Group, List<User>> groups = new Dictionary<Group, List<User>>() { { group, users } };
Step 4: Cache the groups identifiers
Optionally, to reduce network latency, you can cache the user-group associations so that when a search request is issued, groups are returned from the cache, saving a roundtrip to Microsoft Entra ID. You can use Microsoft Entra Batch API to send a single Http request with multiple users and build the cache.
Microsoft Graph is designed to handle a high volume of requests. If an overwhelming number of requests occur, Microsoft Graph fails the request with HTTP status code 429. For more information, see Microsoft Graph throttling.
Index document with their permitted groups
Query operations in Azure AI Search are executed over an Azure AI Search index. In this step, an indexing operation imports searchable data into an index, including the identifiers used as security filters.
Azure AI Search doesn't authenticate user identities, or provide logic for establishing which content a user has permission to view. The use case for security trimming assumes that you provide the association between a sensitive document and the group identifier having access to that document, imported intact into a search index.
In the hypothetical example, the body of the PUT request on an Azure AI Search index would include an applicant's college essay or transcript along with the group identifier having permission to view that content.
In the generic example used in the code sample for this walkthrough, the index action might look as follows:
private static void IndexDocuments(string indexName, List<string> groups)
{
    IndexDocumentsBatch<SecuredFiles> batch = IndexDocumentsBatch.Create(
        IndexDocumentsAction.Upload(
            new SecuredFiles()
            {
                FileId = "1",
                Name = "secured_file_a",
                GroupIds = new[] { groups[0] }
            }),
              ...
            };

IndexDocumentsResult result = searchClient.IndexDocuments(batch);
Issue a search request
For security trimming purposes, the values in your security field in the index are static values used for including or excluding documents in search results. For example, if the group identifier for Admissions is "A11B22C33D44-E55F66G77-H88I99JKK", any documents in an Azure AI Search index having that identifier in the security field are included (or excluded) in the search results sent back to the caller.
To filter documents returned in search results based on groups of the user issuing the request, review the following steps.
Step 1: Retrieve user's group identifiers
If the user's groups weren't already cached, or the cache has expired, issue the groups request.
private static async void RefreshCache(IEnumerable<User> users)
{
    HttpClient client = new HttpClient();
    var userGroups = await _microsoftGraphHelper.GetGroupsForUsers(client, users);
    _groupsCache = new ConcurrentDictionary<string, List<string>>(userGroups);
}
Step 2: Compose the search request
Assuming you have the user's groups membership, you can issue the search request with the appropriate filter values.
private static void SearchQueryWithFilter(string user)
{
    // Using the filter below, the search result will contain all documents that their GroupIds field
    // contain any one of the Ids in the groups list
    string filter = String.Format("groupIds/any(p:search.in(p, '{0}'))", string.Join(",", String.Join(",", _groupsCache[user])));
    SearchOptions searchOptions =
        new SearchOptions()
        {
            Filter = filter
        };
    searchOptions.Select.Add("name");

    SearchResults<SecuredFiles> results = searchClient.Search<SecuredFiles>("*", searchOptions);

    Console.WriteLine("Results for groups '{0}' : {1}", _groupsCache[user], results.GetResults().Select(r => r.Document.Name));
}
Step 3: Handle the results
The response includes a filtered list of documents, consisting of those that the user has permission to view. Depending on how you construct the search results page, you might want to include visual cues to reflect the filtered result set.
Next steps
In this walkthrough, you learned a pattern for using Microsoft Entra sign-ins to filter documents in Azure AI Search results, trimming the results of documents that don't match the filter provided on the request. For an alternative pattern that might be simpler, or to revisit other security features, see the following links.
Feedback
Coming soon: Throughout 2024 we will be phasing out GitHub Issues as the feedback mechanism for content and replacing it with a new feedback system. For more information see: https://aka.ms/ContentUserFeedback.
Submit and view feedback for