Continuously export Microsoft Defender for Cloud data

Microsoft Defender for Cloud generates detailed security alerts and recommendations. To analyze the information that's in these alerts and recommendations, you can export them to Log Analytics in Azure Monitor, to Azure Event Hubs, or to another Security Information and Event Management (SIEM), Security Orchestration Automated Response (SOAR), or IT classic deployment model solution. You can stream the alerts and recommendations as they're generated or define a schedule to send periodic snapshots of all new data.

When you set up continuous export, you can fully customize what information to export and where the information goes. For example, you can configure it so that:

  • All high-severity alerts are sent to an Azure event hub.
  • All medium or higher-severity findings from vulnerability assessment scans of your computers running SQL Server are sent to a specific Log Analytics workspace.
  • Specific recommendations are delivered to an event hub or Log Analytics workspace whenever they're generated.
  • The secure score for a subscription is sent to a Log Analytics workspace whenever the score for a control changes by 0.01 or more.

This article describes how to set up continuous export to a Log Analytics workspace or to an event hub in Azure.

Tip

Defender for Cloud also offers the option to do a onetime, manual export to a comma-separated values (CSV) file. Learn more in Manually export alerts and recommendations.

Availability

Aspect Details
Release status: General availability (GA)
Pricing: Free
Required roles and permissions:
  • Security Admin or Owner for the resource group.
  • Write permissions for the target resource.
  • If you use the Azure Policy DeployIfNotExist policies, you must have permissions that let you assign policies.
  • To export data to Event Hubs, you must have Write permissions on the Event Hubs policy.
  • To export to a Log Analytics workspace:
    • If it has the SecurityCenterFree solution, you must have a minimum of Read permissions for the workspace solution: Microsoft.OperationsManagement/solutions/read.
    • If it doesn't have the SecurityCenterFree solution, you must have write permissions for the workspace solution: Microsoft.OperationsManagement/solutions/action.
    • Learn more about Azure Monitor and Log Analytics workspace solutions.
Clouds: Commercial clouds
National (Azure Government, Microsoft Azure operated by 21Vianet)

What data types can be exported?

You can use continuous export to export the following data types whenever they change:

Set up continuous export

You can set up continuous export on the Microsoft Defender for Cloud pages in the Azure portal, by using the REST API, or at scale by using provided Azure Policy templates.

Set up continuous export on the Defender for Cloud pages in the Azure portal

To set up a continuous export to Log Analytics or Azure Event Hubs by using the Azure portal:

  1. On the Defender for Cloud resource menu, select Environment settings.

  2. Select the subscription that you want to configure data export for.

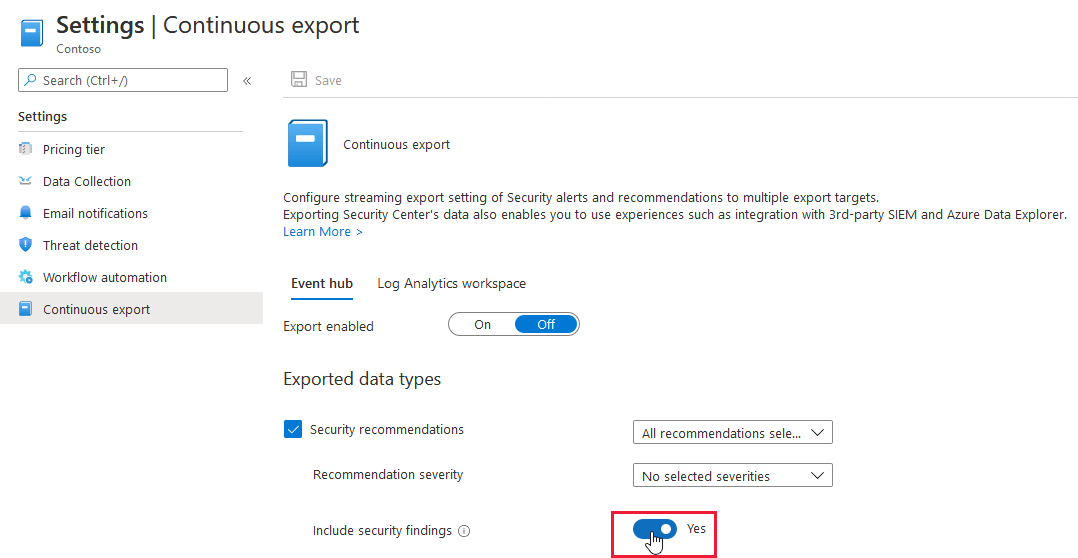
  3. In the resource menu under Settings, select Continuous export.

    Screenshot that shows the export options in Microsoft Defender for Cloud.

    The export options appear. There's a tab for each available export target, either event hub or Log Analytics workspace.

  4. Select the data type you'd like to export, and choose from the filters on each type (for example, export only high-severity alerts).

  5. Select the export frequency:

    • Streaming. Assessments are sent when a resource’s health state is updated (if no updates occur, no data is sent).
    • Snapshots. A snapshot of the current state of the selected data types that are sent once a week per subscription. To identify snapshot data, look for the field IsSnapshot.

    If your selection includes one of these recommendations, you can include the vulnerability assessment findings with them:

    To include the findings with these recommendations, set Include security findings to Yes.

    Screenshot that shows the Include security findings toggle in a continuous export configuration.

  6. Under Export target, choose where you'd like the data saved. Data can be saved in a target of a different subscription (for example, in a central Event Hubs instance or in a central Log Analytics workspace).

    You can also send the data to an event hub or Log Analytics workspace in a different tenant.

  7. Select Save.

Note

Log Analytics supports only records that are up to 32 KB in size. When the data limit is reached, an alert displays the message Data limit has been exceeded.

Export to a Log Analytics workspace

If you want to analyze Microsoft Defender for Cloud data inside a Log Analytics workspace or use Azure alerts together with Defender for Cloud alerts, set up continuous export to your Log Analytics workspace.

Log Analytics tables and schemas

Security alerts and recommendations are stored in the SecurityAlert and SecurityRecommendation tables respectively.

The name of the Log Analytics solution that contains these tables depends on whether you enabled the enhanced security features: Security (the Security and Audit solution) or SecurityCenterFree.

Tip

To see the data on the destination workspace, you must enable one of these solutions: Security and Audit or SecurityCenterFree.

Screenshot that shows the SecurityAlert table in Log Analytics.

To view the event schemas of the exported data types, see Log Analytics table schemas.

Export data to an event hub or Log Analytics workspace in another tenant

You can't configure data to be exported to a Log Analytics workspace in another tenant if you use Azure Policy to assign the configuration. This process works only when you use the REST API to assign the configuration, and the configuration is unsupported in the Azure portal (because it requires a multitenant context). Azure Lighthouse doesn't resolve this issue with Azure Policy, although you can use Azure Lighthouse as the authentication method.

When you collect data in a tenant, you can analyze the data from one, central location.

To export data to an event hub or Log Analytics workspace in a different tenant:

  1. In the tenant that has the event hub or Log Analytics workspace, invite a user from the tenant that hosts the continuous export configuration, or you can configure Azure Lighthouse for the source and destination tenant.
  2. If you use business-to-business (B2B) guest user access in Microsoft Entra ID, ensure that the user accepts the invitation to access the tenant as a guest.
  3. If you use a Log Analytics workspace, assign the user in the workspace tenant one of these roles: Owner, Contributor, Log Analytics Contributor, Sentinel Contributor, or Monitoring Contributor.
  4. Create and submit the request to the Azure REST API to configure the required resources. You must manage the bearer tokens in both the context of the local (workspace) tenant and the remote (continuous export) tenant.

Continuously export to an event hub behind a firewall

You can enable continuous export as a trusted service so that you can send data to an event hub that has Azure Firewall enabled.

To grant access to continuous export as a trusted service:

  1. Sign in to the Azure portal.

  2. Go to Microsoft Defender for Cloud > Environmental settings.

  3. Select the relevant resource.

  4. Select Continuous export.

  5. Select Export as a trusted service.

    Screenshot that shows where the checkbox is located to select export as trusted service.

You must add the relevant role assignment to the destination event hub.

To add the relevant role assignment to the destination event hub:

  1. Go to the selected event hub.

  2. In the resource menu, select Access control (IAM) > Add role assignment.

    Screenshot that shows the Add role assignment button.

  3. Select Azure Event Hubs Data Sender.

  4. Select the Members tab.

  5. Choose + Select members.

  6. Search for and then select Windows Azure Security Resource Provider.

    Screenshot that shows you where to enter and search for Microsoft Azure Security Resource Provider.

  7. Select Review + assign.

View exported alerts and recommendations in Azure Monitor

You might also choose to view exported security alerts or recommendations in Azure Monitor.

Azure Monitor provides a unified alerting experience for various Azure alerts, including a diagnostic log, metric alerts, and custom alerts that are based on Log Analytics workspace queries.

To view alerts and recommendations from Defender for Cloud in Azure Monitor, configure an alert rule that's based on Log Analytics queries (a log alert rule):

  1. On the Azure Monitor Alerts page, select New alert rule.

    Screenshot that shows the Azure Monitor alerts page.

  2. On the Create rule pane, set up your new rule the same way you'd configure a log alert rule in Azure Monitor:

    • For Resource, select the Log Analytics workspace to which you exported security alerts and recommendations.

    • For Condition, select Custom log search. In the page that appears, configure the query, lookback period, and frequency period. In the search query, you can enter SecurityAlert or SecurityRecommendation to query the data types that Defender for Cloud continuously exports to as you enable the continuous export to Log Analytics feature.

    • Optionally, create an action group to trigger. Action groups can automate sending an email, creating an ITSM ticket, running a webhook, and more, based on an event in your environment.

    Screenshot that shows the Azure Monitor create alert rule pane.

The Defender for Cloud alerts or recommendations appear (depending on your configured continuous export rules and the condition that you defined in your Azure Monitor alert rule) in Azure Monitor alerts, with automatic triggering of an action group (if provided).

Manually export alerts and recommendations

To download a CSV file that lists alerts or recommendations, go to the Security alerts page or the Recommendations page, and then select the Download CSV report button.

Tip

Due to Azure Resource Graph limitations, the reports are limited to a file size of 13,000 rows. If you see errors related to too much data being exported, try limiting the output by selecting a smaller set of subscriptions to be exported.

Screenshot that shows how to download alerts data as a CSV file.

Note

These reports contain alerts and recommendations for resources from the currently selected subscriptions.

In this article, you learned how to configure continuous exports of your recommendations and alerts. You also learned how to download your alerts data as a CSV file.

To see related content: