Service Fabric managed cluster node types
Each node type in a Service Fabric managed cluster is backed by a virtual machine scale set. With managed clusters, you make any required changes through the Service Fabric managed cluster resource provider. All of the underlying resources for the cluster are created and abstracted by the managed cluster provider on your behalf. Having the resource provider manage the resources helps to simplify cluster node type deployment and management, prevent operation errors such as deleting a seed node, and application of best practices such as validating a VM SKU is safe to use.
The rest of this document will cover how to adjust various settings from creating a node type, adjusting node type instance count, enable automatic OS image upgrades, change the OS Image, and configuring placement properties. This document will also focus on using Azure portal or Azure Resource Manager Templates to make changes.
Important
At this time, Service Fabric Managed Clusters do not support custom OS images.
Note
You will not be able to modify the node type while a change is in progress. It is recommended to let any requested change complete before doing another.
Add a node type
You can add a node type to a Service Fabric managed cluster through Portal, an Azure Resource Manager template, or PowerShell.
Add with portal
Note
You can only add secondary node types using Portal
Log in to Azure portal
Navigate to your cluster resource Overview page.

Select
Node typesunder theSettingssection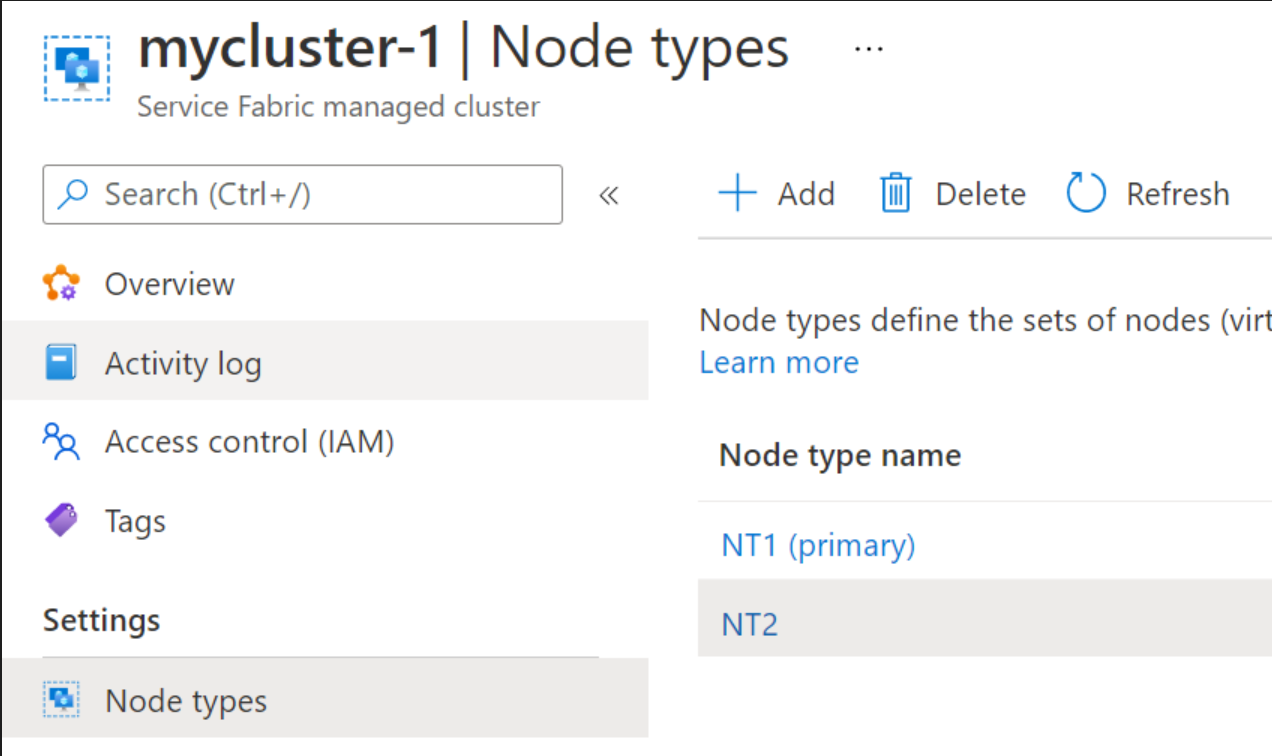
Click
Addat the top, fill in the required information, then click Add at the bottom, that's it!Wait for the new node type addition to be completed
Add with an ARM template
Add another resource type Microsoft.ServiceFabric/managedclusters/nodetypes with the required values and do a cluster deployment for the setting to take effect.
- The Service Fabric managed cluster resource apiVersion should be 2021-05-01 or later.
- Make sure to set
isPrimarytotrueif you are intending to replace an existing primary node type.
{
    "apiVersion": "[variables('sfApiVersion')]",
    "type": "Microsoft.ServiceFabric/managedclusters/nodetypes",
    "name": "[concat(parameters('clusterName'), '/', parameters('nodeType2Name'))]",
    "location": "[resourcegroup().location]",
    "dependsOn": [
        "[concat('Microsoft.ServiceFabric/managedclusters/', parameters('clusterName'))]"
    ],
    "properties": {
        "isPrimary": false,
        "vmImagePublisher": "[parameters('vmImagePublisher')]",
        "vmImageOffer": "[parameters('vmImageOffer')]",
        "vmImageSku": "[parameters('vmImageSku')]",
        "vmImageVersion": "[parameters('vmImageVersion')]",
        "vmSize": "[parameters('nodeType2VmSize')]",
        "vmInstanceCount": "[parameters('nodeType2VmInstanceCount')]",
        "dataDiskSizeGB": "[parameters('nodeType2DataDiskSizeGB')]",
        "dataDiskType": "[parameters('nodeType2managedDataDiskType')]"
    }
}
For an example two node type configuration, see our sample two node type ARM Template
Add with PowerShell
To create a new node type, you'll need to define these properties:
- Resource Group: Resource group the cluster is in
- Cluster Name: Name of the managed cluster
- Node Type Name: Name that is unique from any existing node types in the cluster.
- Instance Count: Initial number of nodes of the new node type.
- VM Size: VM SKU for the nodes. If not specified, the default value Standard_D2 is used.
Note
If adding a primary node type, the -Primary property must be used.
$resourceGroup = "myResourceGroup"
$clusterName = "mysfcluster"
$nodeTypeName = "nt2"
$vmSize = "Standard_D2_v2"

New-AzServiceFabricManagedNodeType -ResourceGroupName $resourceGroup -ClusterName $clusterName -Name $nodeTypeName -InstanceCount 3 -vmSize $vmSize
Remove a node type
You can remove a Service Fabric managed cluster node type using Portal or PowerShell.
Note
To remove a primary node type from a Service Fabric managed cluster, you must use PowerShell and there must be more than one primary node type available.
Remove with portal
Log in to Azure portal
Navigate to your cluster resource Overview page.
Select
Node typesunder theSettingssectionSelect the
Node Typeyou want to remove and clickDeleteat the top.
Remove with PowerShell
Note
If removing a primary node type for scenarios such as upgrading the SKU it will take multiple hours and progress can be monitored by using SFX. Seed nodes will migrate one node per upgrade domain(UD) walk at a time.
To remove a node type, you'll need to define these properties:
- Resource Group: Resource group the cluster is in
- Cluster Name: Name of the managed cluster
- Node Type Name: Name that is unique from any existing node types in the cluster.
$resourceGroup = "myResourceGroup"
$clusterName = "myCluster"
$nodeTypeName = "nt2"

Remove-AzServiceFabricManagedNodeType -ResourceGroupName $resourceGroup -ClusterName $clusterName  -Name $nodeTypeName
Scale a node type
You can scale a Service Fabric managed cluster node type with portal, ARM template, or PowerShell. You can also configure autoscale for a secondary node type if you want a fully automated solution.
Note
- A primary node type can't be set to auto-scale and you can only set it to manual scale.
- For the Primary node type, you will not be able to go below 3 nodes for a Basic SKU cluster, and 5 nodes for a Standard SKU cluster.
Scale using portal
In this walkthrough, you will learn how to modify the node count for a node type using portal.
Log in to Azure portal
Navigate to your cluster resource Overview page.
Select
Node Typesunder theSettingssectionSelect the
Node type nameyou want to modifyReview and update node type properties if needed.

Select
Manage node type scalingto configure the scaling settings and choose between custom autoscale and manual scale options. Autoscale is a built-in feature that helps applications perform their best when demand changes. You can choose to scale your resource manually to a specific instance count, or via a custom Autoscale policy that scales based on metric(s) thresholds, or schedule instance count which scales during designated time windows. Learn more about Azure Autoscale or view the how-to video.Custom autoscale: Select the appropriate
scale modeto define the custom Autoscale policy -Scale to a specific instance countorScale based on a metric. The latter is based on metric trigger rules, for example, increase instance count by 1 when CPU Percentage is above 70%. Once you define the policy, selectSaveat the top.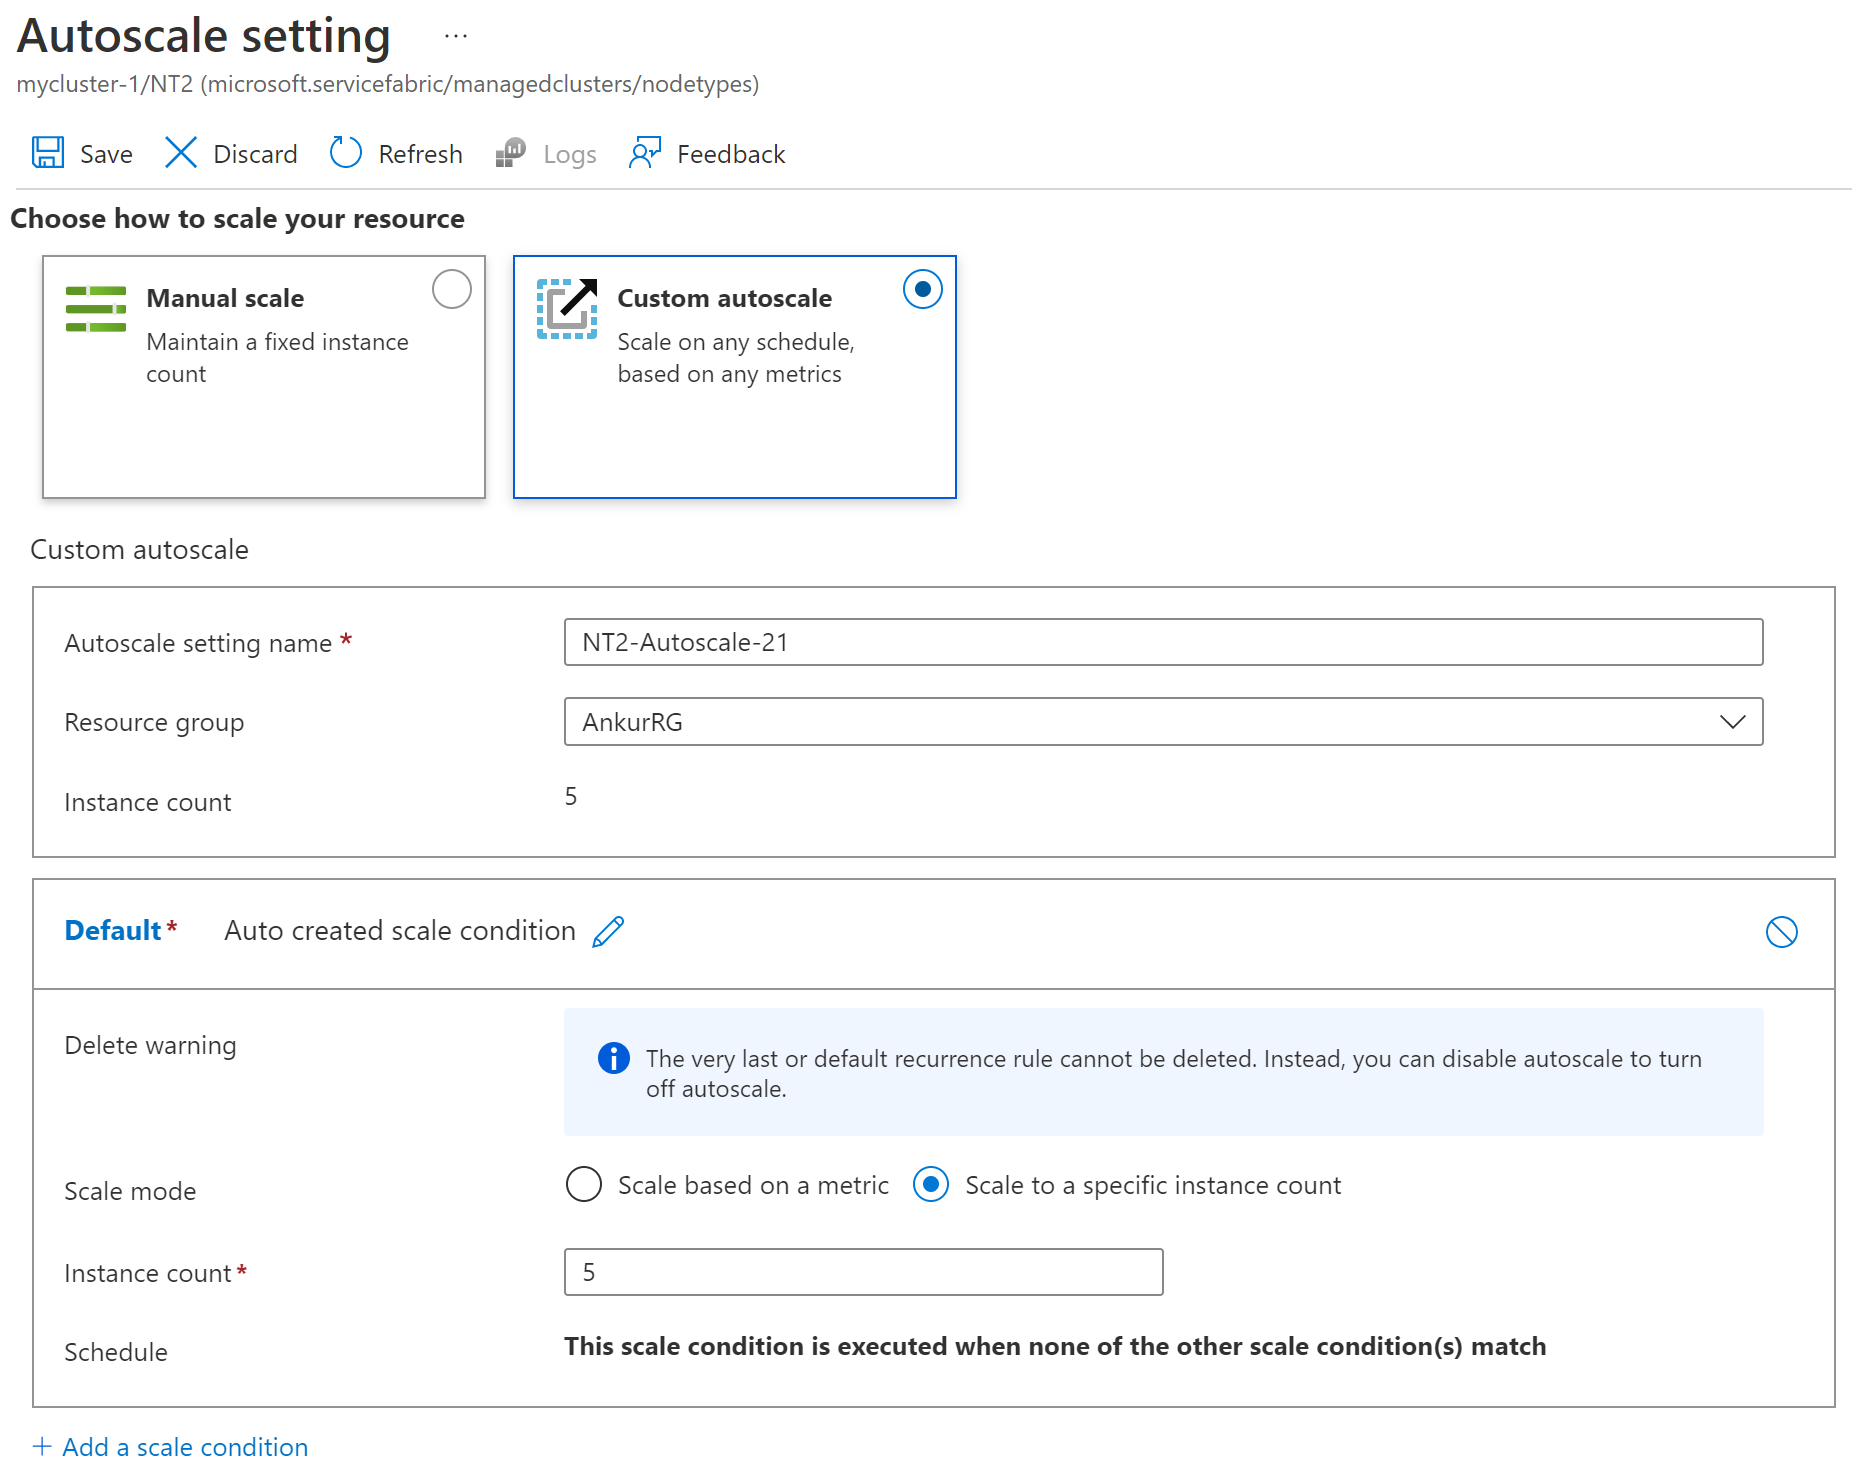
Manual scale: Adjust the
Node countto the new value you want and selectSaveat the top. In this screenshot, the value was3and adjusted to5.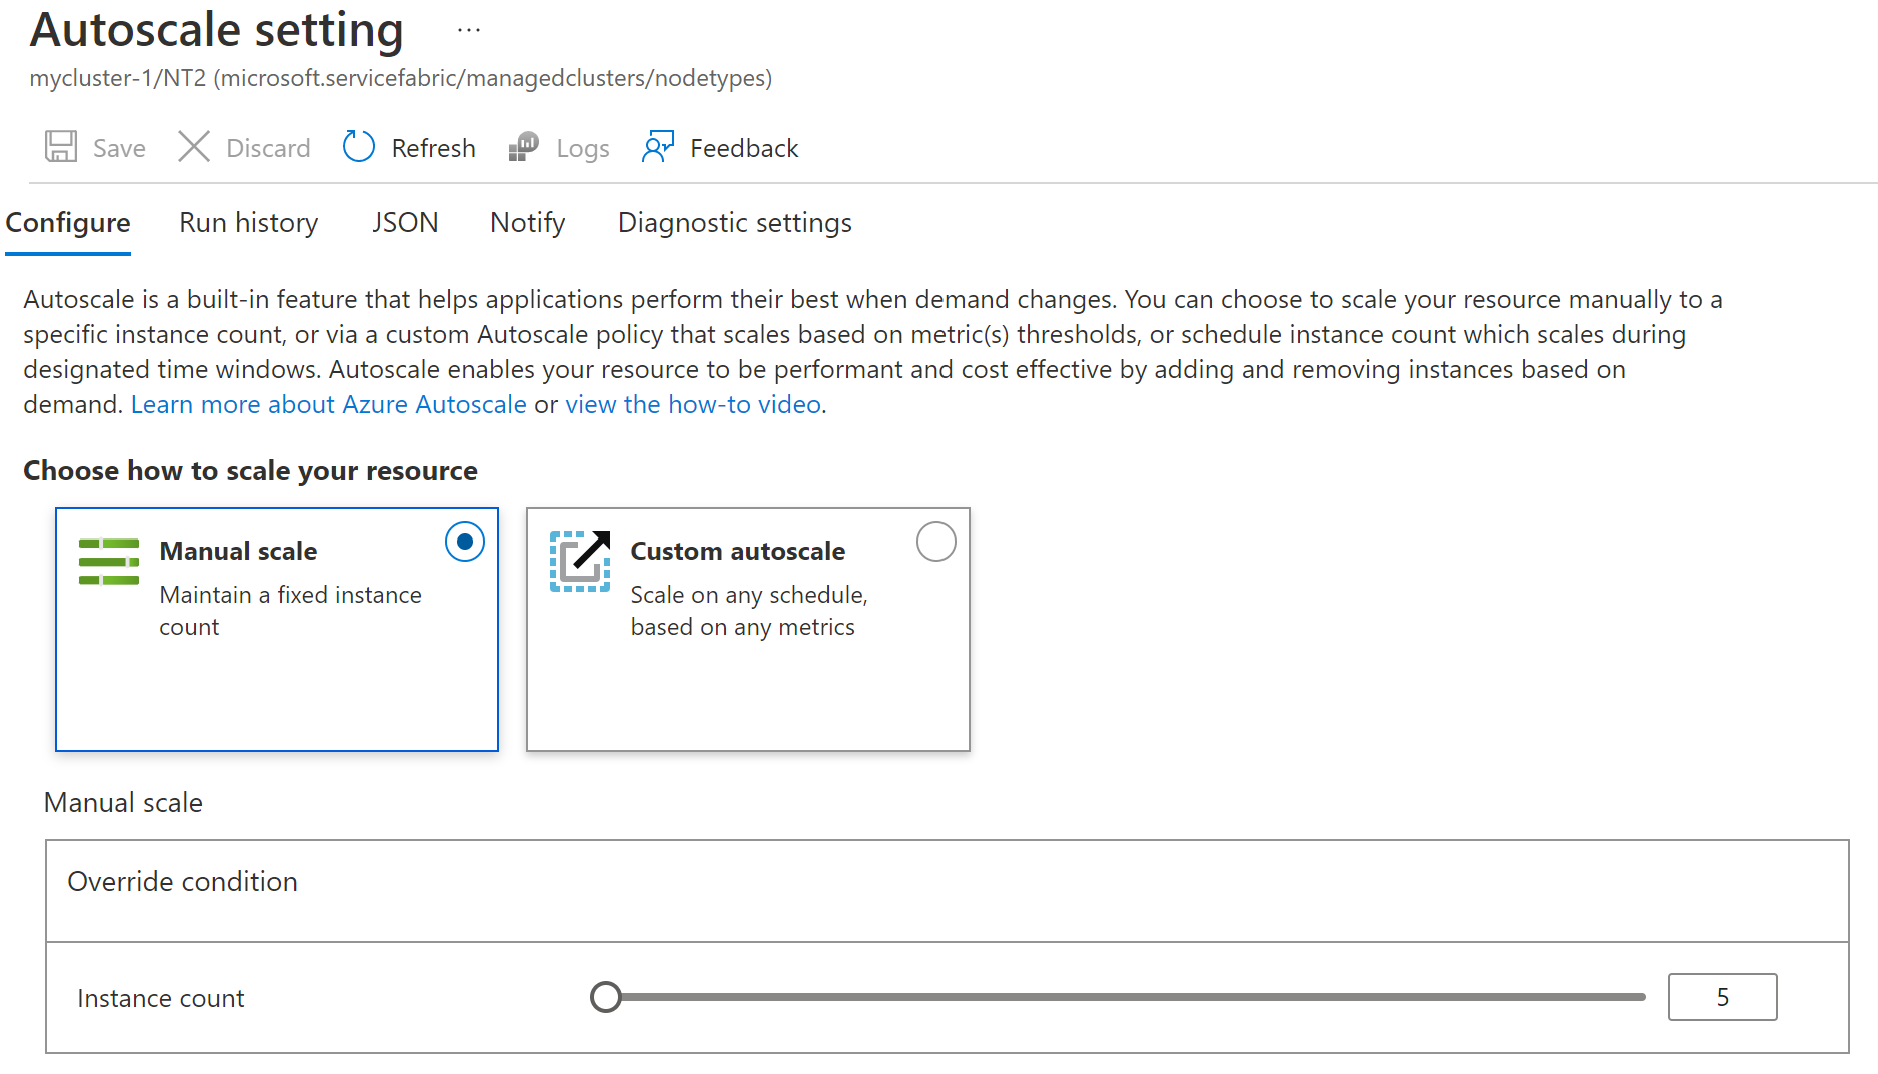
Select
Applyat the bottom to configure these saved settings on the node type.The
Provisioning statewill now show a status ofUpdatinguntil complete. When complete, it will showSucceededagain.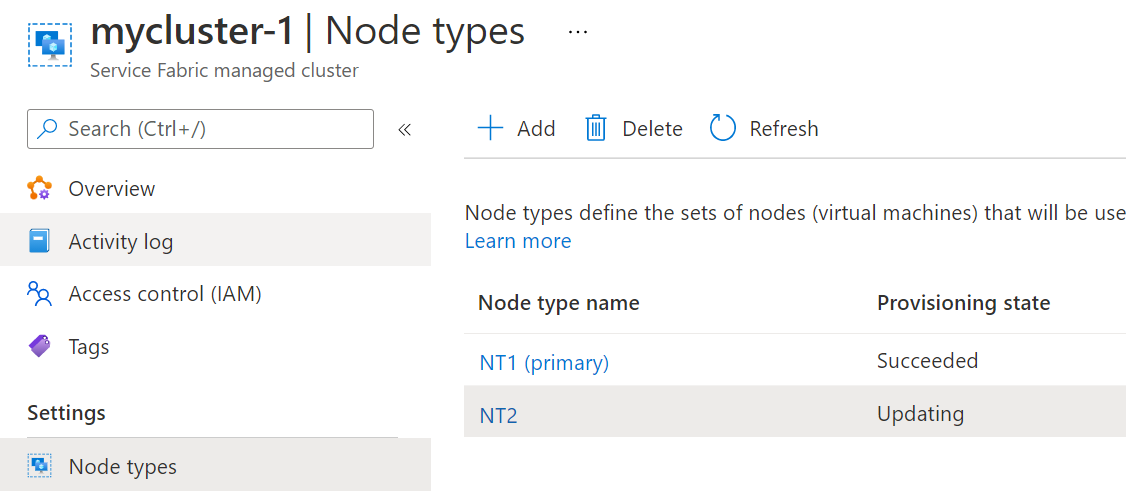
Scale a node type with a template
To adjust the node count for a node type using an ARM Template, adjust the vmInstanceCount property with the new value and do a cluster deployment for the setting to take effect. The cluster will begin upgrading automatically you will see the additional nodes when complete.
- The Service Fabric managed cluster resource apiVersion should be 2021-05-01 or later.
Note
The managed cluster provider will block scale adjustments and return an error if the scaling request violates required minimums.
{
  "apiVersion": "[variables('sfApiVersion')]",
  "type": "Microsoft.ServiceFabric/managedclusters/nodetypes",
  "name": "[concat(parameters('clusterName'), '/', parameters('nodeTypeName'))]",
  "location": "[resourcegroup().location]",
  "properties": {
    ...
    "vmInstanceCount": "[parameters('nodeTypeVmInstanceCount')]",
    ...
  }
}
Scale a node type with PowerShell
Change the instance count to increase or decrease the number of nodes on the node type that you would like to scale. You can find node type names in the Azure Resource Manager template (ARM template) from your cluster deployment, or in the Service Fabric Explorer.
$resourceGroup = "myResourceGroup"
$clusterName = "mysfcluster"
$nodeTypeName = "FE"
$instanceCount = "7"

Set-AzServiceFabricManagedNodeType -ResourceGroupName $resourceGroup -ClusterName $clusterName -name $nodeTypeName -InstanceCount $instanceCount -Verbose
The cluster will begin upgrading automatically you will see the additional nodes when complete.
Enable automatic OS image upgrades
You can choose to enable automatic OS image upgrades to the virtual machines running your managed cluster nodes. Although the virtual machine scale set resources are managed on your behalf with Service Fabric managed clusters, it's your choice to enable automatic OS image upgrades for your cluster nodes. As with classic Service Fabric clusters, managed cluster nodes are not upgraded by default, in order to prevent unintended disruptions to your cluster.
To enable automatic OS upgrades:
- Use apiVersion
2021-05-01or later version of Microsoft.ServiceFabric/managedclusters and Microsoft.ServiceFabric/managedclusters/nodetypes resources - Set the cluster's property
enableAutoOSUpgradeto true - Set the cluster nodeTypes' resource property
vmImageVersionto latest
For example:
    {
      "apiVersion": "[variables('sfApiVersion')]",
      "type": "Microsoft.ServiceFabric/managedclusters",
      ...
      "properties": {
        ...
        "enableAutoOSUpgrade": true
      },
    },
    {
      "apiVersion": "[variables('sfApiVersion')]",
      "type": "Microsoft.ServiceFabric/managedclusters/nodetypes",
       ...
      "properties": {
        ...
        "vmImageVersion": "latest",
        ...
      }
    }
}
Once enabled, Service Fabric will begin querying and tracking OS image versions in the managed cluster. If a new OS version is available, the cluster node types (virtual machine scale sets) will be upgraded, one at a time. Service Fabric runtime upgrades are performed only after confirming no cluster node OS image upgrades are in progress.
If an upgrade fails, Service Fabric will retry after 24 hours, for a maximum of three retries. Similar to classic (unmanaged) Service Fabric upgrades, unhealthy apps or nodes may block the OS image upgrade.
For more on image upgrades, see Automatic OS image upgrades with Azure virtual machine scale sets.
Modify the OS SKU for a node type
Service Fabric managed clusters enables you to modify the OS SKU for a node type in place. This is helpful for scenarios such as migrating from Windows 2019 to Windows 2022 or if you want to switch to a Server (Core) SKU vs Server with Desktop Experience SKU.
Modify OS SKU with portal
In this walkthrough, you will learn how to modify the OS image for a node type using portal.
Log in to Azure portal
Navigate to your cluster resource Overview page.
Select
Node Typesunder theSettingssectionSelect the
Node type nameyou want to modifyAdjust the
OS Imageto the new value you want and selectApplyat the bottom. ![Sample showing changing the OS image][change-os-image]The
Provisioning statewill now show a status ofUpdatingand will proceed one upgrade domain at a time. When complete, it will showSucceededagain.
Modify OS SKU with a template
To modify the OS image used for a node type using an ARM Template, adjust the vmImageSku property with the new value and do a cluster deployment for the setting to take effect. The managed cluster provider will reimage each instance by upgrade domain.
- The Service Fabric managed cluster resource apiVersion should be 2021-05-01 or later.
{
  "apiVersion": "[variables('sfApiVersion')]",
  "type": "Microsoft.ServiceFabric/managedclusters/nodetypes",
  "name": "[concat(parameters('clusterName'), '/', parameters('nodeTypeName'))]",
  "location": "[resourcegroup().location]",
  "properties": {
    ...
    "vmImagePublisher": "[parameters('vmImagePublisher')]",
    "vmImageOffer": "[parameters('vmImageOffer')]",
    "vmImageSku": "[parameters('vmImageSku')]",
    "vmImageVersion": "[parameters('vmImageVersion')]",
    ...
  }
}
Configure placement properties for a node type
Placement properties are used to ensure that certain workloads run only on certain node types in the cluster. Service Fabric managed clusters support configuring these properties via portal, ARM template, or PowerShell.
Configure placement properties with portal
In this walkthrough, you will learn how to modify a placement property for a node type using portal.
Log in to Azure portal
Navigate to your cluster resource Overview page.
Select
Node Typesunder theSettingssectionSelect the
Node type nameyou want to modifyIn the
Placement propertiessection add the name and value you want and selectApplyat the bottom. In this screenshot, theNameSSD_Premiumwas used withValueoftrue.
The
Provisioning statewill now show a status ofUpdatinguntil complete. When complete, it will showSucceededagain.
Configure placement properties with a template
To adjust the placement properties for a node type using an ARM Template, adjust the placementProperties property with the new value(s) and do a cluster deployment for the setting to take effect. The below sample shows three values being set for a node type.
- The Service Fabric managed cluster resource apiVersion should be 2021-05-01 or later.
{
  "apiVersion": "[variables('sfApiVersion')]",
  "type": "Microsoft.ServiceFabric/managedclusters/nodetypes",
  "name": "[concat(parameters('clusterName'), '/', parameters('nodeTypeName'))]",
  "location": "[resourcegroup().location]",
  "properties": {
    "placementProperties": {
      "PremiumSSD": "true",
      "NodeColor": "green",
      "SomeProperty": "5"
    }
  }
}
Configure placement properties with PowerShell
The following example will update and overwrite any existing placement properties for a given node type.
$rgName = "testRG"
$clusterName = "testCluster"
$NodeTypeName = "nt1"
Set-AzServiceFabricManagedNodeType -ResourceGroupName $rgName -ClusterName $clusterName -name $NodeTypeName -PlacementProperty @{NodeColor="Red";SomeProperty="6";} -Verbose
Modify the VM SKU for a node type
To modify the VM SKU size used for a node type using an ARM Template, adjust the vmSize property with the new value and do a cluster deployment for the setting to take effect. The managed cluster provider will reimage each instance by upgrade domain. For a list of SKU options, please refer to the VM sizes - Azure Virtual Machines | Microsoft Learn.
{
  "apiVersion": "[variables('sfApiVersion')]",
  "type": "Microsoft.ServiceFabric/managedclusters/nodetypes",
  "name": "[concat(parameters('clusterName'), '/', parameters('nodeTypeName'))]",
  "location": "[resourcegroup().location]",
  "properties": {
    ...
    "vmSize": "[parameters('vmImageVersion')]",
    ...
  }
}
Configure multiple managed disks
Service Fabric managed clusters by default configure one managed disk. By configuring the following optional property and values, you can add more managed disks to node types within a cluster. You are able to specify the drive letter, disk type, and size per disk.
Configure more managed disks by declaring additionalDataDisks property and required parameters in your Resource Manager template as follows:
Feature Requirements
- Lun must be unique per disk and can't use reserved lun 0
- Disk letter cannot use reserved letters C or D and cannot be modified once created. S will be used as default if not specified.
- Must specify a supported disk type
- The Service Fabric managed cluster resource apiVersion should be 2022-01-01 or later.
{
  "apiVersion": "[variables('sfApiVersion')]",
  "type": "Microsoft.ServiceFabric/managedclusters/nodetypes",
  "name": "[concat(parameters('clusterName'), '/', parameters('nodeTypeName'))]",
  "location": "[resourcegroup().location]",
  "properties": {
    "additionalDataDisks": {
      "lun": "1",
      "diskSizeGB": "50",
      "diskType": "Standard_LRS",
      "diskLetter": "S"
    }
  }
}
See full list of parameters available
Configure the Service Fabric data disk drive letter
Service Fabric managed clusters by default configure a Service Fabric data disk and automatically configure the drive letter on all nodes of a node type. By configuring this optional property and value, you can specify and retrieve the Service Fabric data disk letter if you have specific requirements for drive letter mapping.
Feature Requirements
- Disk letter cannot use reserved letters C or D and cannot be modified once created. S will be used as default if not specified.
- The Service Fabric managed cluster resource apiVersion should be 2022-01-01 or later.
{
  {
    "apiVersion": "[variables('sfApiVersion')]",
    "type": "Microsoft.ServiceFabric/managedclusters/nodetypes",
    "name": "[concat(parameters('clusterName'), '/', parameters('nodeTypeName'))]",
    "location": "[resourcegroup().location]",
    "properties": {
      "dataDiskLetter": "S"
    }
  }
}
Next steps
Feedback
Coming soon: Throughout 2024 we will be phasing out GitHub Issues as the feedback mechanism for content and replacing it with a new feedback system. For more information see: https://aka.ms/ContentUserFeedback.
Submit and view feedback for