Configure network settings for Service Fabric managed clusters
Service Fabric managed clusters are created with a default networking configuration. This configuration consists of an Azure Load Balancer with a public ip, a VNet with one subnet allocated, and an NSG configured for essential cluster functionality. There are also optional NSG rules applied such as allowing all outbound traffic by default that is intended to make customer configuration easier. This document walks through how to modify the following networking configuration options and more:
- Manage NSG Rules
- Manage RDP access
- Manage Load Balancer config
- Enable public IP
- Enable IPv6
- Bring your own virtual network
- Bring your own load balancer
- Enable accelerated networking
- Configure Auxiliary Subnets
Manage NSG rules
NSG rules guidance
Be aware of these considerations when creating new NSG rules for your managed cluster.
- Service Fabric managed clusters reserve the NSG rule priority range 0 to 999 for essential functionality. You can't create custom NSG rules with a priority value of less than 1000.
- Service Fabric managed clusters reserve the priority range 3001 to 4000 for creating optional NSG rules. These rules are added automatically to make configurations quick and easy. You can override these rules by adding custom NSG rules in priority range 1000 to 3000.
- Custom NSG rules should have a priority within the range 1000 to 3000.
Apply NSG rules
Service Fabric managed clusters enable you to assign NSG rules directly within the cluster resource of your deployment template.
Use the networkSecurityRules property of your Microsoft.ServiceFabric/managedclusters resource (version 2021-05-01 or later) to assign NSG rules. For example:
{
  "apiVersion": "2021-05-01",
  "type": "Microsoft.ServiceFabric/managedclusters",
  "properties": {
    "networkSecurityRules": [
      {
        "name": "AllowCustomers",
        "protocol": "*",
        "sourcePortRange": "*",
        "sourceAddressPrefix": "Internet",
        "destinationAddressPrefix": "*",
        "destinationPortRange": "33000-33499",
        "access": "Allow",
        "priority": 2001,
        "direction": "Inbound"
      },
      {
        "name": "AllowARM",
        "protocol": "*",
        "sourcePortRange": "*",
        "sourceAddressPrefix": "AzureResourceManager",
        "destinationAddressPrefix": "*",
        "destinationPortRange": "33500-33699",
        "access": "Allow",
        "priority": 2002,
        "direction": "Inbound"
      },
      {
        "name": "DenyCustomers",
        "protocol": "*",
        "sourcePortRange": "*",
        "sourceAddressPrefix": "Internet",
        "destinationAddressPrefix": "*",
        "destinationPortRange": "33700-33799",
        "access": "Deny",
        "priority": 2003,
        "direction": "Outbound"
      },
      {
        "name": "DenyRDP",
        "protocol": "*",
        "sourcePortRange": "*",
        "sourceAddressPrefix": "*",
        "destinationAddressPrefix": "VirtualNetwork",
        "destinationPortRange": "3389",
        "access": "Deny",
        "priority": 2004,
        "direction": "Inbound",
        "description": "Override for optional SFMC_AllowRdpPort rule. This is required in tests to avoid Sev2 incident for security policy violation."
      }
    ],
    "fabricSettings": [
      "..."
    ]
  }
}
ClientConnection and HttpGatewayConnection default and optional rules
NSG rule: SFMC_AllowServiceFabricGatewayToSFRP
A default NSG rule is added to allow the Service Fabric resource provider to access the cluster's clientConnectionPort and httpGatewayConnectionPort. This rule allows access to the ports through the service tag 'ServiceFabric'.
Note
This rule is always added and can't be overridden.
{
    "name": "SFMC_AllowServiceFabricGatewayToSFRP",
    "type": "Microsoft.Network/networkSecurityGroups/securityRules",
    "properties": {
        "description": "This is required rule to allow SFRP to connect to the cluster. This rule can't be overridden.",
        "protocol": "TCP",
        "sourcePortRange": "*",
        "sourceAddressPrefix": "ServiceFabric",
        "destinationAddressPrefix": "VirtualNetwork",
        "access": "Allow",
        "priority": 500,
        "direction": "Inbound",
        "sourcePortRanges": [],
        "destinationPortRanges": [
            "19000",
            "19080"
        ]
    }
}
NSG rule: SFMC_AllowServiceFabricGatewayPorts
This optional rule enables customers to access SFX, connect to the cluster using PowerShell, and use Service Fabric cluster API endpoints from the internet by opening LB ports for clientConnectionPort and httpGatewayPort.
Note
This rule will not be added if there's a custom rule with the same access, direction, and protocol values for the same port. You can override this rule with custom NSG rules.
{
    "name": "SFMC_AllowServiceFabricGatewayPorts",
    "type": "Microsoft.Network/networkSecurityGroups/securityRules",
    "properties": {
        "description": "Optional rule to open SF cluster gateway ports. To override add a custom NSG rule for gateway ports in priority range 1000-3000.",
        "protocol": "tcp",
        "sourcePortRange": "*",
        "sourceAddressPrefix": "*",
        "destinationAddressPrefix": "VirtualNetwork",
        "access": "Allow",
        "priority": 3001,
        "direction": "Inbound",
        "sourcePortRanges": [],
        "destinationPortRanges": [
            "19000",
            "19080"
        ]
    }
}
Enable access to RDP ports from internet
Service Fabric managed clusters don't enable inbound access to the RDP ports from the internet by default. You can open inbound access to the RDP ports from the internet by setting the following property on a Service Fabric managed cluster resource.
"allowRDPAccess": true
When the allowRDPAccess property is set to true, the following NSG rule will be added to your cluster deployment.
{
    "name": "SFMC_AllowRdpPort",
    "type": "Microsoft.Network/networkSecurityGroups/securityRules",
    "properties": {
        "description": "Optional rule to open RDP ports.",
        "protocol": "tcp",
        "sourcePortRange": "*",
        "sourceAddressPrefix": "*",
        "destinationAddressPrefix": "VirtualNetwork",
        "access": "Allow",
        "priority": 3002,
        "direction": "Inbound",
        "sourcePortRanges": [],
        "destinationPortRange": "3389"
    }
}
Service Fabric managed clusters automatically creates inbound NAT rules for each instance in a node type. To find the port mappings to reach specific instances (cluster nodes) follow the steps below:
Using Azure portal, locate the managed cluster created inbound NAT rules for Remote Desktop Protocol (RDP).
Navigate to the managed cluster resource group within your subscription named with the following format: SFC_{cluster-id}
Select the load balancer for the cluster with the following format: LB-{cluster-name}
On the page for your load balancer, select Inbound NAT rules. Review the inbound NAT rules to confirm the inbound Frontend port to target port mapping for a node.
The following screenshot shows the inbound NAT rules for three different node types:
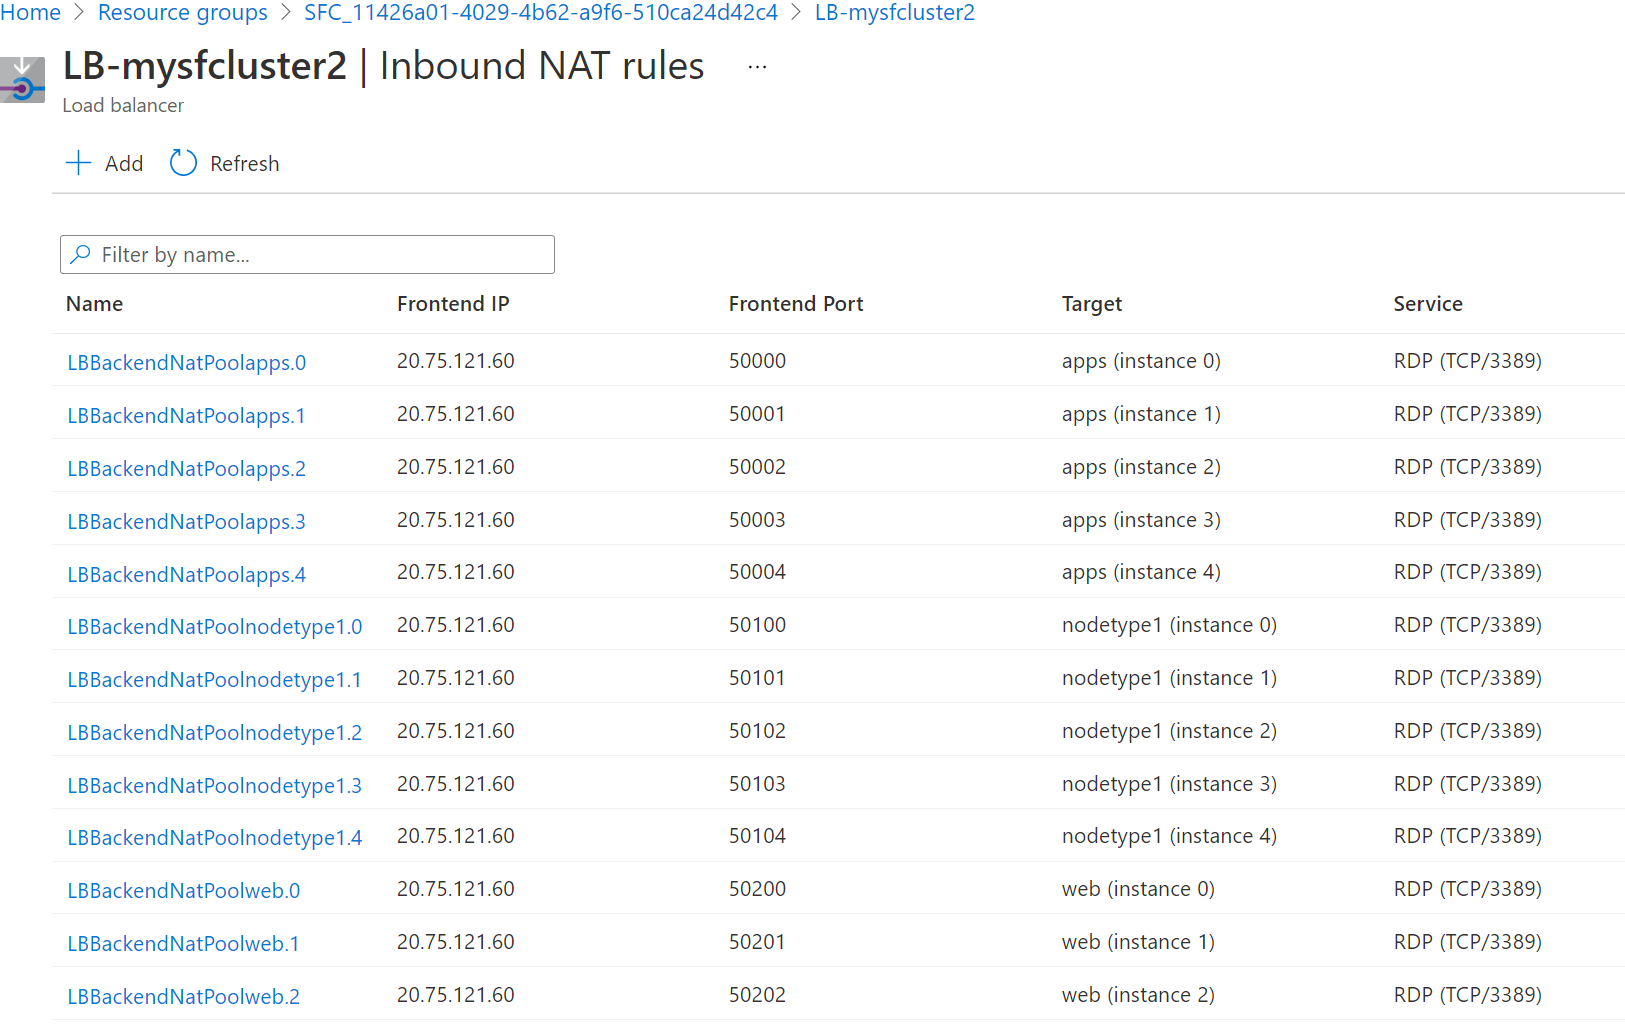
By default, for Windows clusters, the Frontend Port is in the 50000 and higher range and the target port is port 3389, which maps to the RDP service on the target node.
Note
If you are using the BYOLB feature and you want RDP, you must configure a NAT pool separately to do so. This will not automatically create any NAT rules for those node types.
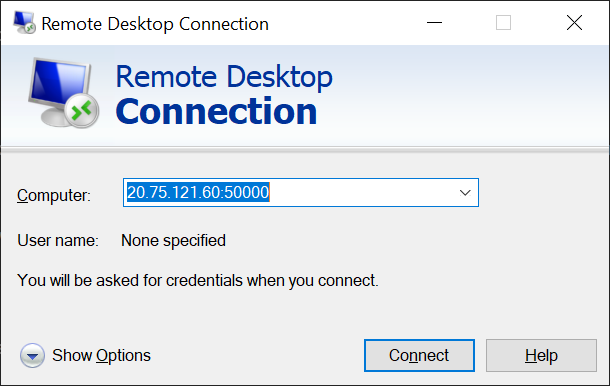
Remotely connect to the specific node (scale set instance). You can use the user name and password that you set when you created the cluster or any other credentials you have configured.
The following screenshot shows using Remote Desktop Connection to connect to the apps (Instance 0) node in a Windows cluster:
Modify default Load balancer configuration
Load balancer ports
Service Fabric managed clusters creates an NSG rule in default priority range for all the load balancer (LB) ports configured under "loadBalancingRules" section under ManagedCluster properties. This rule opens LB ports for inbound traffic from the internet.
Note
This rule is added in the optional priority range and can be overridden by adding custom NSG rules.
{
    "name": "SFMC_AllowLoadBalancedPorts",
    "type": "Microsoft.Network/networkSecurityGroups/securityRules",
    "properties": {
        "description": "Optional rule to open LB ports",
        "protocol": "*",
        "sourcePortRange": "*",
        "sourceAddressPrefix": "*",
        "destinationAddressPrefix": "VirtualNetwork",
        "access": "Allow",
        "priority": 3003,
        "direction": "Inbound",
        "sourcePortRanges": [],
        "destinationPortRanges": [
        "80", "8080", "4343"
        ]
    }
}
Load balancer probes
Service Fabric managed clusters automatically creates load balancer probes for fabric gateway ports and all ports configured under the loadBalancingRules section of managed cluster properties.
{
  "value": [
    {
        "name": "FabricTcpGateway",
        "properties": {
            "provisioningState": "Succeeded",
            "protocol": "Tcp",
            "port": 19000,
            "intervalInSeconds": 5,
            "numberOfProbes": 2,
            "loadBalancingRules": [
                {
                    "id": "<>"
                }
            ]
        },
        "type": "Microsoft.Network/loadBalancers/probes"
    },
    {
        "name": "FabricHttpGateway",
        "properties": {
            "provisioningState": "Succeeded",
            "protocol": "Tcp",
            "port": 19080,
            "intervalInSeconds": 5,
            "numberOfProbes": 2,
            "loadBalancingRules": [
                {
                    "id": "<>"
                }
            ]
        },
        "type": "Microsoft.Network/loadBalancers/probes"
    },
    {
        "name": "probe1_tcp_8080",
        "properties": {
            "provisioningState": "Succeeded",
            "protocol": "Tcp",
            "port": 8080,
            "intervalInSeconds": 5,
            "numberOfProbes": 2,
            "loadBalancingRules": [
            {
                "id": "<>"
            }
        ]
      },
      "type": "Microsoft.Network/loadBalancers/probes"
    }
  ]
}
Enable public IP
Note
Currently, only public IPv4 is supported.
Service Fabric managed cluster nodes don't require their own public IP addresses for communication. However, some scenarios may require a node to have its own public IP address to communicate with the internet and public-facing Azure services. For example:
- Gaming, where a console needs to make a direct connection to a cloud virtual machine that is doing game physics processing.
- Virtual machines that need to make external connections to one another across regions in a distributed database.
For more information about outbound connections in Azure, see Understand outbound connections.
Public IP can only be enabled on secondary node types, because primary node types are reserved for Service Fabric system services. Follow the steps in the Bring your own load balancer section of this article to create a secondary node type for your managed cluster.
Azure dynamically assigns available IP addresses.
Note
Enabling public IP is only supported via ARM template.
The following steps describe enable public IP on your node.
Download your ARM template.
For each node type in the template, add
enableNodePublicIPto the ARM template:{ "name": "<secondary_node_type_name>", "apiVersion": "2023-02-01-preview", "properties": { "isPrimary" : false, "vmImageResourceId": "/subscriptions/<your_subscription_id>/resourceGroups/<your_resource_group>/providers/Microsoft.Compute/images/<your_custom_image>", "vmSize": "Standard_D2", "vmInstanceCount": 5, "dataDiskSizeGB": 100, "enableNodePublicIP": true } }Verify you have a public IP on your nodes by running the following PowerShell command:
az vmss list-instance-public-ips -g MC_MyResourceGroup2_MyManagedCluster_eastus -n YourVirtualMachineScaleSetNameThe command outputs in JSON format.
[
  {
    "etag": "etag_0",
    "id": "<id_0/name>",
    "idleTimeoutInMinutes": 15,
    "ipAddress": "<ip_address_0>",
    "ipConfiguration": {
      "id": "<configuration_id_0>",
      "resourceGroup": "<your_resource_group>"
    },
    "ipTags": [],
    "name": "<name>",
    "provisioningState": "Succeeded",
    "publicIPAddressVersion": "IPv4",
    "publicIPAllocationMethod": "Static",
    "resourceGroup": "<your_resource_group>",
    "resourceGuid": "resource_guid_0",
    "sku": {
      "name": "Standard"
    }
  },
  {
    "etag": "etag_1",
    "id": "/<id_1/name>",
    "idleTimeoutInMinutes": 15,
    "ipAddress": "<ip_address_1>",
    "ipConfiguration": {
      "id": "<configuration_id_1>",
      "resourceGroup": "<your_resource_group>"
    },
    "ipTags": [],
    "name": "<name>",
    "provisioningState": "Succeeded",
    "publicIPAddressVersion": "IPv4",
    "publicIPAllocationMethod": "Static",
    "resourceGroup": "<your_resource_group>",
    "resourceGuid": "resource_guid_1",
    "sku": {
      "name": "Standard"
    }
  },
  {
    "etag": "etag_2",
    "id": "<id_2/name>",
    "idleTimeoutInMinutes": 15,
    "ipAddress": "<ip_address_2>",
    "ipConfiguration": {
      "id": "<configuration_id_2>",
      "resourceGroup": "<your_resource_group>"
    },
    "ipTags": [],
    "name": "<name>",
    "provisioningState": "Succeeded",
    "publicIPAddressVersion": "IPv4",
    "publicIPAllocationMethod": "Static",
    "resourceGroup": "<your_resource_group>",
    "resourceGuid": "resource_guid_2",
    "sku": {
      "name": "Standard"
    }
  }
]
Enable IPv6
Managed clusters don't enable IPv6 by default. This feature will enable full dual stack IPv4/IPv6 capability from the Load Balancer frontend to the backend resources. Any changes you make to the managed cluster load balancer config or NSG rules will affect both the IPv4 and IPv6 routing.
Note
This setting is not available in portal and can't be changed once the cluster is created.
- The Service Fabric managed cluster resource apiVersion should be 2022-01-01 or later.
Set the following property on a Service Fabric managed cluster resource.
    "resources": [
         {
         "apiVersion": "[variables('sfApiVersion')]",
         "type": "Microsoft.ServiceFabric/managedclusters",
         ...
         "properties": {
             "enableIpv6": true
             },
         }
    ]
Deploy your IPv6 enabled managed cluster. Customize the sample template as needed or build your own. In the following example, we'll create a resource group called
MyResourceGroupinwestusand deploy a cluster with this feature enabled.New-AzResourceGroup -Name MyResourceGroup -Location westus New-AzResourceGroupDeployment -Name deployment -ResourceGroupName MyResourceGroup -TemplateFile AzureDeploy.jsonAfter deployment, your clusters virtual network and resources will be dual-stack. As a result, the clusters frontend load balancer will have a unique dns address created for example,
mycluster-ipv6.southcentralus.cloudapp.azure.comthat is associated to a public IPv6 address on the Azure Load Balancer and private IPv6 addresses on the VMs.
Bring your own virtual network
This feature allows customers to use an existing virtual network by specifying a dedicated subnet the managed cluster will deploy its resources into. This can be useful if you already have a configured VNet and subnet with related security policies and traffic routing that you want to use. After you deploy to an existing virtual network, it's easy to use or incorporate other networking features, like Azure ExpressRoute, Azure VPN Gateway, a network security group, and virtual network peering. Additionally, you can bring your own Azure Load balancer if needed also.
Note
When using BYOVNET, managed cluster resources will be deployed in one subnet.
Note
This setting can't be changed once the cluster is created and the managed cluster will assign an NSG to the provided subnet. Don't override the NSG assignment or traffic may break.
To bring your own virtual network:
Get the service
Idfrom your subscription for Service Fabric Resource Provider application.Login-AzAccount Select-AzSubscription -SubscriptionId <SubId> Get-AzADServicePrincipal -DisplayName "Azure Service Fabric Resource Provider"Note
Make sure you are in the correct subscription, the principal ID will change if the subscription is in a different tenant.
ServicePrincipalNames : {74cb6831-0dbb-4be1-8206-fd4df301cdc2}
ApplicationId         : 74cb6831-0dbb-4be1-8206-fd4df301cdc2
ObjectType            : ServicePrincipal
DisplayName           : Azure Service Fabric Resource Provider
Id                    : 00000000-0000-0000-0000-000000000000
Note the Id of the previous output as principalId for use in a later step
Role definition name Role definition ID Network Contributor 4d97b98b-1d4f-4787-a291-c67834d212e7 Note the
Role definition nameandRole definition IDproperty values for use in a later stepAdd a role assignment to the Service Fabric Resource Provider application. Adding a role assignment is a one time action. You add the role by running the following PowerShell commands or by configuring an Azure Resource Manager (ARM) template as detailed below.
In the following steps, we start with an existing virtual network named ExistingRG-vnet, in the ExistingRG resource group. The subnet is named default.
Obtain the required info from the existing VNet.
Login-AzAccount
Select-AzSubscription -SubscriptionId <SubId>
Get-AzVirtualNetwork -Name ExistingRG-vnet -ResourceGroupName ExistingRG
Note the following subnet name and
Idproperty value that is returned from theSubnetssection in the response you'll use in later steps.Subnets:[ { ... "Id": "/subscriptions/<subscriptionId>/resourceGroups/Existing-RG/providers/Microsoft.Network/virtualNetworks/ExistingRG-vnet/subnets/default" }]Run the following PowerShell command using the principal ID, role definition name from step 2, and assignment scope
Idobtained above:New-AzRoleAssignment -PrincipalId 00000000-0000-0000-0000-000000000000 -RoleDefinitionName "Network Contributor" -Scope "/subscriptions/<subscriptionId>/resourceGroups/<resourceGroupName>/providers/Microsoft.Network/virtualNetworks/<vnetName>/subnets/<subnetName>"Or you can add the role assignment by using an Azure Resource Manager (ARM) template configured with proper values for
principalId,roleDefinitionId,vnetName, andsubnetName:"type": "Microsoft.Authorization/roleAssignments", "apiVersion": "2020-04-01-preview", "name": "[parameters('VNetRoleAssignmentID')]", "scope": "[concat('Microsoft.Network/virtualNetworks/', parameters('vnetName'), '/subnets/', parameters('subnetName'))]", "dependsOn": [ "[concat('Microsoft.Network/virtualNetworks/', parameters('vnetName'))]" ], "properties": { "roleDefinitionId": "[concat('/subscriptions/', subscription().subscriptionId, '/providers/Microsoft.Authorization/roleDefinitions/4d97b98b-1d4f-4787-a291-c67834d212e7')]", "principalId": "00000000-0000-0000-0000-000000000000" }Note
VNetRoleAssignmentID has to be a GUID. If you deploy a template again including this role assignment, make sure the GUID is the same as the one originally used. We suggest you run this isolated or remove this resource from the cluster template post-deployment as it just needs to be created once.
Here's a full sample Azure Resource Manager (ARM) template that creates a VNet subnet and does role assignment you can use for this step.
Configure the
subnetIdproperty for the cluster deployment after the role is set up as shown below:
The Service Fabric managed cluster resource apiVersion should be 2022-01-01 or later.
  "resources": [
      {
          "apiVersion": "[variables('sfApiVersion')]",
          "type": "Microsoft.ServiceFabric/managedclusters",
          ...
          },
          "properties": {
              "subnetId": "subnetId",
          ...
          }
  ]
See the bring your own VNet cluster sample template or customize your own.
Deploy the configured managed cluster Azure Resource Manager (ARM) template.
In the following example, we'll create a resource group called
MyResourceGroupinwestusand deploy a cluster with this feature enabled.New-AzResourceGroup -Name MyResourceGroup -Location westus New-AzResourceGroupDeployment -Name deployment -ResourceGroupName MyResourceGroup -TemplateFile AzureDeploy.jsonWhen you bring your own VNet subnet the public endpoint is still created and managed by the resource provider, but in the configured subnet. The feature doesn't allow you to specify the public ip/re-use static ip on the Azure Load Balancer. You can bring your own Azure Load Balancer in concert with this feature or by itself if you require those or other load balancer scenarios that aren't natively supported.
Bring your own Azure Load Balancer
Managed clusters create an Azure public Standard Load Balancer and fully qualified domain name with a static public IP for both the primary and secondary node types. Bring your own load balancer allows you to use an existing Azure Load Balancer for secondary node types for both inbound and outbound traffic. When you bring your own Azure Load Balancer, you can:
- Use a preconfigured Load Balancer static IP address for either private or public traffic
- Map a Load Balancer to a specific node type
- Configure network security group rules per node type because each node type is deployed in its own subnet
- Maintain existing policies and controls you may have in place
- Configure an internal-only load balancer and use the default load balancer for external traffic
Note
When using BYOVNET, managed cluster resources will be deployed in one subnet with one NSG regardless of additional configured load balancers.
Note
You can not switch from the default load balancer to a custom one after deployment of a node type, but you can modify custom load balancer configuration post-deployment if enabled.
Feature Requirements
- Basic and Standard SKU Azure Load Balancer types are supported
- You must have backend and NAT pools configured on the Azure Load Balancer
- You must enable outbound connectivity either using a provided public load balancer or the default public load balancer
Here are a couple example scenarios customers may use this for:
In this example, a customer wants to route traffic through an existing Azure Load Balancer configured with an existing static IP address to two node types.
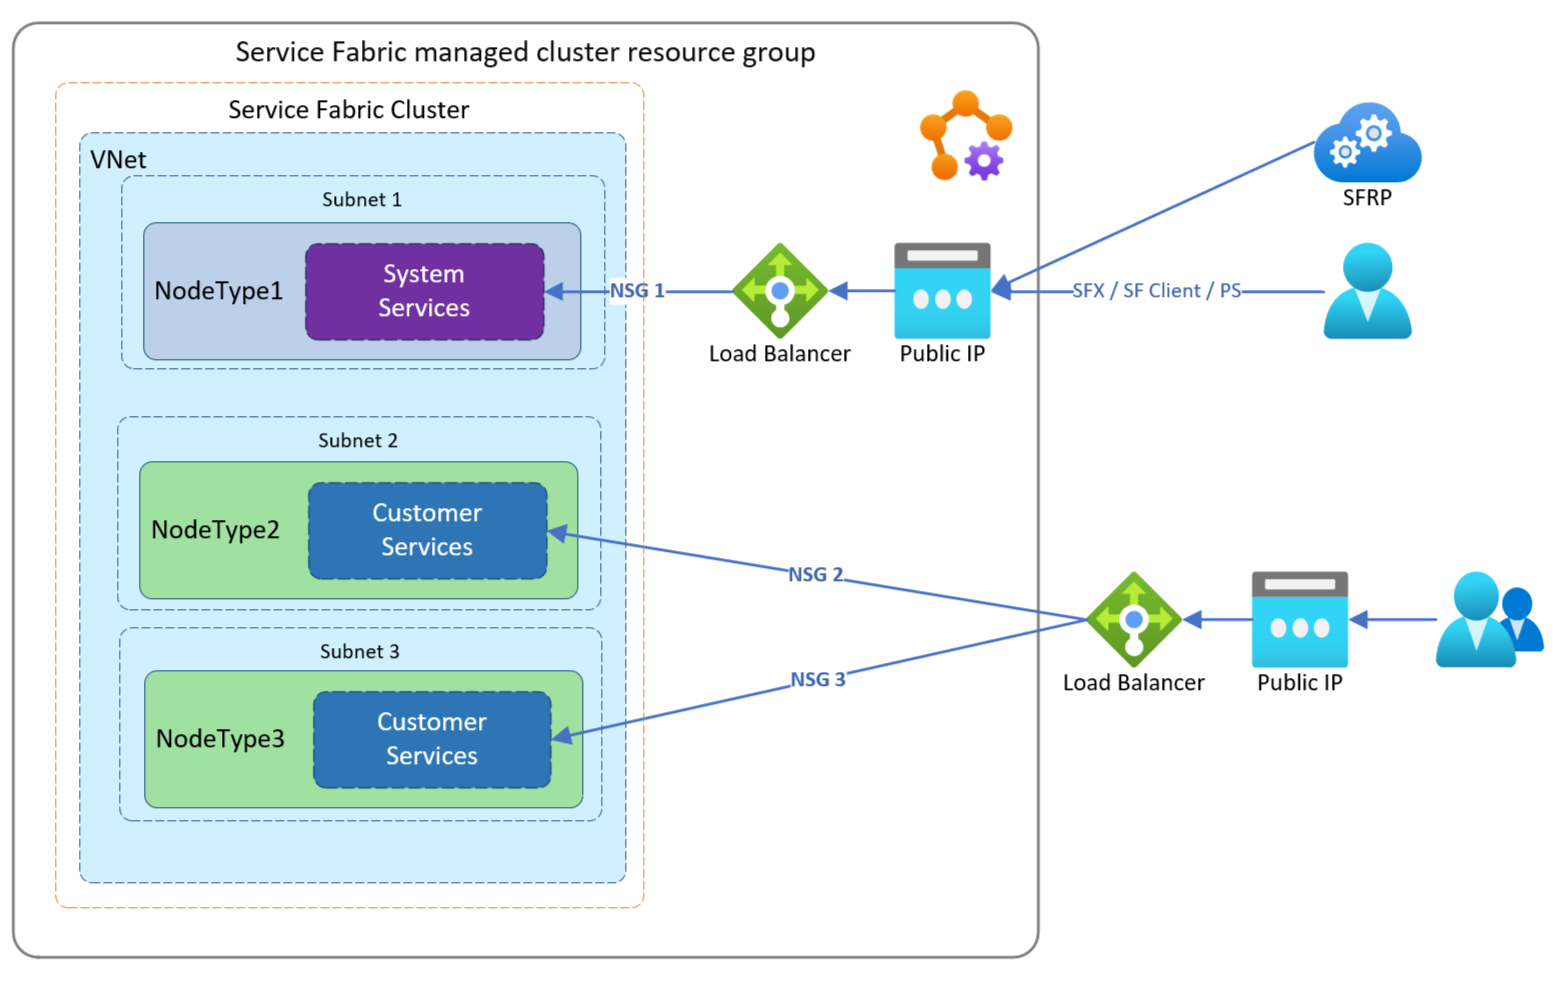
In this example, a customer wants to route traffic through existing Azure Load Balancers to help them manage traffic flow to their applications independently that live on separate node types. When set up like this example, each node type will be behind its own managed NSG.
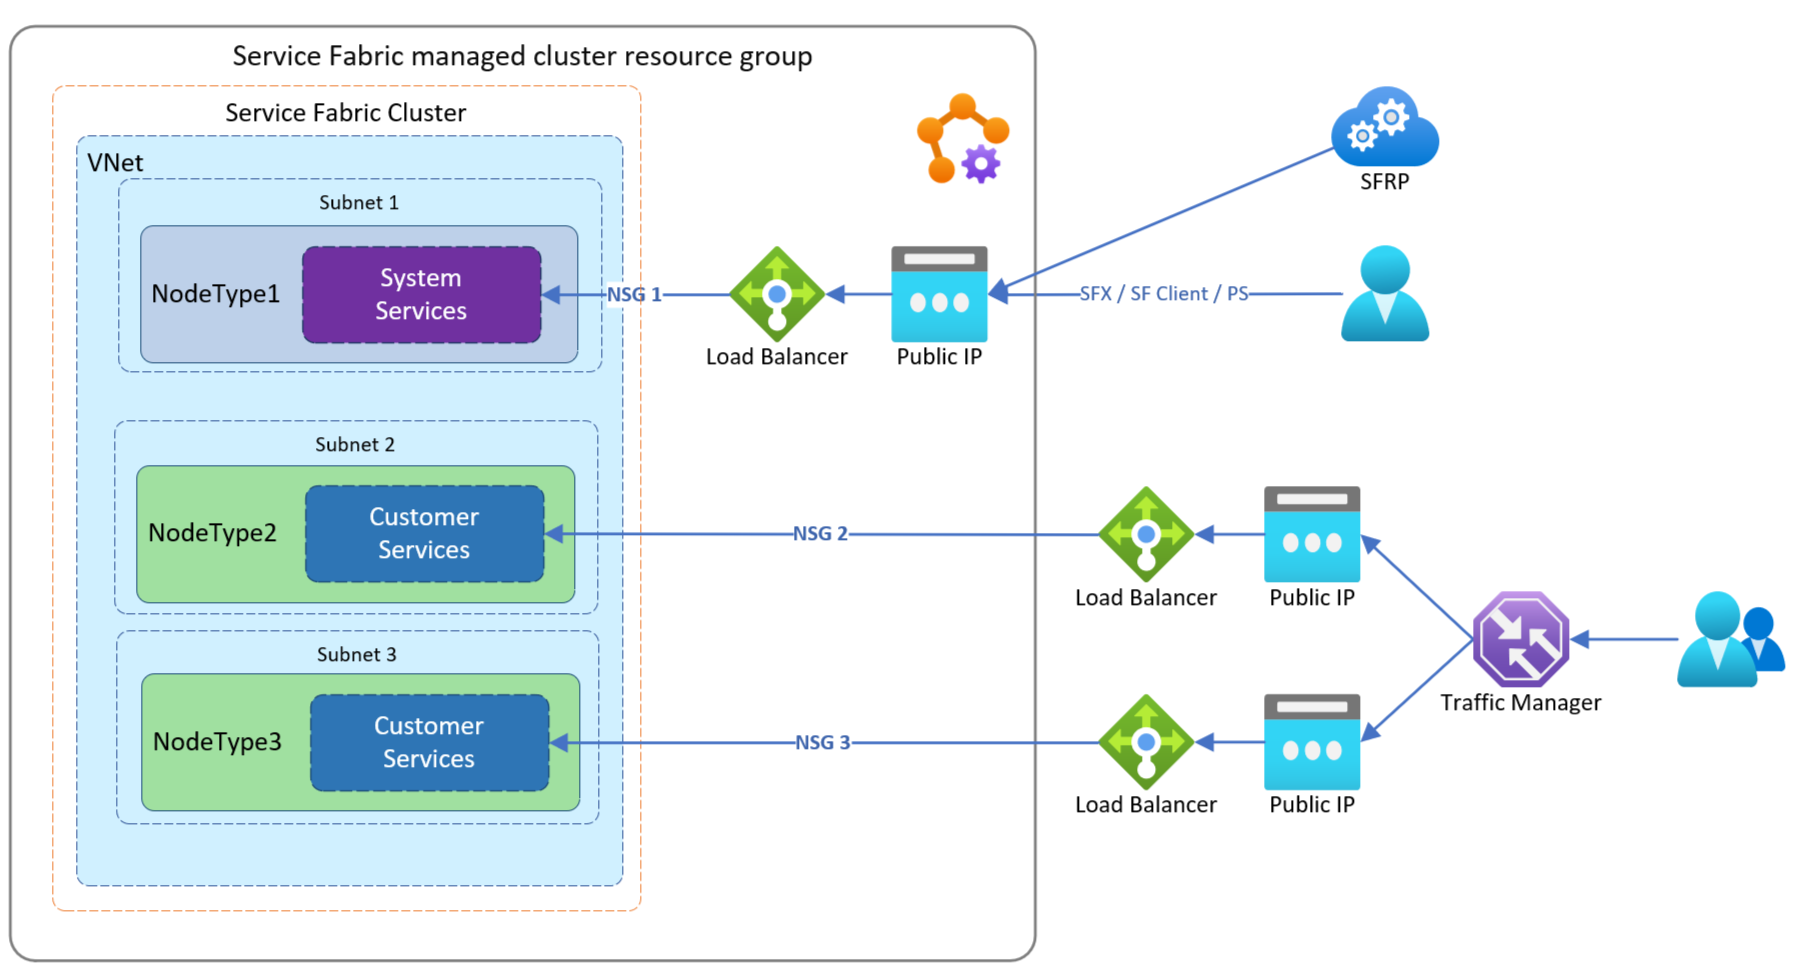
In this example, a customer wants to route traffic through existing internal Azure Load Balancers. This helps them manage traffic flow to their applications independently that live on separate node types. When set up like this example, each node type will be behind its own managed NSG and use the default load balancer for external traffic.

To configure with your own load balancer:
Get the service
Idfrom your subscription for Service Fabric Resource Provider application:Login-AzAccount Select-AzSubscription -SubscriptionId <SubId> Get-AzADServicePrincipal -DisplayName "Azure Service Fabric Resource Provider"Note
Make sure you are in the correct subscription, the principal ID will change if the subscription is in a different tenant.
ServicePrincipalNames : {74cb6831-0dbb-4be1-8206-fd4df301cdc2}
ApplicationId         : 74cb6831-0dbb-4be1-8206-fd4df301cdc2
ObjectType            : ServicePrincipal
DisplayName           : Azure Service Fabric Resource Provider
Id                    : 00000000-0000-0000-0000-000000000000
Note the Id of the previous output as principalId for use in a later step
Role definition name Role definition ID Network Contributor 4d97b98b-1d4f-4787-a291-c67834d212e7 Note the
Role definition nameandRole definition IDproperty values for use in a later stepAdd a role assignment to the Service Fabric Resource Provider application. Adding a role assignment is a one time action. You add the role by running the following PowerShell commands or by configuring an Azure Resource Manager (ARM) template as detailed below.
In the following steps, we start with an existing load balancer named Existing-LoadBalancer1, in the Existing-RG resource group.
Obtain the required
Idproperty info from the existing Azure Load Balancer.Login-AzAccount Select-AzSubscription -SubscriptionId <SubId> Get-AzLoadBalancer -Name "Existing-LoadBalancer1" -ResourceGroupName "Existing-RG"Note the following
Idyou'll use in the next step:{ ... "Id": "/subscriptions/<subscriptionId>/resourceGroups/Existing-RG/providers/Microsoft.Network/loadBalancers/Existing-LoadBalancer1" }Run the following PowerShell command using the principal ID, role definition name from step 2, and assignment scope
Idyou just obtained:New-AzRoleAssignment -PrincipalId 00000000-0000-0000-0000-000000000000 -RoleDefinitionName "Network Contributor" -Scope "/subscriptions/<subscriptionId>/resourceGroups/<resourceGroupName>/providers/Microsoft.Network/loadBalancers/<LoadBalancerName>"Or you can add the role assignment by using an Azure Resource Manager (ARM) template configured with proper values for
principalId,roleDefinitionId":"type": "Microsoft.Authorization/roleAssignments", "apiVersion": "2020-04-01-preview", "name": "[parameters('loadBalancerRoleAssignmentID')]", "scope": "[concat('Microsoft.Network/loadBalancers/', variables('lbName'))]", "dependsOn": [ "[concat('Microsoft.Network/loadBalancers/', variables('lbName'))]" ], "properties": { "roleDefinitionId": "[concat('/subscriptions/', subscription().subscriptionId, '/providers/Microsoft.Authorization/roleDefinitions/4d97b98b-1d4f-4787-a291-c67834d212e7')]", "principalId": "00000000-0000-0000-0000-000000000000" }Note
loadBalancerRoleAssignmentID has to be a GUID. If you deploy a template again including this role assignment, make sure the GUID is the same as the one originally used. We suggest you run this isolated or remove this resource from the cluster template post-deployment as it just needs to be created once.
See this example template to create a public load balancer and assign a role.
Configure required outbound connectivity for the node type. You must configure a public load balancer to provide outbound connectivity or use the default public load balancer.
Configure
outboundRulesto configure a public load balancer to provide outbound connectivity See the create load balancer and assign role sample Azure Resource Manager (ARM) templateOR
To configure the node type to use the default load balancer set the following in your template:
- The Service Fabric managed cluster resource apiVersion should be 2022-01-01 or later.
 "resources": [
   {
   "apiVersion": "[variables('sfApiVersion')]",
   "type": "Microsoft.ServiceFabric/managedclusters/nodetypes",
   "properties": {
       "isPrimary": false,
       "useDefaultPublicLoadBalancer": true
       }
   }
 ]
Optionally configure an inbound application port and related probe on your existing Azure Load Balancer. See the bring your own load balancer sample Azure Resource Manager (ARM) template for an example
Optionally configure the managed cluster NSG rules applied to the node type to allow any required traffic that you've configured on the Azure Load Balancer or traffic will be blocked. See the bring your own load balancer sample Azure Resource Manager (ARM) template for an example inbound NSG rule configuration. In the template, look for the
networkSecurityRulesproperty.Deploy the configured managed cluster ARM Template For this step we'll use the bring your own load balancer sample Azure Resource Manager (ARM) template
The following will create a resource group called
MyResourceGroupinwestusand deploy a cluster using an existing load balancer.New-AzResourceGroup -Name MyResourceGroup -Location westus New-AzResourceGroupDeployment -Name deployment -ResourceGroupName MyResourceGroup -TemplateFile AzureDeploy.jsonAfter deployment, the secondary node type is configured to use the specified load balancer for inbound and outbound traffic. The Service Fabric client connection and gateway endpoints will still point to the public DNS of the managed cluster primary node type static IP address.
Enable Accelerated Networking
Accelerated networking enables single root I/O virtualization (SR-IOV) to a virtual machine scale set VM that is the underlying resource for node types. This high-performance path bypasses the host from the data path, which reduces latency, jitter, and CPU utilization for the most demanding network workloads. Service Fabric managed cluster node types can be provisioned with Accelerated Networking on supported VM SKUs. Reference these limitations and constraints for additional considerations.
- Note that Accelerated Networking is supported on most general purpose and compute-optimized instance sizes with 2 or more vCPUs. On instances that support hyperthreading, Accelerated Networking is supported on VM instances with 4 or more vCPUs.
Enable accelerated networking by declaring enableAcceleratedNetworking property in your Resource Manager template as follows:
- The Service Fabric managed cluster resource apiVersion should be 2022-01-01 or later.
   {
   "apiVersion": "[variables('sfApiVersion')]",
   "type": "Microsoft.ServiceFabric/managedclusters/nodetypes",
   ...
   "properties": {
       ...
       "enableAcceleratedNetworking": true,
       ...
   }
To enable Accelerated Networking on an existing Service Fabric cluster, you need to first Scale a Service Fabric cluster out by adding a new node type and perform the following:
- Provision a node type with Accelerated Networking enabled
- Migrate your services and their state to the provisioned node type with Accelerated Networking enabled
Scaling out infrastructure is required to enable Accelerated Networking on an existing cluster, because enabling Accelerated Networking in place would cause downtime, as it requires all virtual machines in an availability set be stop and deallocate before enabling Accelerated networking on any existing NIC.
Configure Auxiliary Subnets
Auxiliary subnets provide the ability to create additional managed subnets without a node type for supporting scenarios such as Private Link Service and Bastion Hosts.
Configure auxiliary subnets by declaring auxiliarySubnets property and required parameters in your Resource Manager template as follows:
- The Service Fabric managed cluster resource apiVersion should be 2022-01-01 or later.
    "resources": [
        {
            "apiVersion": "[variables('sfApiVersion')]",
            "type": "Microsoft.ServiceFabric/managedclusters",
              "properties": {
                "auxiliarySubnets": [
                  {
                  "name" : "mysubnet",
                  "enableIpv6" : "true"
                  }
                ]
              }
        }
    ]
See full list of parameters available
Next steps
Service Fabric managed cluster configuration options Service Fabric managed clusters overview
Feedback
Coming soon: Throughout 2024 we will be phasing out GitHub Issues as the feedback mechanism for content and replacing it with a new feedback system. For more information see: https://aka.ms/ContentUserFeedback.
Submit and view feedback for