Create your first Service Fabric container application on Windows
Running an existing application in a Windows container on a Service Fabric cluster doesn't require any changes to your application. This article walks you through creating a Docker image containing a Python Flask web application and deploying it to an Azure Service Fabric cluster. You will also share your containerized application through Azure Container Registry. This article assumes a basic understanding of Docker. You can learn about Docker by reading the Docker Overview.
Note
This article applies to a Windows development environment. The Service Fabric cluster runtime and the Docker runtime must be running on the same OS. You cannot run Windows containers on a Linux cluster.
Note
We recommend that you use the Azure Az PowerShell module to interact with Azure. See Install Azure PowerShell to get started. To learn how to migrate to the Az PowerShell module, see Migrate Azure PowerShell from AzureRM to Az.
Prerequisites
A development computer running:
- Visual Studio 2015 or Visual Studio 2019.
- Service Fabric SDK and tools.
- Docker for Windows. Get Docker CE for Windows (stable). After installing and starting Docker, right-click on the tray icon and select Switch to Windows containers. This step is required to run Docker images based on Windows.
A Windows cluster with three or more nodes running on Windows Server with Containers.
For this article, the version (build) of Windows Server with Containers running on your cluster nodes must match that on your development machine. This is because you build the docker image on your development machine and there are compatibility constraints between versions of the container OS and the host OS on which it is deployed. For more information, see Windows Server container OS and host OS compatibility.
To determine the version of Windows Server with Containers you need for your cluster, run the
vercommand from a Windows command prompt on your development machine. Refer to Windows Server container OS and host OS compatibility before you creating a cluster.A registry in Azure Container Registry - Create a container registry in your Azure subscription.
Note
Deploying containers to a Service Fabric cluster running on Windows 10 is supported. See this article for information on how to configure Windows 10 to run Windows containers.
Note
Service Fabric versions 6.2 and later support deploying containers to clusters running on Windows Server version 1709.
Define the Docker container
Build an image based on the Python image located on Docker Hub.
Specify your Docker container in a Dockerfile. The Dockerfile consists of instructions for setting up the environment inside your container, loading the application you want to run, and mapping ports. The Dockerfile is the input to the docker build command, which creates the image.
Create an empty directory and create the file Dockerfile (with no file extension). Add the following to Dockerfile and save your changes:
# Use an official Python runtime as a base image
FROM python:2.7-windowsservercore

# Set the working directory to /app
WORKDIR /app

# Copy the current directory contents into the container at /app
ADD . /app

# Install any needed packages specified in requirements.txt
RUN pip install -r requirements.txt

# Make port 80 available to the world outside this container
EXPOSE 80

# Define environment variable
ENV NAME World

# Run app.py when the container launches
CMD ["python", "app.py"]
Read the Dockerfile reference for more information.
Create a basic web application
Create a Flask web application listening on port 80 that returns Hello World!. In the same directory, create the file requirements.txt. Add the following and save your changes:
Flask
Also create the app.py file and add the following snippet:
from flask import Flask

app = Flask(__name__)


@app.route("/")
def hello():

    return 'Hello World!'


if __name__ == "__main__":
    app.run(host='0.0.0.0', port=80)
Login to Docker and build the image
Next we'll create the image that runs your web application. When pulling public images from Docker (like python:2.7-windowsservercore in our Dockerfile), it's a best practice to authenticate with your Docker Hub account instead of making an anonymous pull request.
Note
When making frequent anonymous pull requests you might see Docker errors similar to ERROR: toomanyrequests: Too Many Requests. or You have reached your pull rate limit. Authenticate to Docker Hub to prevent these errors. See Manage public content with Azure Container Registry for more info.
Open a PowerShell window and navigate to the directory containing the Dockerfile. Then run the following commands:
docker login
docker build -t helloworldapp .
This command builds the new image using the instructions in your Dockerfile, naming (-t tagging) the image helloworldapp. To build a container image, the base image is first downloaded down from Docker Hub to which the application is added.
Once the build command completes, run the docker images command to see information on the new image:
$ docker images

REPOSITORY                    TAG                 IMAGE ID            CREATED             SIZE
helloworldapp                 latest              8ce25f5d6a79        2 minutes ago       10.4 GB
Run the application locally
Verify your image locally before pushing it the container registry.
Run the application:
docker run -d --name my-web-site helloworldapp
name gives a name to the running container (instead of the container ID).
Once the container starts, find its IP address so that you can connect to your running container from a browser:
docker inspect -f "{{ .NetworkSettings.Networks.nat.IPAddress }}" my-web-site
If that command does not return anything, run the following command and inspect the NetworkSettings->Networks element for the IP address:
docker inspect my-web-site
Connect to the running container. Open a web browser pointing to the IP address returned, for example "http://172.31.194.61". You should see the heading "Hello World!" display in the browser.
To stop your container, run:
docker stop my-web-site
Delete the container from your development machine:
docker rm my-web-site
Push the image to the container registry
After you verify that the container runs on your development machine, push the image to your registry in Azure Container Registry.
Run docker login to sign in to your container registry with your registry credentials.
The following example passes the ID and password of a Microsoft Entra service principal. For example, you might have assigned a service principal to your registry for an automation scenario. Or, you could sign in using your registry username and password.
docker login myregistry.azurecr.io -u xxxxxxxx-xxxx-xxxx-xxxx-xxxxxxxxxxxx -p myPassword
The following command creates a tag, or alias, of the image, with a fully qualified path to your registry. This example places the image in the samples namespace to avoid clutter in the root of the registry.
docker tag helloworldapp myregistry.azurecr.io/samples/helloworldapp
Push the image to your container registry:
docker push myregistry.azurecr.io/samples/helloworldapp
Create the containerized service in Visual Studio
The Service Fabric SDK and tools provide a service template to help you create a containerized application.
- Start Visual Studio. Select File > New > Project.
- Select Service Fabric application, name it "MyFirstContainer", and click OK.
- Select Container from the list of service templates.
- In Image Name enter "myregistry.azurecr.io/samples/helloworldapp", the image you pushed to your container repository.
- Give your service a name, and click OK.
Configure communication
The containerized service needs an endpoint for communication. Add an Endpoint element with the protocol, port, and type to the ServiceManifest.xml file. In this example, a fixed port 8081 is used. If no port is specified, a random port from the application port range is chosen.
<Resources>
  <Endpoints>
    <Endpoint Name="Guest1TypeEndpoint" UriScheme="http" Port="8081" Protocol="http"/>
  </Endpoints>
</Resources>
Note
Additional Endpoints for a service can be added by declaring additional EndPoint elements with applicable property values. Each Port can only declare one protocol value.
By defining an endpoint, Service Fabric publishes the endpoint to the Naming service. Other services running in the cluster can resolve this container. You can also perform container-to-container communication using the reverse proxy. Communication is performed by providing the reverse proxy HTTP listening port and the name of the services that you want to communicate with as environment variables.
The service is listening on a specific port (8081 in this example). When the application deploys to a cluster in Azure, both the cluster and the application run behind an Azure load balancer. The application port must be open in the Azure load balancer so that inbound traffic can get through to the service. You can open this port in the Azure load balancer using a PowerShell script or in the Azure portal.
Configure and set environment variables
Environment variables can be specified for each code package in the service manifest. This feature is available for all services irrespective of whether they are deployed as containers or processes or guest executables. You can override environment variable values in the application manifest or specify them during deployment as application parameters.
The following service manifest XML snippet shows an example of how to specify environment variables for a code package:
<CodePackage Name="Code" Version="1.0.0">
  ...
  <EnvironmentVariables>
    <EnvironmentVariable Name="HttpGatewayPort" Value=""/>
  </EnvironmentVariables>
</CodePackage>
These environment variables can be overridden in the application manifest:
<ServiceManifestImport>
  <ServiceManifestRef ServiceManifestName="Guest1Pkg" ServiceManifestVersion="1.0.0" />
  <EnvironmentOverrides CodePackageRef="FrontendService.Code">
    <EnvironmentVariable Name="HttpGatewayPort" Value="19080"/>
  </EnvironmentOverrides>
  ...
</ServiceManifestImport>
Configure container port-to-host port mapping and container-to-container discovery
Configure a host port used to communicate with the container. The port binding maps the port on which the service is listening inside the container to a port on the host. Add a PortBinding element in ContainerHostPolicies element of the ApplicationManifest.xml file. For this article, ContainerPort is 80 (the container exposes port 80, as specified in the Dockerfile) and EndpointRef is "Guest1TypeEndpoint" (the endpoint previously defined in the service manifest). Incoming requests to the service on port 8081 are mapped to port 80 on the container.
<ServiceManifestImport>
    ...
    <Policies>
        <ContainerHostPolicies CodePackageRef="Code">
            <PortBinding ContainerPort="80" EndpointRef="Guest1TypeEndpoint"/>
        </ContainerHostPolicies>
    </Policies>
    ...
</ServiceManifestImport>
Note
Additional PortBindings for a service can be added by declaring additional PortBinding elements with applicable property values.
Configure container repository authentication
See Container Repository Authenticationto learn how to configure different types of authentication for container image downloading.
Configure isolation mode
Windows supports two isolation modes for containers: process and Hyper-V. With the process isolation mode, all the containers running on the same host machine share the kernel with the host. With the Hyper-V isolation mode, the kernels are isolated between each Hyper-V container and the container host. The isolation mode is specified in the ContainerHostPolicies element in the application manifest file. The isolation modes that can be specified are process, hyperv, and default. The default is process isolation mode on Windows Server hosts. On Windows 10 hosts, only Hyper-V isolation mode is supported, so the container runs in Hyper-V isolation mode regardless of its isolation mode setting. The following snippet shows how the isolation mode is specified in the application manifest file.
<ContainerHostPolicies CodePackageRef="Code" Isolation="hyperv">
Note
The hyperv isolation mode is available on Ev3 and Dv3 Azure SKUs which have nested virtualization support.
Configure resource governance
Resource governance restricts the resources that the container can use on the host. The ResourceGovernancePolicy element, which is specified in the application manifest, is used to declare resource limits for a service code package. Resource limits can be set for the following resources: Memory, MemorySwap, CpuShares (CPU relative weight), MemoryReservationInMB, BlkioWeight (BlockIO relative weight). In this example, service package Guest1Pkg gets one core on the cluster nodes where it is placed. Memory limits are absolute, so the code package is limited to 1024 MB of memory (and a soft-guarantee reservation of the same). Code packages (containers or processes) are not able to allocate more memory than this limit, and attempting to do so results in an out-of-memory exception. For resource limit enforcement to work, all code packages within a service package should have memory limits specified.
<ServiceManifestImport>
  <ServiceManifestRef ServiceManifestName="Guest1Pkg" ServiceManifestVersion="1.0.0" />
  <Policies>
    <ServicePackageResourceGovernancePolicy CpuCores="1"/>
    <ResourceGovernancePolicy CodePackageRef="Code" MemoryInMB="1024"  />
  </Policies>
</ServiceManifestImport>
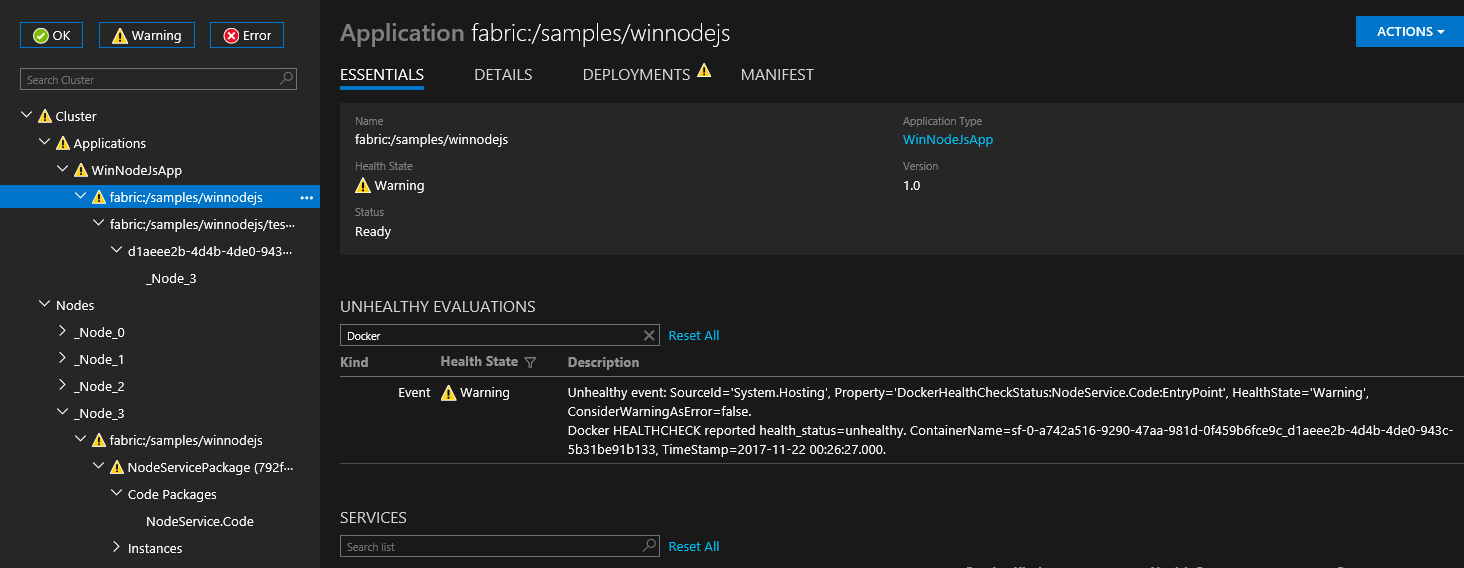
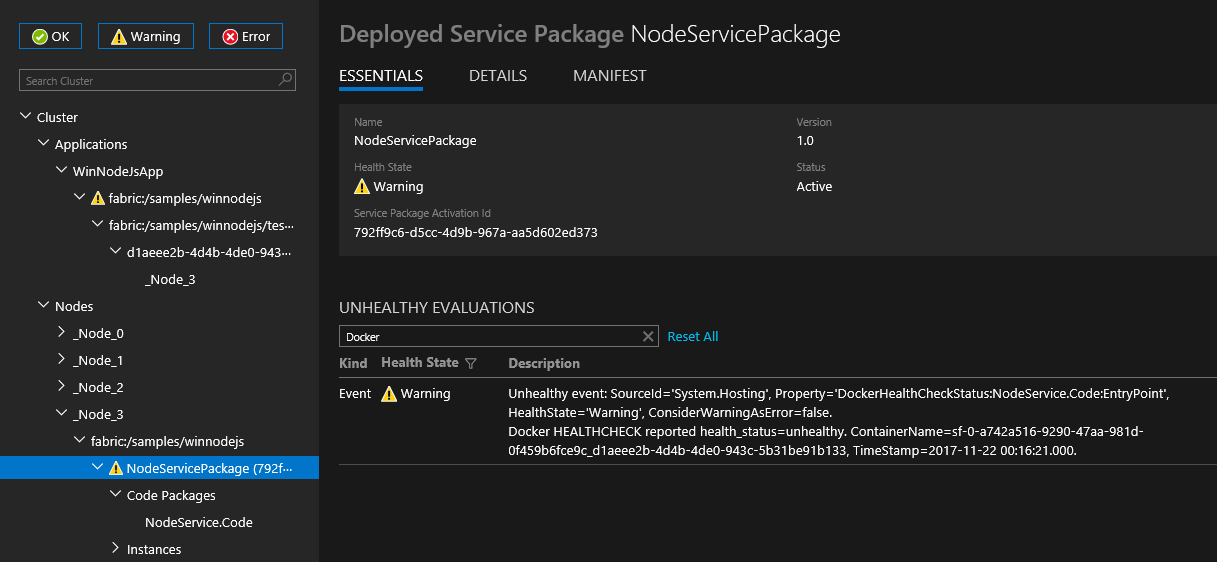
Configure docker HEALTHCHECK
Starting v6.1, Service Fabric automatically integrates docker HEALTHCHECK events to its system health report. This means that if your container has HEALTHCHECK enabled, Service Fabric will report health whenever the health status of the container changes as reported by Docker. An OK health report will appear in Service Fabric Explorer when the health_status is healthy and WARNING will appear when health_status is unhealthy.
Starting with the latest refresh release of v6.4, you have the option to specify that docker HEALTHCHECK evaluations should be reported as an error. If this option is enabled, an OK health report will appear when health_status is healthy and ERROR will appear when health_status is unhealthy.
The HEALTHCHECK instruction pointing to the actual check that is performed for monitoring container health must be present in the Dockerfile used while generating the container image.

You can configure HEALTHCHECK behavior for each container by specifying HealthConfig options as part of ContainerHostPolicies in ApplicationManifest.
<ServiceManifestImport>
    <ServiceManifestRef ServiceManifestName="ContainerServicePkg" ServiceManifestVersion="2.0.0" />
    <Policies>
      <ContainerHostPolicies CodePackageRef="Code">
        <HealthConfig IncludeDockerHealthStatusInSystemHealthReport="true"
		      RestartContainerOnUnhealthyDockerHealthStatus="false"
		      TreatContainerUnhealthyStatusAsError="false" />
      </ContainerHostPolicies>
    </Policies>
</ServiceManifestImport>
By default IncludeDockerHealthStatusInSystemHealthReport is set to true, RestartContainerOnUnhealthyDockerHealthStatus is set to false, and TreatContainerUnhealthyStatusAsError is set to false.
If RestartContainerOnUnhealthyDockerHealthStatus is set to true, a container repeatedly reporting unhealthy is restarted (possibly on other nodes).
If TreatContainerUnhealthyStatusAsError is set to true, ERROR health reports will appear when the container's health_status is unhealthy.
If you want to the disable the HEALTHCHECK integration for the entire Service Fabric cluster, you will need to set EnableDockerHealthCheckIntegration to false.
Deploy the container application
Save all your changes and build the application. To publish your application, right-click on MyFirstContainer in Solution Explorer and select Publish.
In Connection Endpoint, enter the management endpoint for the cluster. For example, containercluster.westus2.cloudapp.azure.com:19000. You can find the client connection endpoint in the Overview tab for your cluster in the Azure portal.
Click Publish.
Service Fabric Explorer is a web-based tool for inspecting and managing applications and nodes in a Service Fabric cluster. Open a browser and navigate to http://containercluster.westus2.cloudapp.azure.com:19080/Explorer/ and follow the application deployment. The application deploys but is in an error state until the image is downloaded on the cluster nodes (which can take some time, depending on the image size):

The application is ready when it's in Ready state:

Open a browser and navigate to http://containercluster.westus2.cloudapp.azure.com:8081. You should see the heading "Hello World!" display in the browser.
Clean up
You continue to incur charges while the cluster is running, consider deleting your cluster.
After you push the image to the container registry, you can delete the local image from your development computer:
docker rmi helloworldapp
docker rmi myregistry.azurecr.io/samples/helloworldapp
Windows Server container OS and host OS compatibility
Windows Server containers are not compatible across all versions of a host OS. For example:
- Windows Server containers built using Windows Server version 1709 do not work on a host running Windows Server version 2016.
- Windows Server containers built using Windows Server 2016 work in Hyper-V isolation mode only on a host running Windows Server version 1709.
- With Windows Server containers built using Windows Server 2016, it might be necessary to ensure that the revision of the container OS and host OS are the same when running in process isolation mode on a host running Windows Server 2016.
To learn more, see Windows Container Version Compatibility.
Consider the compatibility of the host OS and your container OS when building and deploying containers to your Service Fabric cluster. For example:
- Make sure you deploy containers with an OS compatible with the OS on your cluster nodes.
- Make sure that the isolation mode specified for your container application is consistent with support for the container OS on the node where it is being deployed.
- Consider how OS upgrades to your cluster nodes or containers may affect their compatibility.
We recommend the following practices to make sure that containers are deployed correctly on your Service Fabric cluster:
- Use explicit image tagging with your Docker images to specify the version of Windows Server OS that a container is built from.
- Use OS tagging in your application manifest file to make sure that your application is compatible across different Windows Server versions and upgrades.
Note
With Service Fabric version 6.2 and later, you can deploy containers based on Windows Server 2016 locally on a Windows 10 host. On Windows 10, containers run in Hyper-V isolation mode, regardless of the isolation mode set in the application manifest. To learn more, see Configure isolation mode.
Specify OS build specific container images
Windows Server containers may not be compatible across different versions of the OS. For example, Windows Server containers built using Windows Server 2016 do not work on Windows Server version 1709 in process isolation mode. Hence, if cluster nodes are updated to the latest version, container services built using the earlier versions of the OS may fail. To circumvent this with version 6.1 of the runtime and newer, Service Fabric supports specifying multiple OS images per container and tagging them with the build versions of the OS in the application manifest. You can get the build version of the OS by running winver at a Windows command prompt. Update the application manifests and specify image overrides per OS version before updating the OS on the nodes. The following snippet shows how to specify multiple container images in the application manifest, ApplicationManifest.xml:
      <ContainerHostPolicies>
         <ImageOverrides>
	       <Image Name="myregistry.azurecr.io/samples/helloworldappDefault" />
               <Image Name="myregistry.azurecr.io/samples/helloworldapp1701" Os="14393" />
               <Image Name="myregistry.azurecr.io/samples/helloworldapp1709" Os="16299" />
         </ImageOverrides>
      </ContainerHostPolicies>
The build version for Windows Server 2016 is 14393, and the build version for Windows Server version 1709 is 16299. The service manifest continues to specify only one image per container service as the following shows:
<ContainerHost>
    <ImageName>myregistry.azurecr.io/samples/helloworldapp</ImageName>
</ContainerHost>
Note
The OS build version tagging features is only available for Service Fabric on Windows
If the underlying OS on the VM is build 16299 (version 1709), Service Fabric picks the container image corresponding to that Windows Server version. If an untagged container image is also provided alongside tagged container images in the application manifest, then Service Fabric treats the untagged image as one that works across versions. Tag the container images explicitly to avoid issues during upgrades.
The untagged container image will work as an override for the one provide in the ServiceManifest. So image "myregistry.azurecr.io/samples/helloworldappDefault" will override the ImageName "myregistry.azurecr.io/samples/helloworldapp" in the ServiceManifest.
Complete example Service Fabric application and service manifests
Here are the complete service and application manifests used in this article.
ServiceManifest.xml
<?xml version="1.0" encoding="utf-8"?>
<ServiceManifest Name="Guest1Pkg"
                 Version="1.0.0"
                 xmlns="http://schemas.microsoft.com/2011/01/fabric"
                 xmlns:xsd="https://www.w3.org/2001/XMLSchema"
                 xmlns:xsi="https://www.w3.org/2001/XMLSchema-instance">
  <ServiceTypes>
    <!-- This is the name of your ServiceType.
         The UseImplicitHost attribute indicates this is a guest service. -->
    <StatelessServiceType ServiceTypeName="Guest1Type" UseImplicitHost="true" />
  </ServiceTypes>

  <!-- Code package is your service executable. -->
  <CodePackage Name="Code" Version="1.0.0">
    <EntryPoint>
      <!-- Follow this link for more information about deploying Windows containers to Service Fabric: https://aka.ms/sfguestcontainers -->
      <ContainerHost>
        <ImageName>myregistry.azurecr.io/samples/helloworldapp</ImageName>
        <!-- Pass comma delimited commands to your container: dotnet, myproc.dll, 5" -->
        <!--Commands> dotnet, myproc.dll, 5 </Commands-->
        <Commands></Commands>
      </ContainerHost>
    </EntryPoint>
    <!-- Pass environment variables to your container: -->
    <EnvironmentVariables>
      <EnvironmentVariable Name="HttpGatewayPort" Value=""/>
      <EnvironmentVariable Name="BackendServiceName" Value=""/>
    </EnvironmentVariables>

  </CodePackage>

  <!-- Config package is the contents of the Config directory under PackageRoot that contains an
       independently-updateable and versioned set of custom configuration settings for your service. -->
  <ConfigPackage Name="Config" Version="1.0.0" />

  <Resources>
    <Endpoints>
      <!-- This endpoint is used by the communication listener to obtain the port on which to
           listen. Please note that if your service is partitioned, this port is shared with
           replicas of different partitions that are placed in your code. -->
      <Endpoint Name="Guest1TypeEndpoint" UriScheme="http" Port="8081" Protocol="http"/>
    </Endpoints>
  </Resources>
</ServiceManifest>
ApplicationManifest.xml
<?xml version="1.0" encoding="utf-8"?>
<ApplicationManifest ApplicationTypeName="MyFirstContainerType"
                     ApplicationTypeVersion="1.0.0"
                     xmlns="http://schemas.microsoft.com/2011/01/fabric"
                     xmlns:xsd="https://www.w3.org/2001/XMLSchema"
                     xmlns:xsi="https://www.w3.org/2001/XMLSchema-instance">
  <Parameters>
    <Parameter Name="Guest1_InstanceCount" DefaultValue="-1" />
  </Parameters>
  <!-- Import the ServiceManifest from the ServicePackage. The ServiceManifestName and ServiceManifestVersion
       should match the Name and Version attributes of the ServiceManifest element defined in the
       ServiceManifest.xml file. -->
  <ServiceManifestImport>
    <ServiceManifestRef ServiceManifestName="Guest1Pkg" ServiceManifestVersion="1.0.0" />
    <EnvironmentOverrides CodePackageRef="FrontendService.Code">
      <EnvironmentVariable Name="HttpGatewayPort" Value="19080"/>
    </EnvironmentOverrides>
    <ConfigOverrides />
    <Policies>
      <ContainerHostPolicies CodePackageRef="Code">
        <RepositoryCredentials AccountName="myregistry" Password="MIIB6QYJKoZIhvcNAQcDoIIB2jCCAdYCAQAxggFRMIIBTQIBADA1MCExHzAdBgNVBAMMFnJ5YW53aWRhdGFlbmNpcGhlcm1lbnQCEFfyjOX/17S6RIoSjA6UZ1QwDQYJKoZIhvcNAQEHMAAEg
gEAS7oqxvoz8i6+8zULhDzFpBpOTLU+c2mhBdqXpkLwVfcmWUNA82rEWG57Vl1jZXe7J9BkW9ly4xhU8BbARkZHLEuKqg0saTrTHsMBQ6KMQDotSdU8m8Y2BR5Y100wRjvVx3y5+iNYuy/JmM
gSrNyyMQ/45HfMuVb5B4rwnuP8PAkXNT9VLbPeqAfxsMkYg+vGCDEtd8m+bX/7Xgp/kfwxymOuUCrq/YmSwe9QTG3pBri7Hq1K3zEpX4FH/7W2Zb4o3fBAQ+FuxH4nFjFNoYG29inL0bKEcTX
yNZNKrvhdM3n1Uk/8W2Hr62FQ33HgeFR1yxQjLsUu800PrYcR5tLfyTB8BgkqhkiG9w0BBwEwHQYJYIZIAWUDBAEqBBBybgM5NUV8BeetUbMR8mJhgFBrVSUsnp9B8RyebmtgU36dZiSObDsI
NtTvlzhk11LIlae/5kjPv95r3lw6DHmV4kXLwiCNlcWPYIWBGIuspwyG+28EWSrHmN7Dt2WqEWqeNQ==" PasswordEncrypted="true"/>
        <PortBinding ContainerPort="80" EndpointRef="Guest1TypeEndpoint"/>
      </ContainerHostPolicies>
      <ServicePackageResourceGovernancePolicy CpuCores="1"/>
      <ResourceGovernancePolicy CodePackageRef="Code" MemoryInMB="1024"  />
    </Policies>
  </ServiceManifestImport>
  <DefaultServices>
    <!-- The section below creates instances of service types, when an instance of this
         application type is created. You can also create one or more instances of service type using the
         ServiceFabric PowerShell module.

         The attribute ServiceTypeName below must match the name defined in the imported ServiceManifest.xml file. -->
    <Service Name="Guest1">
      <StatelessService ServiceTypeName="Guest1Type" InstanceCount="[Guest1_InstanceCount]">
        <SingletonPartition />
      </StatelessService>
    </Service>
  </DefaultServices>
</ApplicationManifest>
Configure time interval before container is force terminated
You can configure a time interval for the runtime to wait before the container is removed after the service deletion (or a move to another node) has started. Configuring the time interval sends the docker stop <time in seconds> command to the container. For more detail, see docker stop. The time interval to wait is specified under the Hosting section. The Hosting section can be added at cluster creation or later in a configuration upgrade. The following cluster manifest snippet shows how to set the wait interval:
"fabricSettings": [
	...,
	{
        "name": "Hosting",
        "parameters": [
          {
                "name": "ContainerDeactivationTimeout",
                "value" : "10"
          },
	      ...
        ]
	}
]
The default time interval is set to 10 seconds. Since this configuration is dynamic, a config only upgrade on the cluster updates the timeout.
Configure the runtime to remove unused container images
You can configure the Service Fabric cluster to remove unused container images from the node. This configuration allows disk space to be recaptured if too many container images are present on the node. To enable this feature, update the Hosting section in the cluster manifest as shown in the following snippet:
"fabricSettings": [
	...,
	{
        "name": "Hosting",
        "parameters": [
          {
                "name": "PruneContainerImages",
                "value": "True"
          },
          {
                "name": "ContainerImagesToSkip",
                "value": "mcr.microsoft.com/windows/servercore|mcr.microsoft.com/windows/nanoserver|mcr.microsoft.com/dotnet/framework/aspnet|..."
          }
          ...
          }
        ]
	}
]
For images that shouldn't be deleted, you can specify them under the ContainerImagesToSkip parameter.
Configure container image download time
The Service Fabric runtime allocates 20 minutes to download and extract container images, which work for the majority of container images. For large images, or when the network connection is slow, it might be necessary to increase the time to wait before aborting the image download and extraction. This time out is set using the ContainerImageDownloadTimeout attribute in the Hosting section of the cluster manifest as shown in the following snippet:
"fabricSettings": [
	...,
	{
        "name": "Hosting",
        "parameters": [
          {
              "name": "ContainerImageDownloadTimeout",
              "value": "1200"
          }
        ]
	}
]
Set container retention policy
To assist with diagnosing container startup failures, Service Fabric (version 6.1 or higher) supports retaining containers that terminated or failed to startup. This policy can be set in the ApplicationManifest.xml file as shown in the following snippet:
<ContainerHostPolicies CodePackageRef="NodeService.Code" Isolation="process" ContainersRetentionCount="2" RunInteractive="true">
The setting ContainersRetentionCount specifies the number of containers to retain when they fail. If a negative value is specified, all failing containers will be retained. When the ContainersRetentionCount attribute is not specified, no containers will be retained. The attribute ContainersRetentionCount also supports Application Parameters so users can specify different values for test and production clusters. Use placement constraints to target the container service to a particular node when using this feature to prevent the container service from moving to other nodes. Any containers retained using this feature must be manually removed.
Start the Docker daemon with custom arguments
With the 6.2 version of the Service Fabric runtime and greater, you can start the Docker daemon with custom arguments. When custom arguments are specified, Service Fabric does not pass any other argument to docker engine except the --pidfile argument. Hence, --pidfile shouldn't be passed as an argument. Additionally, the argument should continue to have the docker daemon listen on the default name pipe on Windows (or unix domain socket on Linux) for Service Fabric to communicate with the Daemon. The custom arguments are passed in the cluster manifest under the Hosting section under ContainerServiceArguments as shown in the following snippet:
"fabricSettings": [
	...,
	{
        "name": "Hosting",
        "parameters": [
          {
            "name": "ContainerServiceArguments",
            "value": "-H localhost:1234 -H unix:///var/run/docker.sock"
          }
        ]
	}
]
EntryPoint Override
With 8.2 version of ServiceFabric Runtime, entrypoint for container and exe host code package can be overridden. This can be used in cases where all the manifest elements remains the same but the container image needs to be changed, then provisioning a different app type version is not required anymore, or different arguments needs to be passed based on test or prod scenario and the entry point remains the same.
Following is an example on how to override container entry point:
ApplicationManifest.xml
<?xml version="1.0" encoding="utf-8"?>
<ApplicationManifest ApplicationTypeName="MyFirstContainerType"
                     ApplicationTypeVersion="1.0.0"
                     xmlns="http://schemas.microsoft.com/2011/01/fabric"
                     xmlns:xsd="https://www.w3.org/2001/XMLSchema"
                     xmlns:xsi="https://www.w3.org/2001/XMLSchema-instance">
  <Parameters>
    <Parameter Name="ImageName" DefaultValue="myregistry.azurecr.io/samples/helloworldapp" />
    <Parameter Name="Commands" DefaultValue="commandsOverride" />
    <Parameter Name="FromSource" DefaultValue="sourceOverride" />
    <Parameter Name="EntryPoint" DefaultValue="entryPointOverride" />
  </Parameters>
  <!-- Import the ServiceManifest from the ServicePackage. The ServiceManifestName and ServiceManifestVersion
       should match the Name and Version attributes of the ServiceManifest element defined in the
       ServiceManifest.xml file. -->
  <ServiceManifestImport>
    <ServiceManifestRef ServiceManifestName="Guest1Pkg" ServiceManifestVersion="1.0.0" />
    <ConfigOverrides />
    <Policies>
      <CodePackagePolicy CodePackageRef="Code">
        <EntryPointOverride>
         <ContainerHostOverride>
            <ImageOverrides>
              <Image Name="[ImageName]" />
            </ImageOverrides>
            <Commands>[Commands]</Commands>
            <FromSource>[Source]</FromSource>
            <EntryPoint>[EntryPoint]</EntryPoint>
          </ContainerHostOverride>
        </EntryPointOverride>
      </CodePackagePolicy>
    </Policies>
  </ServiceManifestImport>
</ApplicationManifest>
ServiceManifest.xml
<?xml version="1.0" encoding="utf-8"?>
<ServiceManifest Name="Guest1Pkg"
                 Version="1.0.0"
                 xmlns="http://schemas.microsoft.com/2011/01/fabric"
                 xmlns:xsd="https://www.w3.org/2001/XMLSchema"
                 xmlns:xsi="https://www.w3.org/2001/XMLSchema-instance">
  <ServiceTypes>
    <!-- This is the name of your ServiceType.
         The UseImplicitHost attribute indicates this is a guest service. -->
    <StatelessServiceType ServiceTypeName="Guest1Type" UseImplicitHost="true" />
  </ServiceTypes>

  <!-- Code package is your service executable. -->
  <CodePackage Name="Code" Version="1.0.0">
    <EntryPoint>
      <!-- Follow this link for more information about deploying Windows containers to Service Fabric: https://aka.ms/sfguestcontainers -->
      <ContainerHost>
        <ImageName>default imagename</ImageName>
        <Commands>default cmd</Commands>
        <EntryPoint>default entrypoint</EntryPoint>
        <FromSource>default source</FromSource>
      </ContainerHost>
    </EntryPoint>
  </CodePackage>

  <ConfigPackage Name="Config" Version="1.0.0" />
</ServiceManifest>
After the overrides in application manifest are specified, container with image name myregistry.azurecr.io/samples/helloworldapp, command commandsOverride, source sourceOverride, and entryPoint entryPointOverride will be started.
Similarly, below is an example on how to override the ExeHost:
<?xml version="1.0" encoding="utf-8"?>
<Policies>
  <CodePackagePolicy CodePackageRef="Code">
    <EntryPointOverride>
      <ExeHostOverride>
        <Program>[Program]</Program>
        <Arguments>[Entry]</Arguments>
      </ExeHostOverride>
    </EntryPointOverride>
  </CodePackagePolicy>
</Policies>
Note
Entry point override is not supported for SetupEntryPoint.
Next steps
- Learn more about running containers on Service Fabric.
- Read the Deploy a .NET application in a container tutorial.
- Learn about the Service Fabric application life-cycle.
- Checkout the Service Fabric container code samples on GitHub.
Feedback
Coming soon: Throughout 2024 we will be phasing out GitHub Issues as the feedback mechanism for content and replacing it with a new feedback system. For more information see: https://aka.ms/ContentUserFeedback.
Submit and view feedback for