Tutorial: Create Azure VM infrastructure to host a Service Fabric cluster
Service Fabric standalone clusters offer you the option to choose your own environment and create a cluster as part of the "any OS, any cloud" approach that Service Fabric is taking. In this tutorial series, you create a standalone cluster hosted on Azure VMs and install an application onto it.
This tutorial is part one of a series. In this article, you generate the Azure VM resources required to host your standalone cluster of Service Fabric. In future articles you need install the Service Fabric standalone suite, install a sample application into your cluster, and finally, clean up your cluster.
In part one of the series, you learn how to:
- Create a set of AzureVM instances
- Modify the security group
- Log in to one of the instances
- Prep the instance for Service Fabric
Prerequisites
To complete this tutorial, you need an Azure subscription. If you don't already have an account, create an account using the Azure portal.
Create Azure Virtual Machine instances
Sign in to the Azure portal and select Virtual machines (not Virtual Machines (classic)).

Select the Add button, which will open up the Create a virtual machine form.
In the Basics tab, be sure to choose the subscription and resource group you want (using a new resource group is recommended).
Change the Image type to Windows Server 2016 Datacenter.
Change the instance Size to Standard DS2 v2. Set an administrator Username and Password, noting what they are.
Leave the Inbound Port Rules blocked for now; we will configure those in the next section.
In the Networking tab, create a new Virtual Network and take note of its name.
Next, set the NIC network security group to Advanced. Create a new security group, noting its name, and create the following rules to allow TCP traffic from any source:

- Port
3389, for RDP and ICMP (basic connectivity). - Ports
19000-19003, for Service Fabric. - Ports
19080-19081, for Service Fabric. - Port
8080, for web browser requests.
Tip
To connect your virtual machines together in Service Fabric, the VMs that are hosting your infrastructure need to have the same credentials. There are two common ways to get consistent credentials: join them all to the same domain, or set the same administrator password on each VM. Fortunately, Azure allows all virtual machines on the same Virtual network to easily connect, so we will be sure to have all our instances on the same network.
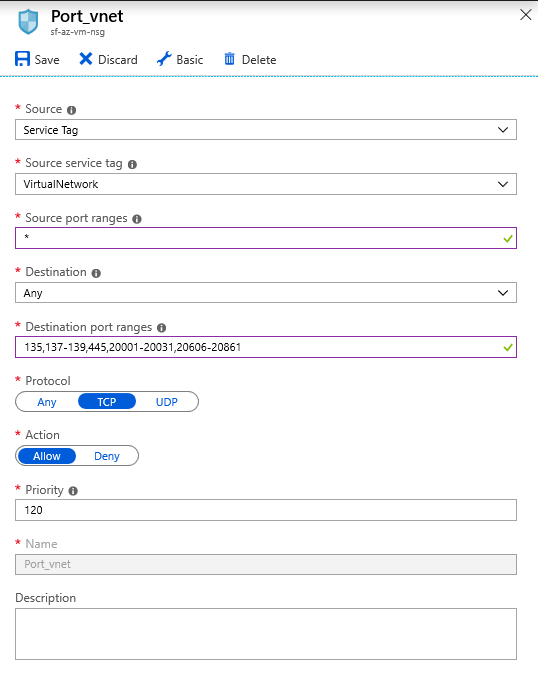
- Port
Add another rule. Set the source to be Service Tag and set the source service tag to VirtualNetwork. Service Fabric requires the following ports to be open for communication within the cluster: 135,137-139,445,20001-20031,20606-20861.
The rest of the options are acceptable in their default state. Review them if you like, and then launch your virtual machine.
Creating more instances for your Service Fabric cluster
Launch two more Virtual Machines, being sure to maintain the same settings outlined in the previous section. Particularly, maintain the same administrator username and password. The Virtual Network and NIC network security group should not be recreated; select the ones you already created from the dropdown menu. It may take a few minutes for each of your instances to be deployed.
Connect to your instances
Select one of your instances from the Virtual Machine section.
In the Overview tab, take note of the private IP address. Then, click Connect.
In the RDP tab, note that we are using the public IP address and port 3389, which we specifically opened earlier. Download the RDP file.
Open the RDP file, and when prompted enter the username and password you provided in the VM setup.
Once you are connected to an instance, you need to validate that remote registry was running, enable SMB, and open the requisite ports for SMB and remote registry.
To enable SMB, this is the PowerShell command:
netsh advfirewall firewall set rule group="File and Printer Sharing" new enable=YesTo open the ports in the firewall here is the PowerShell command:
New-NetFirewallRule -DisplayName "Service Fabric Ports" -Direction Inbound -Action Allow -RemoteAddress LocalSubnet -Protocol TCP -LocalPort 135, 137-139, 445Repeat this process for your other instances, again noting the private IP addresses.
Verify your settings
To validate the basic connectivity, connect to one of the VMs using RDP.
Open up the Command Prompt from within that VM, then, use the ping command to connect from one VM to another, replacing the below IP address with one of the private IP addresses you noted earlier (not the IP of the VM you're connected to already).
ping 172.31.20.163If your output looks like
Reply from 172.31.20.163: bytes=32 time<1ms TTL=128repeated four times then your connection between the instances is working.Now validate that your SMB sharing works with the following command:
net use * \\172.31.20.163\c$It should return
Drive Z: is now connected to \\172.31.20.163\c$.as the output.Now your instances are properly prepared for Service Fabric.
Next steps
In part one of the series, you learned how to launch three Azure VM instances and get them configured for the Service Fabric installation:
- Create a set of Azure VM instances
- Modify the security group
- Log in to one of the instances
- Prep the instance for Service Fabric
Advance to part two of the series to configure Service Fabric on your cluster.
Feedback
Coming soon: Throughout 2024 we will be phasing out GitHub Issues as the feedback mechanism for content and replacing it with a new feedback system. For more information see: https://aka.ms/ContentUserFeedback.
Submit and view feedback for