Set up disaster recovery of on-premises Hyper-V VMs in VMM clouds to Azure
This tutorial describes how to enable replication for on-premises Hyper-V virtual machines (VM) managed by System Center Virtual Machine Manager (VMM) to Azure using Azure Site Recovery. If you aren't using VMM, follow this tutorial.
In this tutorial, you learn how to:
- Select your replication source and target.
- Set up the source replication environment, including on-premises Site Recovery components and the target replication environment.
- Set up network mapping between VMM VM networks and Azure virtual networks.
- Create a replication policy.
- Enable replication for a VM.
Note
Tutorials show you the simplest deployment path for a scenario. They use default options where possible, and don't show all possible settings and paths. For detailed instructions, review the articles in the How-to Guides section of the Site Recovery documentation.
Prerequisites
This tutorial assumes that you already completed the following tutorials:
Select a replication goal
In the Azure portal, go to Recovery Services vaults and select the ContosoVMVault vault that was created in the Prepare Azure tutorial.
From Getting Started, select Site Recovery > Prepare Infrastructure and configure the following settings:
- Protection goal > Where are your machines located?, select On-premises.
- Where do you want to replicate your machines?, select To Azure.
- Are your machines virtualized?, select Yes, with Hyper-V.
- Are you using System Center VMM to manage your Hyper-V hosts?, select Yes.
Select OK.

Confirm deployment planning
- In Deployment planning, if you're planning a large deployment, download the Deployment Planner for Hyper-V from the link on the page. Learn more about Hyper-V deployment planning.
- For this tutorial, we don't need the Deployment Planner. In Have you completed deployment planning?, select I will do it later, and then select OK.
Set up the source environment
When you set up the source environment, you install the Azure Site Recovery Provider on the VMM server and register the server in the vault. You install the Azure Recovery Services agent on each Hyper-V host.
Prepare Infrastructure. Select Source.
Prepare source. Select + VMM to add a VMM server. In Add Server, check that System Center VMM server appears in Server type.
Download the installer for the Microsoft Azure Site Recovery Provider.
Download the vault registration key. You need this key when you run the Provider setup. The key is valid for five days after you generate it.
Download the installer for the Microsoft Azure Recovery Services agent.

Install the Provider on the VMM server
- In the Azure Site Recovery Provider Setup wizard Microsoft Update. Opt in to use Microsoft Update to check for Provider updates.
- Installation. Accept the default installation location for the Provider and select Install.
- After installation, in the Microsoft Azure Site Recovery Registration Wizard select Vault Settings, Browse, and in Key file, select the vault key file that you downloaded.
- Specify the Azure Site Recovery subscription, and the vault name (ContosoVMVault). Specify a friendly name for the VMM server, to identify it in the vault.
- Proxy Settings. Select Connect directly to Azure Site Recovery without a proxy.
- Accept the default location for the certificate that's used to encrypt data. Encrypted data will be decrypted when you fail over.
- Synchronize cloud metadata. Select Sync cloud meta data to Site Recovery portal. This action needs to happen only once on each server. Then, select Register.
- After the server is registered in the vault, select Finish.
After registration finishes, metadata from the server is retrieved by Azure Site Recovery and the VMM server is displayed in Site Recovery Infrastructure.
Install the Recovery Services agent on Hyper-V hosts
Install the agent on each Hyper-V host containing VMs that you want to replicate.
In the Microsoft Azure Recovery Services Agent Setup Wizard, configure these settings:
Prerequisites Check. Select Next. Any missing prerequisites will be installed automatically.
Installation Settings. Accept the installation location. Then, select Install.
Note
For Azure Site Recovery, Cache Location is not required.
Installation. When the installation finishes, select Close to finish the wizard.

Install the Recovery Services agent on Windows core Hyper-V hosts
Install the agent on each Windows core Hyper-V host containing VMs that you want to replicate.
On the Windows Core Hyper-V host, create a directory by running the following command:
New-Item -Path C:\ASR -ItemType DirectoryDownload the installer for the Microsoft Azure Recovery Services agent:
Invoke-WebRequest -Uri <put the URI here> -OutFile .\ASR\MARSsoftware.exeExecute the installer by running the below command:
.\MARSsoftware.exeOnce the Microsoft Azure Recovery Services agent installation completes, you can close the Wizard console.
Set up the target environment
- Select Prepare infrastructure > Target.
- Select the subscription and the resource group (ContosoRG) in which the Azure VMs will be created after failover.
- Select the Resource Manager deployment model.
Site Recovery checks that there's one or more compatible Azure storage accounts and networks.
Configure network mapping
Site Recovery Infrastructure > Network mappings > Network Mapping. Select the +Network Mapping icon.
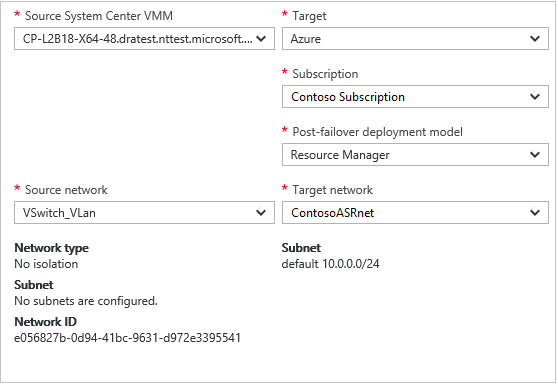
Add network mapping. Select the Source System Center VMM server. For the Target, select Azure.
Verify the subscription and the deployment model after failover.
Source network. Select the source on-premises VM network.
Target network. Select the Azure network in which replica Azure VMs will be located when they're created after failover. Then, select OK.
Set up a replication policy
- Select Prepare infrastructure > Replication Settings > +Create and associate.
- In Create and associate policy, specify a policy name. We're using ContosoReplicationPolicy.
- Accept the default settings and select OK:
- Copy frequency indicates that, after initial replication, delta data will replicate every five minutes.
- Recovery point retention indicates that each recovery point will be retained for two hours.
- App-consistent snapshot frequency indicates that recovery points containing app-consistent snapshots will be created every hour.
- Initial replication start time indicates that initial replication will start immediately.
- Encrypt data stored on Azure is set to the default (Off) and indicates that at-rest data in Azure isn't encrypted.
- After the policy is created, select OK. When you create a new policy, it's automatically associated with the VMM cloud.
Enable replication
Replicate application. Select Source.
Source. Select the VMM cloud. Then, select OK.
Target. Verify the target (Azure), the vault subscription, and select the Resource Manager model.
Select the contosovmsacct1910171607 storage account and the ContosoASRnet Azure network.
Virtual machines > Select. Select the VM that you want to replicate. Then, select OK.
You can track progress of the Enable Protection action in Jobs > Site Recovery jobs. After the Finalize Protection job finishes, the initial replication is complete, and the VM is ready for failover.
Next steps
Feedback
Coming soon: Throughout 2024 we will be phasing out GitHub Issues as the feedback mechanism for content and replacing it with a new feedback system. For more information see: https://aka.ms/ContentUserFeedback.
Submit and view feedback for