Physical server to Azure disaster recovery architecture – Modernized
This article describes the modernized architecture and processes used when you replicate, failover, and recover physical Windows and Linux servers between an on-premises site and Azure, using the Azure Site Recovery service.
For information about configuration server requirements in Classic releases, see Physical server to Azure disaster recovery architecture.
Note
Ensure you create a new Recovery Services vault for setting up the ASR replication appliance. Don't use an existing vault.
Architectural components
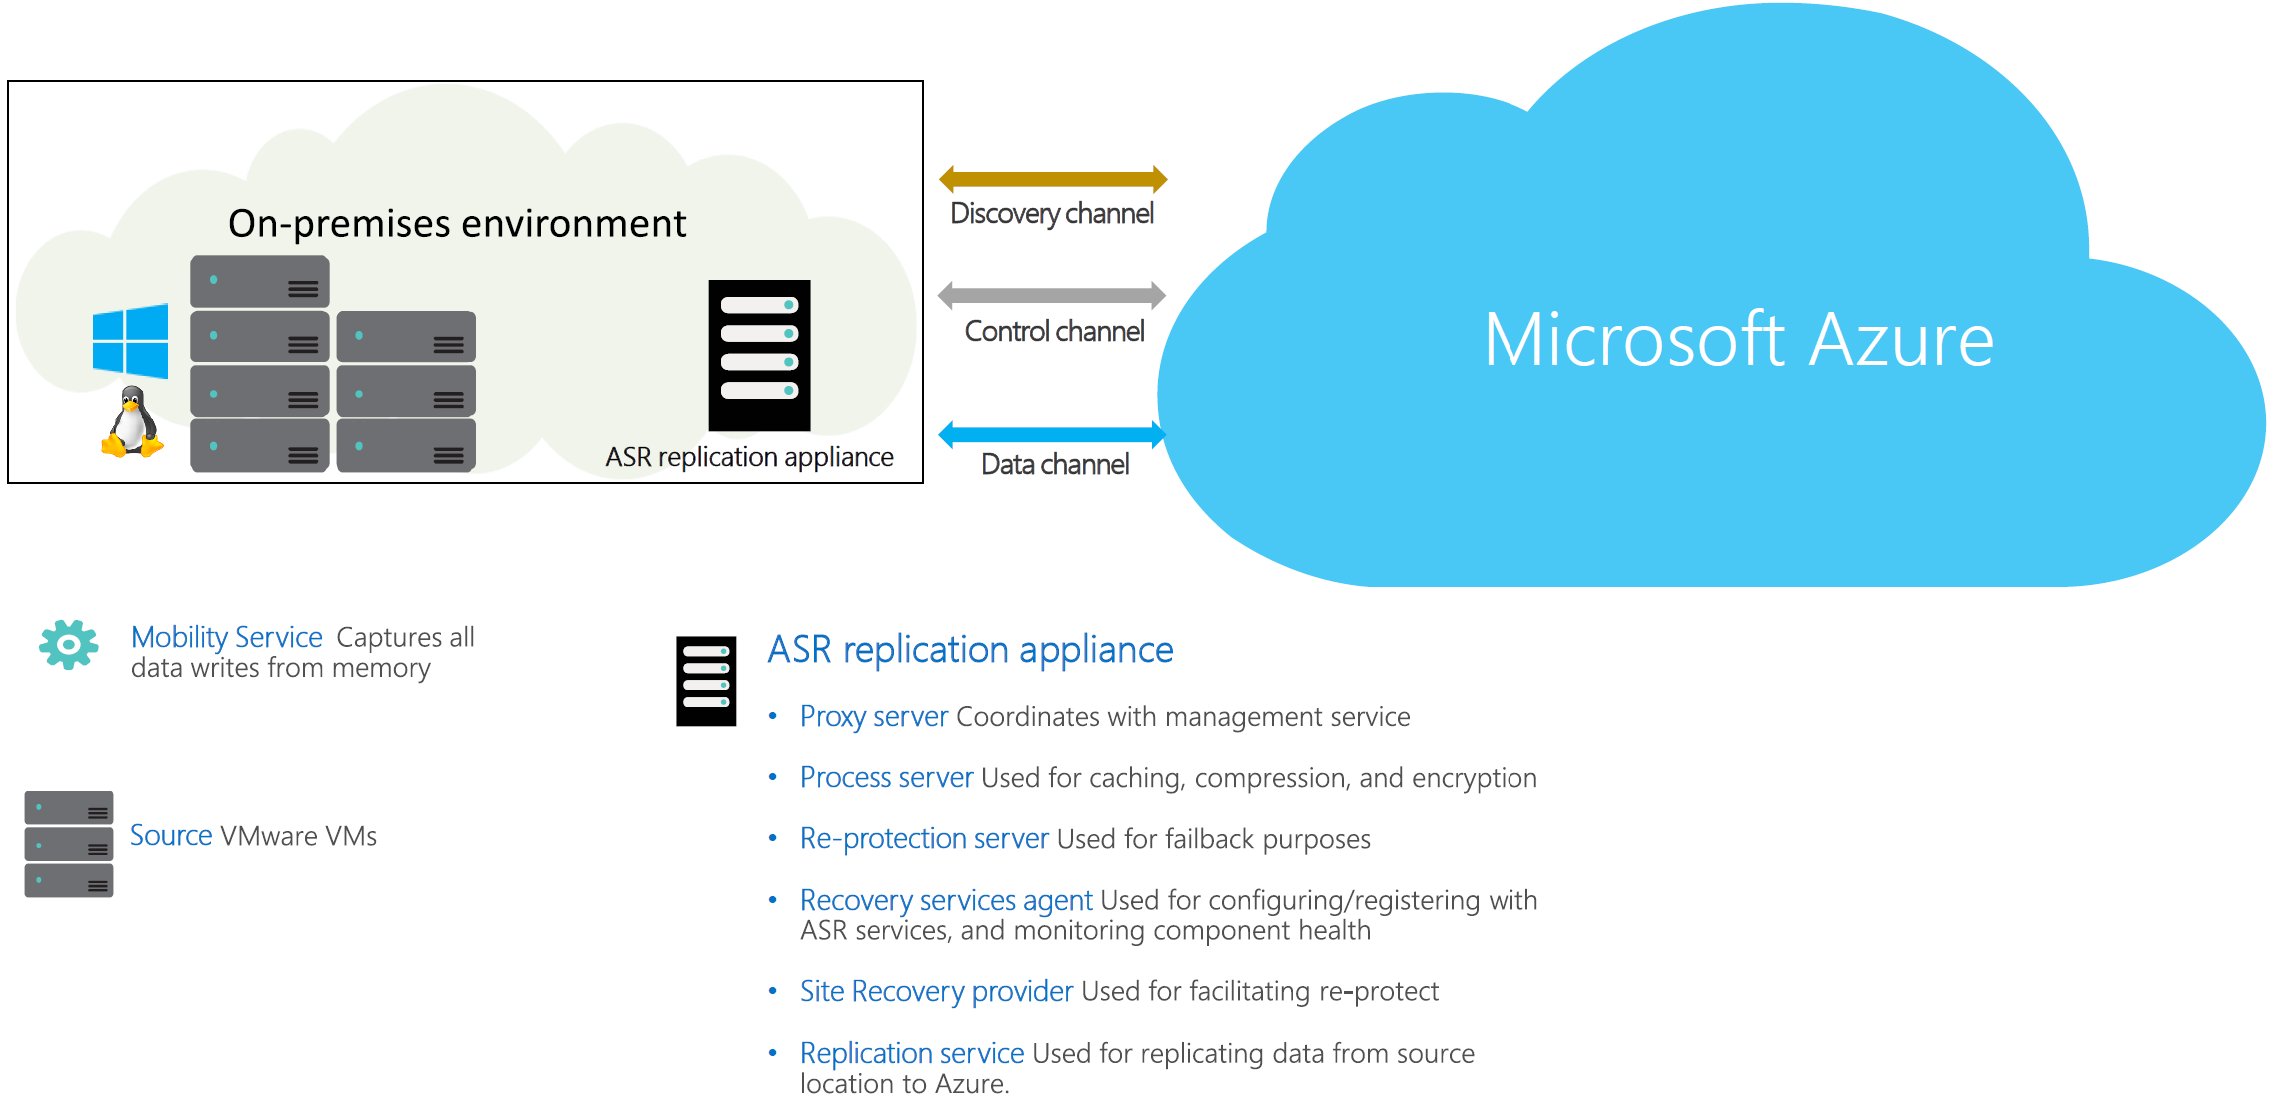
The following table and graphic provide a high-level view of the components used for physical machine disaster recovery to Azure.
| Component | Requirement | Details |
|---|---|---|
| Azure | An Azure subscription, Azure Storage account for cache, Managed Disk, and Azure network. | Replicated data from on-premises machines is stored in Azure storage. Azure VMs are created with the replicated data when you run a failover from on-premises to Azure. The Azure VMs connect to the Azure virtual network when they're created. |
| Azure Site Recovery replication appliance | This is the basic building block of the entire Azure Site Recovery on-premises infrastructure. All components in the appliance coordinate with the replication appliance. This service oversees all end-to-end Site Recovery activities including monitoring the health of protected machines, data replication, automatic updates, etc. |
The appliance hosts various crucial components like: Proxy server: This component acts as a proxy channel between mobility agent and Site Recovery services in the cloud. It ensures there is no additional internet connectivity required from production workloads to generate recovery points. Discovered items: This component gathers information of vCenter and coordinates with Azure Site Recovery management service in the cloud. Re-protection server: This component coordinates between Azure and on-premises machines during reprotect and failback operations. Process server: This component is used for caching, compression of data before being sent to Azure. Learn more about replication appliance and how to use multiple replication appliances. Recovery Service agent: This component is used for configuring/registering with Site Recovery services, and for monitoring the health of all the components. Site Recovery provider: This component is used for facilitating re-protect. It identifies between alternate location re-protect and original location re-protect for a source machine. Replication service: This component is used for replicating data from source location to Azure. |
| Replicated machines | Mobility Service is installed on each physical server that you replicate. | We recommend that you allow automatic installation of the Mobility Service. Alternatively, you can install the service manually. |
Set up outbound network connectivity
For Site Recovery to work as expected, you need to modify outbound network connectivity to allow your environment to replicate.
Note
Site Recovery doesn't support using an authentication proxy to control network connectivity.
Outbound connectivity for URLs
If you're using a URL-based firewall proxy to control outbound connectivity, allow access to these URLs:
| URL | Details |
|---|---|
| portal.azure.com | Navigate to the Azure portal. |
*.windows.net *.msftauth.net*.msauth.net*.microsoft.com*.live.com *.office.com |
To sign-in to your Azure subscription. |
*.microsoftonline.com |
Create Microsoft Entra apps for the appliance to communicate with Azure Site Recovery. |
| management.azure.com | Create Microsoft Entra apps for the appliance to communicate with the Azure Site Recovery service. |
*.services.visualstudio.com |
Upload app logs used for internal monitoring. |
*.vault.azure.net |
Manage secrets in the Azure Key Vault. Note: Ensure machines to replicate have access to this. |
| aka.ms | Allow access to aka.ms links. Used for Azure Site Recovery appliance updates. |
| download.microsoft.com/download | Allow downloads from Microsoft download. |
*.servicebus.windows.net |
Communication between the appliance and the Azure Site Recovery service. |
*.discoverysrv.windowsazure.com |
Connect to Azure Site Recovery discovery service URL. |
*.hypervrecoverymanager.windowsazure.com |
Connect to Azure Site Recovery micro-service URLs |
*.blob.core.windows.net |
Upload data to Azure storage which is used to create target disks |
*.backup.windowsazure.com |
Protection service URL – a microservice used by Azure Site Recovery for processing & creating replicated disks in Azure |
Replication process
When you enable replication for a system, initial replication to Azure storage begins, using the specified replication policy. Note the following:
- For physical machines, replication is block-level, near-continuous, using the Mobility service agent running on the system.
- Any replication policy settings are applied:
- RPO threshold. This setting does not affect replication. It helps with monitoring. An event is raised, and optionally an email sent, if the current RPO exceeds the threshold limit that you specify.
- Recovery point retention. This setting specifies how far back in time you want to go when a disruption occurs. Maximum retention is 15 days.
- App-consistent snapshots. App-consistent snapshot can be taken every 1 to 12 hours, depending on your app needs. Snapshots are standard Azure blob snapshots. The Mobility agent running on a physical machine requests a VSS snapshot in accordance with this setting, and bookmarks that point-in-time as an application consistent point in the replication stream.
Note
High recovery point retention period may have an implication on the storage cost since more recovery points may need to be saved.
Traffic replicates to Azure storage public endpoints over the internet. Alternately, you can use Azure ExpressRoute with Microsoft peering. Replicating traffic over a site-to-site virtual private network (VPN) from an on-premises site to Azure isn't supported.
Initial replication operation ensures that entire data on the machine at the time of enable replication is sent to Azure. After initial replication finishes, replication of delta changes to Azure begins. Tracked changes for a machine are sent to the process server.
Communication happens as follows:
- Machines communicate with the on-premises appliance on port HTTPS 443 inbound, for replication management.
- The appliance orchestrates replication with Azure over port HTTPS 443 outbound.
- Machines send replication data to the process server on port HTTPS 9443 inbound. This port can be modified.
- The process server receives replication data, optimizes, and encrypts it, and sends it to Azure storage over port 443 outbound.
The replication data logs first land in a cache storage account in Azure. These logs are processed and the data is stored in an Azure Managed Disk (called as asrseeddisk). The recovery points are created on this disk.
Failover and failback process
After you set up replication and run a disaster recovery drill (test failover) to check that everything's working as expected, you can run proceed to failover as needed.
Note
For physical servers, failback is not supported
- You can run failover for a single machine or create a recovery plan to failover multiple servers simultaneously. The advantage of a recovery plan rather than single machine failover include:
- You can model app-dependencies by including all the servers across the app in a single recovery plan.
- You can add scripts, Azure runbooks, and pause for manual actions.
- After triggering the initial failover, you commit it to start accessing the workload from the Azure VM.
Resynchronization process
- At times, during initial replication or while transferring delta changes, there can be network connectivity issues between source machine to process server or between process server to Azure. Either of these can lead to failures in data transfer to Azure momentarily.
- To avoid data integrity issues, and minimize data transfer costs, Site Recovery marks a machine for resynchronization.
- A machine can also be marked for resynchronization in situations like following to maintain consistency between source machine and data stored in Azure
- If a machine undergoes force shut down
- If a machine undergoes configurational changes like disk resizing (modifying the size of disk from 2 TB to 4 TB)
- Resynchronization sends only delta data to Azure. Data transfer between on-premises and Azure by minimized by computing checksums of data between source machine and data stored in Azure.
- By default, resynchronization is scheduled to run automatically outside office hours. If you don't want to wait for default resynchronization outside hours, you can resynchronize a system manually. To do this, go to Azure portal, select the physical machine > Resynchronize.
- If default resynchronization fails outside office hours and a manual intervention is required, then an error is generated on the specific machine in Azure portal. You can resolve the error and trigger the resynchronization manually.
- After completion of resynchronization, replication of delta changes will resume.
Replication policy
When you enable Azure VM replication, by default Site Recovery creates a new replication policy with the default settings summarized in the table.
| Policy setting | Details | Default |
|---|---|---|
| Recovery point retention | Specifies how long Site Recovery keeps recovery points | 1 days |
| App-consistent snapshot frequency | How often Site Recovery takes an app-consistent snapshot | Disabled |
Snapshots and recovery points
Recovery points are created from snapshots of machine's disks taken at a specific point in time. When you fail over a system, you use a recovery point to restore the physical machine as a VM in the target location.
When failing over, we generally want to ensure that the VM starts with no corruption or data loss, and that the VM data is consistent for the operating system, and for apps that run on the VM. This depends on the type of snapshots taken.
Site Recovery takes snapshots as follows:
- Site Recovery takes crash-consistent snapshots of data by default, and app-consistent snapshots if you specify a frequency for them.
- Recovery points are created from the snapshots and stored in accordance with retention settings in the replication policy.
Consistency
The following table explains different types of consistency.
Crash-consistent
| Description | Details | Recommendation |
|---|---|---|
| A crash consistent snapshot captures data that was on the disk when the snapshot was taken. It doesn't include anything in memory. It contains the equivalent of the on-disk data that would be present if the system crashed or the power cord was pulled from the server at the instant that the snapshot was taken. A crash-consistent doesn't guarantee data consistency for the operating system, or for apps on the machine. |
Site Recovery creates crash-consistent recovery points every five minutes by default. This setting can't be modified. |
Today, most apps can recover well from crash-consistent points. Crash-consistent recovery points are usually sufficient for the replication of operating systems, and apps such as DHCP servers and print servers. |
App-consistent
| Description | Details | Recommendation |
|---|---|---|
| App-consistent recovery points are created from app-consistent snapshots. An app-consistent snapshot contains all the information in a crash-consistent snapshot, plus all the data in memory and transactions in progress. |
App-consistent snapshots use the Volume Shadow Copy Service (VSS): 1) Azure Site Recovery uses Copy Only backup (VSS_BT_COPY) method which does not change Microsoft SQL's transaction log backup time and sequence number 2) When a snapshot is initiated, VSS perform a copy-on-write (COW) operation on the volume. 3) Before it performs the COW, VSS informs every app on the machine that it needs to flush its memory-resident data to disk. 4) VSS then allows the backup/disaster recovery app (in this case Site Recovery) to read the snapshot data and proceed. |
App-consistent snapshots are taken in accordance with the frequency you specify. This frequency should always be less than you set for retaining recovery points. For example, if you retain recovery points using the default setting of 24 hours, you should set the frequency at less than 24 hours. They're more complex and take longer to complete than crash-consistent snapshots. They affect the performance of apps running on a system enabled for replication. |
Next steps
Follow this tutorial to enable physical machine and VMware to Azure replication.
Feedback
Coming soon: Throughout 2024 we will be phasing out GitHub Issues as the feedback mechanism for content and replacing it with a new feedback system. For more information see: https://aka.ms/ContentUserFeedback.
Submit and view feedback for