Tutorial: Step-by-step instructions to create a new Android app using Azure Spatial Anchors
This tutorial will show you how to create a new Android app that integrates ARCore functionality with Azure Spatial Anchors.
Prerequisites
To complete this tutorial, make sure you have:
- A Windows or macOS machine with Android Studio 3.4+.
- A developer enabled and ARCore capable Android device.
Getting started
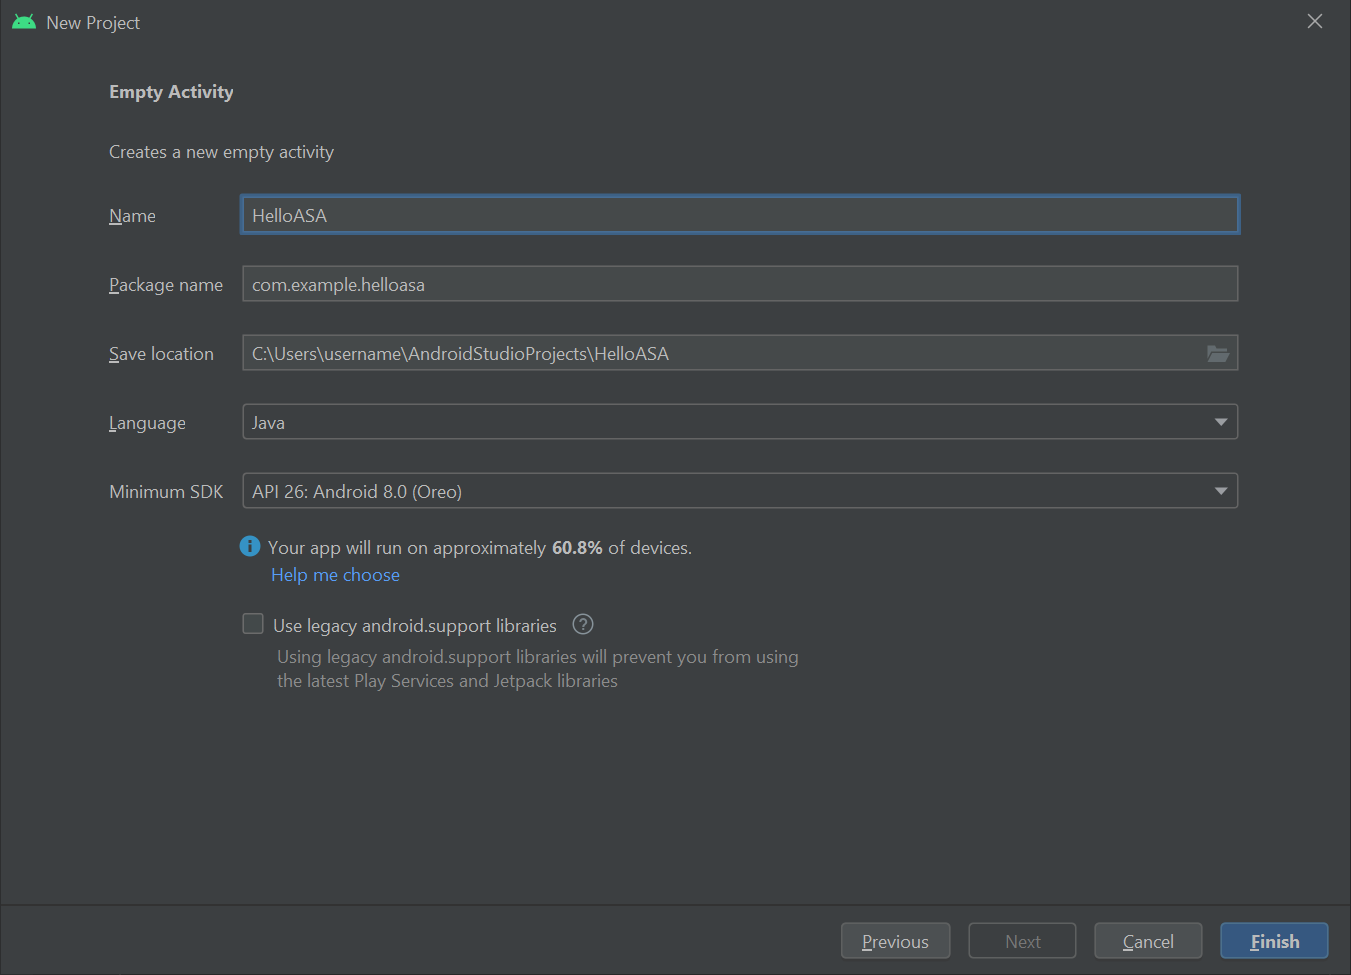
Start Android Studio. In the Welcome to Android Studio window, click Start a new Android Studio project.
- Select File->New Project.
- In the Create New Project window, under the Phone and Tablet section, choose Empty Activity, and click Next.
- In the New Project - Empty Activity window, change the following values:
- Change the Name, Package name and Save location to your desired values
- Set Language is to
Java - Set Minimum API level to
API 26: Android 8.0 (Oreo) - Leave the other options as they are
- Click Finish.
- The Component Installer will run. After some processing, Android Studio will open the IDE.
Trying it out
To test out your new app, connect your developer-enabled device to your development machine with a USB cable. On the top right of Android Studio select your connected device and click on the Run 'app' icon. Android Studio installs the app on your connected device and starts it. You should now see "Hello World!" displayed in the app running on your device. Click Run->Stop 'app'.

Integrating ARCore
ARCore is Google's platform for building Augmented Reality experiences, enabling your device to track its position as it moves and builds its own understanding of the real world.
Modify app\manifests\AndroidManifest.xml to include the following entries inside the root <manifest> node. This code snippet does a few things:
- It will allow your app to access your device camera.
- It will also ensure your app is only visible in the Google Play Store to devices that support ARCore.
- It will configure the Google Play Store to download and install ARCore, if it isn't installed already, when your app is installed.
<manifest ...>

    <uses-permission android:name="android.permission.CAMERA" />
    <uses-feature android:name="android.hardware.camera.ar" />

    <application>
        ...
        <meta-data android:name="com.google.ar.core" android:value="required" />
        ...
    </application>

</manifest>
Modify Gradle Scripts\build.gradle (Module: app) to include the following entry. This code will ensure that your app targets ARCore version 1.25. After this change, you might get a notification from Gradle asking you to sync: click Sync now.
dependencies {
    ...
    implementation 'com.google.ar:core:1.25.0'
    ...
}
Integrating Sceneform
Sceneform makes it simple to render realistic 3D scenes in Augmented Reality apps, without having to learn OpenGL.
Modify Gradle Scripts\build.gradle (Module: app) to include the following entries. This code will allow your app to use language constructs from Java 8, which Sceneform requires. It will also ensure your app targets Sceneform version 1.15. After this change, you might get a notification from Gradle asking you to sync: click Sync now.
android {
    ...

    compileOptions {
        sourceCompatibility JavaVersion.VERSION_1_8
        targetCompatibility JavaVersion.VERSION_1_8
    }
}

dependencies {
    ...
    implementation 'com.google.ar.sceneform.ux:sceneform-ux:1.15.0'
    ...
}
Open your app\res\layout\activity_main.xml, and replace the existing Hello Wolrd <TextView ... /> element with the following ArFragment. This code will cause the camera feed to be displayed on your screen enabling ARCore to track your device position as it moves.
<fragment android:name="com.google.ar.sceneform.ux.ArFragment"
    android:id="@+id/ux_fragment"
    android:layout_width="match_parent"
    android:layout_height="match_parent" />
Note
In order to see the raw xml of your main activity click on the "Code" or "Split" button on the top right of Android Studio.
Redeploy your app to your device to validate it once more. This time, you should be asked for camera permissions. Once approved, you should see your camera feed rendering on your screen.
Place an object in the real world
Let's create & place an object using your app. First, add the following imports into your app\java\<PackageName>\MainActivity:
import com.google.ar.core.HitResult;
import com.google.ar.core.Plane;
import com.google.ar.sceneform.AnchorNode;
import com.google.ar.sceneform.math.Vector3;
import com.google.ar.sceneform.rendering.Color;
import com.google.ar.sceneform.rendering.MaterialFactory;
import com.google.ar.sceneform.rendering.Renderable;
import com.google.ar.sceneform.rendering.ShapeFactory;
import com.google.ar.sceneform.ux.ArFragment;

import android.view.MotionEvent;
Then, add the following member variables into your MainActivity class:
private boolean tapExecuted = false;
private final Object syncTaps = new Object();
private ArFragment arFragment;
private AnchorNode anchorNode;
private Renderable nodeRenderable = null;
private float recommendedSessionProgress = 0f;
Next, add the following code into your app\java\<PackageName>\MainActivity onCreate() method. This code will hook up a listener, called handleTap(), that will detect when the user taps the screen on your device. If the tap happens to be on a real world surface that has already been recognized by ARCore's tracking, the listener will run.
@Override
protected void onCreate(Bundle savedInstanceState) {
    super.onCreate(savedInstanceState);
    setContentView(R.layout.activity_main);

    this.arFragment = (ArFragment) getSupportFragmentManager().findFragmentById(R.id.ux_fragment);
    this.arFragment.setOnTapArPlaneListener(this::handleTap);
}
Finally, add the following handleTap() method, that will tie everything together. It will create a sphere, and place it on the tapped location. The sphere will initially be black, since this.recommendedSessionProgress is set to zero right now. This value will be adjusted later on.
protected void handleTap(HitResult hitResult, Plane plane, MotionEvent motionEvent) {
    synchronized (this.syncTaps) {
        if (this.tapExecuted) {
            return;
        }

        this.tapExecuted = true;
    }

    this.anchorNode = new AnchorNode();
    this.anchorNode.setAnchor(hitResult.createAnchor());

    MaterialFactory.makeOpaqueWithColor(this, new Color(
            this.recommendedSessionProgress,
            this.recommendedSessionProgress,
            this.recommendedSessionProgress))
            .thenAccept(material -> {
                this.nodeRenderable = ShapeFactory.makeSphere(0.1f, new Vector3(0.0f, 0.15f, 0.0f), material);
                this.anchorNode.setRenderable(nodeRenderable);
                this.anchorNode.setParent(arFragment.getArSceneView().getScene());
            });
}
Redeploy your app to your device to validate it once more. This time, you can move around your device to get ARCore to start recognizing your environment. Then, tap the screen to create & place your black sphere over the surface of your choice.
Attach a local Azure Spatial Anchor
Modify Gradle Scripts\build.gradle (Module: app) to include the following entry. This sample code snippet targets Azure Spatial Anchors SDK version 2.10.2. Note that SDK version 2.7.0 is currently the minimum supported version, and referencing any more recent version of Azure Spatial Anchors should work as well. We recommend using the latest version of Azure Spatial Anchors SDK. You can find the SDK release notes here.
dependencies {
    ...
    implementation 'com.microsoft.azure.spatialanchors:spatialanchors_jni:[2.10.2]'
    implementation 'com.microsoft.azure.spatialanchors:spatialanchors_java:[2.10.2]'
    ...
}
If you are targeting Azure Spatial Anchors SDK 2.10.0 or later, include the following entry in the repositories section of your project's settings.gradle file. This will include the URL to the Maven package feed that hosts Azure Spatial Anchors Android packages for SDK 2.10.0 or later:
dependencyResolutionManagement {
    ...
    repositories {
        ...
        maven {
            url 'https://pkgs.dev.azure.com/aipmr/MixedReality-Unity-Packages/_packaging/Maven-packages/maven/v1'
        }
        ...
    }
}
Right-click app\java\<PackageName>->New->Java Class. Set Name to MyFirstApp, and select Class. A file called MyFirstApp.java will be created. Add the following import to it:
import com.microsoft.CloudServices;
Define android.app.Application as its superclass.
public class MyFirstApp extends android.app.Application {...
Then, add the following code inside the new MyFirstApp class, which will ensure Azure Spatial Anchors is initialized with your application's context.
    @Override
    public void onCreate() {
        super.onCreate();
        CloudServices.initialize(this);
    }
Now, modify app\manifests\AndroidManifest.xml to include the following entry inside the root <application> node. This code will hook up the Application class you created into your app.
    <application
        android:name=".MyFirstApp"
        ...
    </application>
Back in app\java\<PackageName>\MainActivity, add the following imports into it:
import android.view.MotionEvent;
import android.util.Log;

import com.google.ar.sceneform.ArSceneView;
import com.google.ar.sceneform.Scene;
import com.microsoft.azure.spatialanchors.CloudSpatialAnchor;
import com.microsoft.azure.spatialanchors.CloudSpatialAnchorSession;
import com.microsoft.azure.spatialanchors.SessionLogLevel;
Then, add the following member variables into your MainActivity class:
private float recommendedSessionProgress = 0f;

private ArSceneView sceneView;
private CloudSpatialAnchorSession cloudSession;
private boolean sessionInitialized = false;
Next, let's add the following initializeSession() method inside your mainActivity class. Once called, it will ensure an Azure Spatial Anchors session is created and properly initialized during the startup of your app. This code makes sure that the sceneview session passed to ASA session via the cloudSession.setSession call is not null by having early return.
private void initializeSession() {
    if (sceneView.getSession() == null) {
        //Early return if the ARCore Session is still being set up
        return;
    }

    if (this.cloudSession != null) {
        this.cloudSession.close();
    }
    this.cloudSession = new CloudSpatialAnchorSession();
    this.cloudSession.setSession(sceneView.getSession());
    this.cloudSession.setLogLevel(SessionLogLevel.Information);
    this.cloudSession.addOnLogDebugListener(args -> Log.d("ASAInfo", args.getMessage()));
    this.cloudSession.addErrorListener(args -> Log.e("ASAError", String.format("%s: %s", args.getErrorCode().name(), args.getErrorMessage())));

    sessionInitialized = true;
}
Since initializeSession() could do an early return if sceneView session is not yet setup (i.e., if sceneView.getSession() is null), we add an onUpdate call to make sure that ASA session gets initialized once sceneView session is created.
private void scene_OnUpdate(FrameTime frameTime) {
    if (!sessionInitialized) {
        //retry if initializeSession did an early return due to ARCore Session not yet available (i.e. sceneView.getSession() == null)
        initializeSession();
    }
}
Now, let's hook your initializeSession() and scene_OnUpdate(...) method into your onCreate() method. Also, we'll ensure that frames from your camera feed are sent to Azure Spatial Anchors SDK for processing.
@Override
protected void onCreate(Bundle savedInstanceState) {
    super.onCreate(savedInstanceState);
    setContentView(R.layout.activity_main);

    this.arFragment = (ArFragment) getSupportFragmentManager().findFragmentById(R.id.ux_fragment);
    this.arFragment.setOnTapArPlaneListener(this::handleTap);

    this.sceneView = arFragment.getArSceneView();
    Scene scene = sceneView.getScene();
    scene.addOnUpdateListener(frameTime -> {
        if (this.cloudSession != null) {
            this.cloudSession.processFrame(sceneView.getArFrame());
        }
    });
    scene.addOnUpdateListener(this::scene_OnUpdate);
    initializeSession();
}
Finally, add the following code into your handleTap() method. It will attach a local Azure Spatial Anchor to the black sphere that we're placing in the real world.
protected void handleTap(HitResult hitResult, Plane plane, MotionEvent motionEvent) {
    synchronized (this.syncTaps) {
        if (this.tapExecuted) {
            return;
        }

        this.tapExecuted = true;
    }

    this.anchorNode = new AnchorNode();
    this.anchorNode.setAnchor(hitResult.createAnchor());
    CloudSpatialAnchor cloudAnchor = new CloudSpatialAnchor();
    cloudAnchor.setLocalAnchor(this.anchorNode.getAnchor());

    MaterialFactory.makeOpaqueWithColor(this, new Color(
            this.recommendedSessionProgress,
            this.recommendedSessionProgress,
            this.recommendedSessionProgress))
            .thenAccept(material -> {
                this.nodeRenderable = ShapeFactory.makeSphere(0.1f, new Vector3(0.0f, 0.15f, 0.0f), material);
                this.anchorNode.setRenderable(nodeRenderable);
                this.anchorNode.setParent(arFragment.getArSceneView().getScene());
            });
}
Redeploy your app once more. Move around your device, tap the screen, and place a black sphere. This time, though, your code will be creating and attaching a local Azure Spatial Anchor to your sphere.
Before proceeding any further, you'll need to create an Azure Spatial Anchors account to get the account Identifier, Key, and Domain, if you don't already have them. Follow the following section to obtain them.
Create a Spatial Anchors resource
Go to the Azure portal.
On the left pane, select Create a resource.
Use the search box to search for Spatial Anchors.
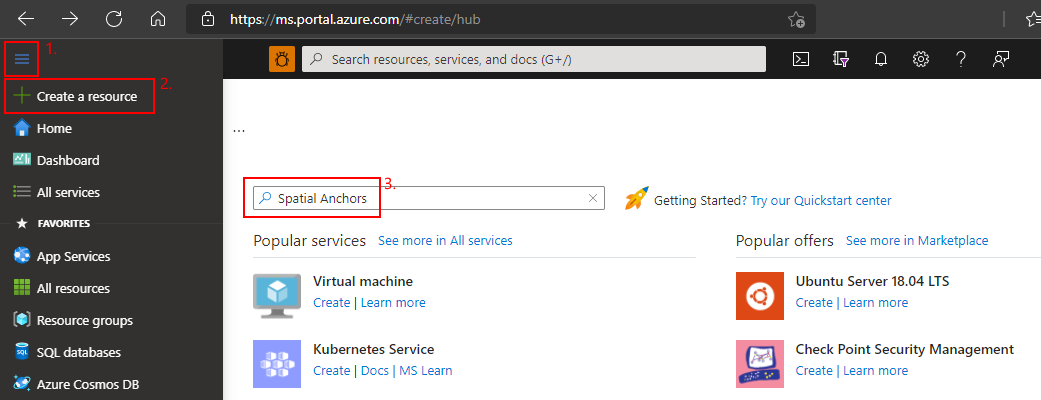
Select Spatial Anchors, and then select Create.
On the Spatial Anchors Account pane, do the following:
Enter a unique resource name by using regular alphanumeric characters.
Select the subscription that you want to attach the resource to.
Create a resource group by selecting Create new. Name it myResourceGroup, and then select OK.
A resource group is a logical container into which Azure resources, such as web apps, databases, and storage accounts, are deployed and managed. For example, you can choose to delete the entire resource group in one simple step later.
Select a location (region) in which to place the resource.
Select Create to begin creating the resource.

After the resource is created, the Azure portal shows that your deployment is complete.
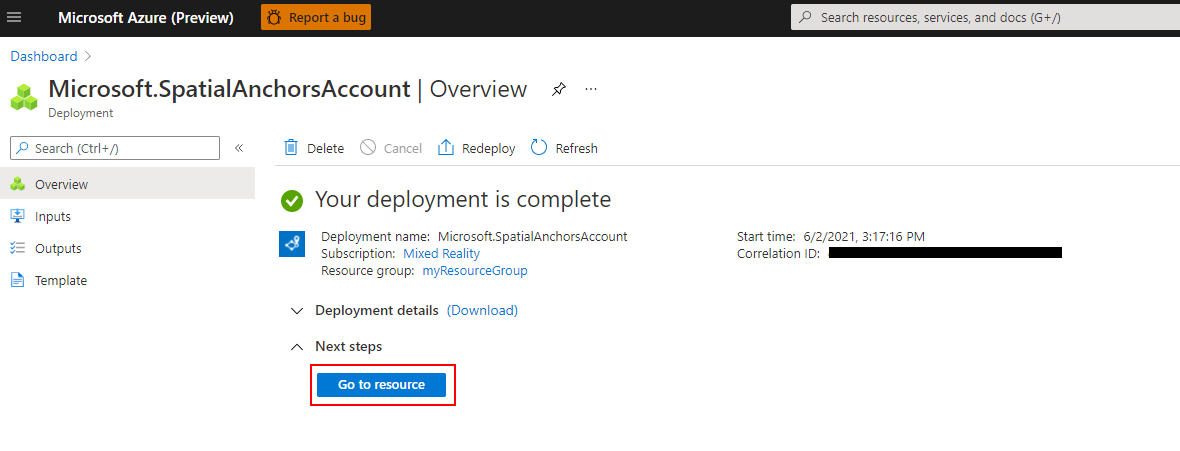
Select Go to resource. You can now view the resource properties.
Copy the resource's Account ID value into a text editor for later use.
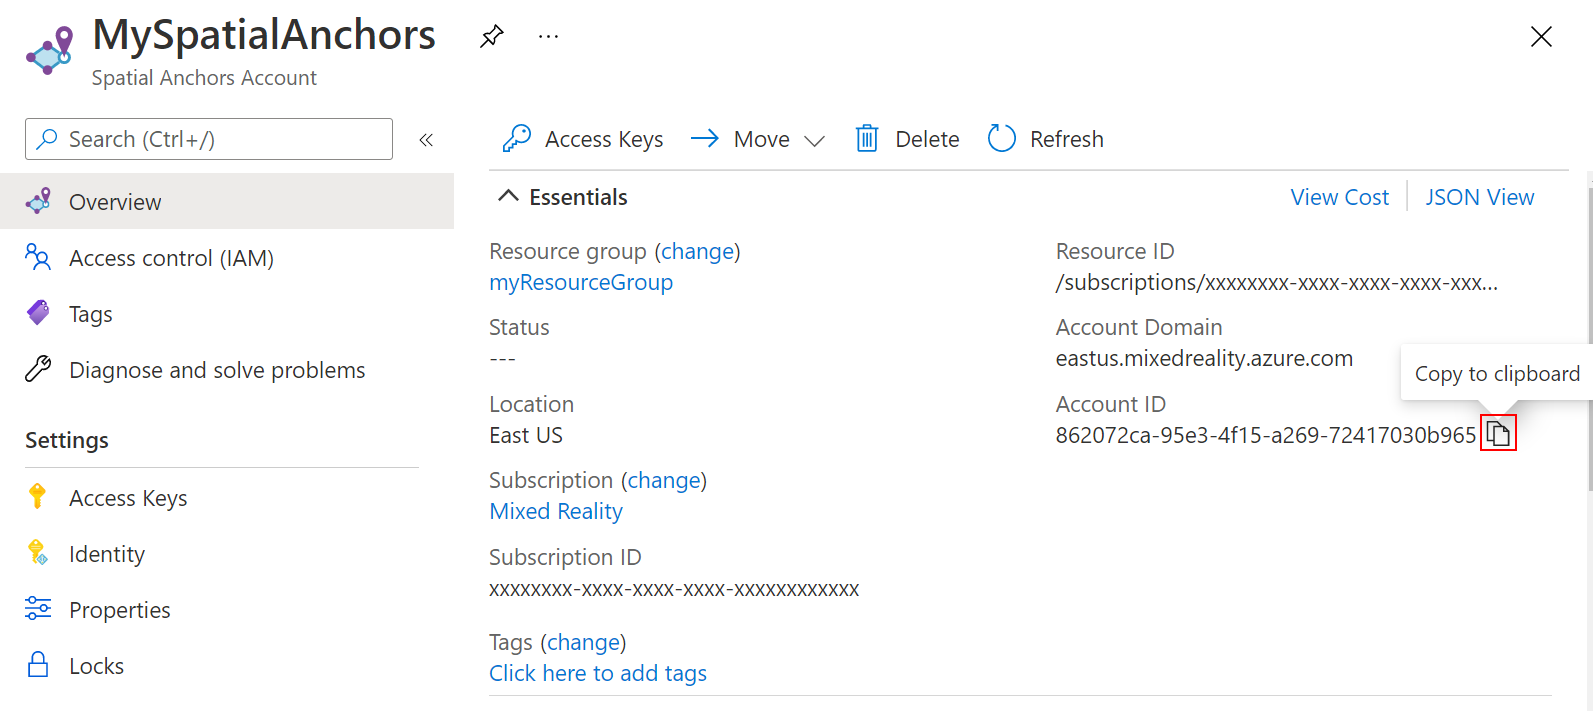
Also copy the resource's Account Domain value into a text editor for later use.
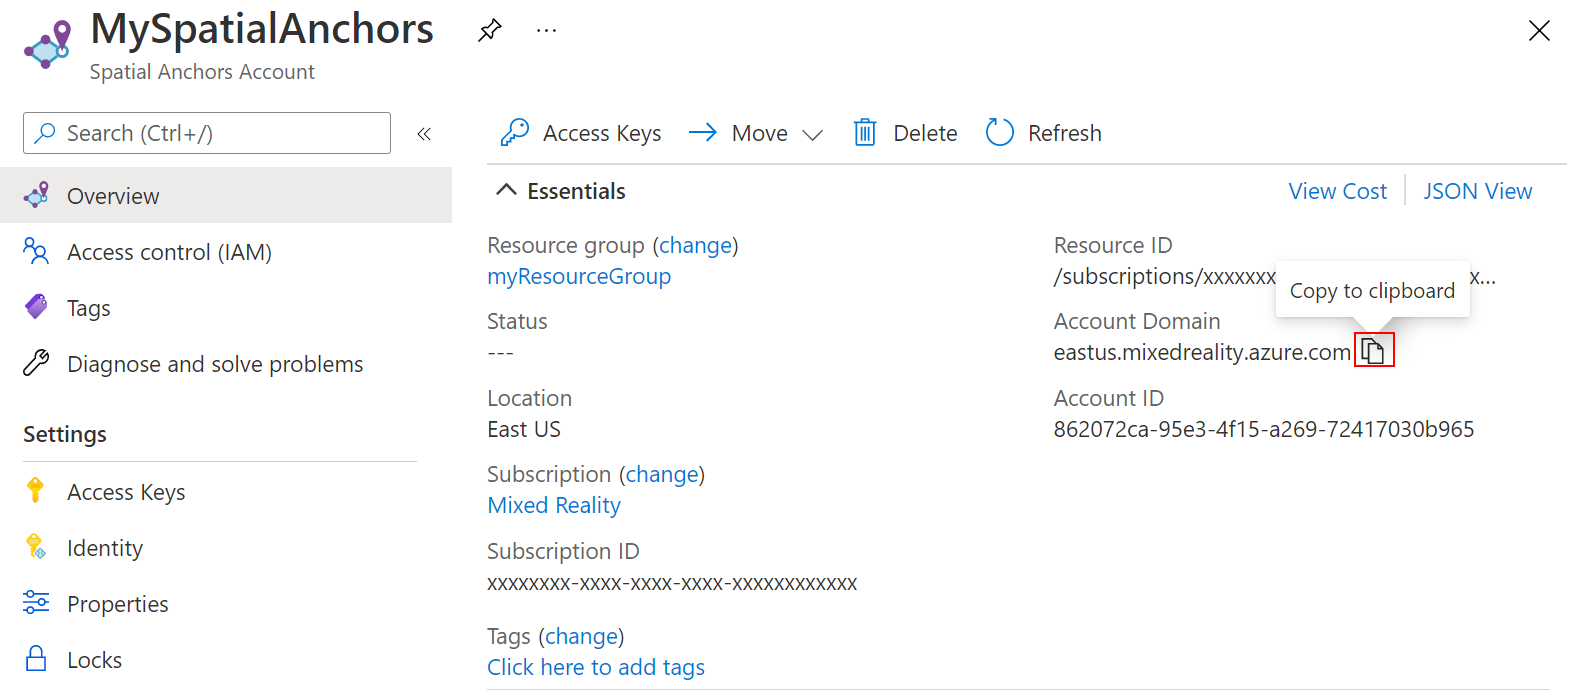
Under Settings, select Access Key. Copy the Primary key value, Account Key, into a text editor for later use.


Upload your local anchor into the cloud
Once you have your Azure Spatial Anchors account Identifier, Key, and Domain, we can go back in app\java\<PackageName>\MainActivity, add the following imports into it:
import com.microsoft.azure.spatialanchors.SessionLogLevel;

import java.util.concurrent.CompletableFuture;
import java.util.concurrent.ExecutionException;
import java.util.concurrent.ExecutorService;
import java.util.concurrent.Executors;
Then, add the following member variables into your MainActivity class:
private boolean sessionInitialized = false;

private String anchorId = null;
private boolean scanningForUpload = false;
private final Object syncSessionProgress = new Object();
private ExecutorService executorService = Executors.newSingleThreadExecutor();
Now, add the following code into your initializeSession() method. First, this code will allow your app to monitor the progress that the Azure Spatial Anchors SDK makes as it collects frames from your camera feed. As it does, the color of your sphere will start changing from its original black, into grey. Then, it will turn white once enough frames are collected to submit your anchor to the cloud. Second, this code will provide the credentials needed to communicate with the cloud back-end. Here is where you'll configure your app to use your account Identifier, Key, and Domain. You copied them into a text editor when setting up the Spatial Anchors resource.
private void initializeSession() {
    if (sceneView.getSession() == null) {
        //Early return if the ARCore Session is still being set up
        return;
    }

    if (this.cloudSession != null) {
        this.cloudSession.close();
    }
    this.cloudSession = new CloudSpatialAnchorSession();
    this.cloudSession.setSession(sceneView.getSession());
    this.cloudSession.setLogLevel(SessionLogLevel.Information);
    this.cloudSession.addOnLogDebugListener(args -> Log.d("ASAInfo", args.getMessage()));
    this.cloudSession.addErrorListener(args -> Log.e("ASAError", String.format("%s: %s", args.getErrorCode().name(), args.getErrorMessage())));

    sessionInitialized = true;

    this.cloudSession.addSessionUpdatedListener(args -> {
        synchronized (this.syncSessionProgress) {
            this.recommendedSessionProgress = args.getStatus().getRecommendedForCreateProgress();
            Log.i("ASAInfo", String.format("Session progress: %f", this.recommendedSessionProgress));
            if (!this.scanningForUpload) {
                return;
            }
        }

        runOnUiThread(() -> {
            synchronized (this.syncSessionProgress) {
                MaterialFactory.makeOpaqueWithColor(this, new Color(
                        this.recommendedSessionProgress,
                        this.recommendedSessionProgress,
                        this.recommendedSessionProgress))
                        .thenAccept(material -> {
                            this.nodeRenderable.setMaterial(material);
                        });
            }
        });
    });

    this.cloudSession.getConfiguration().setAccountId(/* Copy your account Identifier in here */);
    this.cloudSession.getConfiguration().setAccountKey(/* Copy your account Key in here */);
    this.cloudSession.getConfiguration().setAccountDomain(/* Copy your account Domain in here */);
    this.cloudSession.start();
}
Next, add the following uploadCloudAnchorAsync() method inside your mainActivity class. Once called, this method will asynchronously wait until enough frames are collected from your device. As soon as that happens, it will switch the color of your sphere to yellow, and then it will start uploading your local Azure Spatial Anchor into the cloud. Once the upload finishes, the code will return an anchor identifier.
private CompletableFuture<String> uploadCloudAnchorAsync(CloudSpatialAnchor anchor) {
    synchronized (this.syncSessionProgress) {
        this.scanningForUpload = true;
    }


    return CompletableFuture.runAsync(() -> {
        try {
            float currentSessionProgress;
            do {
                synchronized (this.syncSessionProgress) {
                    currentSessionProgress = this.recommendedSessionProgress;
                }
                if (currentSessionProgress < 1.0) {
                    Thread.sleep(500);
                }
            }
            while (currentSessionProgress < 1.0);

            synchronized (this.syncSessionProgress) {
                this.scanningForUpload = false;
            }
            runOnUiThread(() -> {
                MaterialFactory.makeOpaqueWithColor(this, new Color(android.graphics.Color.YELLOW))
                        .thenAccept(yellowMaterial -> {
                            this.nodeRenderable.setMaterial(yellowMaterial);
                        });
            });

            this.cloudSession.createAnchorAsync(anchor).get();
        } catch (InterruptedException | ExecutionException e) {
            Log.e("ASAError", e.toString());
            throw new RuntimeException(e);
        }
    }, executorService).thenApply(ignore -> anchor.getIdentifier());
}
Finally, let's hook everything together. In your handleTap() method, add the following code. It will invoke your uploadCloudAnchorAsync() method as soon as your sphere is created. Once the method returns, the code below will perform one final update to your sphere, changing its color to blue.
protected void handleTap(HitResult hitResult, Plane plane, MotionEvent motionEvent) {
    synchronized (this.syncTaps) {
        if (this.tapExecuted) {
            return;
        }

        this.tapExecuted = true;
    }

    this.anchorNode = new AnchorNode();
    this.anchorNode.setAnchor(hitResult.createAnchor());
    CloudSpatialAnchor cloudAnchor = new CloudSpatialAnchor();
    cloudAnchor.setLocalAnchor(this.anchorNode.getAnchor());

    MaterialFactory.makeOpaqueWithColor(this, new Color(
            this.recommendedSessionProgress,
            this.recommendedSessionProgress,
            this.recommendedSessionProgress))
            .thenAccept(material -> {
                this.nodeRenderable = ShapeFactory.makeSphere(0.1f, new Vector3(0.0f, 0.15f, 0.0f), material);
                this.anchorNode.setRenderable(nodeRenderable);
                this.anchorNode.setParent(arFragment.getArSceneView().getScene());
            });


    uploadCloudAnchorAsync(cloudAnchor)
            .thenAccept(id -> {
                this.anchorId = id;
                Log.i("ASAInfo", String.format("Cloud Anchor created: %s", this.anchorId));
                runOnUiThread(() -> {
                    MaterialFactory.makeOpaqueWithColor(this, new Color(android.graphics.Color.BLUE))
                            .thenAccept(blueMaterial -> {
                                this.nodeRenderable.setMaterial(blueMaterial);
                                synchronized (this.syncTaps) {
                                    this.tapExecuted = false;
                                }
                            });
                });
            });
}
Redeploy your app once more. Move around your device, tap the screen, and place your sphere. This time, though, your sphere will change its color from black to white, as camera frames are collected. Once we have enough frames, the sphere will turn to yellow, and the cloud upload will start. Make sure your phone is connected to the internet. Once the upload finishes, your sphere will turn blue. Optionally, you can monitor the Logcat window in Android Studio to view the log messages your app is sending. Examples of messages that would be logged include the session progress during the frames-capture and the anchor identifier that the cloud returns once the upload is completed.
Note
If you are not seeing the value of recommendedSessionProgress (in your debug logs referred to as Session progress) change then make sure you are both moving and rotating your phone around the sphere you have placed.
Locate your cloud spatial anchor
Once your anchor is uploaded to the cloud, we're ready to attempt locating it again. First, let's add the following imports into your code.
import java.util.concurrent.Executors;

import com.microsoft.azure.spatialanchors.AnchorLocateCriteria;
import com.microsoft.azure.spatialanchors.LocateAnchorStatus;
Then, let's add the following code into your handleTap() method. This code will:
- Remove our existing blue sphere from the screen.
- Initialize our Azure Spatial Anchors session again. This action will ensure that the anchor we're going to locate comes from the cloud instead of the local anchor we created.
- Issue a query for the anchor we uploaded to the cloud.
protected void handleTap(HitResult hitResult, Plane plane, MotionEvent motionEvent) {
    synchronized (this.syncTaps) {
        if (this.tapExecuted) {
            return;
        }

        this.tapExecuted = true;
    }

    if (this.anchorId != null) {
        this.anchorNode.getAnchor().detach();
        this.anchorNode.setParent(null);
        this.anchorNode = null;
        initializeSession();
        AnchorLocateCriteria criteria = new AnchorLocateCriteria();
        criteria.setIdentifiers(new String[]{this.anchorId});
        cloudSession.createWatcher(criteria);
        return;
    }

    this.anchorNode = new AnchorNode();
    this.anchorNode.setAnchor(hitResult.createAnchor());
    CloudSpatialAnchor cloudAnchor = new CloudSpatialAnchor();
    cloudAnchor.setLocalAnchor(this.anchorNode.getAnchor());

    MaterialFactory.makeOpaqueWithColor(this, new Color(
            this.recommendedSessionProgress,
            this.recommendedSessionProgress,
            this.recommendedSessionProgress))
            .thenAccept(material -> {
                this.nodeRenderable = ShapeFactory.makeSphere(0.1f, new Vector3(0.0f, 0.15f, 0.0f), material);
                this.anchorNode.setRenderable(nodeRenderable);
                this.anchorNode.setParent(arFragment.getArSceneView().getScene());
            });


    uploadCloudAnchorAsync(cloudAnchor)
            .thenAccept(id -> {
                this.anchorId = id;
                Log.i("ASAInfo", String.format("Cloud Anchor created: %s", this.anchorId));
                runOnUiThread(() -> {
                    MaterialFactory.makeOpaqueWithColor(this, new Color(android.graphics.Color.BLUE))
                            .thenAccept(blueMaterial -> {
                                this.nodeRenderable.setMaterial(blueMaterial);
                                synchronized (this.syncTaps) {
                                    this.tapExecuted = false;
                                }
                            });
                });
            });
}
Now, let's hook the code that will be invoked when the anchor we're querying for is located. Inside your initializeSession() method, add the following code. This snippet will create & place a green sphere once the cloud spatial anchor is located. It will also enable screen tapping again, so you can repeat the whole scenario once more: create another local anchor, upload it, and locate it again.
private void initializeSession() {
    if (sceneView.getSession() == null) {
        //Early return if the ARCore Session is still being set up
        return;
    }

    if (this.cloudSession != null) {
        this.cloudSession.close();
    }
    this.cloudSession = new CloudSpatialAnchorSession();
    this.cloudSession.setSession(sceneView.getSession());
    this.cloudSession.setLogLevel(SessionLogLevel.Information);
    this.cloudSession.addOnLogDebugListener(args -> Log.d("ASAInfo", args.getMessage()));
    this.cloudSession.addErrorListener(args -> Log.e("ASAError", String.format("%s: %s", args.getErrorCode().name(), args.getErrorMessage())));

    sessionInitialized = true;

    this.cloudSession.addSessionUpdatedListener(args -> {
        synchronized (this.syncSessionProgress) {
            this.recommendedSessionProgress = args.getStatus().getRecommendedForCreateProgress();
            Log.i("ASAInfo", String.format("Session progress: %f", this.recommendedSessionProgress));
            if (!this.scanningForUpload) {
                return;
            }
        }

        runOnUiThread(() -> {
            synchronized (this.syncSessionProgress) {
                MaterialFactory.makeOpaqueWithColor(this, new Color(
                        this.recommendedSessionProgress,
                        this.recommendedSessionProgress,
                        this.recommendedSessionProgress))
                        .thenAccept(material -> {
                            this.nodeRenderable.setMaterial(material);
                        });
            }
        });
    });

    this.cloudSession.addAnchorLocatedListener(args -> {
        if (args.getStatus() == LocateAnchorStatus.Located) {
            runOnUiThread(() -> {
                this.anchorNode = new AnchorNode();
                this.anchorNode.setAnchor(args.getAnchor().getLocalAnchor());
                MaterialFactory.makeOpaqueWithColor(this, new Color(android.graphics.Color.GREEN))
                        .thenAccept(greenMaterial -> {
                            this.nodeRenderable = ShapeFactory.makeSphere(0.1f, new Vector3(0.0f, 0.15f, 0.0f), greenMaterial);
                            this.anchorNode.setRenderable(nodeRenderable);
                            this.anchorNode.setParent(arFragment.getArSceneView().getScene());

                            this.anchorId = null;
                            synchronized (this.syncTaps) {
                                this.tapExecuted = false;
                            }
                        });
            });
        }
    });

    this.cloudSession.getConfiguration().setAccountId(/* Copy your account Identifier in here */);
    this.cloudSession.getConfiguration().setAccountKey(/* Copy your account Key in here */);
    this.cloudSession.getConfiguration().setAccountDomain(/* Copy your account Domain in here */);
    this.cloudSession.start();
}
That's it! Redeploy your app one last time to try out the whole scenario end to end. Move around your device, and place your black sphere. Then, keep moving your device to capture camera frames until the sphere turns yellow. Your local anchor will be uploaded, and your sphere will turn blue. Finally, tap your screen once more, so that your local anchor is removed, and then we'll query for its cloud counterpart. Continue moving your device around until your cloud spatial anchor is located. A green sphere should appear in the correct location, and you can rinse & repeat the whole scenario again.
Putting everything together
Here is how the complete MainActivity class file should look, after all
the different elements have been put together. You can use it as a reference to
compare against your own file, and spot if you may have any differences left.
package com.example.myfirstapp;

import android.os.Bundle;
import android.util.Log;
import android.view.MotionEvent;

import androidx.appcompat.app.AppCompatActivity;

import com.google.ar.core.HitResult;
import com.google.ar.core.Plane;
import com.google.ar.sceneform.AnchorNode;
import com.google.ar.sceneform.ArSceneView;
import com.google.ar.sceneform.FrameTime;
import com.google.ar.sceneform.Scene;
import com.google.ar.sceneform.math.Vector3;
import com.google.ar.sceneform.rendering.Color;
import com.google.ar.sceneform.rendering.MaterialFactory;
import com.google.ar.sceneform.rendering.Renderable;
import com.google.ar.sceneform.rendering.ShapeFactory;
import com.google.ar.sceneform.ux.ArFragment;

import com.microsoft.azure.spatialanchors.AnchorLocateCriteria;
import com.microsoft.azure.spatialanchors.CloudSpatialAnchor;
import com.microsoft.azure.spatialanchors.CloudSpatialAnchorSession;
import com.microsoft.azure.spatialanchors.LocateAnchorStatus;
import com.microsoft.azure.spatialanchors.SessionLogLevel;

import java.util.concurrent.CompletableFuture;
import java.util.concurrent.ExecutionException;
import java.util.concurrent.ExecutorService;
import java.util.concurrent.Executors;

public class MainActivity extends AppCompatActivity {

    private boolean tapExecuted = false;
    private final Object syncTaps = new Object();
    private ArFragment arFragment;
    private AnchorNode anchorNode;
    private Renderable nodeRenderable = null;
    private float recommendedSessionProgress = 0f;

    private ArSceneView sceneView;
    private CloudSpatialAnchorSession cloudSession;
    private boolean sessionInitialized = false;

    private String anchorId = null;
    private boolean scanningForUpload = false;
    private final Object syncSessionProgress = new Object();
    private ExecutorService executorService = Executors.newSingleThreadExecutor();

    @Override
    protected void onCreate(Bundle savedInstanceState) {
        super.onCreate(savedInstanceState);
        setContentView(R.layout.activity_main);

        this.arFragment = (ArFragment) getSupportFragmentManager().findFragmentById(R.id.ux_fragment);
        this.arFragment.setOnTapArPlaneListener(this::handleTap);

        this.sceneView = arFragment.getArSceneView();
        Scene scene = sceneView.getScene();
        scene.addOnUpdateListener(frameTime -> {
            if (this.cloudSession != null) {
                this.cloudSession.processFrame(sceneView.getArFrame());
            }
        });
        scene.addOnUpdateListener(this::scene_OnUpdate);
        initializeSession();
    }

    // <scene_OnUpdate>
    private void scene_OnUpdate(FrameTime frameTime) {
        if (!sessionInitialized) {
            //retry if initializeSession did an early return due to ARCore Session not yet available (i.e. sceneView.getSession() == null)
            initializeSession();
        }
    }
    // </scene_OnUpdate>

    // <initializeSession>
    private void initializeSession() {
        if (sceneView.getSession() == null) {
            //Early return if the ARCore Session is still being set up
            return;
        }

        if (this.cloudSession != null) {
            this.cloudSession.close();
        }
        this.cloudSession = new CloudSpatialAnchorSession();
        this.cloudSession.setSession(sceneView.getSession());
        this.cloudSession.setLogLevel(SessionLogLevel.Information);
        this.cloudSession.addOnLogDebugListener(args -> Log.d("ASAInfo", args.getMessage()));
        this.cloudSession.addErrorListener(args -> Log.e("ASAError", String.format("%s: %s", args.getErrorCode().name(), args.getErrorMessage())));

        sessionInitialized = true;

        this.cloudSession.addSessionUpdatedListener(args -> {
            synchronized (this.syncSessionProgress) {
                this.recommendedSessionProgress = args.getStatus().getRecommendedForCreateProgress();
                Log.i("ASAInfo", String.format("Session progress: %f", this.recommendedSessionProgress));
                if (!this.scanningForUpload) {
                    return;
                }
            }

            runOnUiThread(() -> {
                synchronized (this.syncSessionProgress) {
                    MaterialFactory.makeOpaqueWithColor(this, new Color(
                            this.recommendedSessionProgress,
                            this.recommendedSessionProgress,
                            this.recommendedSessionProgress))
                            .thenAccept(material -> {
                                this.nodeRenderable.setMaterial(material);
                            });
                }
            });
        });

        this.cloudSession.addAnchorLocatedListener(args -> {
            if (args.getStatus() == LocateAnchorStatus.Located) {
                runOnUiThread(() -> {
                    this.anchorNode = new AnchorNode();
                    this.anchorNode.setAnchor(args.getAnchor().getLocalAnchor());
                    MaterialFactory.makeOpaqueWithColor(this, new Color(android.graphics.Color.GREEN))
                            .thenAccept(greenMaterial -> {
                                this.nodeRenderable = ShapeFactory.makeSphere(0.1f, new Vector3(0.0f, 0.15f, 0.0f), greenMaterial);
                                this.anchorNode.setRenderable(nodeRenderable);
                                this.anchorNode.setParent(arFragment.getArSceneView().getScene());

                                this.anchorId = null;
                                synchronized (this.syncTaps) {
                                    this.tapExecuted = false;
                                }
                            });
                });
            }
        });

        this.cloudSession.getConfiguration().setAccountId(/* Copy your account Identifier in here */);
        this.cloudSession.getConfiguration().setAccountKey(/* Copy your account Key in here */);
        this.cloudSession.getConfiguration().setAccountDomain(/* Copy your account Domain in here */);
        this.cloudSession.start();
    }
    // </initializeSession>

    // <handleTap>
    protected void handleTap(HitResult hitResult, Plane plane, MotionEvent motionEvent) {
        synchronized (this.syncTaps) {
            if (this.tapExecuted) {
                return;
            }

            this.tapExecuted = true;
        }

        if (this.anchorId != null) {
            this.anchorNode.getAnchor().detach();
            this.anchorNode.setParent(null);
            this.anchorNode = null;
            initializeSession();
            AnchorLocateCriteria criteria = new AnchorLocateCriteria();
            criteria.setIdentifiers(new String[]{this.anchorId});
            cloudSession.createWatcher(criteria);
            return;
        }

        this.anchorNode = new AnchorNode();
        this.anchorNode.setAnchor(hitResult.createAnchor());
        CloudSpatialAnchor cloudAnchor = new CloudSpatialAnchor();
        cloudAnchor.setLocalAnchor(this.anchorNode.getAnchor());

        MaterialFactory.makeOpaqueWithColor(this, new Color(
                this.recommendedSessionProgress,
                this.recommendedSessionProgress,
                this.recommendedSessionProgress))
                .thenAccept(material -> {
                    this.nodeRenderable = ShapeFactory.makeSphere(0.1f, new Vector3(0.0f, 0.15f, 0.0f), material);
                    this.anchorNode.setRenderable(nodeRenderable);
                    this.anchorNode.setParent(arFragment.getArSceneView().getScene());
                });


        uploadCloudAnchorAsync(cloudAnchor)
                .thenAccept(id -> {
                    this.anchorId = id;
                    Log.i("ASAInfo", String.format("Cloud Anchor created: %s", this.anchorId));
                    runOnUiThread(() -> {
                        MaterialFactory.makeOpaqueWithColor(this, new Color(android.graphics.Color.BLUE))
                                .thenAccept(blueMaterial -> {
                                    this.nodeRenderable.setMaterial(blueMaterial);
                                    synchronized (this.syncTaps) {
                                        this.tapExecuted = false;
                                    }
                                });
                    });
                });
    }
    // </handleTap>

    // <uploadCloudAnchorAsync>
    private CompletableFuture<String> uploadCloudAnchorAsync(CloudSpatialAnchor anchor) {
        synchronized (this.syncSessionProgress) {
            this.scanningForUpload = true;
        }


        return CompletableFuture.runAsync(() -> {
            try {
                float currentSessionProgress;
                do {
                    synchronized (this.syncSessionProgress) {
                        currentSessionProgress = this.recommendedSessionProgress;
                    }
                    if (currentSessionProgress < 1.0) {
                        Thread.sleep(500);
                    }
                }
                while (currentSessionProgress < 1.0);

                synchronized (this.syncSessionProgress) {
                    this.scanningForUpload = false;
                }
                runOnUiThread(() -> {
                    MaterialFactory.makeOpaqueWithColor(this, new Color(android.graphics.Color.YELLOW))
                            .thenAccept(yellowMaterial -> {
                                this.nodeRenderable.setMaterial(yellowMaterial);
                            });
                });

                this.cloudSession.createAnchorAsync(anchor).get();
            } catch (InterruptedException | ExecutionException e) {
                Log.e("ASAError", e.toString());
                throw new RuntimeException(e);
            }
        }, executorService).thenApply(ignore -> anchor.getIdentifier());
    }
    // </uploadCloudAnchorAsync>

}
Next steps
In this tutorial, you've seen how to create a new Android app that integrates ARCore functionality with Azure Spatial Anchors. To learn more about the Azure Spatial Anchors library, continue to our guide on how to create and locate anchors.
Feedback
Coming soon: Throughout 2024 we will be phasing out GitHub Issues as the feedback mechanism for content and replacing it with a new feedback system. For more information see: https://aka.ms/ContentUserFeedback.
Submit and view feedback for