How to enable your own persistent storage in Azure Spring Apps
Note
Azure Spring Apps is the new name for the Azure Spring Cloud service. Although the service has a new name, you'll see the old name in some places for a while as we work to update assets such as screenshots, videos, and diagrams.
This article applies to: ✔️ Java ✔️ C#
This article applies to: ✔️ Basic/Standard ✔️ Enterprise
This article shows you how to enable your own persistent storage in Azure Spring Apps.
When you use the built-in persistent storage in Azure Spring Apps, artifacts generated by your application are uploaded into Azure Storage Accounts. Microsoft controls the encryption-at-rest and lifetime management policies for those artifacts.
When you use your own persistent storage, artifacts generated by your application are uploaded into a storage account that you control. You control the encryption-at-rest policy, the lifetime management policy, and network access. You're responsible for the costs associated with that storage account.
Prerequisites
- An existing Azure Storage Account and an existing Azure File Share. If you need to create a storage account and file share in Azure, see Create an SMB Azure file share.
- Azure CLI, version 2.45.0 or higher.
Important
If you deployed your Azure Spring Apps in your own virtual network and you want the storage account to be accessed only from the virtual network, see Use private endpoints for Azure Storage and the Grant access from a virtual network section of Configure Azure Storage firewalls and virtual networks.
Mount your own extra persistent storage to applications
Note
Updating persistent storage restarts your applications.
When you use virtual network integration, ensure that ports 80 and 445 are open.
Use the following steps to bind an Azure Storage account as a storage resource in your Azure Spring Apps and create an app with your own persistent storage.
Go to the service Overview page, and then select Storage in the left-hand navigation pane.
On the Storage page, select Add storage.

Enter the following information on the Add storage page, and then select Apply.
Setting Value Storage name The name of the storage resource, which is a service-level resource in Azure Spring Apps. Account name The name of the storage account. Account key The storage account key. 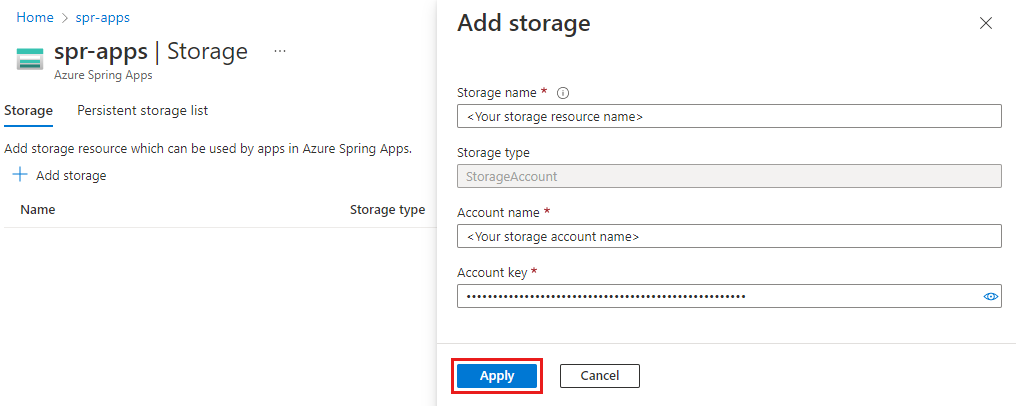
Go to the Apps page, and then select an application to mount the persistent storage.

Select Configuration, and then select Persistent Storage.
Select Add persistent storage. Add the values in the following table, and then select Apply.
Setting Value Storage name The name of the storage resource that you entered earlier. Persistent storage type AzureFileVolume Share name The name of the Azure File share in the Azure Storage account. Mount path A unique mount path. Mount options Optional Read only Optional 
Select Save to apply the configuration changes.


Best practices
Use the following best practices when you add your own persistent storage to Azure Spring Apps.
To avoid potential latency issues, place the Azure Spring Apps instance and the Azure Storage Account in the same Azure region.
In the Azure Storage Account, avoid regenerating the account key that you're using. The storage account contains two different keys. Use a step-by-step approach to ensure that the persistent storage remains available to applications during key regeneration.
For example, use the following steps to ensure that the persistent storage remains available if you used key1 to bind a storage account to Azure Spring Apps.
- Regenerate key2.
- Update the account key of the storage resource to use the regenerated key2.
- Restart the applications that mount the persistent storage from this storage resource. Use the
az spring storage list-persistent-storagecommand to list all related applications. - Regenerate key1.
If you delete an Azure Storage account or Azure file share, avoid possible errors by removing the corresponding storage resource or persistent storage in the applications.
If you'd like to write files to the same path for every individual application instance, but keep them in separate subdirectories from the perspective of the file share, you could use the SubPath option. Note that the SubPath option is incompatible with Read only because SubPath is used for writing new files and Read only is used for reading existing files.
FAQ
This section addresses frequently asked questions about using your own persistent storage with Azure Spring Apps.
If I have built-in persistent storage enabled, and then I enabled my own storage as extra persistent storage, is my data migrated into my Azure Storage account?
No. But we're going to provide a document to help you do the migration yourself soon.
What are the reserved mount paths?
Azure Spring Apps reserves the following mount paths:
- /tmp
- /persistent
- /secrets
- /app-insights/agents
- /etc/azure-spring-cloud/certs
- /app-insights/agents/settings
- /app-lifecycle/settings
What are the available mount options?
We currently support the following mount options:
uidgidfile_modedir_mode
The
mountOptionsproperty is optional. The default values for these mount options are: ["uid=0", "gid=0", "file_mode=0777", "dir_mode=0777"]I'm using the service endpoint to configure the storage account to allow access only from my own virtual network. Why did I receive a Permission Denied error when I tried to mount custom persistent storage to my applications?
A service endpoint provides network access on a subnet level only. Make sure you've added both subnets used by the Azure Spring Apps instance to the scope of the service endpoint.
Next steps
Feedback
Coming soon: Throughout 2024 we will be phasing out GitHub Issues as the feedback mechanism for content and replacing it with a new feedback system. For more information see: https://aka.ms/ContentUserFeedback.
Submit and view feedback for