Expose applications to the internet with TLS Termination at Application Gateway
Note
Azure Spring Apps is the new name for the Azure Spring Cloud service. Although the service has a new name, you'll see the old name in some places for a while as we work to update assets such as screenshots, videos, and diagrams.
This article explains how to expose applications to the internet using Application Gateway.
When an Azure Spring Apps service instance is deployed in your virtual network (VNET), applications on the service instance are only accessible in the private network. To make the applications accessible on the Internet, you need to integrate with Azure Application Gateway. The incoming encrypted traffic can be decrypted at the application gateway or it can be passed to Azure Spring Apps encrypted to achieve end-to-end TLS/SSL. For dev and test purposes, you can start with SSL termination at the application gateway, which is covered in this guide. For production, we recommend end-to-end TLS/SSL with private certificate, as described in Expose applications with end-to-end TLS in a virtual network.
Prerequisites
- Azure CLI version 2.0.4 or later.
- An Azure Spring Apps service instance deployed in a virtual network with an application accessible over the private network using the default
.private.azuremicroservices.iodomain suffix. For more information, see Deploy Azure Spring Apps in a virtual network - A custom domain to be used to access the application.
- A certificate, stored in Key Vault, which matches the custom domain to be used to establish the HTTPS listener. For more information, see Tutorial: Import a certificate in Azure Key Vault.
Configure Application Gateway for Azure Spring Apps
We recommend that the domain name, as seen by the browser, is the same as the host name which Application Gateway uses to direct traffic to the Azure Spring Apps back end. This recommendation provides the best experience when using Application Gateway to expose applications hosted in Azure Spring Apps and residing in a virtual network. If the domain exposed by Application Gateway is different from the domain accepted by Azure Spring Apps, cookies and generated redirect URLs (for example) can be broken. For more information, see Host name preservation.
To configure Application Gateway in front of Azure Spring Apps in a private VNET, use the following steps.
- Follow the instructions in Deploy Azure Spring Apps in a virtual network.
- Follow the instructions in Access your application in a private network.
- Acquire a certificate for your domain of choice and store that in Key Vault. For more information, see Tutorial: Import a certificate in Azure Key Vault.
- Configure a custom domain and corresponding certificate from Key Vault on an app deployed onto Azure Spring Apps. For more information, see Tutorial: Map an existing custom domain to Azure Spring Apps.
- Deploy Application Gateway in a virtual network configured according to the following list:
- Use Azure Spring Apps in the backend pool, referenced by the domain suffixed with
private.azuremicroservices.io. - Include an HTTPS listener using the same certificate from Key Vault.
- Configure the virtual network with HTTP settings that use the custom domain name configured on Azure Spring Apps instead of the domain suffixed with
private.azuremicroservices.io.
- Use Azure Spring Apps in the backend pool, referenced by the domain suffixed with
- Configure your public DNS to point to the application gateway.
Define variables
Next, use the following commands to define variables for the resource group and virtual network you created as directed in Deploy Azure Spring Apps in a virtual network. Replace the <...> placeholders with real values based on your actual environment. When you define SPRING_APP_PRIVATE_FQDN, remove https:// from the URI.
export SUBSCRIPTION='<subscription-id>'
export RESOURCE_GROUP='<resource-group-name>'
export LOCATION='eastus'
export SPRING_CLOUD_NAME='<name-of-Azure-Spring-Apps-instance>'
export APPNAME='<name-of-app-in-Azure-Spring-Apps>'
export SPRING_APP_PRIVATE_FQDN='$APPNAME.private.azuremicroservices.io'
export VIRTUAL_NETWORK_NAME='azure-spring-apps-vnet'
export APPLICATION_GATEWAY_SUBNET_NAME='app-gw-subnet'
export APPLICATION_GATEWAY_SUBNET_CIDR='10.1.2.0/24'
Sign in to Azure
Use the following command to sign in to the Azure CLI and choose your active subscription.
az login
az account set --subscription $SUBSCRIPTION
Configure the public domain name on Azure Spring Apps
Traffic will enter the application deployed on Azure Spring Apps using the public domain name. To configure your application to listen to this host name over HTTP, use the following commands to add a custom domain to your app, replacing the <...> placeholders with real values:
export KV_NAME='<name-of-key-vault>'
export KV_RG='<resource-group-name-of-key-vault>'
export CERT_NAME_IN_KV='<name-of-certificate-with-intermediaries-in-key-vault>'
export DOMAIN_NAME=myapp.mydomain.com

az spring app custom-domain bind \
    --resource-group $RESOURCE_GROUP \
    --service $SPRING_CLOUD_NAME \
    --domain-name $DOMAIN_NAME \
    --app $APPNAME
Create network resources
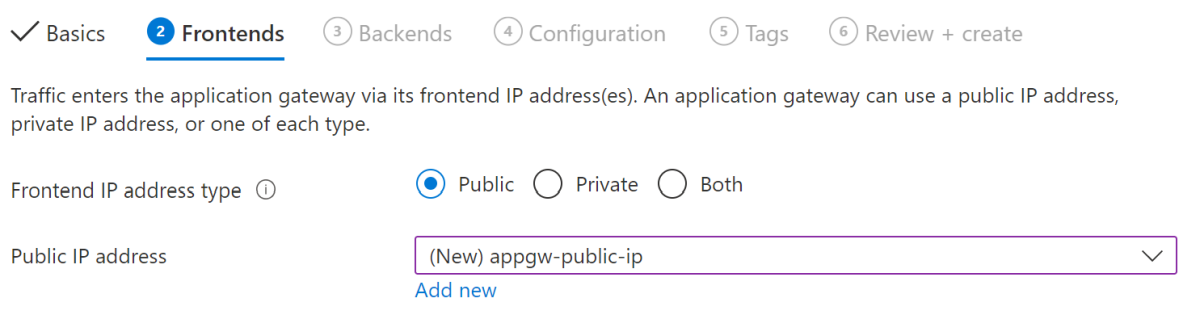
The application gateway to be created will join the same virtual network as the Azure Spring Apps service instance. First, create a new subnet for the application gateway in the virtual network, then create a public IP address as the frontend of the application gateway, as shown in the following example.
export APPLICATION_GATEWAY_PUBLIC_IP_NAME='app-gw-public-ip'
az network vnet subnet create \
    --name $APPLICATION_GATEWAY_SUBNET_NAME \
    --resource-group $RESOURCE_GROUP \
    --vnet-name $VIRTUAL_NETWORK_NAME \
    --address-prefix $APPLICATION_GATEWAY_SUBNET_CIDR
az network public-ip create \
    --resource-group $RESOURCE_GROUP \
    --location $LOCATION \
    --name $APPLICATION_GATEWAY_PUBLIC_IP_NAME \
    --allocation-method Static \
    --sku Standard
Create a managed identity for the application gateway
Your application gateway will need to be able to access Key Vault to read the certificate. To do this, the application gateway will use a user-assigned managed identity. For more information, see What are managed identities for Azure resources? Create the managed identity by using the following command, replacing the <...> placeholder:
export APPGW_IDENTITY_NAME='<name-for-appgw-managed-identity>'
az identity create \
    --resource-group $RESOURCE_GROUP \
    --name $APPGW_IDENTITY_NAME
Then, use the following command to fetch the objectId for the managed identity. This value will be used later on to give rights to access the certificate in Key Vault.
export APPGW_IDENTITY_CLIENTID=$(az identity show \
    --resource-group $RESOURCE_GROUP \
    --name $APPGW_IDENTITY_NAME \
    --query clientId \
    --output tsv)
export APPGW_IDENTITY_OID=$(az ad sp show \
    --id $APPGW_IDENTITY_CLIENTID \
    --query objectId \
    --output tsv)
Set policy on Key Vault
Configure Key Vault using the following command so that the managed identity for the application gateway is allowed to access the certificate stored in Key Vault:
az keyvault set-policy \
    --resource-group $KV_RG \
    --name $KV_NAME \
    --object-id $APPGW_IDENTITY_OID \
    --secret-permissions get list \
    --certificate-permissions get list
Create an application gateway
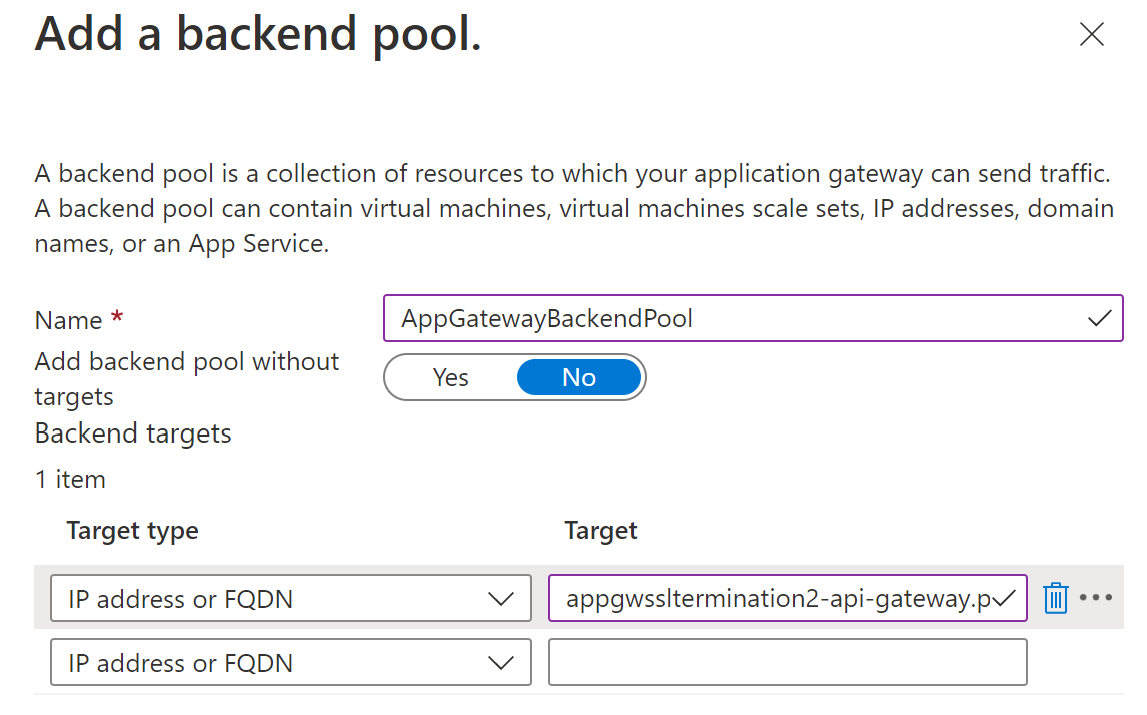
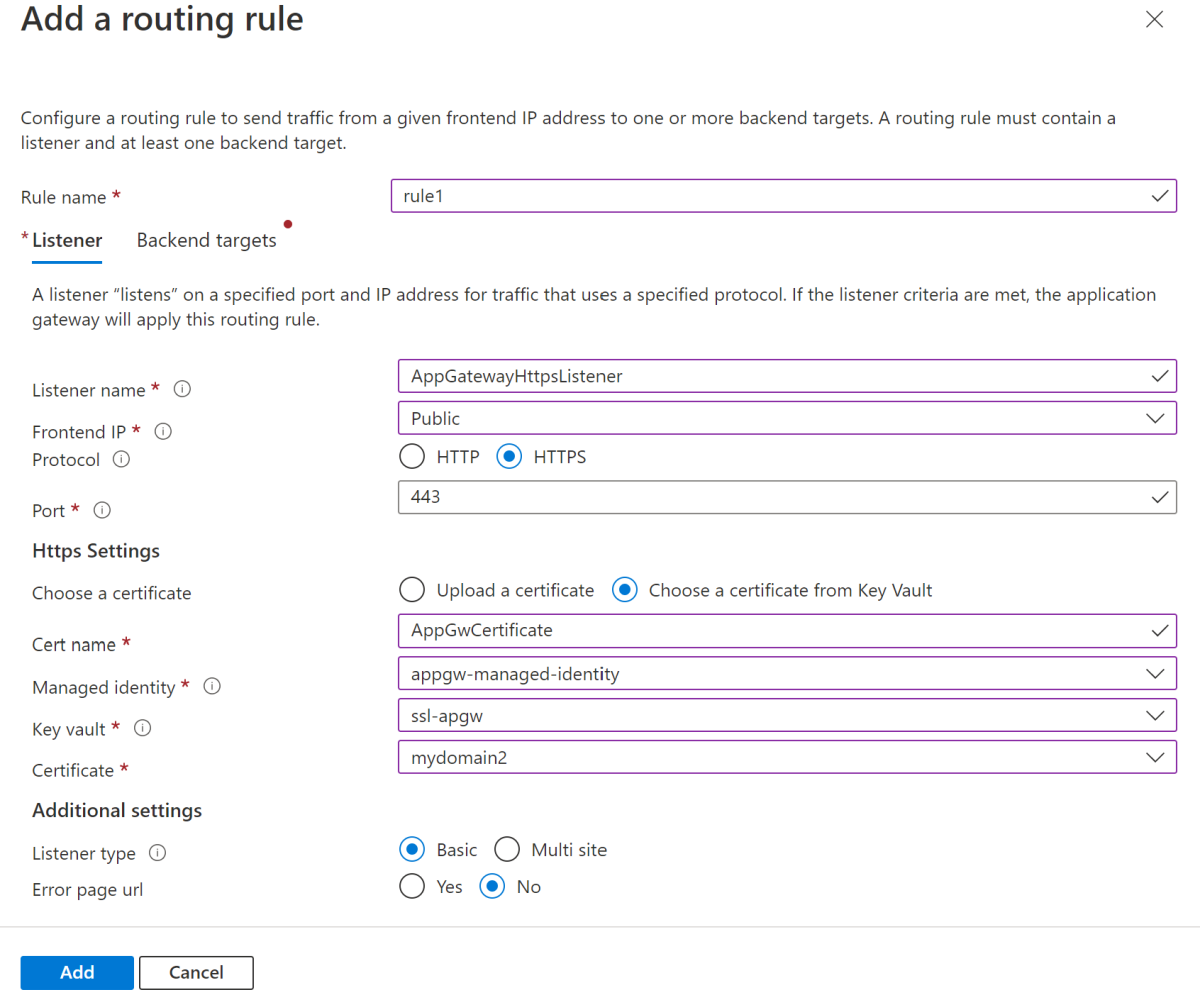
Create an application gateway using az network application-gateway create and specify your application's private fully qualified domain name (FQDN) as servers in the backend pool. Be sure to use the user-assigned managed identity and point to the certificate in Key Vault using the certificate's secret ID.
export APPGW_NAME='<name-for-application-gateway>'
export CERT_NAME_IN_KV='<name-of-certificate-in-key-vault>'
export KEYVAULT_SECRET_ID_FOR_CERT=$(az keyvault certificate show \
    --name $CERT_NAME_IN_KV \
    --vault-name $KV_NAME \
    --query sid \
    --output tsv)

az network application-gateway create \
    --name $APPGW_NAME \
    --resource-group $RESOURCE_GROUP \
    --location $LOCATION \
    --capacity 2 \
    --sku Standard_v2 \
    --frontend-port 443 \
    --http-settings-cookie-based-affinity Disabled \
    --http-settings-port 80 \
    --http-settings-protocol Http \
    --public-ip-address $APPLICATION_GATEWAY_PUBLIC_IP_NAME \
    --vnet-name $VIRTUAL_NETWORK_NAME \
    --subnet $APPLICATION_GATEWAY_SUBNET_NAME \
    --servers $SPRING_APP_PRIVATE_FQDN \
    --key-vault-secret-id $KEYVAULT_SECRET_ID_FOR_CERT \
    --identity $APPGW_IDENTITY_NAME
It can take up to 30 minutes for Azure to create the application gateway.

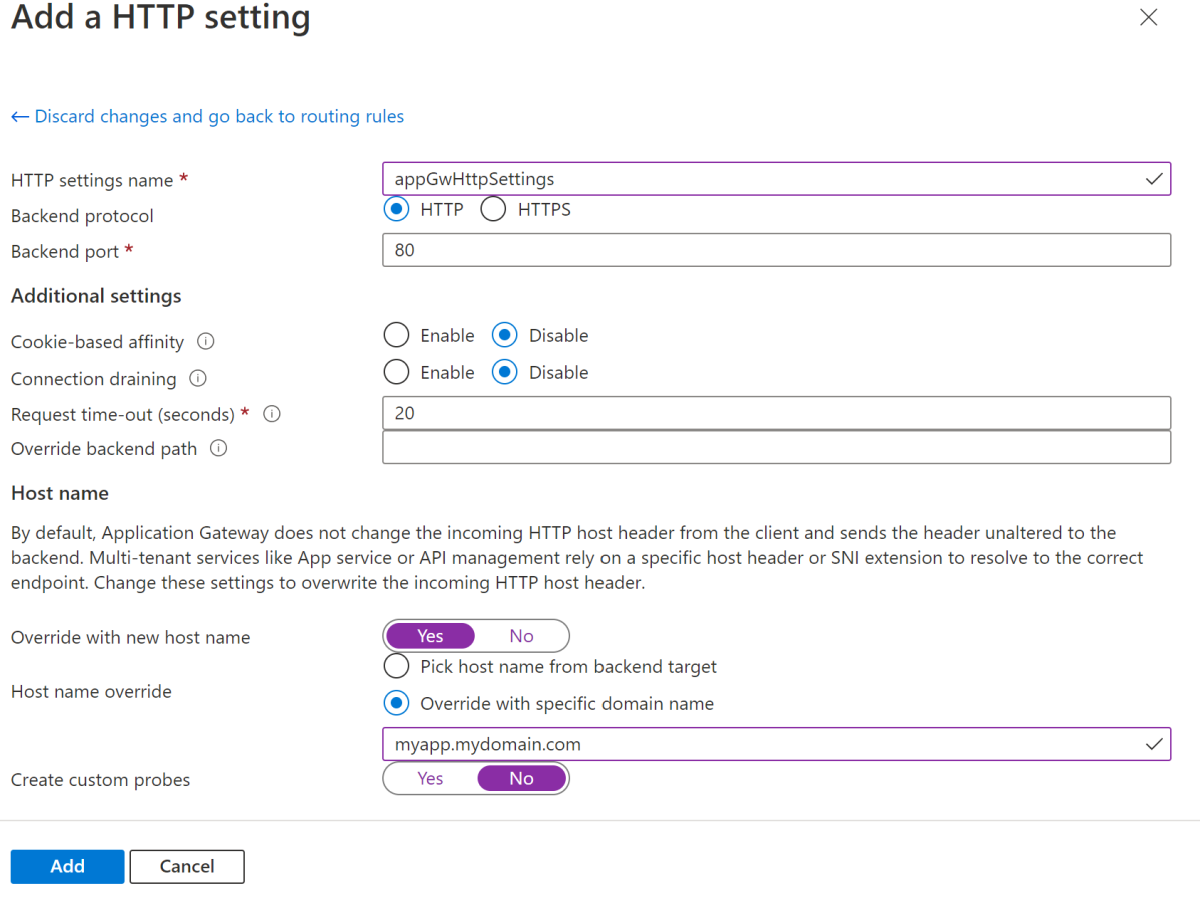
Update HTTP settings to use the domain name towards the backend
Update the HTTP settings to use the public domain name as the hostname instead of the domain suffixed with .private.azuremicroservices.io to send traffic to Azure Spring Apps with.
az network application-gateway http-settings update \
    --resource-group $RESOURCE_GROUP \
    --gateway-name $APPGW_NAME \
    --host-name-from-backend-pool false \
    --host-name $DOMAIN_NAME \
    --name appGatewayBackendHttpSettings
Check the deployment of the application gateway
After it's created, check the backend health by using the following command. The output of this command enables you to determine whether the application gateway reaches your application through its private fully qualified domain name (FQDN).
az network application-gateway show-backend-health \
    --name $APPGW_NAME \
    --resource-group $RESOURCE_GROUP
The output indicates the healthy status of backend pool, as shown in the following example:
{
  "backendAddressPools": [
    {
      "backendHttpSettingsCollection": [
        {
          "servers": [
            {
              "address": "my-azure-spring-apps-hello-vnet.private.azuremicroservices.io",
              "health": "Healthy",
              "healthProbeLog": "Success. Received 200 status code",
              "ipConfiguration": null
            }
          ]
        }
      ]
    }
  ]
}
Configure DNS and access the application
Configure the public DNS to point to the application gateway using a CNAME or A-record. You can find the public address for the application gateway by using the following command:
az network public-ip show \
    --resource-group $RESOURCE_GROUP \
    --name $APPLICATION_GATEWAY_PUBLIC_IP_NAME \
    --query [ipAddress] \
    --output tsv
You can now access the application using the public domain name.
Clean up resources
If you plan to continue working with subsequent articles, you might want to leave these resources in place. When no longer needed, delete the resource group, which deletes the resources in the resource group. To delete the resource group by using Azure CLI, use the following command:
az group delete --name $RESOURCE_GROUP
Next steps
Feedback
Coming soon: Throughout 2024 we will be phasing out GitHub Issues as the feedback mechanism for content and replacing it with a new feedback system. For more information see: https://aka.ms/ContentUserFeedback.
Submit and view feedback for