Use Azure Stream Analytics with dedicated SQL pool in Azure Synapse Analytics
Azure Stream Analytics is a fully managed service providing low-latency, highly available, scalable complex event processing over streaming data in the cloud. You can learn the basics by reading Introduction to Azure Stream Analytics. You can then learn how to create an end-to-end solution with Stream Analytics by following the Get started using Azure Stream Analytics tutorial.
In this article, you will learn how to use your dedicated SQL pool as an output sink for high throughput data ingestion with Azure Stream Analytics jobs.
Prerequisites
Azure Stream Analytics Job - To create an Azure Stream Analytics job, follow the steps in the Get started using Azure Stream Analytics tutorial to:
Create an Event Hubs input
Configure and start event generator application. This app sends data from a client through your Event Hubs. The JSON structure of the data looks as follows:
{
    RecordType: "",
    SystemIdentity: "",
    FileNum: ,
    SwitchNum: "",
    CallingNum: "",
    CallingIMSI: "",
    CalledNum: "",
    CalledIMSI: "",
    DateS: "",
    TimeS: "",
    TimeType: ,
    CallPeriod: ,
    CallingCellID: "",
    CalledCellID: "",
    ServiceType: "",
    Transfer: ,
    IncomingTrunk: "",
    OutgoingTrunk: "",
    MSRN: "",
    CalledNum2: "",
    FCIFlag: "",
    callrecTime: "",
    EventProcessedUtcTime: "",
    PartitionId: ,
    EventEnqueuedUtcTime: ""
}
Provision a Stream Analytics job
Specify job input and query
Dedicated SQL pool - To create a new dedicated SQL pool, follow the steps in the Quickstart: Create a dedicated SQL pool.
Specify streaming output to point to your dedicated SQL pool
Step 1
From the Azure portal, go to your Stream Analytics job and click on Outputs under the Job topology menu.
Step 2
Click on the Add button and choose Azure Synapse Analytics from the drop-down menu.

Step 3
Enter the following values:
- Output Alias: Enter a friendly name for this job output.
- Subscription:
- If your dedicated SQL pool is in the same subscription as the Stream Analytics job, click on Select Azure Synapse Analytics from your subscriptions.
- If your dedicated SQL pool is in a different subscription, click on Provide Azure Synapse Analytics settings manually.
- Database: Select the destination database from the drop-down list.
- User Name: Specify the user name of an account that has write permissions for the database.
- Password: Provide the password for the specified user account.
- Table: Specify the name of the target table in the database.
- click on the Save button

Step 4
Before you can run a test, you will need to create the table in your dedicated SQL pool. Run the following table creation script using SQL Server Management Studio (SSMS) or your choice of query tool.
CREATE TABLE SensorLog
(
    RecordType VARCHAR(2)
    , SystemIdentity VARCHAR(2)
    , FileNum INT
    , SwitchNum VARCHAR(50)
    , CallingNum VARCHAR(25)
    , CallingIMSI VARCHAR(25)
    , CalledNum VARCHAR(25)
    , CalledIMSI VARCHAR(25)
    , DateS VARCHAR(25)
    , TimeS VARCHAR(25)
    , TimeType INT
    , CallPeriod INT
    , CallingCellID VARCHAR(25)
    , CalledCellID VARCHAR(25)
    , ServiceType VARCHAR(25)
    , [Transfer] INT
    , IncomingTrunk VARCHAR(25)
    , OutgoingTrunk VARCHAR(25)
    , MSRN VARCHAR(25)
    , CalledNum2 VARCHAR(25)
    , FCIFlag VARCHAR(25)
    , callrecTime VARCHAR(50)
    , EventProcessedUtcTime VARCHAR(50)
    , PartitionId int
    , EventEnqueuedUtcTime VARCHAR(50)
    )
WITH (DISTRIBUTION = ROUND_ROBIN)
Step 5
On the Azure portal for Stream Analytics job, click on your job name. Click on the Test button in the Output details pane.
 When the connection to the database succeeds, you will see a notification in the portal.
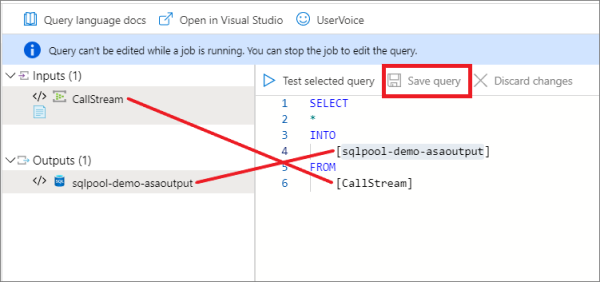
Step 6
Click on the Query menu under Job topology and change the query to insert data into the Stream output you created. Click on the Test selected query button to test your query. Click Save Query button when your query test is successful.
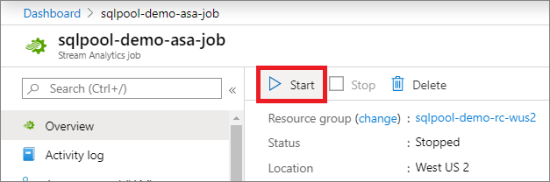
Step 7
Start the Azure Stream Analytics job. Click on the Start button on the Overview menu.
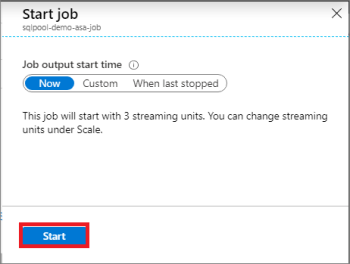
Click the Start button on the start job pane.
Next steps
For an overview of integration, see Integrate other services. For more development tips, see Design decisions and coding techniques for dedicated SQL pool.
Feedback
Coming soon: Throughout 2024 we will be phasing out GitHub Issues as the feedback mechanism for content and replacing it with a new feedback system. For more information see: https://aka.ms/ContentUserFeedback.
Submit and view feedback for