Immutable storage for Azure Blob Storage enables users to store business-critical data in a WORM (Write Once, Read Many) state. While in a WORM state, data cannot be modified or deleted for a user-specified interval. By configuring immutability policies for blob data, you can protect your data from overwrites and deletes. Immutability policies include time-based retention policies and legal holds. For more information about immutability policies for Blob Storage, see Store business-critical blob data with immutable storage.
An immutability policy may be scoped either to an individual blob version or to a container. This article describes how to configure a container-level immutability policy. To learn how to configure version-level immutability policies, see Configure immutability policies for blob versions.
Note
Immutability policies are not supported in accounts that have the Network File System (NFS) 3.0 protocol or the SSH File Transfer Protocol (SFTP) enabled on them.
Configure a retention policy on a container
To configure a time-based retention policy on a container, use the Azure portal, PowerShell, or Azure CLI. You can configure a container-level retention policy for between 1 and 146000 days.
To configure a time-based retention policy on a container with the Azure portal, follow these steps:
Navigate to the desired container.
Select the More button on the right, then select Access policy.
In the Immutable blob storage section, select Add policy.
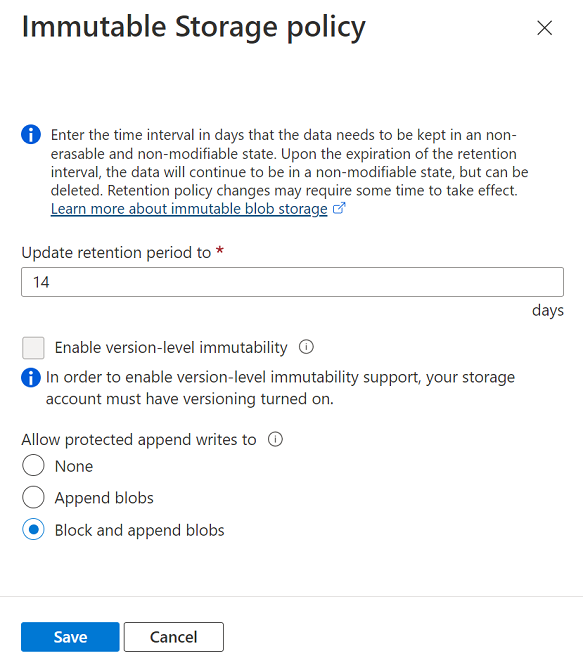
In the Policy type field, select Time-based retention, and specify the retention period in days.
To create a policy with container scope, do not check the box for Enable version-level immutability.
Choose whether to allow protected append writes.
The Append blobs option enables your workloads to add new blocks of data to the end of an append blob by using the Append Block operation.
The Block and append blobs option provides you with the same permissions as the Append blobs option but adds the ability to write new blocks to a block blob. The Blob Storage API does not provide a way for applications to do this directly. However, applications can accomplish this by using append and flush methods that are available in the Data Lake Storage Gen2 API. Also, some Microsoft applications use internal APIs to create block blobs and then append to them. If your workloads depend on any of these tools, then you can use this property to avoid errors that can appear when those tools attempt to append blocks to a block blob.
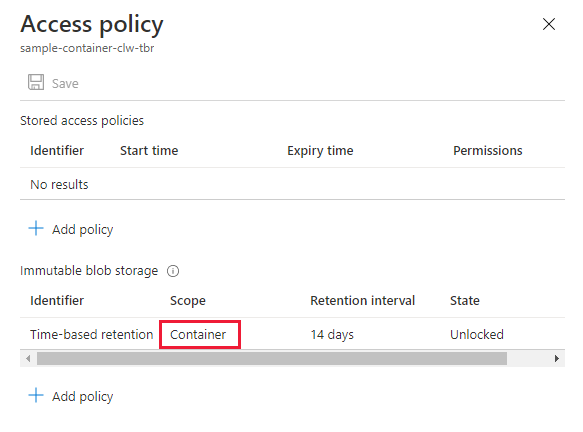
After you've configured the immutability policy, you will see that it is scoped to the container:
To configure a time-based retention policy on a container with PowerShell, call the Set-AzRmStorageContainerImmutabilityPolicy command, providing the retention interval in days. Remember to replace placeholder values in angle brackets with your own values:
To allow protected append writes, set the -AllowProtectedAppendWrite or -AllowProtectedAppendWriteAll parameter to true.
The AllowProtectedAppendWrite option enables your workloads to add new blocks of data to the end of an append blob by using the Append Block operation.
The AllowProtectedAppendWriteAll option provides you with the same permissions as the AllowProtectedAppendWrite option but adds the ability to write new blocks to a block blob. The Blob Storage API does not provide a way for applications to do this directly. However, applications can accomplish this by using append and flush methods that are available in the Data Lake Storage Gen2 API. Also, some Microsoft applications use internal APIs to create block blobs and then append to them. If your workloads depend on any of these tools, then you can use this property to avoid errors that can appear when those tools attempt to append blocks to a block blob.
To configure a time-based retention policy on a container with Azure CLI, call the az storage container immutability-policy create command, providing the retention interval in days. Remember to replace placeholder values in angle brackets with your own values:
To allow protected append writes, set the --allow-protected-append-writes or --allow-protected-append-writes-all parameter to true.
The --allow-protected-append-writes option enables your workloads to add new blocks of data to the end of an append blob by using the Append Block operation.
The --allow-protected-append-writes-all option provides you with the same permissions as the --allow-protected-append-writes option but adds the ability to write new blocks to a block blob. The Blob Storage API does not provide a way for applications to do this directly. However, applications can accomplish this by using append and flush methods that are available in the Data Lake Storage Gen2 API. Also, some Microsoft applications use internal APIs to create block blobs and then append to them. If your workloads depend on any of these tools, then you can use this property to avoid errors that can appear when those tools attempt to append blocks to a block blob.
You can modify an unlocked time-based retention policy to shorten or lengthen the retention interval and to allow additional writes to append blobs in the container. You can also delete an unlocked policy.
To modify an unlocked time-based retention policy in the Azure portal, follow these steps:
Navigate to the desired container.
Select the More button and choose Access policy.
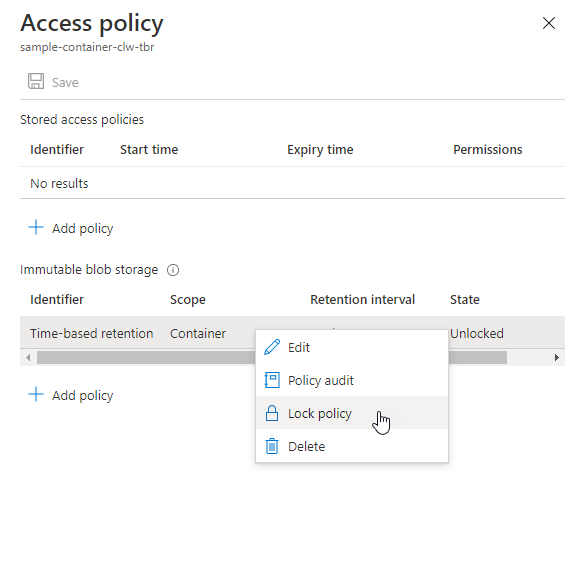
Under the Immutable blob versions section, locate the existing unlocked policy. Select the More button, then select Edit from the menu.
Provide a new retention interval for the policy. You can also select Allow additional protected appends to permit writes to protected append blobs.
To delete an unlocked policy, select the More button, then Delete.
Note
You can enable version-level immutability policies by selecting the Enable version-level immutability checkbox. For more information about enabling version-level immutability policies, see Configure immutability policies for blob versions.
To modify an unlocked policy, first retrieve the policy by calling the Get-AzRmStorageContainerImmutabilityPolicy command. Next, call the Set-AzRmStorageContainerImmutabilityPolicy command to update the policy. Include the new retention interval in days and the -ExtendPolicy parameter. Remember to replace placeholder values in angle brackets with your own values:
To modify an unlocked time-based retention policy with Azure CLI, call the az storage container immutability-policy extend command, providing the new retention interval in days. Remember to replace placeholder values in angle brackets with your own values:
When you have finished testing a time-based retention policy, you can lock the policy. A locked policy is compliant with SEC 17a-4(f) and other regulatory compliance. You can lengthen the retention interval for a locked policy up to five times, but you cannot shorten it.
After a policy is locked, you cannot delete it. However, you can delete the blob after the retention interval has expired.
A legal hold stores immutable data until the legal hold is explicitly cleared. To learn more about legal hold policies, see Legal holds for immutable blob data.
To configure a legal hold on a container with the Azure portal, follow these steps:
Navigate to the desired container.
Select the More button and choose Access policy.
Under the Immutable blob versions section, select Add policy.
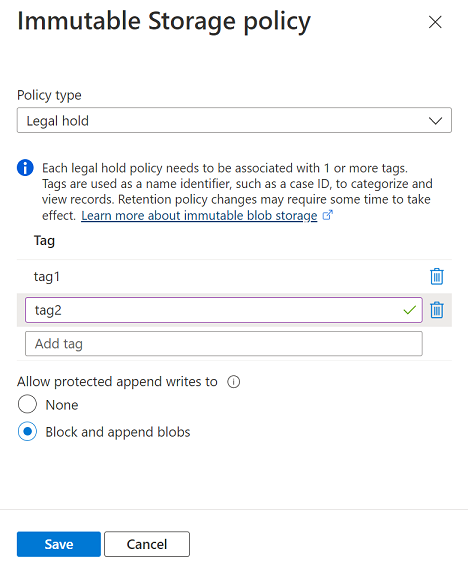
Choose Legal hold as the policy type.
Add one or more legal hold tags.
Choose whether to allow protected append writes, and then select Save.
The Append blobs option enables your workloads to add new blocks of data to the end of an append blob by using the Append Block operation.
This setting also adds the ability to write new blocks to a block blob. The Blob Storage API does not provide a way for applications to do this directly. However, applications can accomplish this by using append and flush methods that are available in the Data Lake Storage Gen2 API. Also, this property enables Microsoft applications such as Azure Data Factory to append blocks of data by using internal APIs. If your workloads depend on any of these tools, then you can use this property to avoid errors that can appear when those tools attempt to append data to blobs.
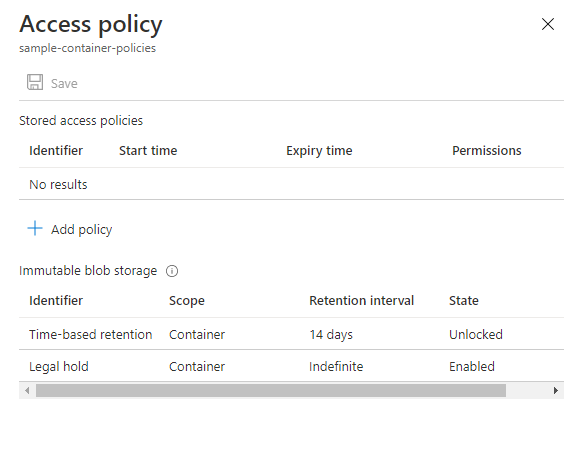
After you've configured the immutability policy, you will see that it is scoped to the container:
The following image shows a container with both a time-based retention policy and legal hold configured.
To clear a legal hold, navigate to the Access policy dialog, select the More button, and choose Delete.
To configure a legal hold on a container with PowerShell, call the Add-AzRmStorageContainerLegalHold command. Remember to replace placeholder values in angle brackets with your own values:
To configure a legal hold on a container with PowerShell, call the az storage container legal-hold set command. Remember to replace placeholder values in angle brackets with your own values:
Coming soon: Throughout 2024 we will be phasing out GitHub Issues as the feedback mechanism for content and replacing it with a new feedback system. For more information see: https://aka.ms/ContentUserFeedback.