Quickstart: Azure Blob Storage client library for Go
Get started with the Azure Blob Storage client library for Go to manage blobs and containers. Follow these steps to install the package and try out example code for basic tasks.
API reference documentation | Library source code | Package (pkg.go.dev)
Prerequisites
- Azure subscription - create one for free
- Azure storage account - create a storage account
- Go 1.18+
Setting up
This section walks you through preparing a project to work with the Azure Blob Storage client library for Go.
Download the sample application
The sample application used in this quickstart is a basic Go application.
Use git to download a copy of the application to your development environment.
git clone https://github.com/Azure-Samples/storage-blobs-go-quickstart
This command clones the repository to your local git folder. To open the Go sample for Blob Storage, look for the file named storage-quickstart.go.
Install the packages
To work with blob and container resources in a storage account, install the azblob package using the following command:
go get github.com/Azure/azure-sdk-for-go/sdk/storage/azblob
To authenticate with Microsoft Entra ID (recommended), install the azidentity module using the following command:
go get github.com/Azure/azure-sdk-for-go/sdk/azidentity
Authenticate to Azure and authorize access to blob data
Application requests to Azure Blob Storage must be authorized. Using DefaultAzureCredential and the Azure Identity client library is the recommended approach for implementing passwordless connections to Azure services in your code, including Blob Storage.
You can also authorize requests to Azure Blob Storage by using the account access key. However, this approach should be used with caution. Developers must be diligent to never expose the access key in an unsecure location. Anyone who has the access key is able to authorize requests against the storage account, and effectively has access to all the data. DefaultAzureCredential offers improved management and security benefits over the account key to allow passwordless authentication. Both options are demonstrated in the following example.
DefaultAzureCredential is a credential chain implementation provided by the Azure Identity client library for Go. DefaultAzureCredential supports multiple authentication methods and determines which method to use at runtime. This approach enables your app to use different authentication methods in different environments (local vs. production) without implementing environment-specific code.
To learn more about the order and locations in which DefaultAzureCredential looks for credentials, see Azure Identity library overview.
For example, your app can authenticate using your Azure CLI sign-in credentials with when developing locally. Once it's deployed to Azure, your app can then use a managed identity. This transition between environments doesn't require any code changes.
Assign roles to your Microsoft Entra user account
When developing locally, make sure that the user account that is accessing blob data has the correct permissions. You'll need Storage Blob Data Contributor to read and write blob data. To assign yourself this role, you'll need to be assigned the User Access Administrator role, or another role that includes the Microsoft.Authorization/roleAssignments/write action. You can assign Azure RBAC roles to a user using the Azure portal, Azure CLI, or Azure PowerShell. You can learn more about the available scopes for role assignments on the scope overview page.
In this scenario, you'll assign permissions to your user account, scoped to the storage account, to follow the Principle of Least Privilege. This practice gives users only the minimum permissions needed and creates more secure production environments.
The following example will assign the Storage Blob Data Contributor role to your user account, which provides both read and write access to blob data in your storage account.
Important
In most cases it will take a minute or two for the role assignment to propagate in Azure, but in rare cases it may take up to eight minutes. If you receive authentication errors when you first run your code, wait a few moments and try again.
In the Azure portal, locate your storage account using the main search bar or left navigation.
On the storage account overview page, select Access control (IAM) from the left-hand menu.
On the Access control (IAM) page, select the Role assignments tab.
Select + Add from the top menu and then Add role assignment from the resulting drop-down menu.
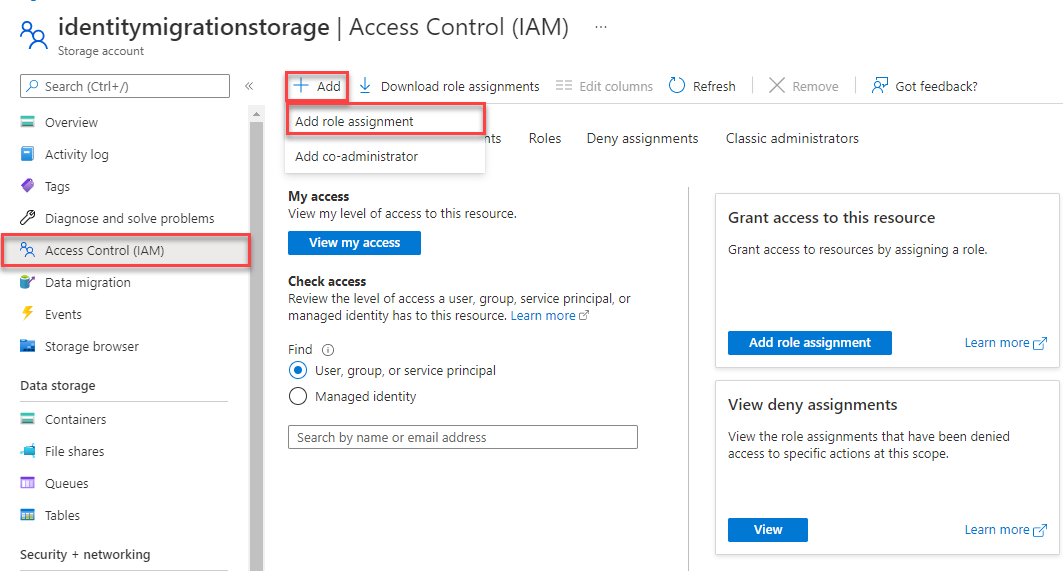
Use the search box to filter the results to the desired role. For this example, search for Storage Blob Data Contributor and select the matching result and then choose Next.
Under Assign access to, select User, group, or service principal, and then choose + Select members.
In the dialog, search for your Microsoft Entra username (usually your user@domain email address) and then choose Select at the bottom of the dialog.
Select Review + assign to go to the final page, and then Review + assign again to complete the process.

Sign-in and connect your app code to Azure using DefaultAzureCredential
You can authorize access to data in your storage account using the following steps:
Make sure you're authenticated with the same Microsoft Entra account you assigned the role to on your storage account. The following example shows how to authenticate via the Azure CLI:
az loginTo use
DefaultAzureCredentialin a Go application, install the azidentity module using the following command::go get github.com/Azure/azure-sdk-for-go/sdk/azidentity
Azure CLI authentication isn't recommended for applications running in Azure. When deployed to Azure, you can use the same code to authorize requests to Azure Storage from an application running in Azure. However, you need to enable managed identity on your app in Azure and configure your storage account to allow that managed identity to connect. For detailed instructions on configuring this connection between Azure services, see the Auth from Azure-hosted apps tutorial.
To learn more about different authentication methods, check out Azure authentication with the Azure SDK for Go.
Run the sample
The code example performs the following actions:
- Creates a client object authorized for data access via
DefaultAzureCredential - Creates a container in a storage account
- Uploads a blob to the container
- Lists the blobs in the container
- Downloads the blob data into a buffer
- Deletes the blob and container resources created by the app
Before you run the sample, open the storage-quickstart.go file. Replace <storage-account-name> with the name of your Azure storage account.
Then run the application using the following command:
go run storage-quickstart.go
The output of the app is similar to the following example:
Azure Blob storage quick start sample
Creating a container named quickstart-sample-container
Uploading a blob named sample-blob
Listing the blobs in the container:
sample-blob
Blob contents:

Hello, world! This is a blob.

Press enter key to delete resources and exit the application.

Cleaning up.
Deleting the blob sample-blob
Deleting the container quickstart-sample-container
When you press the enter key at the prompt, the sample program deletes the blob and container resources created by the app.
Tip
You can also use a tool such as the Azure Storage Explorer to view the files in Blob storage. Azure Storage Explorer is a free cross-platform tool that allows you to access your storage account information.
Understand the sample code
Next, we walk through the sample code to understand how it works.
Authorize access and create a client object
Working with any Azure resource using the SDK begins with creating a client object. To create the client object, the code sample calls azblob.NewClient with the following values:
- serviceURL - the URL of the storage account
- cred - a Microsoft Entra credential obtained via the
azidentitymodule - options - client options; pass nil to accept the default values
The following code example creates a client object to interact with container and blob resources in a storage account:
// TODO: replace <storage-account-name> with your actual storage account name
url := "https://<storage-account-name>.blob.core.windows.net/"
ctx := context.Background()

credential, err := azidentity.NewDefaultAzureCredential(nil)
handleError(err)

client, err := azblob.NewClient(url, credential, nil)
handleError(err)
Create a container
The code sample creates a new container resource in the storage account. If a container with the same name already exists, a ResourceExistsError is raised.
Important
Container names must be lowercase. To learn more about naming requirements for containers and blobs, see Naming and Referencing Containers, Blobs, and Metadata.
The following code example creates a new container called quickstart-sample-container in the storage account:
// Create the container
containerName := "quickstart-sample-container"
fmt.Printf("Creating a container named %s\n", containerName)
_, err = client.CreateContainer(ctx, containerName, nil)
handleError(err)
Upload blobs to the container
The code sample creates a byte array with some data, and uploads the data as a buffer to a new blob resource in the specified container.
The following code example uploads the blob data to the specified container using the UploadBuffer method:
data := []byte("\nHello, world! This is a blob.\n")
blobName := "sample-blob"

// Upload to data to blob storage
fmt.Printf("Uploading a blob named %s\n", blobName)
_, err = client.UploadBuffer(ctx, containerName, blobName, data, &azblob.UploadBufferOptions{})
handleError(err)
List the blobs in a container
The code sample lists the blobs in the specified container. This example uses NewListBlobsFlatPager, which returns a pager for blobs starting from the specified Marker. Here, we use an empty Marker to start enumeration from the beginning, and continue paging until there are no more results. This method returns blob names in lexicographic order.
The following code example lists the blobs in the specified container:
// List the blobs in the container
fmt.Println("Listing the blobs in the container:")

pager := client.NewListBlobsFlatPager(containerName, &azblob.ListBlobsFlatOptions{
	Include: azblob.ListBlobsInclude{Snapshots: true, Versions: true},
})

for pager.More() {
	resp, err := pager.NextPage(context.TODO())
	handleError(err)

	for _, blob := range resp.Segment.BlobItems {
		fmt.Println(*blob.Name)
	}
}
Download the blob
The code sample downloads a blob using the DownloadStream method, and creates a retry reader for reading data. If a connection fails while reading, the retry reader makes other requests to re-establish a connection and continue reading. You can specify retry reader options using the RetryReaderOptions struct.
The following code example downloads a blob and writes the contents to the console:
// Download the blob
get, err := client.DownloadStream(ctx, containerName, blobName, nil)
handleError(err)

downloadedData := bytes.Buffer{}
retryReader := get.NewRetryReader(ctx, &azblob.RetryReaderOptions{})
_, err = downloadedData.ReadFrom(retryReader)
handleError(err)

err = retryReader.Close()
handleError(err)

// Print the contents of the blob we created
fmt.Println("Blob contents:")
fmt.Println(downloadedData.String())
Clean up resources
If you no longer need the blobs uploaded in this quickstart, you can delete the individual blob using the DeleteBlob method, or the entire container and its contents using the DeleteContainer method.
// Delete the blob
fmt.Printf("Deleting the blob " + blobName + "\n")

_, err = client.DeleteBlob(ctx, containerName, blobName, nil)
handleError(err)

// Delete the container
fmt.Printf("Deleting the container " + containerName + "\n")
_, err = client.DeleteContainer(ctx, containerName, nil)
handleError(err)
Next steps
In this quickstart, you learned how to upload, download, and list blobs using Go.
To see Blob storage sample apps, continue to:
- To learn more, see the Azure Blob Storage client library for Go.
- For tutorials, samples, quickstarts, and other documentation, visit Azure for Go Developers.
Feedback
Coming soon: Throughout 2024 we will be phasing out GitHub Issues as the feedback mechanism for content and replacing it with a new feedback system. For more information see: https://aka.ms/ContentUserFeedback.
Submit and view feedback for