Understand storage account migration from the classic deployment model to Azure Resource Manager
Let's take an in-depth look at the process of migrating storage accounts from the Azure classic deployment model to the Azure Resource Manager deployment model. We look at resources at a resource and feature level to help you understand how the Azure platform migrates resources between the two deployment models. For more information, please read the service announcement article: Migrate your classic storage accounts to Azure Resource Manager by August 31, 2024
Understand the data plane and management plane
First, it's helpful to understand the basic architecture of Azure Storage. Azure Storage offers services that store data, including Blob Storage, Azure Data Lake Storage, Azure Files, Queue Storage, and Table Storage. These services and the operations they expose comprise the data plane for Azure Storage. Azure Storage also exposes operations for managing an Azure Storage account and related resources, such as redundancy SKUs, account keys, and certain policies. These operations comprise the management or control plane.
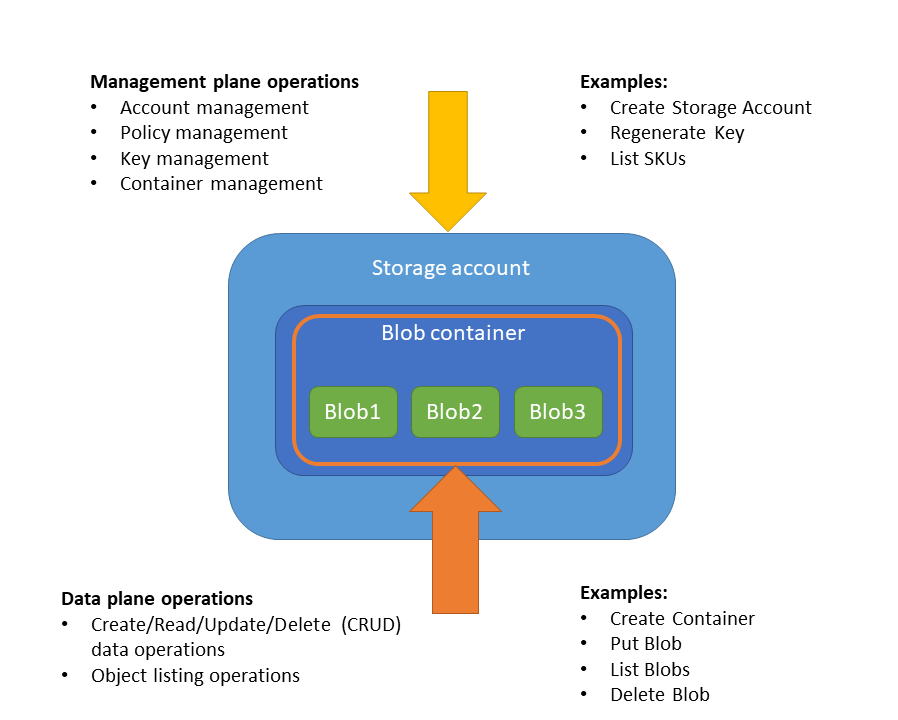
During the migration process, Microsoft translates the representation of the storage account resource from the classic deployment model to the Azure Resource Manager deployment model. As a result, you need to use new tools, APIs, and SDKs to manage your storage accounts and related resources after the migration.
The data plane is unaffected by migration from the classic deployment model to the Azure Resource Manager model. Your applications can continue to read and write data from the storage account throughout the migration process.
The migration experience
You can migrate your classic storage account with the Azure portal, PowerShell, or Azure CLI. To learn how to migrate your account, see Migrate your classic storage accounts to Azure Resource Manager.
Before you start the migration:
Ensure that the storage accounts that you want to migrate don't use any unsupported features or configurations. Usually the platform detects these issues and generates an error.
If you're migrating Azure virtual machines (VMs) that include disks in classic storage accounts, be sure to familiarize yourself with the process of VM migration. For information about unsupported features and configurations, see Overview of platform-supported migration of IaaS resources from classic to Azure Resource Manager. For a list of errors that may occur in relation to classic disk artifacts, see Common errors during Classic to Azure Resource Manager migration.
Plan your migration during non-business hours to accommodate for any unexpected failures that might happen during migration.
There are four steps to the migration process, as shown in the following diagram:
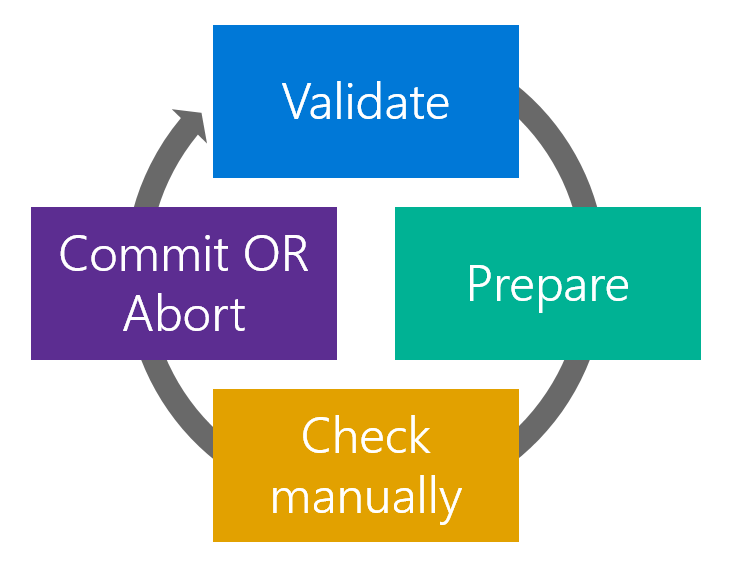
Validate. During the Validation phase, Azure checks the storage account to ensure that it can be migrated.
Prepare. In the Prepare phase, Azure creates a new general-purpose v1 storage account and alerts you to any problems that may have occurred. The new account is created in a new resource group in the same region as your classic account.
At this point, your classic storage account still exists. If there are any problems reported, you can correct them or abort the process.
Check manually. It's a good idea to make a manual check of the new storage account to make sure that the output is as you expect.
Commit or abort. If you're satisfied that the migration has been successful, then you can commit the migration. Committing the migration permanently deletes the classic storage account.
Before you commit the migration, we recommend that you update your client applications to use the Azure Storage resource provider APIs. You can then test your updated code against the migrated storage account, while the classic account still exists.
If there are any problems with the migration, then you can abort the migration at this point rather than committing it. If you choose to abort, the new resource group and new storage account are deleted. Your classic account remains available. You can address any problems and attempt the migration again.
Note
The operations described in the following sections are all idempotent. If you have a problem other than an unsupported feature or a configuration error, retry the prepare, abort, or commit operation.
Validate
The Validation step is the first step in the migration process. The goal of this step is to analyze the state of the resources that you want to migrate from the classic deployment model. The Validation step evaluates whether the resources are capable of migration (success or failure). If the classic storage account isn't capable of migration, Azure lists the reasons why.
The Validation step analyzes the state of resources in the classic deployment model. It checks for failures and unsupported scenarios due to different configurations of the storage account in the classic deployment model.
The Validation step doesn't check for VM disks that may be associated with the storage account. You must check your storage accounts manually to determine whether they contain VM disks. For more information, see the following articles:
- Migrate classic storage accounts to Azure Resource Manager
- Migrate VMs to Resource Manager with PowerShell
- Migrate VMs to Resource Manager using Azure CLI
Keep in mind that it's not possible to check for every constraint that the Azure Resource Manager stack might impose on the storage account during migration. Some constraints are only checked when the resources undergo transformation in the next step of migration (the Prepare step).
Prepare
The Prepare step is the second step in the migration process. The goal of this step is to simulate the transformation of the storage account from the classic deployment model to the Azure Resource Manager deployment model. The Prepare step also enables you to compare the storage account in the classic deployment model to the migrated storage account in Azure Resource Manager.
Important
Your classic storage account is not modified during this step. It's a safe step to run if you're trying out migration.
If the storage account isn't capable of migration, Azure stops the migration process and lists the reason why the Prepare step failed.
If the storage account is capable of migration, Azure locks management plane operations for the storage account under migration. For example, you can't regenerate the storage account keys while the Prepare phase is underway. Azure then creates a new resource group as the classic storage account. The name of the new resource group follows the pattern <classic-account-name>-Migrated.
Note
It is not possible to select the name of the resource group that is created for a migrated storage account. After migration is complete, however, you can use the move feature of Azure Resource Manager to move your migrated storage account to a different resource group. For more information, see Move resources to a new subscription or resource group.
Finally, Azure migrates the storage account and its configuration to a new storage account in Azure Resource Manager in the same region as the classic storage account. At this point, your classic storage account still exists. If there are any problems reported during the Prepare step, you can correct them or abort the process.
Check manually
After the Prepare step is complete, both accounts exist in your subscription, so that you can review and compare the classic storage account in the pre-migration state and in Azure Resource Manager. For example, you can examine the new account via the Azure portal to ensure that the storage account's configuration is as expected.
There's no set window of time before which you need to commit or abort the migration. You can take as much time as you need for the Check phase. However, management plane operations are locked for the classic storage account until you either abort or commit.
Abort
To revert your changes to the classic deployment model, you can choose to abort the migration. Aborting the migration deletes the new storage account and new resource group. Your classic storage account isn't affected if you choose to abort the migration.
Caution
You cannot abort the migration after you have committed the migration. Make sure that you have checked your migrated storage account carefully for errors before you commit.
Commit
Before you commit the migration, we recommend that you update your client applications to use the Azure Storage resource provider APIs. You can then test your updated code against the migrated storage account, while the classic account still exists. If there are any problems, you can abort the commit.
After you're satisfied that your classic storage account has been migrated successfully and your client applications are working against the new account, you can commit the migration. Committing the migration deletes your classic storage account. Your data is now available only in the newly migrated account in the Resource Manager deployment model.
Warning
Committing the migration permanently deletes your classic storage account. Test the migrated storage account and any client applications thoroughly before you commit the migration.
Committing the migration is an idempotent operation. If it fails, retry the operation. If it continues to fail, create a support ticket or ask a question on Microsoft Q&A.
After the migration
After the migration is complete, your new storage account is ready for use.
Migrated account type
After the migration is complete, your new storage account is a general-purpose v1 storage account. We recommend upgrading to a general-purpose v2 account to take advantage of the newest features that Azure Storage has to offer for security, data protection, lifecycle management, and more. To learn how to upgrade to a general-purpose v2 storage account, see Upgrade to a general-purpose v2 storage account.
Account properties
Any properties that are set on the classic storage account are migrated with their values to the new storage account.
RBAC role assignments
Any RBAC role assignments that are scoped to the classic storage account are maintained after the migration.
Account keys
The account keys aren't changed or rotated during the migration. You don't need to regenerate your account keys after the migration is complete. You won't need to update connection strings in any applications that are using the account keys after the migration.
Portal support
You can manage your migrated storage accounts in the Azure portal. You won't be able to use the classic portal to manage your migrated storage accounts.
See also
Feedback
Coming soon: Throughout 2024 we will be phasing out GitHub Issues as the feedback mechanism for content and replacing it with a new feedback system. For more information see: https://aka.ms/ContentUserFeedback.
Submit and view feedback for