Tutorial: Add a role assignment condition to restrict access to blobs using the Azure portal
In most cases, a role assignment grants the permissions you need to Azure resources. However, in some cases you might want to provide more granular access control by adding a role assignment condition.
In this tutorial, you learn how to:
- Add a condition to a role assignment
- Restrict access to blobs based on a blob index tag
Important
Azure attribute-based access control (Azure ABAC) is generally available (GA) for controlling access to Azure Blob Storage, Azure Data Lake Storage Gen2, and Azure Queues using request, resource, environment, and principal attributes in both the standard and premium storage account performance tiers. Currently, the container metadata resource attribute and the list blob include request attribute are in PREVIEW. For complete feature status information of ABAC for Azure Storage, see Status of condition features in Azure Storage.
See the Supplemental Terms of Use for Microsoft Azure Previews for legal terms that apply to Azure features that are in beta, preview, or otherwise not yet released into general availability.
Prerequisites
For information about the prerequisites to add or edit role assignment conditions, see Conditions prerequisites.
Condition
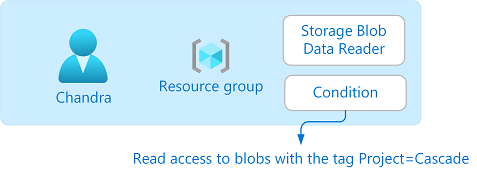
In this tutorial, you restrict access to blobs with a specific tag. For example, you add a condition to a role assignment so that Chandra can only read files with the tag Project=Cascade.
If Chandra tries to read a blob without the tag Project=Cascade, access isn't allowed.

Here's what the condition looks like in code:
(
    (
        !(ActionMatches{'Microsoft.Storage/storageAccounts/blobServices/containers/blobs/read'}
        AND NOT
        SubOperationMatches{'Blob.List'})
    )
    OR
    (
        @Resource[Microsoft.Storage/storageAccounts/blobServices/containers/blobs/tags:Project<$key_case_sensitive$>] StringEqualsIgnoreCase 'Cascade'
    )
)
Step 1: Create a user
Sign in to the Azure portal as an Owner of a subscription.
Select Microsoft Entra ID.
Create a user or find an existing user. This tutorial uses Chandra as the example.
Step 2: Set up storage
Create a storage account that is compatible with the blob index tags feature. For more information, see Manage and find Azure Blob data with blob index tags.
Create a new container within the storage account and set the anonymous access level to Private (no anonymous access).
In the container, select Upload to open the Upload blob pane.
Find a text file to upload.
Select Advanced to expand the pane.
In the Blob index tags section, add the following blob index tag to the text file.
If you don't see the Blob index tags section and you just registered your subscription, you might need to wait a few minutes for changes to propagate. For more information, see Use blob index tags to manage and find data on Azure Blob Storage.
Note
Blobs also support the ability to store arbitrary user-defined key-value metadata. Although metadata is similar to blob index tags, you must use blob index tags with conditions.
Key Value Project Cascade

Select the Upload button to upload the file.
Upload a second text file.
Add the following blob index tag to the second text file.
Key Value Project Baker
Step 3: Assign a storage blob data role
Open the resource group.
Select Access control (IAM).
Select the Role assignments tab to view the role assignments at this scope.
Select Add > Add role assignment. The Add role assignment page opens:

- On the Roles tab, select the Storage Blob Data Reader role.

- On the Members tab, select the user you created earlier.

(Optional) In the Description box, enter Read access to blobs with the tag Project=Cascade.
Select Next.
Step 4: Add a condition
- On the Conditions (optional) tab, select Add condition. The Add role assignment condition page appears:

In the Add action section, select Add action.
The Select an action pane appears. This pane is a filtered list of data actions based on the role assignment that will be the target of your condition. Check the box next to Read a blob, then select Select:

In the Build expression section, select Add expression.
The Expression section expands.
Specify the following expression settings:
Setting Value Attribute source Resource Attribute Blob index tags [Values in key] Key Project Operator StringEqualsIgnoreCase Value Cascade

Scroll up to Editor type and select Code.
The condition is displayed as code. You can make changes to the condition in this code editor. To go back to the visual editor, select Visual.

Select Save to add the condition and return to the Add role assignment page.
Select Next.
On the Review + assign tab, select Review + assign to assign the role with a condition.
After a few moments, the security principal is assigned the role at the selected scope.

Step 5: Assign Reader role
Repeat the previous steps to assign the Reader role to the user you created earlier at resource group scope.
Note
You typically don't need to assign the Reader role. However, this is done so that you can test the condition using the Azure portal.
Step 6: Test the condition
In a new window, sign in to the Azure portal.
Sign in as the user you created earlier.
Open the storage account and container you created.
Ensure that the authentication method is set to Microsoft Entra user Account and not Access key.

Select the Baker text file.
You should NOT be able to view or download the blob and an authorization failed message should be displayed.
Select Cascade text file.
You should be able to view and download the blob.
Step 7: Clean up resources
Remove the role assignment you added.
Delete the test storage account you created.
Delete the user you created.
Next steps
Feedback
Coming soon: Throughout 2024 we will be phasing out GitHub Issues as the feedback mechanism for content and replacing it with a new feedback system. For more information see: https://aka.ms/ContentUserFeedback.
Submit and view feedback for