How to use Queue Storage from Ruby
Tip
Try the Microsoft Azure Storage Explorer
Microsoft Azure Storage Explorer is a free, standalone app from Microsoft that enables you to work visually with Azure Storage data on Windows, macOS, and Linux.
Overview
This guide shows you how to perform common scenarios using the Microsoft Azure Queue Storage service. The samples are written using the Ruby Azure API. The scenarios covered include inserting, peeking, getting, and deleting queue messages, as well as creating and deleting queues.
What is Queue storage?
Azure Queue storage is a service for storing large numbers of messages that can be accessed from anywhere in the world via authenticated calls using HTTP or HTTPS. A single queue message can be up to 64 KB in size, and a queue can contain millions of messages, up to the total capacity limit of a storage account. Queue storage is often used to create a backlog of work to process asynchronously.
Queue service concepts
The Azure Queue service contains the following components:
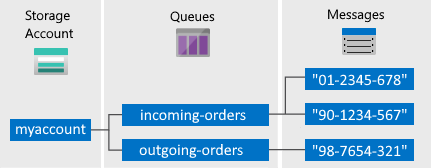
Storage Account: All access to Azure Storage is done through a storage account. For more information about storage accounts, see Storage account overview.
Queue: A queue contains a set of messages. All messages must be in a queue. Note that the queue name must be all lowercase. For information on naming queues, see Naming Queues and Metadata.
Message: A message, in any format, of up to 64 KB. The maximum time that a message can remain in the queue is 7 days. For version 2017-07-29 or later, the maximum time-to-live can be any positive number, or -1 indicating that the message doesn't expire. If this parameter is omitted, the default time-to-live is seven days.
URL format: Queues are addressable using the following URL format: http://
<storage account>.queue.core.windows.net/<queue>The following URL addresses a queue in the diagram:
http://myaccount.queue.core.windows.net/incoming-orders
Create an Azure storage account
The easiest way to create your first Azure storage account is by using the Azure portal. To learn more, see Create a storage account.
You can also create an Azure storage account by using Azure PowerShell, Azure CLI, or the Azure Storage Resource Provider for .NET.
If you prefer not to create a storage account in Azure at this time, you can also use the Azurite storage emulator to run and test your code in a local environment. For more information, see Use the Azurite emulator for local Azure Storage development.
Create a Ruby application
Create a Ruby application. For instructions, see Create a Ruby application in App Service on Linux.
Configure your application to access storage
To use Azure Storage, you need to download and use the Ruby Azure package, which includes a set of convenience libraries that communicate with the storage REST services.
Use RubyGems to obtain the package
- Use a command-line interface such as PowerShell (Windows), Terminal (Mac), or Bash (Unix).
- Type
gem install azurein the command window to install the gem and dependencies.
Import the package
Use your favorite text editor, add the following to the top of the Ruby file where you intend to use storage:
require "azure"
Setup an Azure Storage connection
The Azure module will read the environment variables AZURE_STORAGE_ACCOUNT and AZURE_STORAGE_ACCESS_KEY for information required to connect to your Azure Storage account. If these environment variables are not set, you must specify the account information before using Azure::QueueService with the following code:
Azure.config.storage_account_name = "<your azure storage account>"
Azure.config.storage_access_key = "<your Azure storage access key>"
To obtain these values from a classic or Resource Manager storage account in the Azure portal:
- Log in to the Azure portal.
- Navigate to the storage account you want to use.
- In the Settings blade on the right, click Access Keys.
- In the Access Keys blade that appears, you'll see the access key 1 and access key 2. You can use either of these.
- Click the copy icon to copy the key to the clipboard.
How to: Create a queue
The following code creates a Azure::QueueService object, which enables you to work with queues.
azure_queue_service = Azure::QueueService.new
Use the create_queue() method to create a queue with the specified name.
begin
  azure_queue_service.create_queue("test-queue")
rescue
  puts $!
end
How to: Insert a message into a queue
To insert a message into a queue, use the create_message() method to create a new message and add it to the queue.
azure_queue_service.create_message("test-queue", "test message")
How to: Peek at the next message
You can peek at the message in the front of a queue without removing it from the queue by calling the peek_messages() method. By default, peek_messages() peeks at a single message. You can also specify how many messages you want to peek.
result = azure_queue_service.peek_messages("test-queue",
  {:number_of_messages => 10})
How to: Dequeue the next message
You can remove a message from a queue in two steps.
- When you call
list_messages(), you get the next message in a queue by default. You can also specify how many messages you want to get. The messages returned fromlist_messages()becomes invisible to any other code reading messages from this queue. You pass in the visibility timeout in seconds as a parameter. - To finish removing the message from the queue, you must also call
delete_message().
This two-step process of removing a message assures that when your code fails to process a message due to hardware or software failure, another instance of your code can get the same message and try again. Your code calls delete_message() right after the message has been processed.
messages = azure_queue_service.list_messages("test-queue", 30)
azure_queue_service.delete_message("test-queue",
  messages[0].id, messages[0].pop_receipt)
How to: Change the contents of a queued message
You can change the contents of a message in-place in the queue. The following code uses the update_message() method to update a message. The method will return a tuple which contains the pop receipt of the queue message and a UTC DateTime value that represents when the message will be visible on the queue.
message = azure_queue_service.list_messages("test-queue", 30)
pop_receipt, time_next_visible = azure_queue_service.update_message(
  "test-queue", message.id, message.pop_receipt, "updated test message",
  30)
How to: Additional options for dequeuing messages
There are two ways you can customize message retrieval from a queue.
- You can get a batch of message.
- You can set a longer or shorter invisibility timeout, allowing your code more or less time to fully process each message.
The following code example uses the list_messages() method to get 15 messages in one call. Then it prints and deletes each message. It also sets the invisibility timeout to five minutes for each message.
azure_queue_service.list_messages("test-queue", 300
  {:number_of_messages => 15}).each do |m|
  puts m.message_text
  azure_queue_service.delete_message("test-queue", m.id, m.pop_receipt)
end
How to: Get the queue length
You can get an estimation of the number of messages in the queue. The get_queue_metadata() method returns the approximate message count and other queue metadata.
message_count, metadata = azure_queue_service.get_queue_metadata(
  "test-queue")
How to: Delete a queue
To delete a queue and all the messages contained in it, call the delete_queue() method on the queue object.
azure_queue_service.delete_queue("test-queue")
Next steps
Now that you've learned the basics of Queue Storage, follow these links to learn about more complex storage tasks.
- Visit the Azure Storage team blog
- Visit the Azure SDK for Ruby repository on GitHub
For a comparison between Azure Queue Storage discussed in this article and Azure Service Bus queues discussed in How to use Service Bus queues, see Azure Queue Storage and Service Bus queues - compared and contrasted