Backup to Azure with Commvault
This article helps you integrate a Commvault infrastructure with Azure Blob storage. It includes prerequisites, considerations, implementation, and operational guidance. This article addresses using Azure as an offsite backup target and a recovery site if a disaster occurs, which prevents normal operation within your primary site.
Note
Commvault offers a lower recovery time objective (RTO) solution, Commvault Live Sync. This solution lets you have a standby VM that can help you recover more quickly in the event of a disaster in an Azure production environment. These capabilities are outside the scope of this document.
Reference architecture
The following diagram provides a reference architecture for on-premises to Azure and in-Azure deployments.
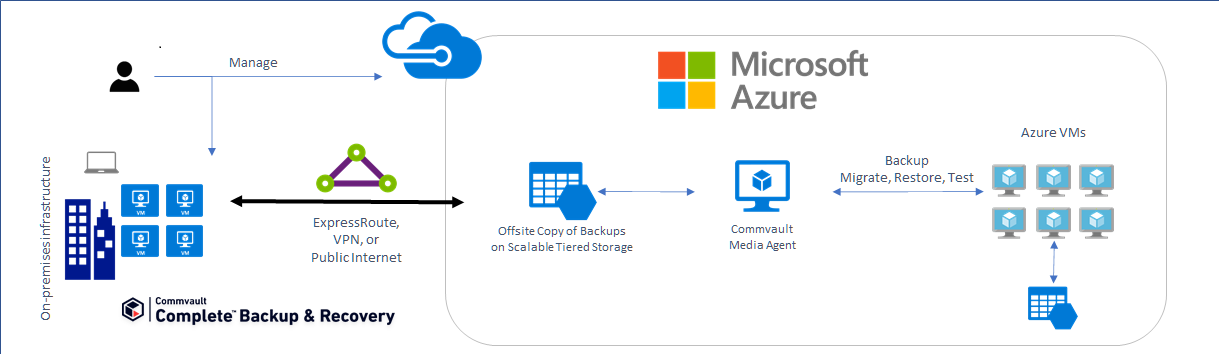
Your existing Commvault deployment can easily integrate with Azure by adding an Azure storage account, or multiple accounts, as a cloud storage target. Commvault also allows you to recover backups from on-premises within Azure giving you a recovery-on-demand site in Azure.
Commvault interoperability matrix
| Workload | GPv2 and Blob storage | Cool tier support | Archive tier support | Data Box Family support |
|---|---|---|---|---|
| On-premises VMs/data | v11.5 | v11.5 | v11.10 | v11.10 |
| Azure VMs | v11.5 | v11.5 | v11.5 | N/A |
| Azure Blob | v11.6 | v11.6 | v11.6 | N/A |
| Azure Files | v11.6 | v11.6 | v11.6 | N/A |
Before you begin
A little upfront planning will help you use Azure as an offsite backup target and recovery site.
Get started with Azure
Microsoft offers a framework to follow to get you started with Azure. The Cloud Adoption Framework (CAF) is a detailed approach to enterprise digital transformation and comprehensive guide to planning a production grade cloud adoption. The CAF includes a step-by-step Azure setup guide to help you get up and running quickly and securely. You can find an interactive version in the Azure portal. You'll find sample architectures, specific best practices for deploying applications, and free training resources to put you on the path to Azure expertise.
Consider the network between your location and Azure
Whether using cloud resources to run production, test and development, or as a backup target and recovery site, it's important to understand your bandwidth needs for initial backup seeding and for ongoing day-to-day transfers.
Azure Data Box provides a way to transfer your initial backup baseline to Azure without requiring more bandwidth. This is useful if the baseline transfer is estimated to take longer than you can tolerate. You can use the Data Transfer estimator when you create a storage account to estimate the time required to transfer your initial backup.

Remember, you'll require enough network capacity to support daily data transfers within the required transfer window (backup window) without impacting production applications. This section outlines the tools and techniques that are available to assess your network needs.
Determine how much bandwidth you'll need
To determine how much bandwidth you'll need, use the following resources:
- Reports from your backup software.
- Commvault provides standard reports to determine change rate and total backup set size for the initial baseline transfer to Azure.
- Backup software-independent assessment and reporting tools like:
Determine unutilized internet bandwidth
It's important to know how much typically unutilized bandwidth (or headroom) you have available on a day-to-day basis. This helps you assess whether you can meet your goals for:
- initial time to upload when you're not using Azure Data Box for offline seeding
- completing daily backups based on the change rate identified earlier and your backup window
Use the following methods to identify the bandwidth headroom that your backups to Azure are free to consume.
- If you're an existing Azure ExpressRoute customer, view your circuit usage in the Azure portal.
- Contact your ISP. They should be able to share reports that show your existing daily and monthly utilization.
- There are several tools that can measure utilization by monitoring your network traffic at the router/switch level. These include:
Choose the right storage options
When you use Azure as a backup target, you'll make use of Azure Blob storage. Blob storage is Microsoft's object storage solution. Blob storage is optimized for storing massive amounts of unstructured data, which is data that does not adhere to any data model or definition. Additionally, Azure Storage is durable, highly available, secure, and scalable. You can select the right storage for your workload to provide the level of resiliency to meet your internal SLAs. Blob storage is a pay-per-use service. You're charged monthly for the amount of data stored, accessing that data, and in the case of cool and archive tiers, a minimum required retention period. The resiliency and tiering options applicable to backup data are summarized in the following tables.
Blob storage resiliency options:
| Locally-redundant | Zone-redundant | Geo-redundant | Geo-zone-redundant | |
|---|---|---|---|---|
| Effective # of copies | 3 | 3 | 6 | 6 |
| # of availability zones | 1 | 3 | 2 | 4 |
| # of regions | 1 | 1 | 2 | 2 |
| Manual failover to secondary region | N/A | N/A | Yes | Yes |
Blob storage tiers:
| Hot tier | Cool tier | Archive tier | |
|---|---|---|---|
| Availability | 99.9% | 99% | Offline |
| Usage charges | Higher storage costs, Lower access, and transaction costs | Lower storage costs, higher access, and transaction costs | Lowest storage costs, highest access, and transaction costs |
| Minimum data retention required | N/A | 30 days | 180 days |
| Latency (time to first byte) | Milliseconds | Milliseconds | Hours |
Sample backup to Azure cost model
With pay-per-use can be daunting to customers who are new to the cloud. While you pay for only the capacity used, you do also pay for transactions (read and or writes) and egress for data read back to your on-premises environment when Azure Express Route direct local or Express Route unlimited data plan are in use where data egress from Azure is included. You can use the Azure Pricing Calculator to perform "what if" analysis. You can base the analysis on list pricing or on Azure Storage Reserved Capacity pricing, which can deliver up to 38% savings. Here's an example pricing exercise to model the monthly cost of backing up to Azure. This is only an example. Your pricing may vary due to activities not captured here.
| Cost factor | Monthly cost |
|---|---|
| 100 TB of backup data on cool storage | $1556.48 |
| 2 TB of new data written per day x 30 Days | $39 in transactions |
| Monthly estimated total | $1595.48 |
| --------- | --------- |
| One time restore of 5 TB to on-premises over public internet | $491.26 |
Note
This estimate was generated in the Azure Pricing Calculator using East US Pay-as-you-go pricing and is based on the Commvault default of 32 MB sub-chunk size which generates 65,536 PUT Requests (write transactions), per day. This example may not be applicable towards your requirements.
Implementation guidance
This section provides a brief guide for how to add Azure Storage to an on-premises Commvault deployment.
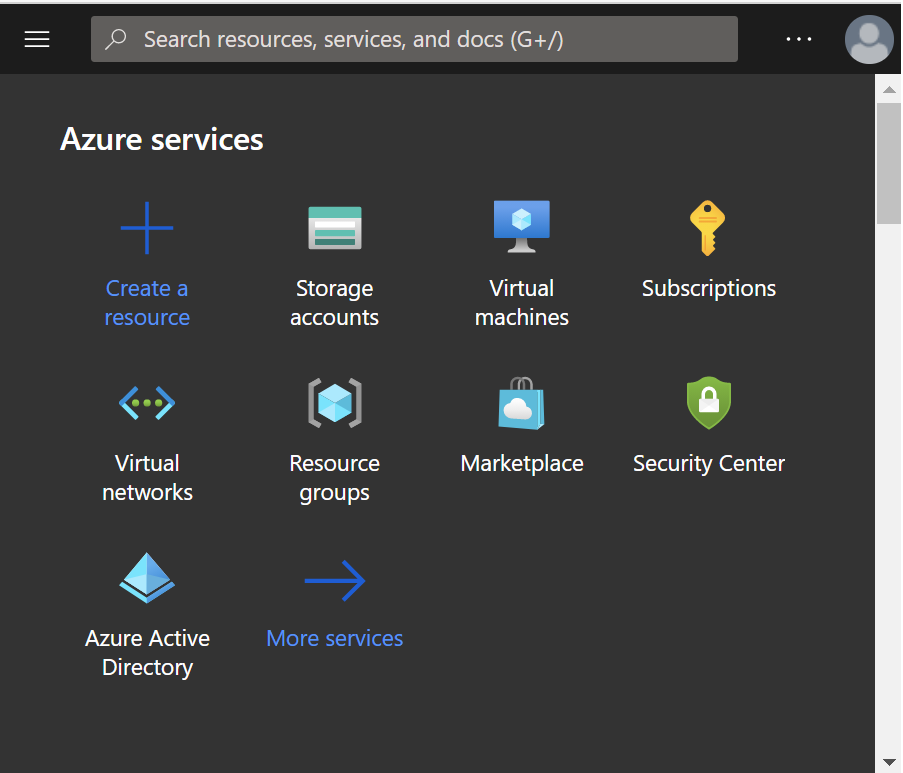
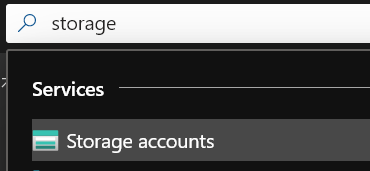
Open the Azure portal, and search for storage accounts. You can also click on the default Storage accounts icon.
Select Create to add an account. Select or create a resource group, provide a unique name, choose the region, select Standard performance, always leave account kind as Storage V2, choose the replication level which meets your SLAs, and the default tier your backup software will apply. An Azure Storage account makes hot, cool, and archive tiers available within a single account and Commvault policies allow you to use multiple tiers to effectively manage the lifecycle of your data.

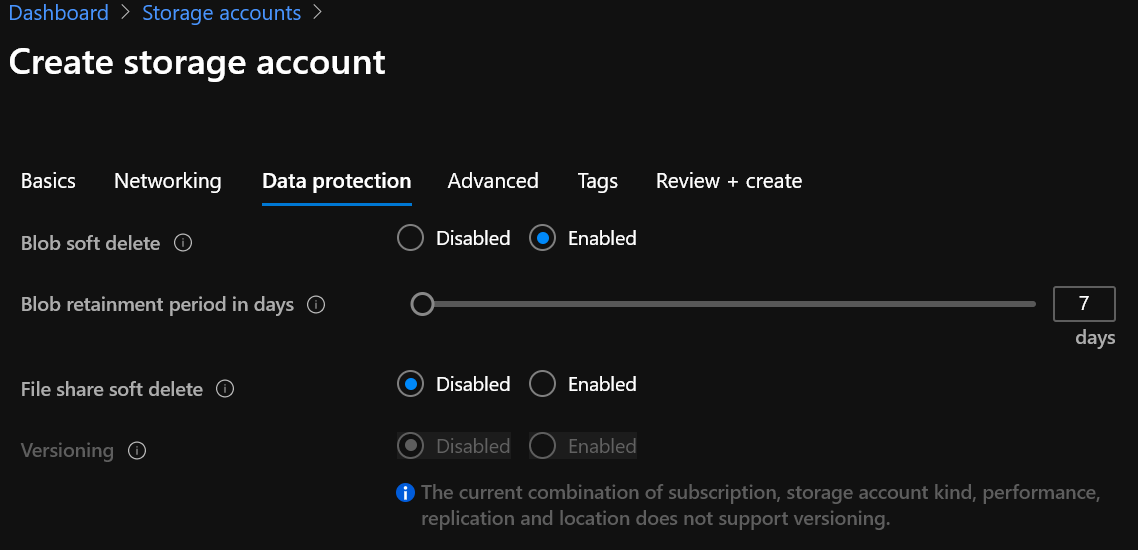
Keep the default networking options for now and move on to Data protection. Here, you can choose to enable soft delete, which allows you to recover an accidentally deleted backup file within the defined retention period and offers protection against accidental or malicious deletion.
Next, we recommend the default settings from the Advanced screen for backup to Azure use cases.
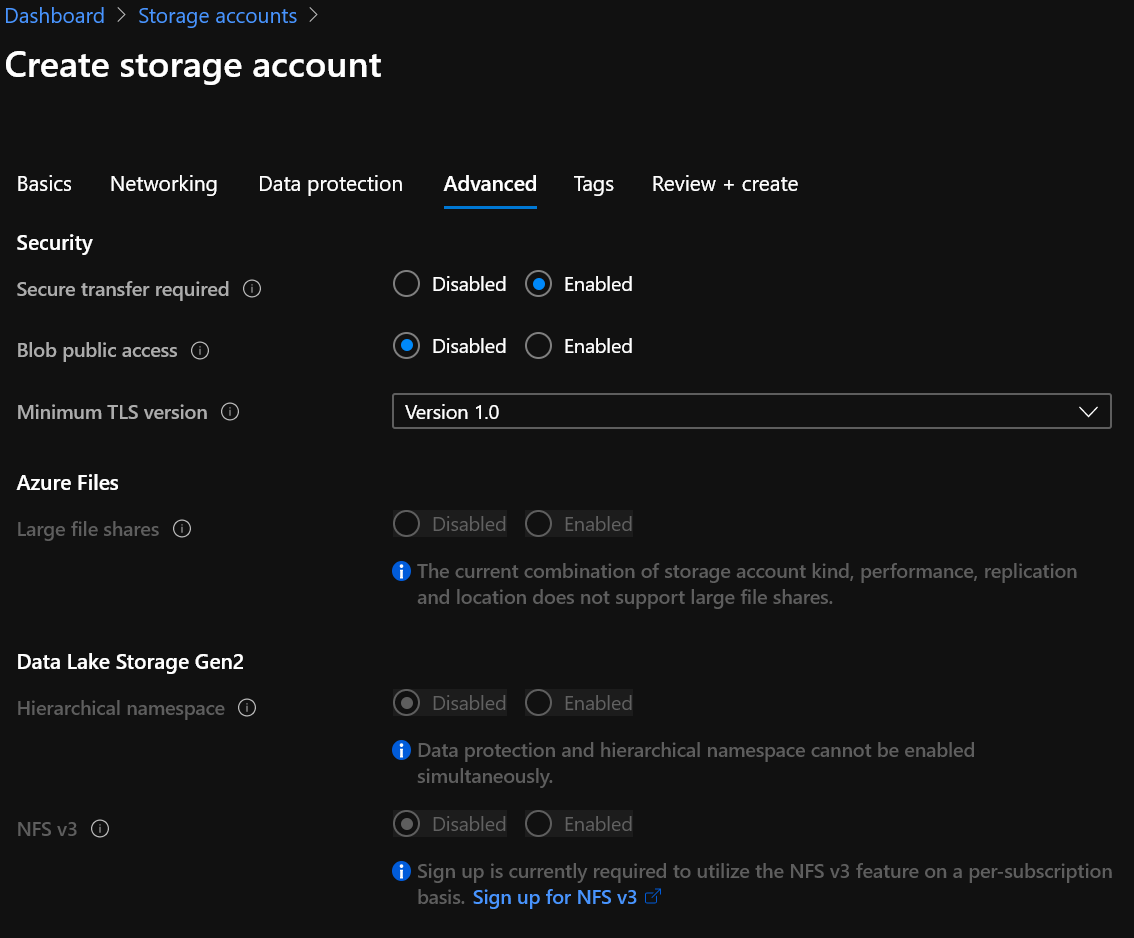
Add tags for organization if you use tagging, and create your account.
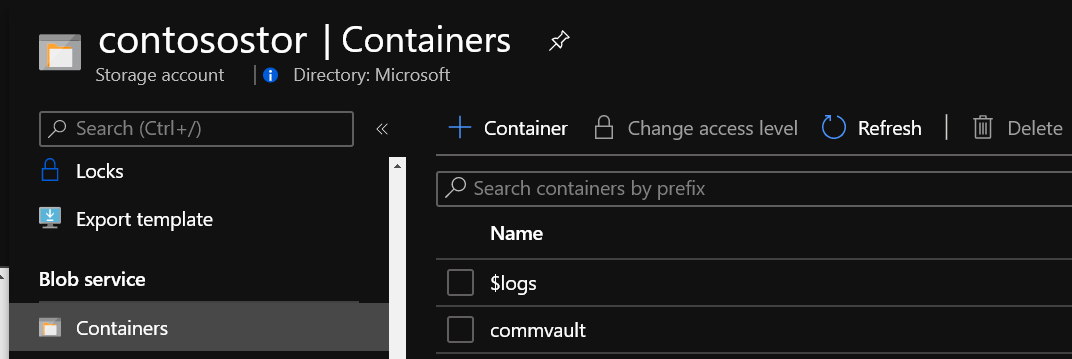
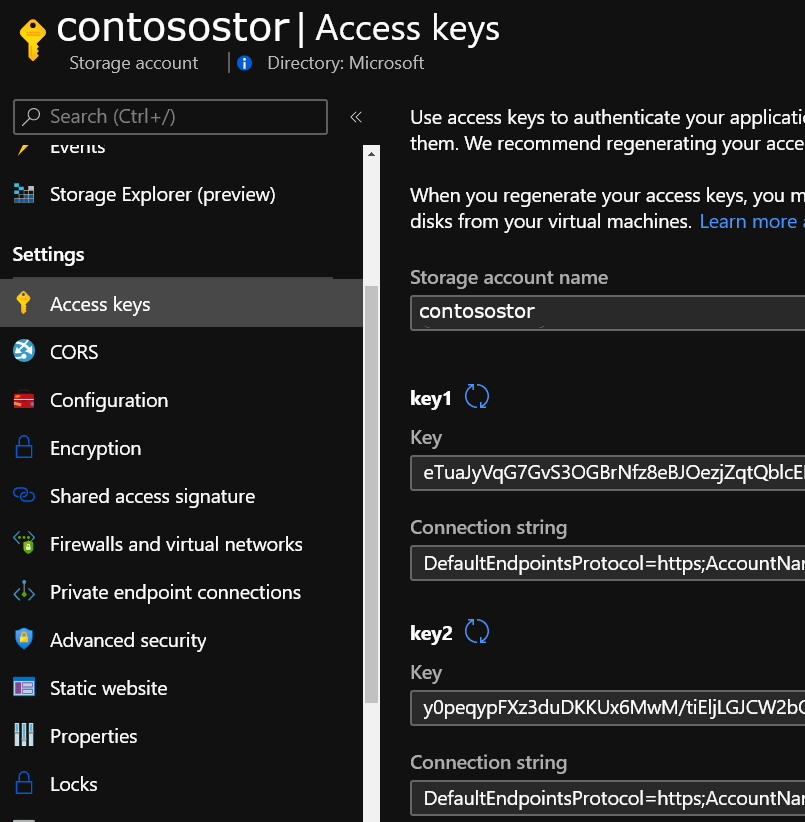
Two quick steps are all that are now required before you can add the account to your Commvault environment. Navigate to the account you created in the Azure portal and select Containers under the Blob service menu. Add a container and choose a meaningful name. Then, navigate to the Access keys item under Settings and copy the Storage account name and one of the two access keys. You'll need the container name, account name, and access key in the next steps.
(Optional) You can add additional layers of security to your deployment.
Configure role-based access to limit who can make changes to your storage account. For more information, see Built-in roles for management operations.
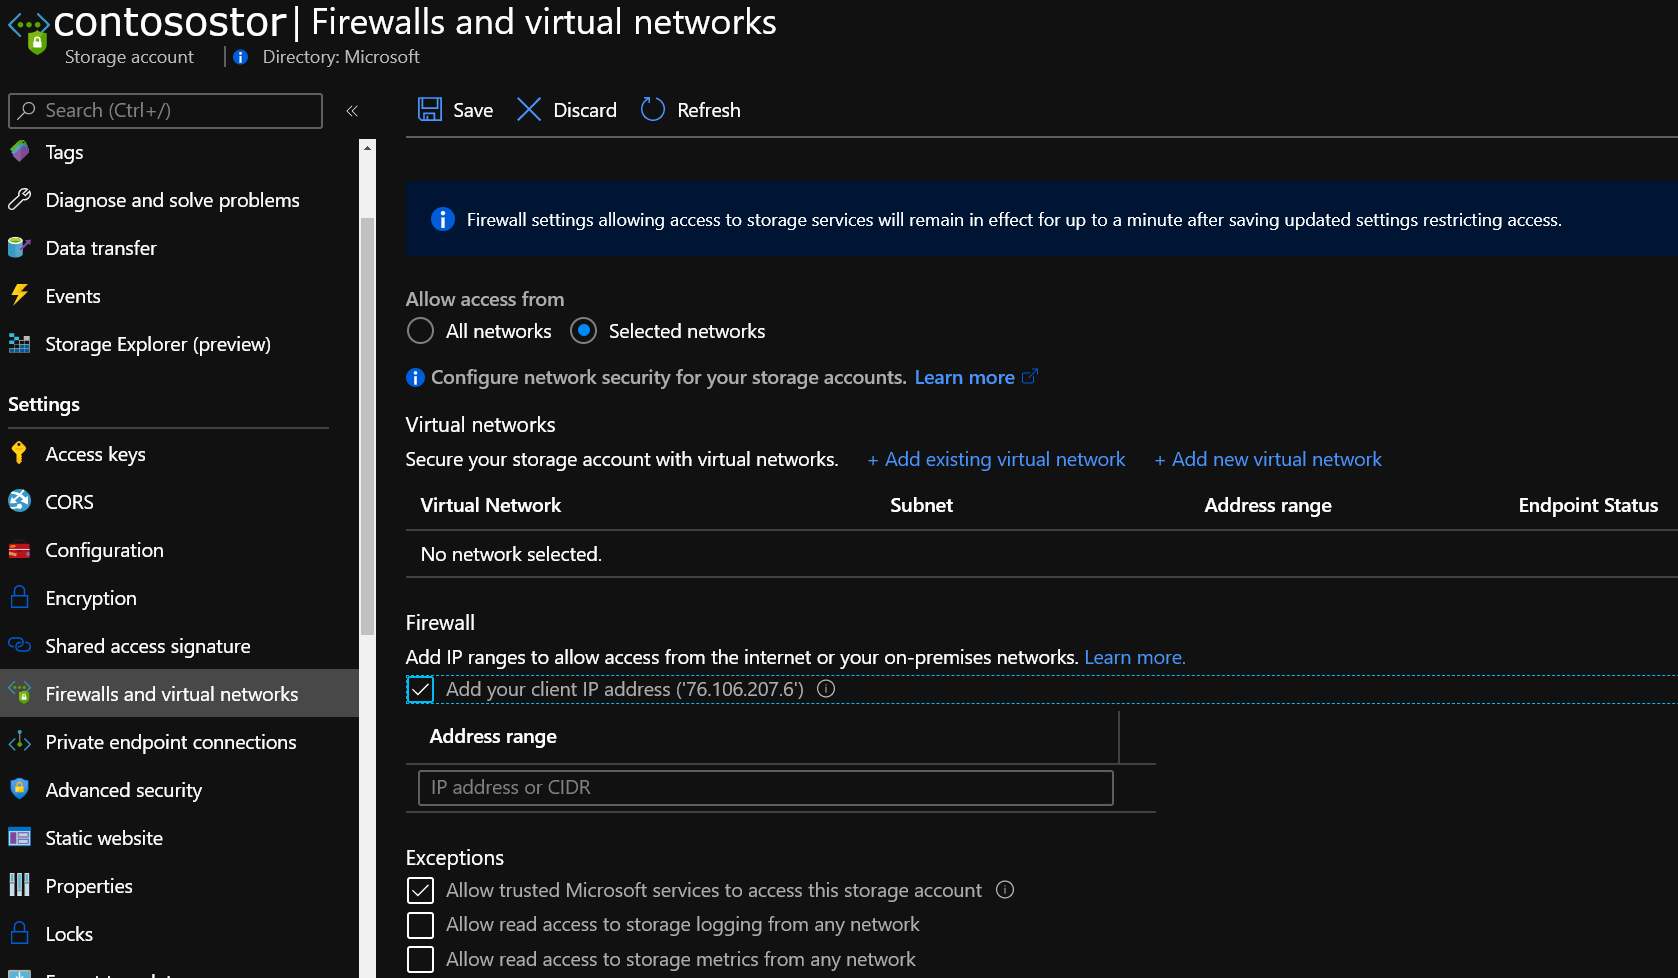
Restrict access to the account to specific network segments with storage firewall settings to prevent access attempts from outside your corporate network.
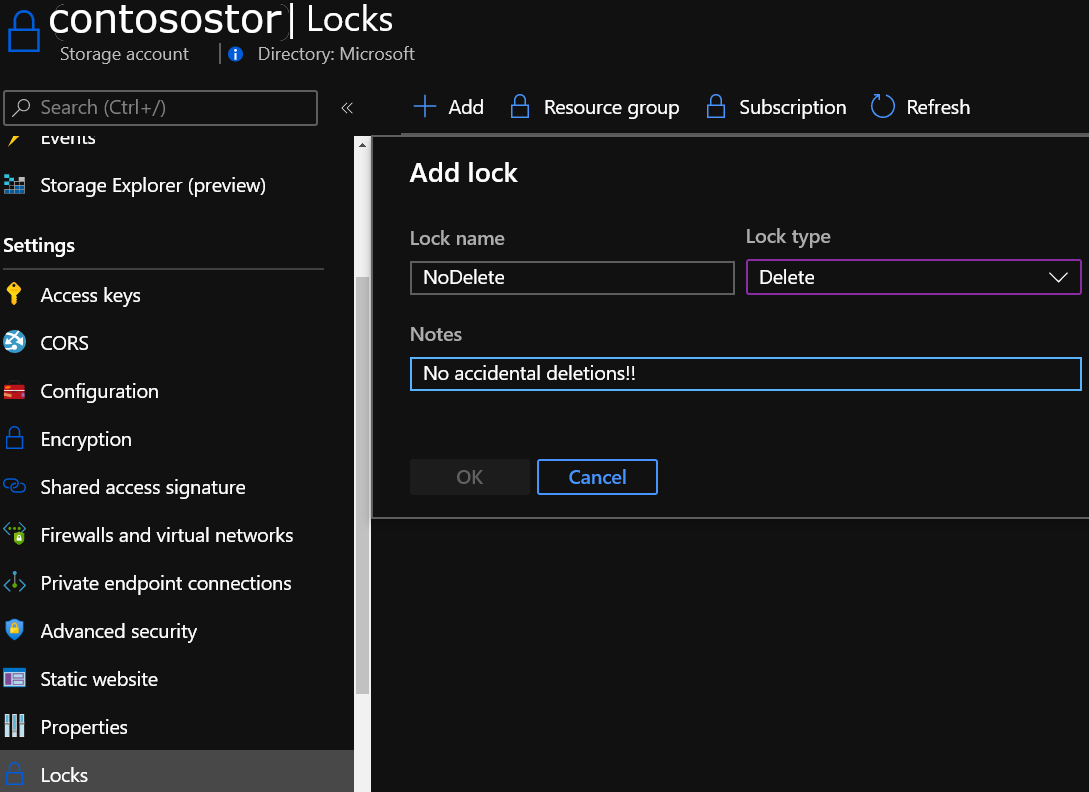
Set a delete lock on the account to prevent accidental deletion of the storage account.
Configure additional security best practices.
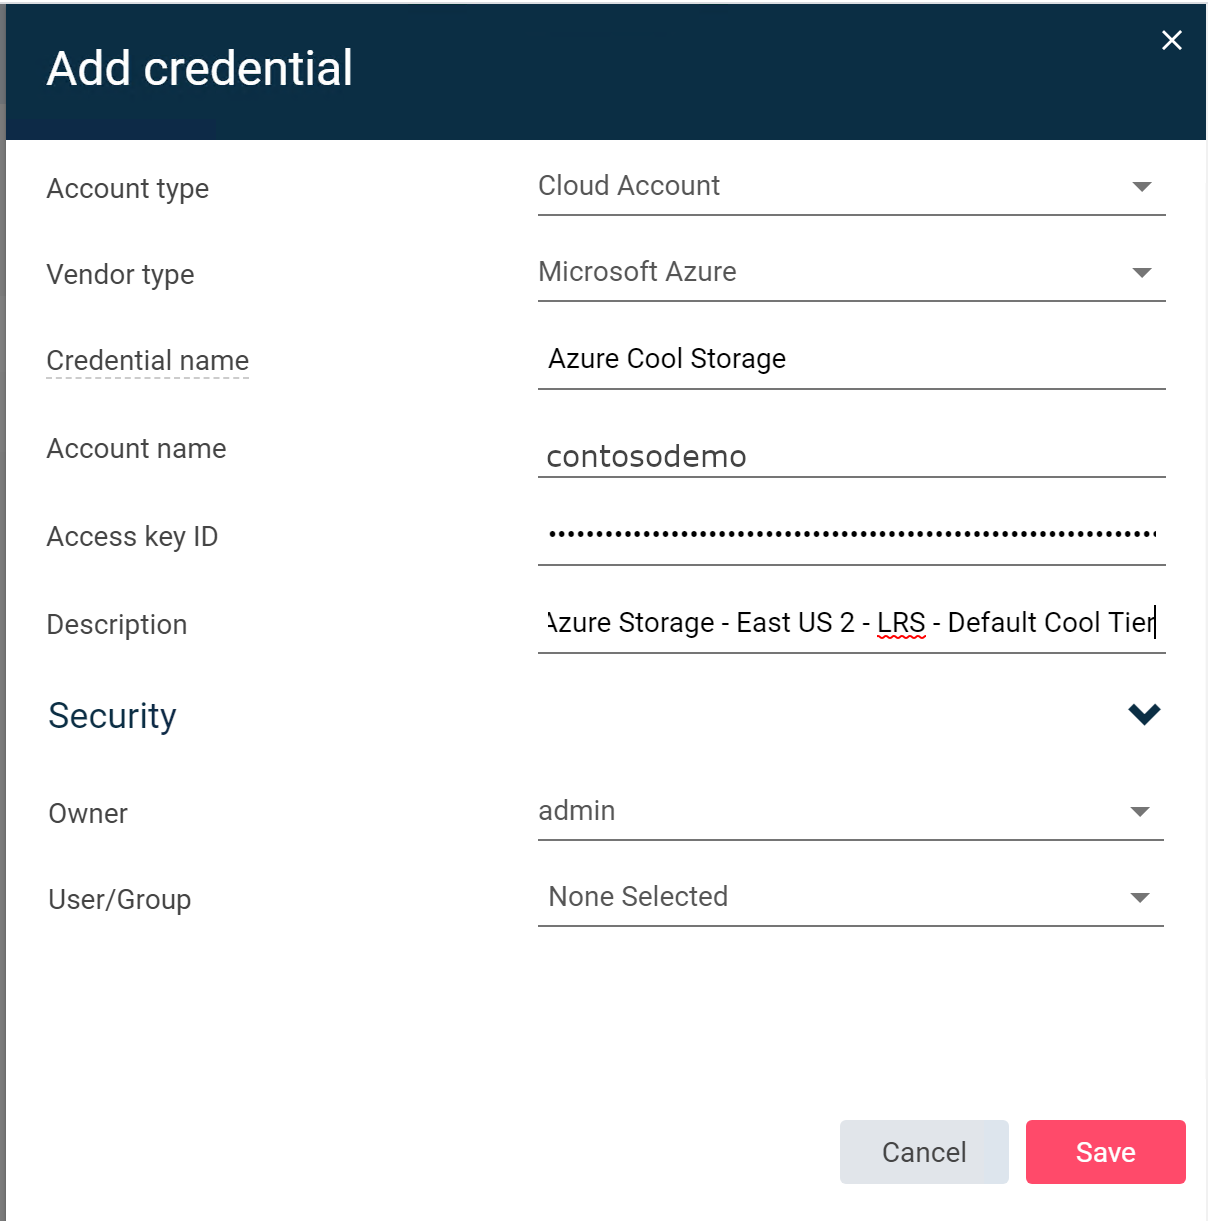
In the Commvault Command Center, navigate to Manage -> Security -> Credential Manager. Choose a Cloud Account, Vendor type of Microsoft Azure Storage, select the MediaAgent, which will transfer data to and from Azure, add the storage account name and access key.
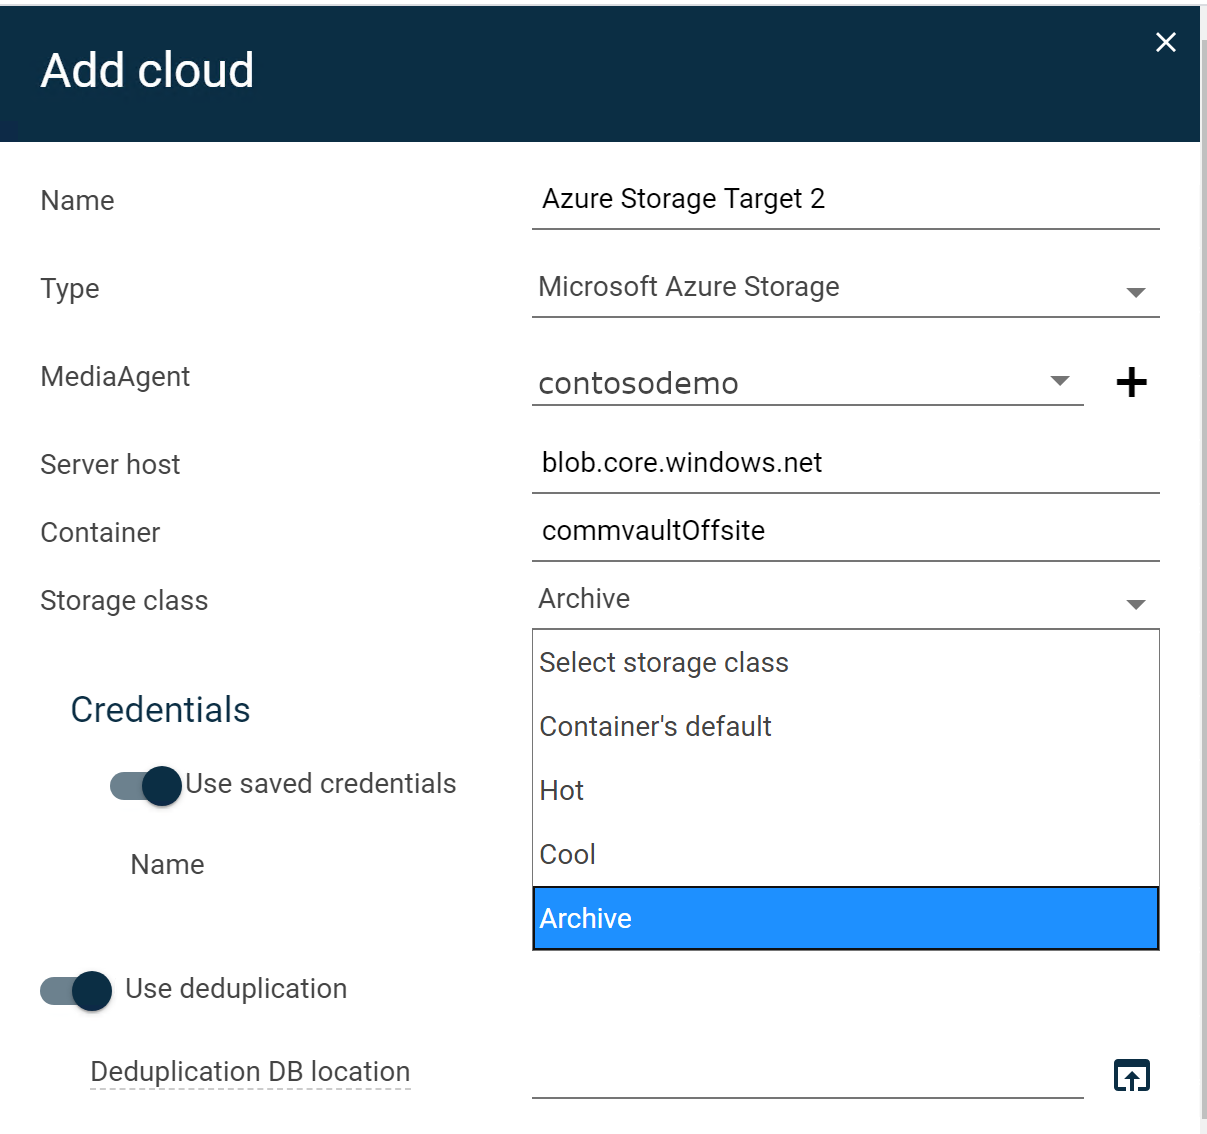
Next, navigate to Storage -> Cloud in Commvault Command Center. Choose to Add. Enter a friendly name for the storage account and then select Microsoft Azure Storage from the Type list. Select a Media Agent server to be used to transfer backups to Azure Storage. Add the container you created, choose the storage tier to use within the Azure storage account, and select the credentials created in Step #8. Finally, choose whether or not to transfer deduplicated backups or not and a location for the deduplication database.
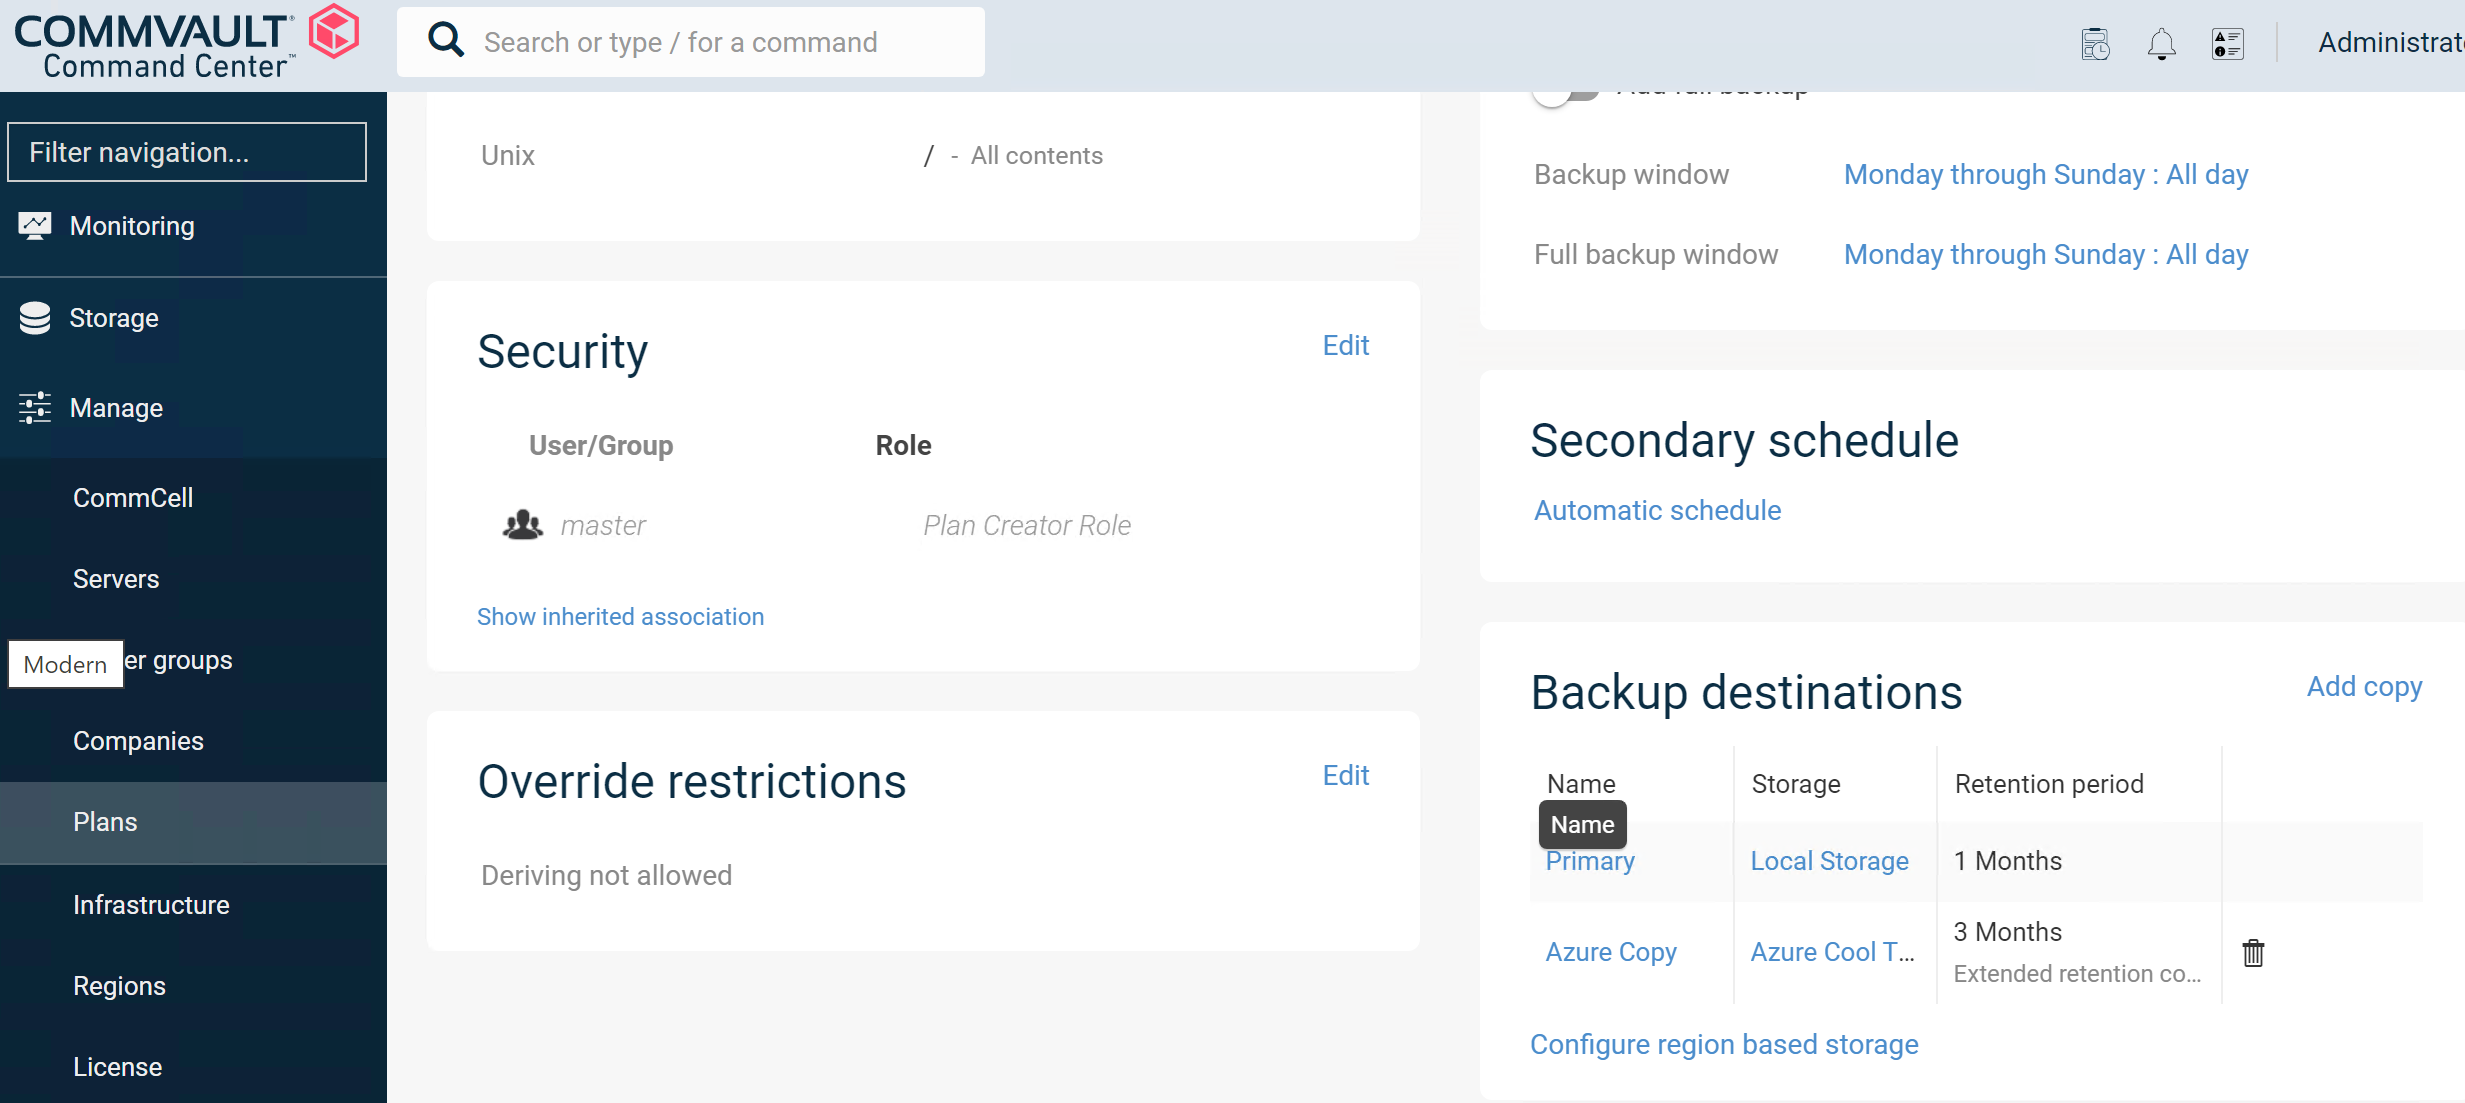
Finally, add your new Azure Storage resource to an existing or new plan in Commvault Command Center via Manage -> Plans as a backup destination.
(Optional) If you plan to use Azure as a recovery site or Commvault to migrate servers and applications to Azure, it's a best practice to deploy a VSA Proxy in Azure.
Operational guidance
Azure alerts and performance monitoring
It is advisable to monitor both your Azure resources and Commvault's ability to leverage them as you would with any storage target you rely on to store your backups. A combination of Azure Monitor and Commvault Command Center monitoring will help you keep your environment healthy.
Azure portal
Azure provides a robust monitoring solution in the form of Azure Monitor. You can configure Azure Monitor to track Azure Storage capacity, transactions, availability, authentication, and more. You can find the full reference of metrics that are collected here. A few useful metrics to track are BlobCapacity - to make sure you remain below the maximum storage account capacity limit, Ingress and Egress - to track the amount of data being written to and read from your Azure Storage account, and SuccessE2ELatency - to track the roundtrip time for requests to and from Azure Storage and your MediaAgent.
You can also create log alerts to track Azure Storage service health and view the Azure status dashboard at any time.
Commvault Command Center
- Create an alert for cloud storage pools
- For information about where you can view performance reports, job completion and begin basic troubleshooting, see Dashboards.
How to open support cases
When you need help with your backup to Azure solution, you should open a case with both Commvault and Azure. This helps our support organizations to collaborate, if necessary.
To open a case with Commvault
On the Commvault Support Site, sign in, and open a case.
To understand the support contract options available to you, see Commvault support options
You may also call in to open a case, or reach Commvault Support via email:
- Toll free: +1 877-780-3077
- Worldwide Support numbers
- Email Commvault Support
To open a case with Azure
In the Azure portal search for support in the search bar at the top. Select Help + support -> New Support Request.
Note
When you open a case, be specific that you need assistance with Azure Storage or Azure Networking. Do not specify Azure Backup. Azure Backup is the name of an Azure service and your case will be routed incorrectly.
Links to relevant Commvault documentation
See the following Commvault documentation for further detail:
Marketplace offerings
Commvault has made it easy to deploy their solution in Azure to protect Azure Virtual Machines and many other Azure services. For more information, see the following references:
- Deploy Commvault via the Azure Marketplace
- Commvault for Azure datasheet
- Commvault's list of supported Azure features and services
- How to use Commvault to protect SAP HANA in Azure
Next steps
See these additional Commvault resources for information about specialized usage scenarios.
Feedback
Coming soon: Throughout 2024 we will be phasing out GitHub Issues as the feedback mechanism for content and replacing it with a new feedback system. For more information see: https://aka.ms/ContentUserFeedback.
Submit and view feedback for