Tiger Bridge archiving with continuous data protection and disaster recovery
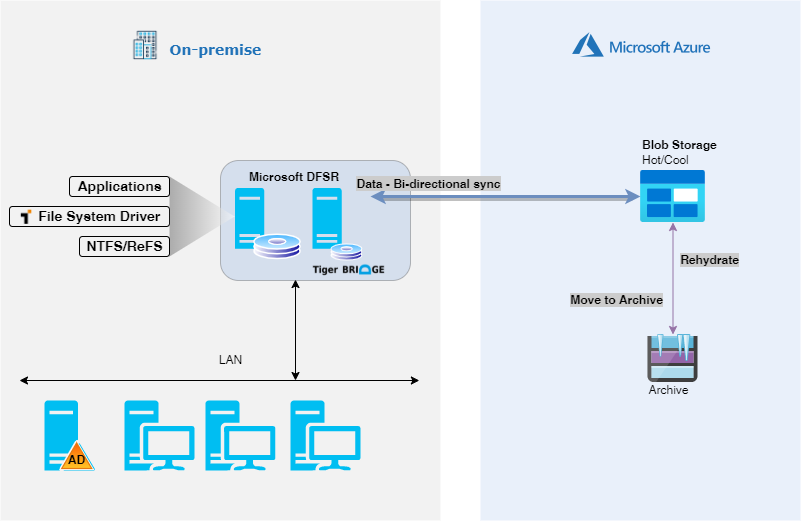
This article will guide you to set up Tiger Bridge data management system with Azure Blob Storage. Tiger Bridge Continuous data protection (CDP) integrates with Soft Delete and Versioning to achieve a complete Continuous Data Protection solution. It applies policies to move data between Azure Blob tiers for optimal cost. Continuous data protection allows customers to have a real-time file-based backup with snapshots to achieve near zero RPO. CDP enables customers to protect their assets with minimum resources. Optionally, it can be used in WORM scenario using immutable storage. In addition, Tiger Bridge provides easy and efficient Disaster Recovery. It can be combined with Microsoft DFSR, but it isn't mandatory. It allows mirrored DR sites, or can be used with minimum storage DR sites (keeping only the most recent data on-prem plus). All the replicated files in Azure Blob Storage are stored as native objects, allowing the organization to access them without using Tiger Bridge. This approach prevents vendor locking.
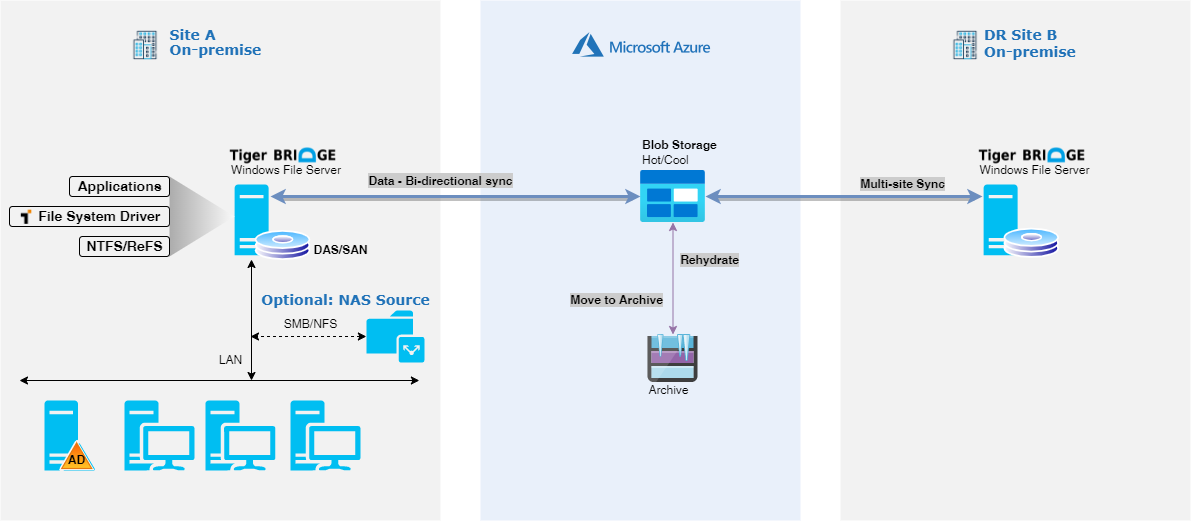
Reference architecture
More information on Tiger Bridge solution, and common use case can be read in Tiger Bridge deployment guide.
Before you begin
Refer to Tiger Bridge deployment guide, it describes initial steps needed for setting up CDP.
Choose the right storage options. When you use Azure as a backup target, you'll make use of Azure Blob storage. Blob storage is optimized for storing massive amounts of unstructured data, which is data that doesn't adhere to any data model, or definition. It's durable, highly available, secure, and scalable. You can select the right storage for your workload by looking at two aspects:
Sample backup to Azure cost model
Subscription based model can be daunting to customers who are new to the cloud. While you pay for only the capacity used, you do also pay for transactions (read and write), and egress for data read back to your on-premises environment (depending on the network connection used). We recommend using the Azure Pricing Calculator to perform what-if analysis. You can base the analysis on list pricing or on Azure Storage Reserved Capacity pricing, which can deliver up to 38% savings. Below is an example pricing exercise to model the monthly cost of backing up to Azure.
| Cost factor | Monthly cost |
|---|---|
| 100 TiB of backup on cool storage | $1556.48 |
| 2 TiB of new data written per day | $39 |
| Monthly estimated total | $1595.48 |
| One time restore of 5 TiB over public internet | $491.26 |
Note
This is only an example. Your pricing may vary due to activities not captured here. Estimate was generated with Azure Pricing Calculator using East US Pay-as-you-go pricing. It is based on a 32 MB block size which generates 65,536 PUT Requests (write transactions), per day. This example may not reflect current Azure pricing, or not be applicable towards your requirements.
Prepare Azure Blob Storage
Refer to Tiger Bridge deployment guide
Deploy Tiger Bridge
Before you can install Tiger Bridge, you need to have a Windows file server installed, and fully functional. Windows server must have access to the storage account prepare in previous step.
Configure continuous data protection
- Deploy Tiger Bridge solution as described in standalone hybrid configuration (steps 1 to 4).
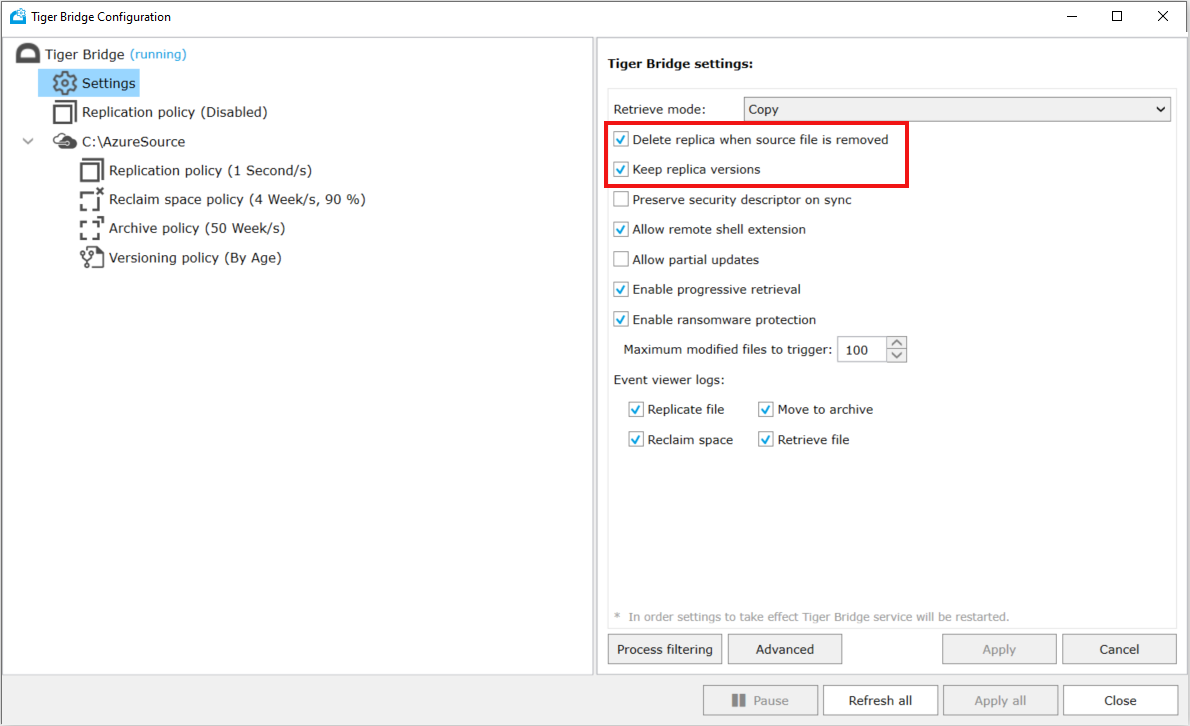
- Under Tiger Bridge settings, enable Delete replica when source file is removed and Keep replica versions
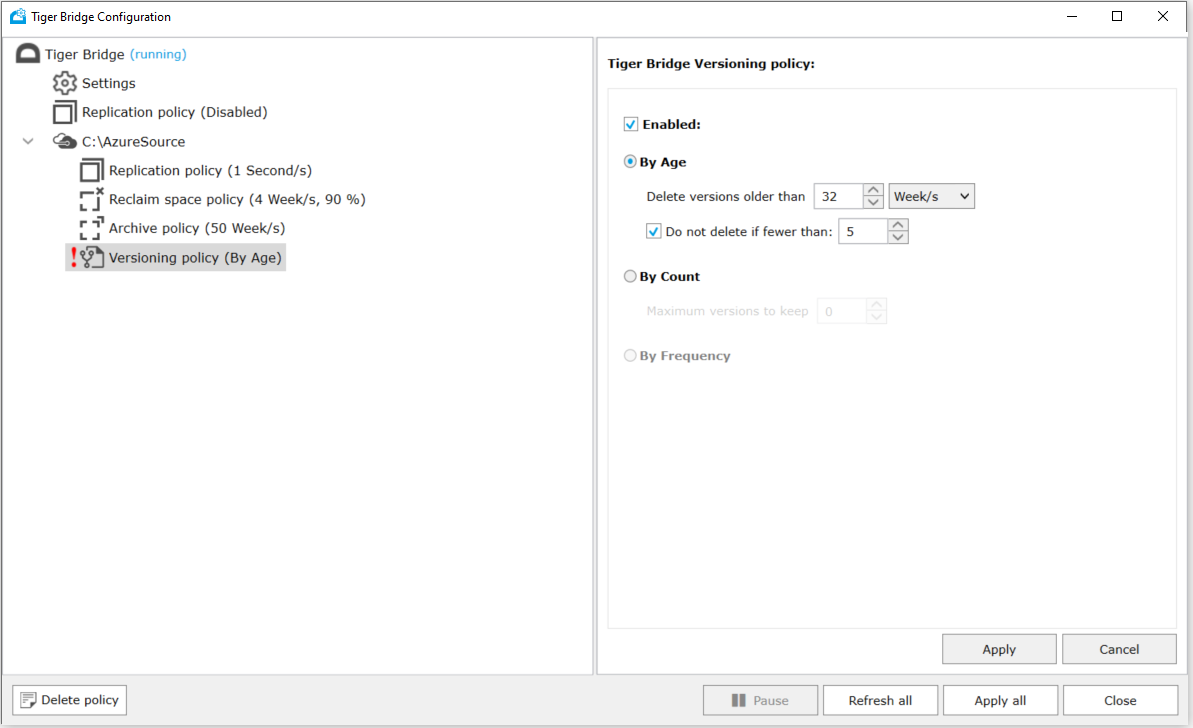
- Set versioning policy either By Age or By Count
Tiger Bridge is natively integrated with Windows Volume Shadow Copy Service. Integration enables restoring files and folders protected by Tiger Bridge CDP using native windows tools, like Windows Explorer. To verify CDP is enabled, simply change any file and use Windows Explorer Previous Versions to verify a version has been created. You can restore any version listed by selecting it, and pressing Restore.

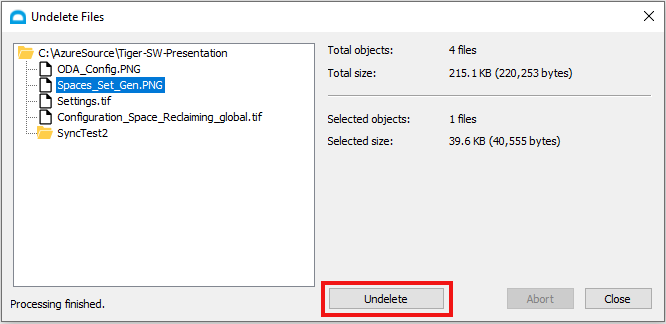
Tiger Bridge CDP also enables restoring files if there was accidental deletions. To undelete a file, Tiger Bridge Shell extension can be used. Simply select the folder where the file was originally located, navigate to Tiger Bridge Shell Extension and select Undelete.
Configure archiving
Tiger Bridge can move a replicated file between Azure Blob Storage tiers to optimize for cost. That process is called archiving, and it replaces a file with an offline file (stub). To configure archiving, perform the following steps.
Replicate data directly to Azure Storage Archive tier - If you want replicated data to be automatically tiered to Azure Storage Archive tier, a Default access tier has to be changed in Tiger Bridge configuration.
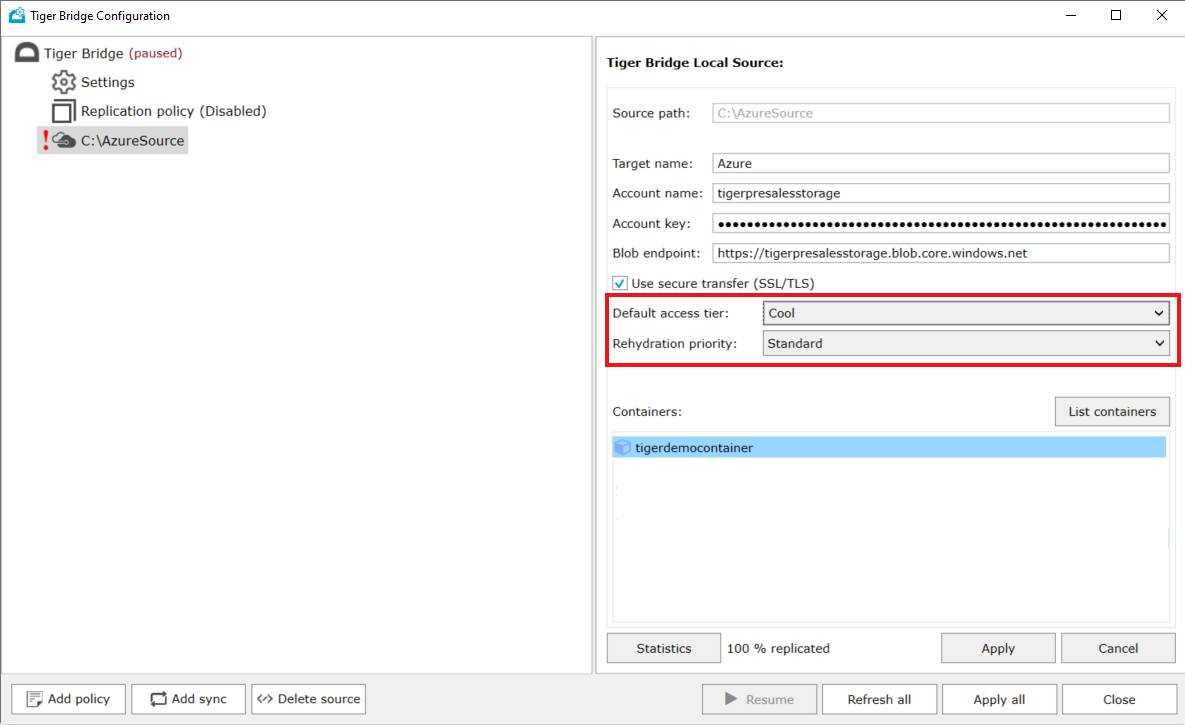
Change Default access tier to Archive. You can also select a default Rehydration priority.

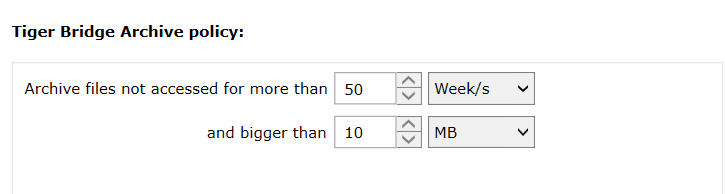
Configure archiving policy - Tiger Bridge allows you to specify which files on local source must be moved to archive tier. Policy can configure two parameters:
- Minimal file size - specifies minimum file size for archiving. Only files with sizes larger than defined value will be tiered to Archive tier.
- Time interval - specifies time interval in which the files haven't been accessed. All files that haven't been accessed in at least the defined value, will be moved to Archive tier.
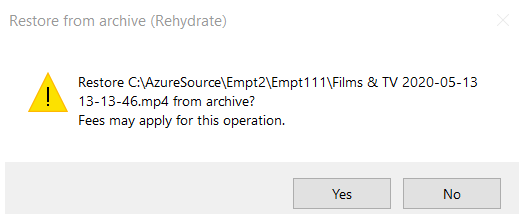
Once the files are in Archive tier, they are not directly accessible. To access those files, they have to be rehydrated (moved from Archive tier to Hot or Cool tier). Tiger Bridge Shell Extension can be used to invoke the rehydration process in a simple way. Right-click on the file you want to rehydrate in Windows Explorer, find Tiger Bridge Shell Extension, and select Rehydrate from Archive. You'll be notified that Restoring from archive (Rehydrate) is an operation that may apply other fees.

For more detailed information on how to configure Tiger Bridge for your specific set-up, refer to the latest Tiger Bridge Administration Guide
Configure disaster recovery
Tiger Bridge can be configured in Disaster Recovery mode. Typical configuration is an active - passive configuration with one Tiger Bridge server on the primary and one on the secondary site. Tiger Bridge server on the primary site is active and replicates the data to secondary Tiger Bridge server (through Azure Blob Storage). Tiger Bridge server on the secondary server is idle and receives file changes
Deploy and setup Tiger Bridge server on the primary and secondary site as instructed in Tiger Bridge deployment guide for standalone hybrid configuration
Note
Both Tiger Bridge servers on primary and secondary site must be connected to the same container and storage account.
Enable Tiger Bridge synchronization on both Tiger Bridge servers.
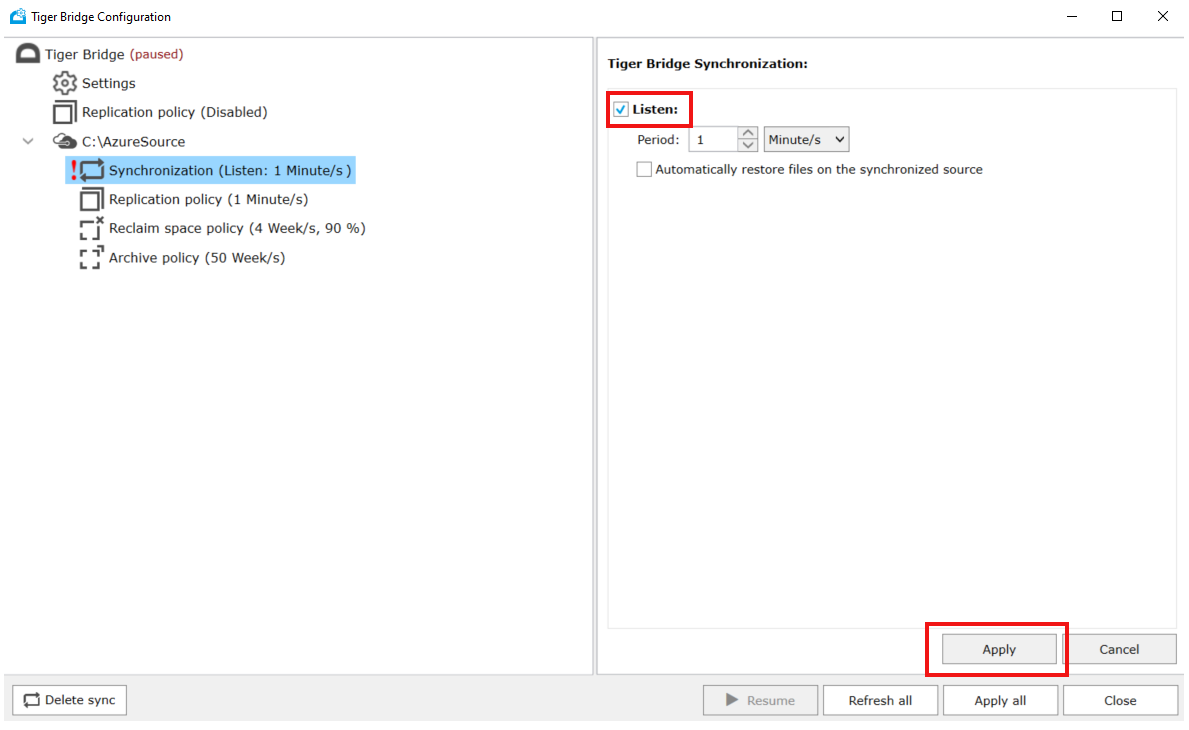
- On secondary Tiger Bridge server, disable Listen, and enter the time interval at which servers will check for notifications from active server about changes.
- Choose if you want to automatically retrieve the changed files to the secondary server immediately. Selecting Automatically restore files on the synchronized source will download all the changes on the secondary server immediately. If unselected, changes will be downloaded on demand.
- After the settings are done, click Apply
For increased resiliency on the primary site, Tiger Bridge support Windows DFSR that would enable replication between two Tiger Bridge servers on the primary site. If there were issues with one of the Tiger Bridge servers on the primary site, other one would continue to operate.
Tip
Tiger Bridge Policies and Synchronization can be defined as global (applied to all Tiger Bridge servers), or can be defined per Tiger Bridge server.
Support
How to open a case with Azure
In the Azure portal search for support in the search bar at the top. Select Help + support -> New Support Request.
Engaging Tiger Bridge support
Tiger Technology provides 365x24x7 support for Tiger Bridge. To contact support, create a support ticket.
Next steps
Feedback
Coming soon: Throughout 2024 we will be phasing out GitHub Issues as the feedback mechanism for content and replacing it with a new feedback system. For more information see: https://aka.ms/ContentUserFeedback.
Submit and view feedback for