Optimize performance by upgrading dedicated SQL pool (formerly SQL DW) in Azure Synapse Analytics
Upgrade your dedicated SQL pool (formerly SQL DW) to the latest generation of Azure hardware and storage architecture.
Why upgrade?
You can now seamlessly upgrade to the dedicated SQL pool (formerly SQL DW) Compute Optimized Gen2 tier in the Azure portal for supported regions. If your region does not support self-upgrade, you can upgrade to a supported region or wait for self-upgrade to be available in your region. Upgrade now to take advantage of the latest generation of Azure hardware and enhanced storage architecture including faster performance, higher scalability, and unlimited columnar storage.
Important
This upgrade applies to Compute Optimized Gen1 tier dedicated SQL pools (fornmerly SQL DW) in supported regions.
Before you begin
Check if your region is supported for GEN1 to GEN2 migration. Note the automatic migration dates. To avoid conflicts with the automated process, plan your manual migration prior to the automated process start date.
If you are in a region that is not yet supported, continue to check for your region to be added or upgrade using restore to a supported region.
If your region is supported, upgrade through the Azure portal
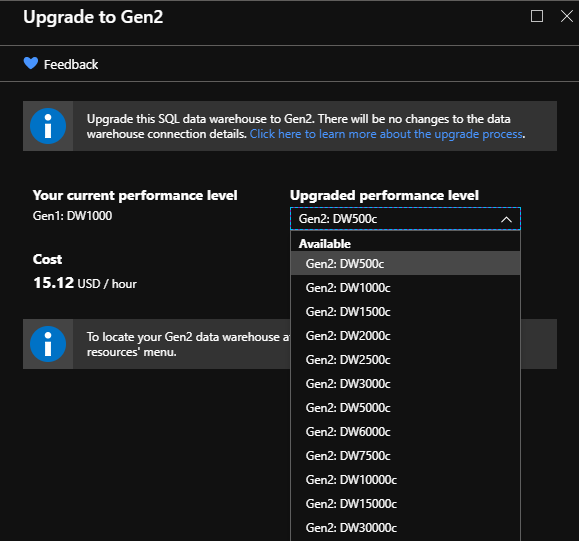
Select the suggested performance level for dedicated SQL pool (formerly SQL DW) based on your current performance level on Compute Optimized Gen1 tier by using the mapping below:
Compute Optimized Gen1 tier Compute Optimized Gen2 tier DW100 DW100c DW200 DW200c DW300 DW300c DW400 DW400c DW500 DW500c DW600 DW500c DW1000 DW1000c DW1200 DW1000c DW1500 DW1500c DW2000 DW2000c DW3000 DW3000c DW6000 DW6000c
Note
Suggested performance levels are not a direct conversion. For example, we recommend going from DW600 to DW500c.
Upgrade in a supported region using the Azure portal
- Migration from Gen1 to Gen2 through the Azure portal is permanent. There is not a process for returning to Gen1.
- Dedicated SQL pool (formerly SQL DW) must be running to migrate to Gen2
Before you begin
Note
We recommend that you use the Azure Az PowerShell module to interact with Azure. See Install Azure PowerShell to get started. To learn how to migrate to the Az PowerShell module, see Migrate Azure PowerShell from AzureRM to Az.
- Sign in to the Azure portal.
- Ensure that dedicated SQL pool (formerly SQL DW) is running - it must be to migrate to Gen2
PowerShell upgrade commands
If the Compute Optimized Gen1 tier dedicated SQL pool (formerly SQL DW) to be upgraded is paused, resume dedicated SQL pool (formerly SQL DW).
Be prepared for a few minutes of downtime.
Identify any code references to Compute Optimized Gen1 performance levels and modify them to their equivalent Compute Optimized Gen2 performance level. Below are two examples of where you should update code references before upgrading:
Original Gen1 PowerShell command:
Set-AzSqlDatabase -ResourceGroupName "myResourceGroup" -DatabaseName "mySampleDataWarehouse" -ServerName "mynewserver-20171113" -RequestedServiceObjectiveName "DW300"Modified to:
Set-AzSqlDatabase -ResourceGroupName "myResourceGroup" -DatabaseName "mySampleDataWarehouse" -ServerName "mynewserver-20171113" -RequestedServiceObjectiveName "DW300c"Note
-RequestedServiceObjectiveName "DW300" is changed to - RequestedServiceObjectiveName "DW300c"
Original Gen1 T-SQL command:
ALTER DATABASE mySampleDataWarehouse MODIFY (SERVICE_OBJECTIVE = 'DW300') ;Modified to:
ALTER DATABASE mySampleDataWarehouse MODIFY (SERVICE_OBJECTIVE = 'DW300c') ;Note
SERVICE_OBJECTIVE = 'DW300' is changed to SERVICE_OBJECTIVE = 'DW300c'
Start the upgrade
Go to your Compute Optimized Gen1 dedicated SQL pool (formerly SQL DW) in the Azure portal. If the Compute Optimized Gen1 tier dedicated SQL pool (formerly SQL DW) to be upgraded is paused, resume dedicated SQL pool.
Select Upgrade to Gen2 card under the Tasks tab:
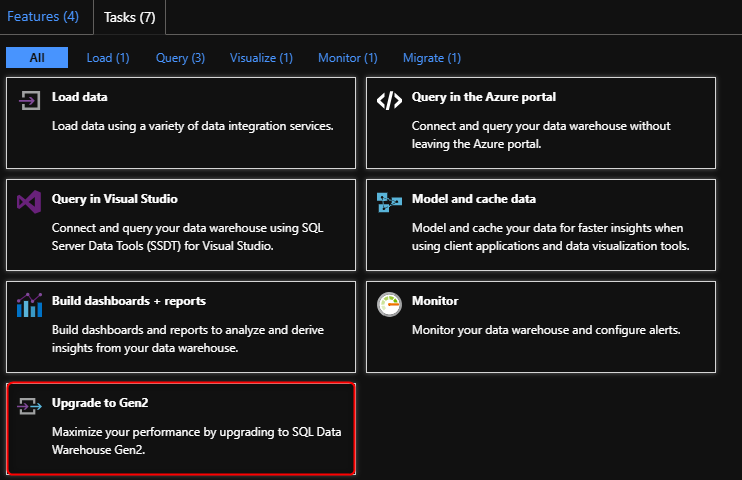
Note
If you do not see the Upgrade to Gen2 card under the Tasks tab, your subscription type is limited in the current region. Submit a support ticket to get your subscription approved.
Ensure your workload has completed running and quiesced before upgrading. You'll experience downtime for a few minutes before your dedicated SQL pool (formerly SQL DW) is back online as a Compute Optimized Gen2 tier dedicated SQL pool (formerly SQL DW). Select Upgrade:
Monitor your upgrade by checking the status in the Azure portal:
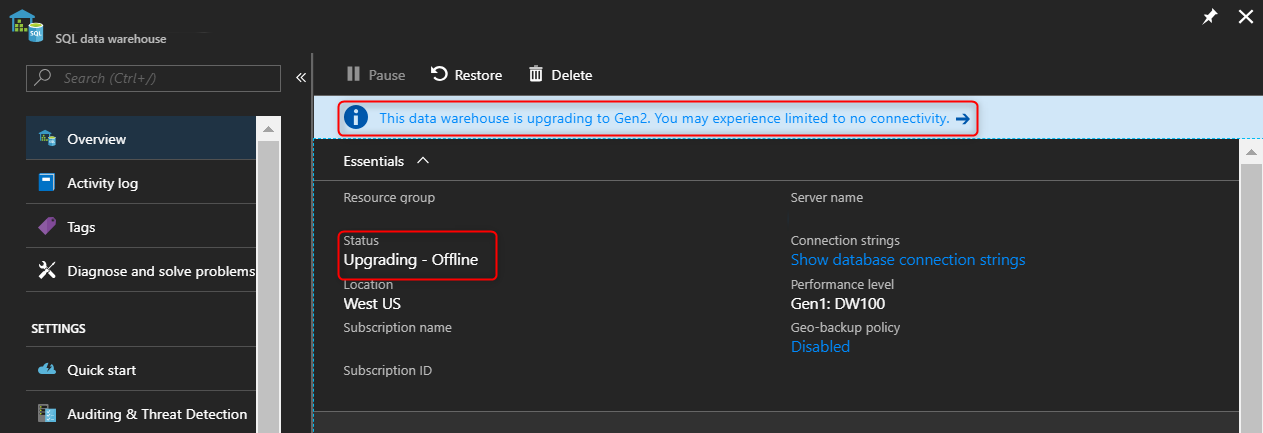
The first step of the upgrade process goes through the scale operation ("Upgrading - Offline") where all sessions will be killed, and connections will be dropped.
The second step of the upgrade process is data migration ("Upgrading - Online"). Data migration is an online trickle background process. This process slowly moves columnar data from the old storage architecture to the new storage architecture using a local SSD cache. During this time, your dedicated SQL pool (formerly SQL DW) will be online for querying and loading. Your data will be available to query regardless of whether it has been migrated or not. The data migration happens at varying rates depending on your data size, your performance level, and the number of your columnstore segments.
Optional Recommendation: Once the scaling operation is complete, you can speed up the data migration background process. You can force data movement by running Alter Index rebuild on all primary columnstore tables you'd be querying at a larger SLO and resource class. This operation is offline compared to the trickle background process, which can take hours to complete depending on the number and sizes of your tables. However, once complete, data migration will be much quicker due to the new enhanced storage architecture with high-quality rowgroups.
Note
Alter Index rebuild is an offline operation and the tables will not be available until the rebuild completes.
The following query generates the required Alter Index Rebuild commands to expedite data migration:
SELECT 'ALTER INDEX [' + idx.NAME + '] ON ['
       + Schema_name(tbl.schema_id) + '].['
       + Object_name(idx.object_id) + '] REBUILD ' + ( CASE
                                                         WHEN (
                                                     (SELECT Count(*)
                                                      FROM   sys.partitions
                                                             part2
                                                      WHERE  part2.index_id
                                                             = idx.index_id
                                                             AND
                                                     idx.object_id =
                                                     part2.object_id)
                                                     > 1 ) THEN
              ' PARTITION = '
              + Cast(part.partition_number AS NVARCHAR(256))
              ELSE ''
                                                       END ) + '; SELECT ''[' +
              idx.NAME + '] ON [' + Schema_name(tbl.schema_id) + '].[' +
              Object_name(idx.object_id) + '] ' + (
              CASE
                WHEN ( (SELECT Count(*)
                        FROM   sys.partitions
                               part2
                        WHERE
                     part2.index_id =
                     idx.index_id
                     AND idx.object_id
                         = part2.object_id) > 1 ) THEN
              ' PARTITION = '
              + Cast(part.partition_number AS NVARCHAR(256))
              + ' completed'';'
              ELSE ' completed'';'
                                                    END )
FROM   sys.indexes idx
       INNER JOIN sys.tables tbl
               ON idx.object_id = tbl.object_id
       LEFT OUTER JOIN sys.partitions part
                    ON idx.index_id = part.index_id
                       AND idx.object_id = part.object_id
WHERE  idx.type_desc = 'CLUSTERED COLUMNSTORE';
Upgrade from an Azure geographical region using restore through the Azure portal
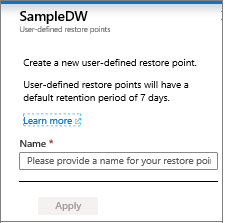
Create a user-defined restore point using the Azure portal
Sign in to the Azure portal.
Navigate to the dedicated SQL pool (formerly SQL DW) that you want to create a restore point for.
At the top of the Overview section, select +New Restore Point.
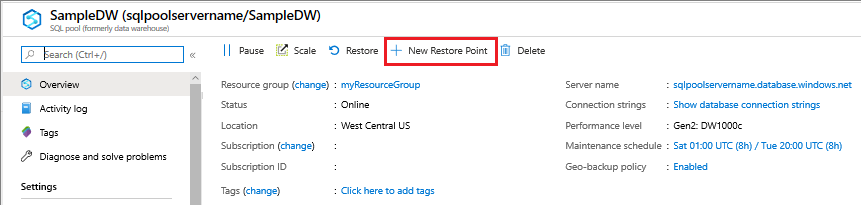
Specify a name for your restore point.
Restore an active or paused database using the Azure portal
Sign in to the Azure portal.
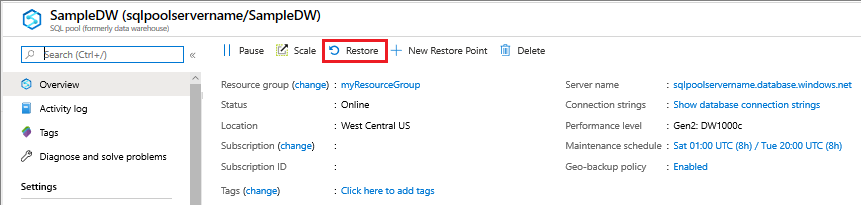
Navigate to the dedicated SQL pool (formerly SQL DW) that you want to restore from.
At the top of the Overview section, select Restore.
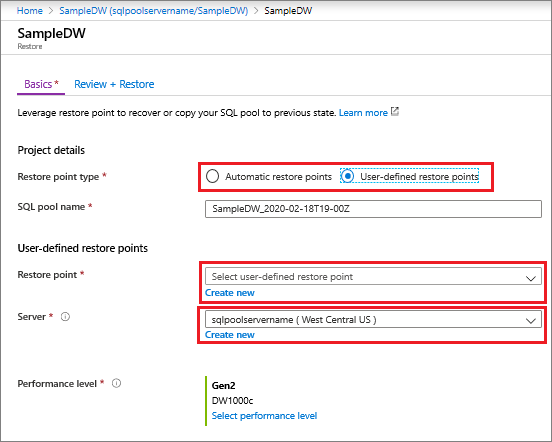
Select either Automatic restore points or user-defined restore points. For user-defined restore points, select a user-defined restore point or Create a new user-defined restore point. For the server, select Create new and choose a server in a Gen2 supported geographic region.
Restore from an Azure geographical region using PowerShell
Note
We recommend that you use the Azure Az PowerShell module to interact with Azure. See Install Azure PowerShell to get started. To learn how to migrate to the Az PowerShell module, see Migrate Azure PowerShell from AzureRM to Az.
To recover a database, use the Restore-AzSqlDatabase cmdlet.
Note
You can perform a geo-restore to Gen2! To do so, specify an Gen2 ServiceObjectiveName (e.g. DW1000c) as an optional parameter.
- Open Windows PowerShell.
- Connect to your Azure account and list all the subscriptions associated with your account.
- Select the subscription that contains the database to be restored.
- Get the database you want to recover.
- Create the recovery request for the database, specifying a Gen2 ServiceObjectiveName.
- Verify the status of the geo-restored database.
Connect-AzAccount
Get-AzSubscription
Select-AzSubscription -SubscriptionName "<Subscription_name>"

# Get the database you want to recover
$GeoBackup = Get-AzSqlDatabaseGeoBackup -ResourceGroupName "<YourResourceGroupName>" -ServerName "<YourServerName>" -DatabaseName "<YourDatabaseName>"

# Recover database
$GeoRestoredDatabase = Restore-AzSqlDatabase –FromGeoBackup -ResourceGroupName "<YourResourceGroupName>" -ServerName "<YourTargetServer>" -TargetDatabaseName "<NewDatabaseName>" –ResourceId $GeoBackup.ResourceID -ServiceObjectiveName "<YourTargetServiceLevel>" -RequestedServiceObjectiveName "DW300c"

# Verify that the geo-restored database is online
$GeoRestoredDatabase.status
Note
To configure your database after the restore has completed, see Configure your database after recovery.
The recovered database will be TDE-enabled if the source database is TDE-enabled.
If you experience any issues with your dedicated SQL pool, create a support request and reference "Gen2 upgrade" as the possible cause.
Next steps
Your upgraded dedicated SQL pool (formerly SQL DW) is online. To take advantage of the enhanced architecture, see Resource classes for Workload Management.
Feedback
Coming soon: Throughout 2024 we will be phasing out GitHub Issues as the feedback mechanism for content and replacing it with a new feedback system. For more information see: https://aka.ms/ContentUserFeedback.
Submit and view feedback for