Create an Azure Time Series Insights Gen2 environment using the Azure portal
Note
The Time Series Insights (TSI) service will no longer be supported after March 2025. Consider migrating existing TSI environments to alternative solutions as soon as possible. For more information on the deprecation and migration, visit our documentation.
This article describes how to create an Azure Time Series Insights Gen2 environment by using the Azure portal.
The environment provisioning tutorial will walk you through the process. You'll learn about selecting the correct Time Series ID and view examples from two JSON payloads.
Overview
When you provision an Azure Time Series Insights Gen2 environment, you create these Azure resources:
- An Azure Time Series Insights Gen2 environment that follows pay-as-you-go pricing model
- An Azure Storage account
- An optional warm store for faster and unlimited queries
Tip
- Learn how to plan your environment.
- Read about how to Add an event hub source or how to Add an IoT hub source.
You will learn how to:
Associate each Azure Time Series Insights Gen 2 environment with an event source. You will also provide a Timestamp ID property and a unique consumer group to ensure that the environment has access to the appropriate events.
After provisioning is complete, you can modify your access policies and other environment attributes to suit your business needs.
Note
The first step is optional when provisioning an environment. If you skip this step, you must attach an event source to the environment later so data can start flowing into your environment and can be accessed through query.
Create the environment
To create an Azure Time Series Insights Gen 2 environment:
Create an Azure Time Series Insights resource under Internet of Things on Azure portal.
Select Gen2(L1) as the Tier. Provide an environment name, and choose the subscription group and resource group to use. Then select a supported location to host the environment.
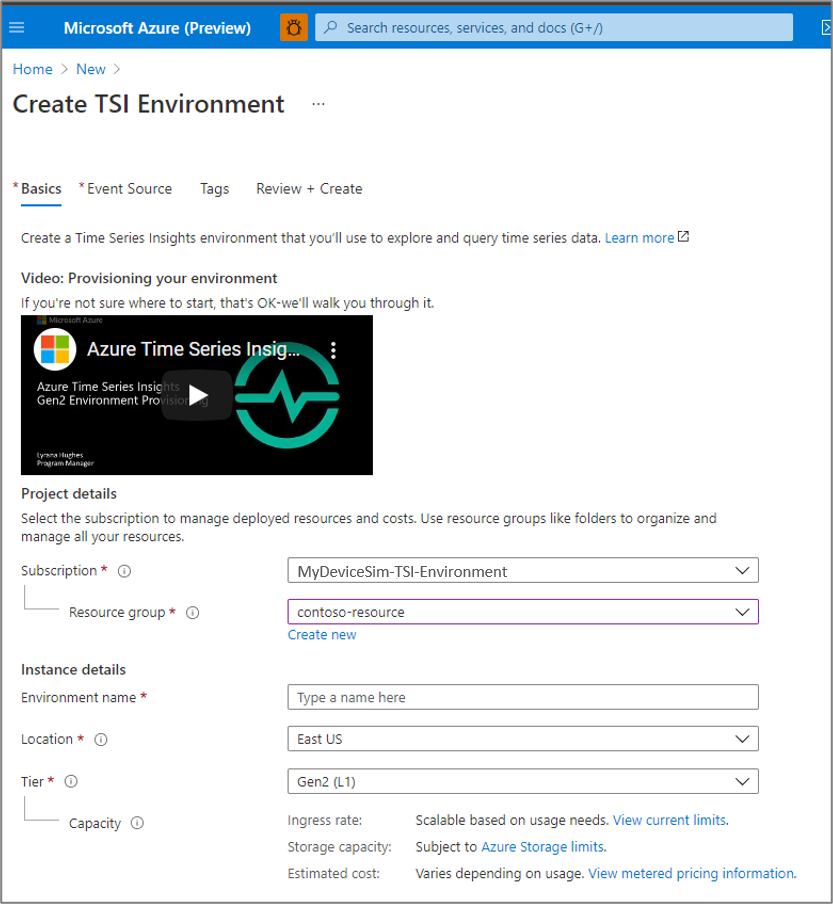
Enter a Time Series ID.

Note
- The Time Series ID is case-sensitive and immutable. (It can't be changed after it's set.)
- Time Series IDs can be up to three keys. Think of it as a primary key in a database, which uniquely represents each device sensor that would send data to your environment. It could be one property or a combination of up to three properties.
- Read more about How to choose a Time Series ID
Create an Azure Storage account by selecting a storage account name, account kind, and designating a replication choice. Doing so automatically creates an Azure Storage account. By default, general purpose v2 account will be created. The account is created in the same region as the Azure Time Series Insights Gen2 environment that you previously selected. Alternatively, you can also bring your own storage (BYOS) through an Azure Resource Manager template when you create a new Azure Time Series Gen2 environment.
(Optional) Enable warm store for your environment if you want faster and unlimited queries over most recent data in your environment. You can also create or delete a warm store through the Storage Configuration option in the left navigation pane, after you create an Azure Time Series Insights Gen2 environment.
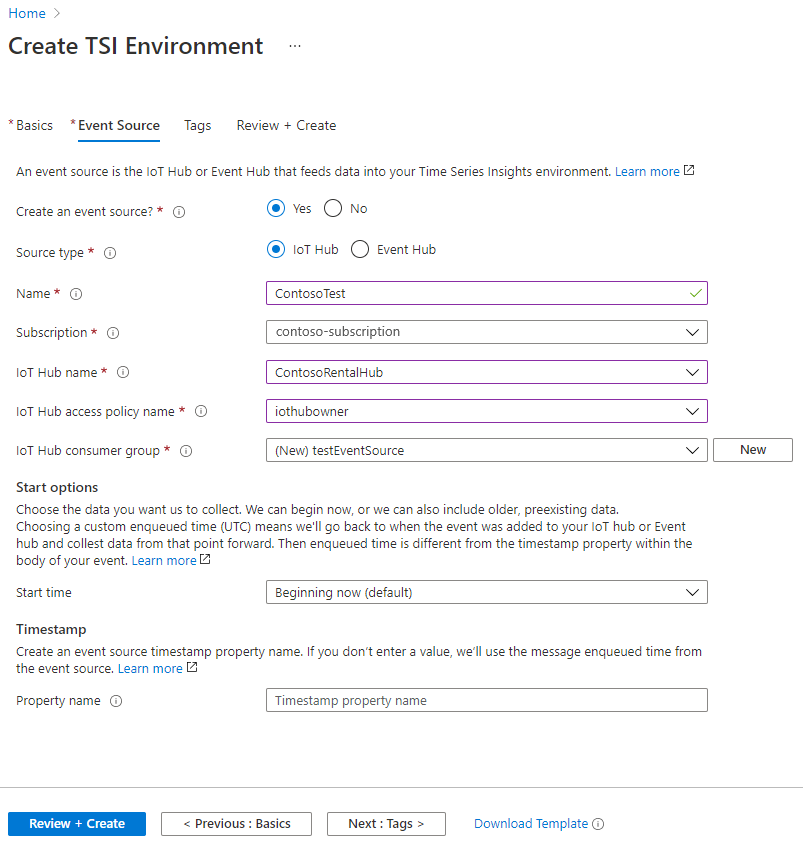
(Optional) You can add an event source now. You can also wait until after the instance has been provisioned.
Azure Time Series Insights supports Azure IoT Hub and Azure Event Hubs as event source options. Although you can add only a single event source when you create the environment, you can add another event source later.
You can select an existing consumer group or create a new consumer group when you add the event source. Be sure that the event source uses a unique consumer group for your environment to read data into it.
Choose when to start collecting data from the event source. The default is to begin collecting from the time the event source is created.
Tip
If you choose the All my data option to collect any pre-existing data from your event source, you could experience high initial latency as your Azure Time Series Insights Gen2 environment processes all of the data. The latency should eventually subside as your data is indexed.
Choose the appropriate Timestamp property. By default, Azure Time Series Insights uses the message-enqueued time for each event source.
Tip
The message-enqueued time might not be the best configured setting to use in batch event scenarios or historical data uploading scenarios. In such cases, make sure to verify your decision to use or not use a Timestamp property.
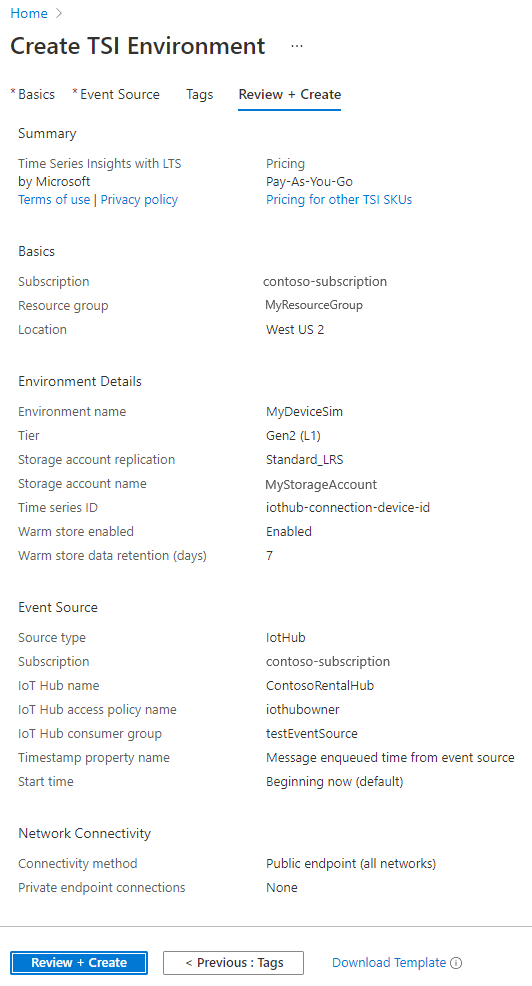
Select Review + Create to confirm that your environment has been provisioned and configured the way you want.


Next steps
- Learn more about Azure Time Series Insights generally available environments and Gen2 environments by reading Plan your environment.
- Learn about streaming ingestion event sources for your Azure Time Series Insights Gen2 environment.
- Learn more about how to manage your environment.
Feedback
Coming soon: Throughout 2024 we will be phasing out GitHub Issues as the feedback mechanism for content and replacing it with a new feedback system. For more information see: https://aka.ms/ContentUserFeedback.
Submit and view feedback for