Troubleshoot common Azure Virtual Desktop Agent issues
The Azure Virtual Desktop Agent can cause connection issues because of multiple factors:
- An error on the broker that makes the agent stop the service.
- Problems with updates.
- Issues with installing during the agent installation, which disrupts connection to the session host.
This article guides you through solutions to these common scenarios and how to address connection issues.
Note
For troubleshooting issues related to session connectivity and the Azure Virtual Desktop agent, we recommend you review the event logs on your session host virtual machines (VMs) by going to Event Viewer > Windows Logs > Application. Look for events that have one of the following sources to identify your issue:
- WVD-Agent
- WVD-Agent-Updater
- RDAgentBootLoader
- MsiInstaller
Error: The RDAgentBootLoader and/or Remote Desktop Agent Loader has stopped running
If you're seeing any of the following issues, it means that the boot loader, which loads the agent, was unable to install the agent properly and the agent service isn't running on your session host VM:
- RDAgentBootLoader is either stopped or not running.
- There's no status for Remote Desktop Agent Loader.
To resolve this issue, start the RDAgent boot loader:
In the Services window, right-click Remote Desktop Agent Loader.
Select Start. If this option is greyed out for you, you don't have administrator permissions. You need to get those permissions in order to start the service.
Wait 10 seconds, then right-click Remote Desktop Agent Loader.
Select Refresh.
If the service stops after you started and refreshed it, you may have a registration failure. For more information, see INVALID_REGISTRATION_TOKEN or EXPIRED_MACHINE_TOKEN.
Error: INVALID_REGISTRATION_TOKEN or EXPIRED_MACHINE_TOKEN
On your session host VM, go to Event Viewer > Windows Logs > Application. If you see an event with ID 3277 with INVALID_REGISTRATION_TOKEN or EXPIRED_MACHINE_TOKEN in the description, the registration token that has been used isn't recognized as valid.
To resolve this issue, create a valid registration token:
To create a new registration token, follow the steps in the Generate a new registration key for the VM section.
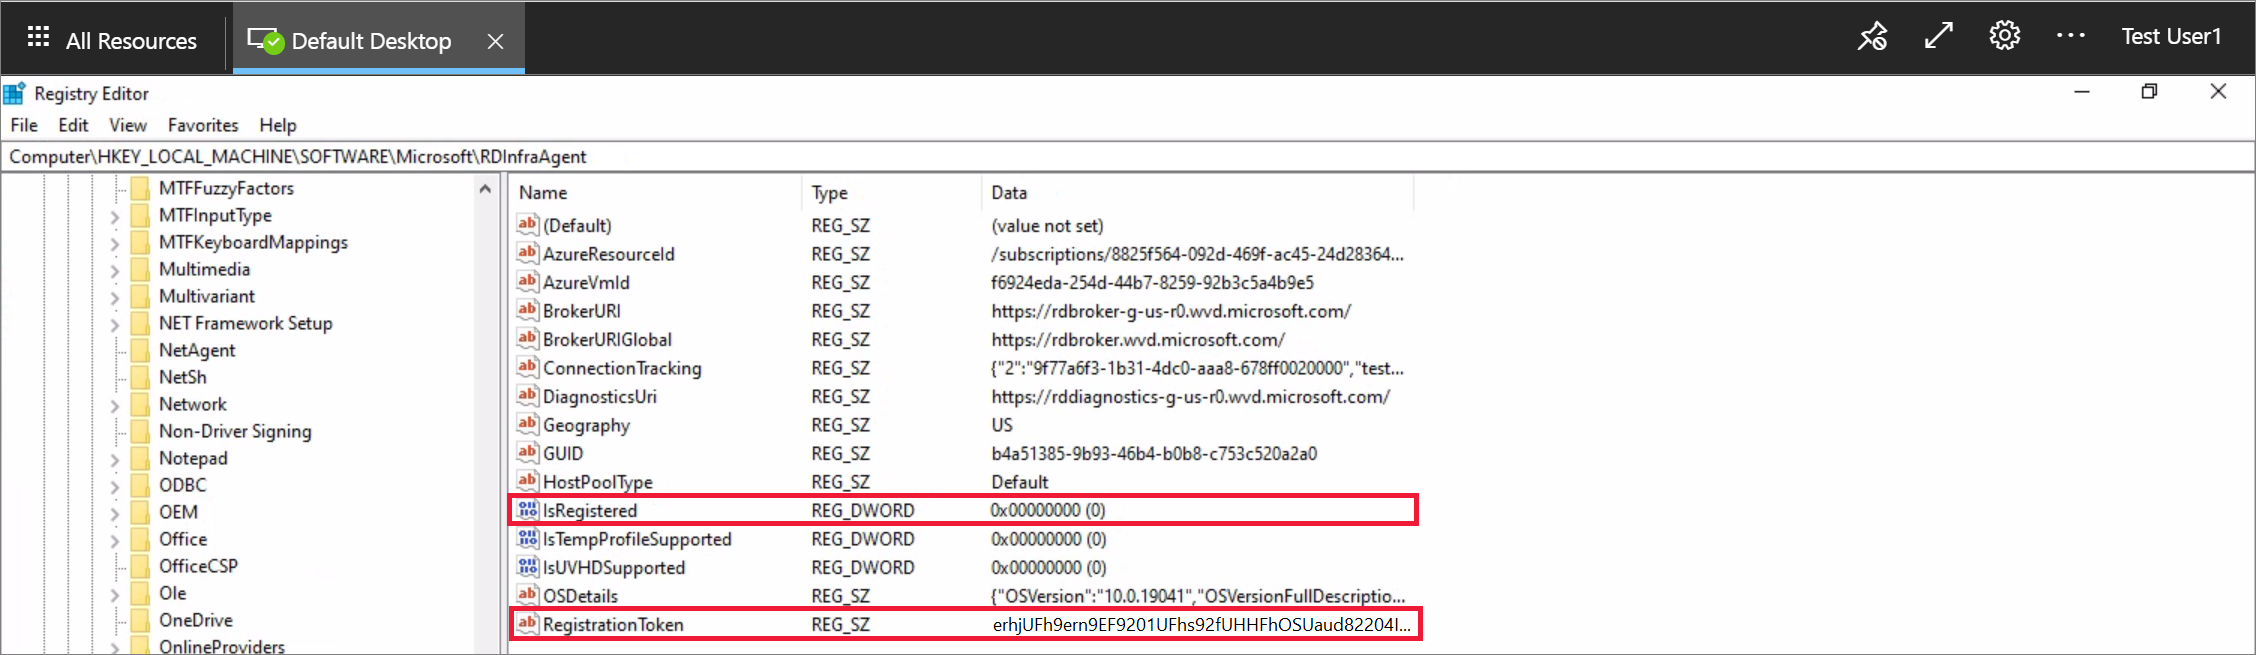
Open Registry Editor.
Go to HKEY_LOCAL_MACHINE\SOFTWARE\Microsoft\RDInfraAgent.
Select IsRegistered.
In the Value data: entry box, type 0 and select Ok.
Select RegistrationToken.
In the Value data: entry box, paste the registration token from step 1.
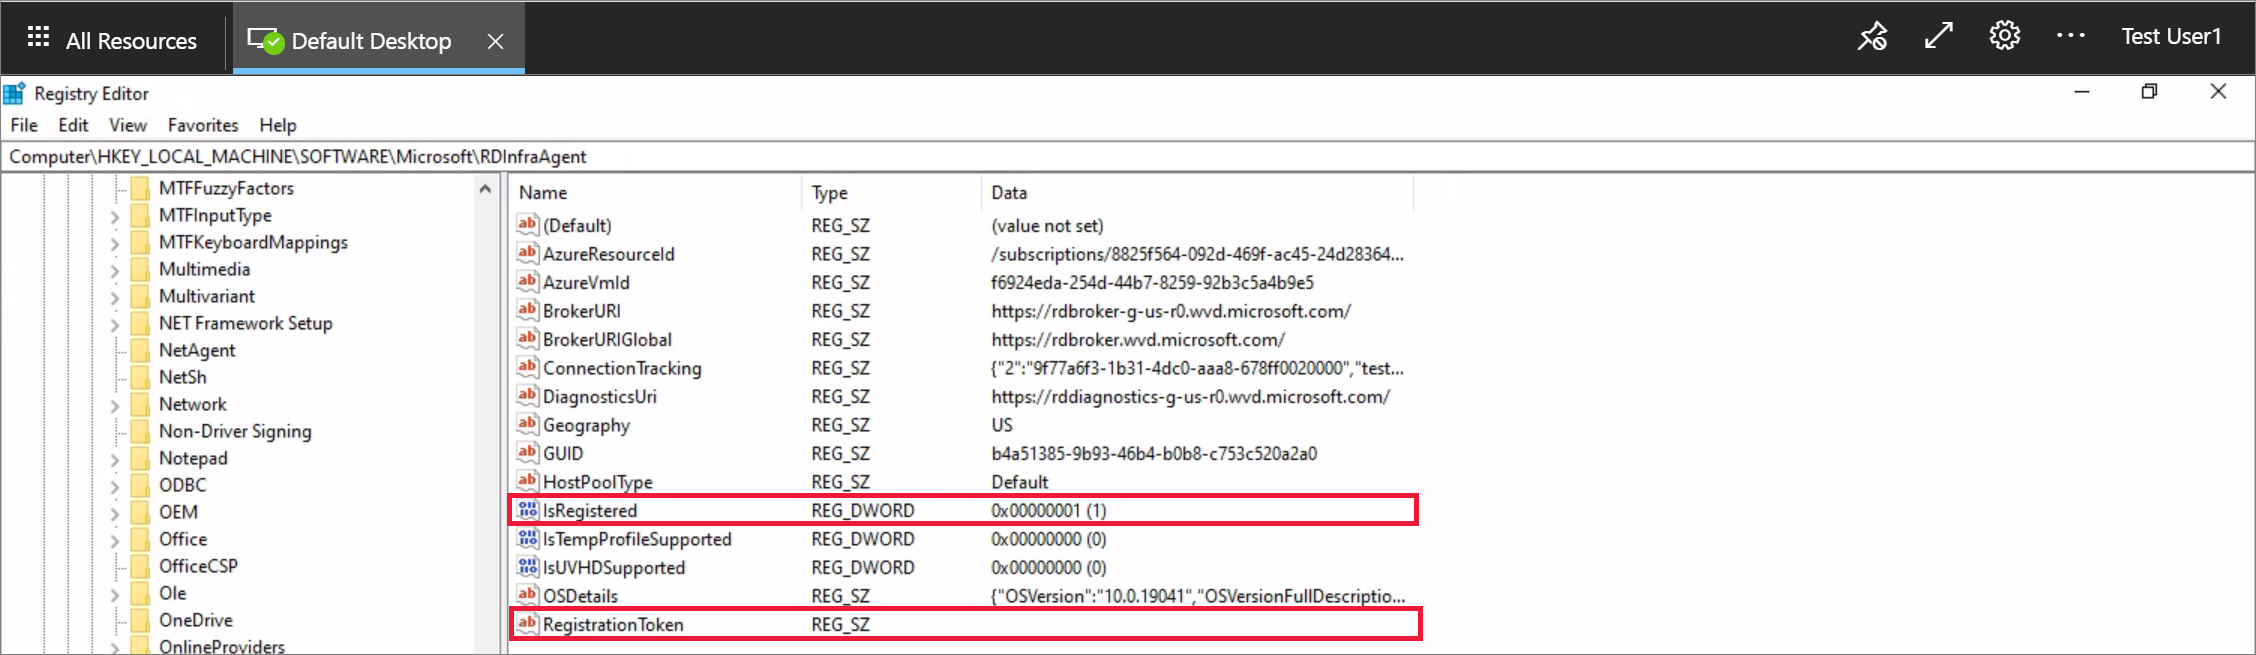
Open a PowerShell prompt as an administrator and run the following command to restart the RDAgentBootLoader service:
Restart-Service RDAgentBootLoaderGo back to Registry Editor.
Go to HKEY_LOCAL_MACHINE\SOFTWARE\Microsoft\RDInfraAgent.
Verify that IsRegistered is set to 1 and there's nothing in the data column for RegistrationToken.
Error: Agent cannot connect to broker with INVALID_FORM
On your session host VM, go to Event Viewer > Windows Logs > Application. If you see an event with ID 3277 with INVALID_FORM in the description, the agent can't connect to the broker or reach a particular endpoint. This issue may be because of certain firewall or DNS settings.
To resolve this issue, check that you can reach the two endpoints referred to as BrokerResourceIdURI and BrokerResourceIdURIGlobal:
Open Registry Editor.
Go to HKEY_LOCAL_MACHINE\SOFTWARE\Microsoft\RDInfraAgent.
Make note of the values for BrokerResourceIdURI and BrokerResourceIdURIGlobal.
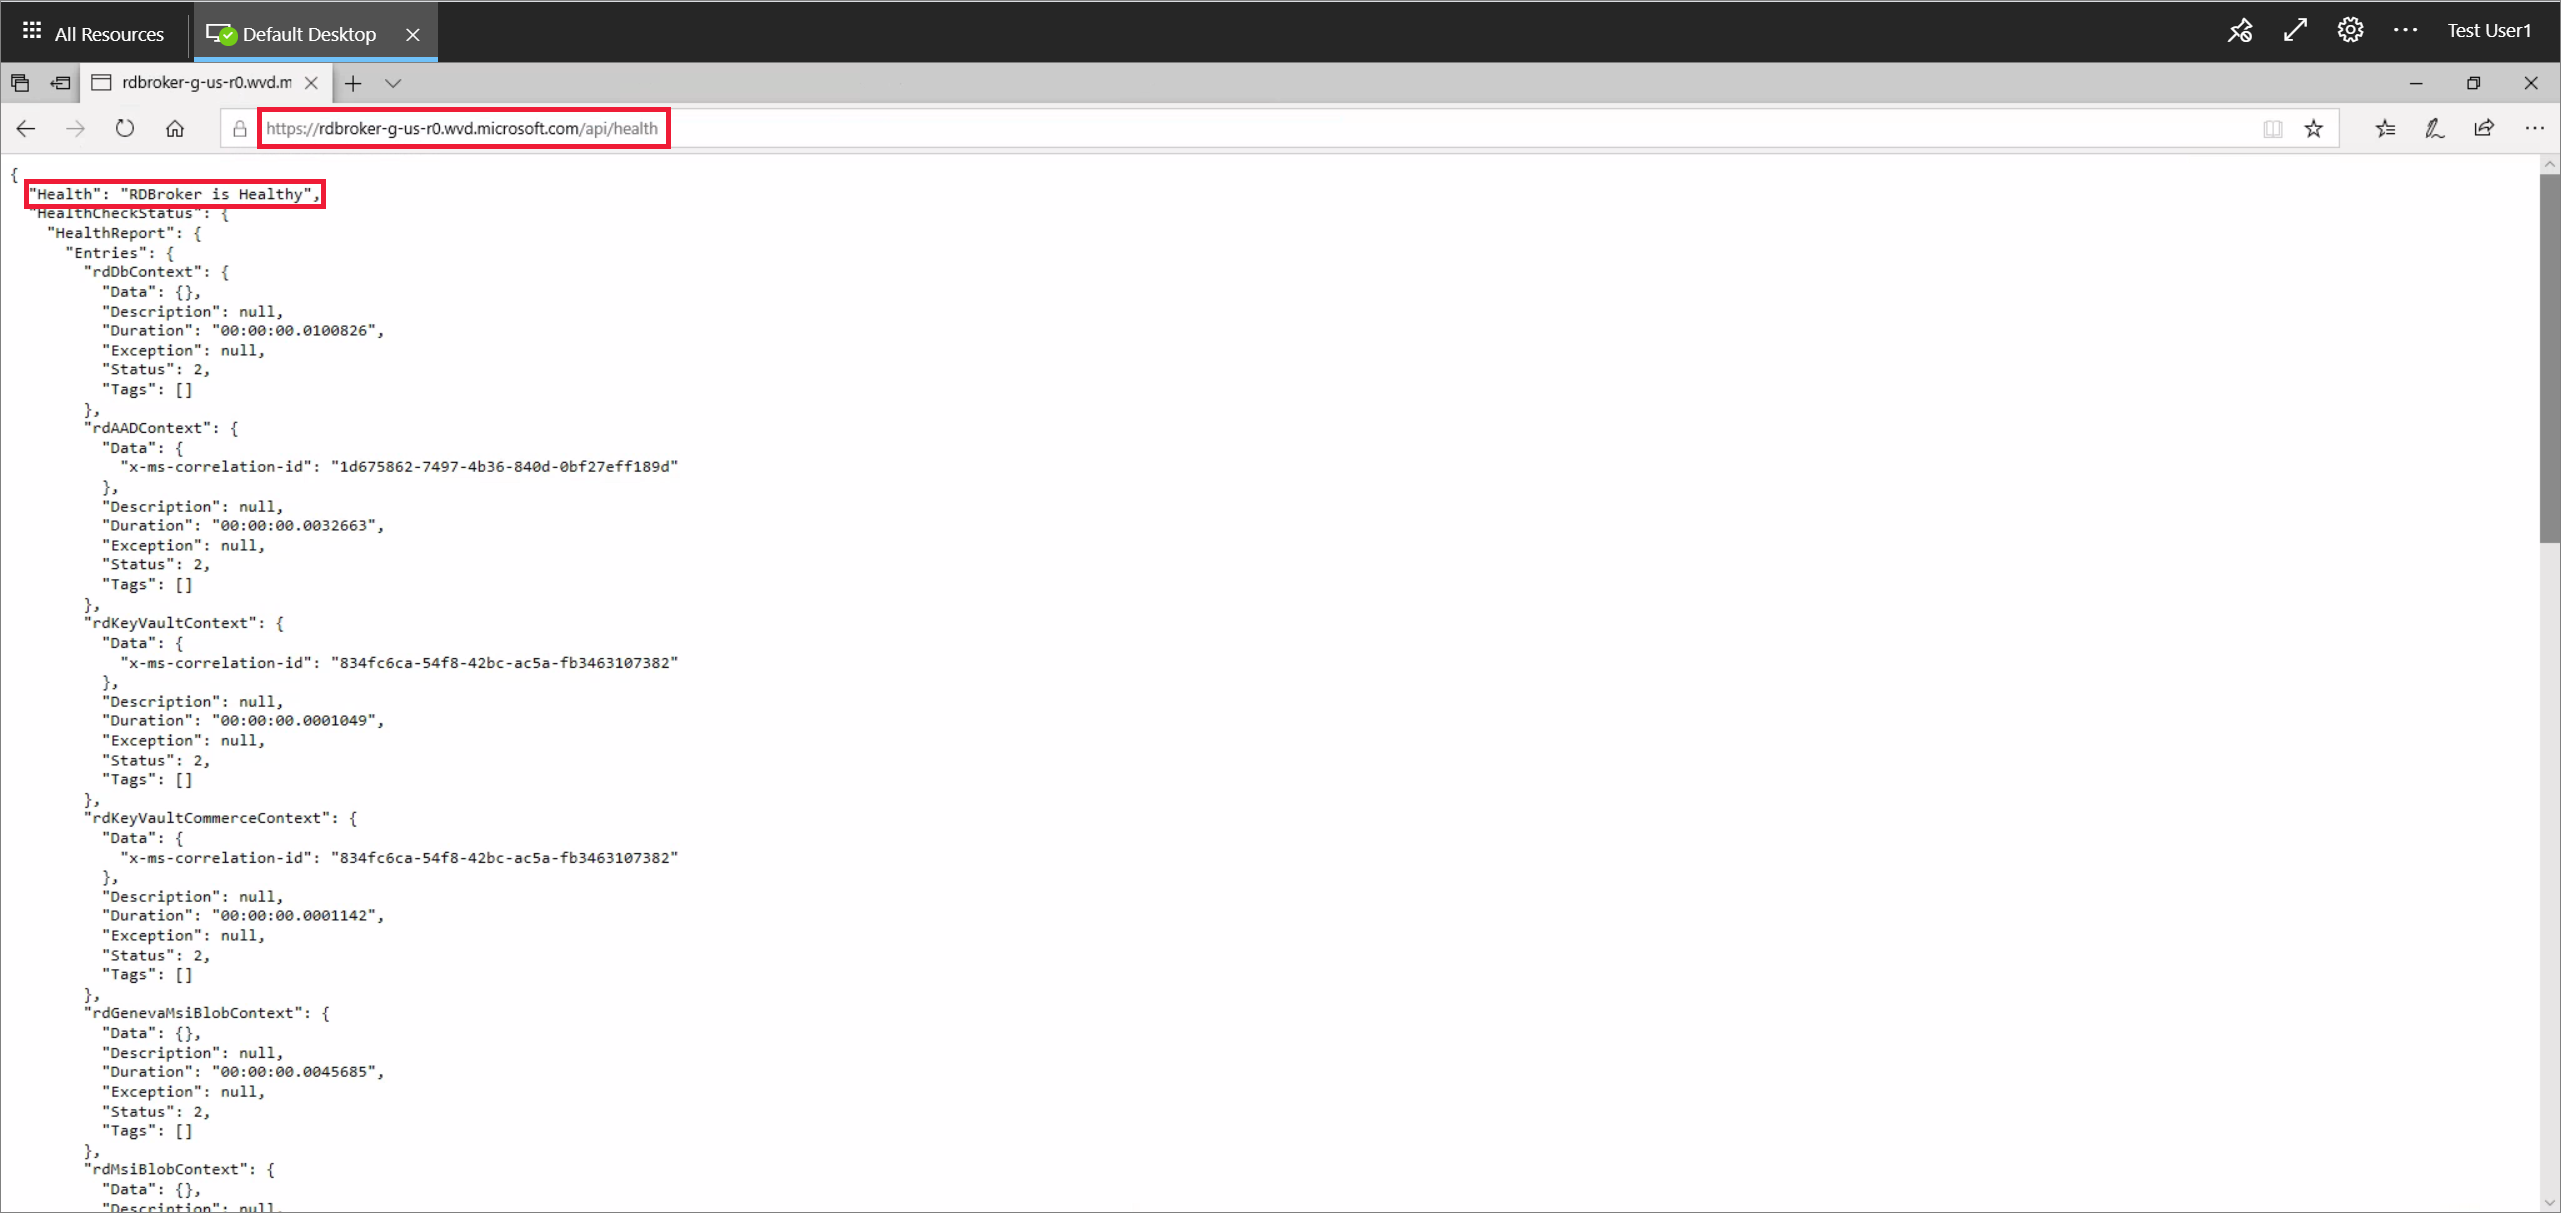
Open a web browser and enter your value for BrokerResourceIdURI in the address bar and add /api/health to the end, for example
https://rdbroker-g-us-r0.wvd.microsoft.com/api/health.Open another tab in the browser and enter your value for BrokerResourceIdURIGlobal in the address bar and add /api/health to the end, for example
https://rdbroker.wvd.microsoft.com/api/health.If your network isn't blocking the connection to the broker, both pages should load successfully and show a message stating RD Broker is Healthy, as shown in the following screenshots:

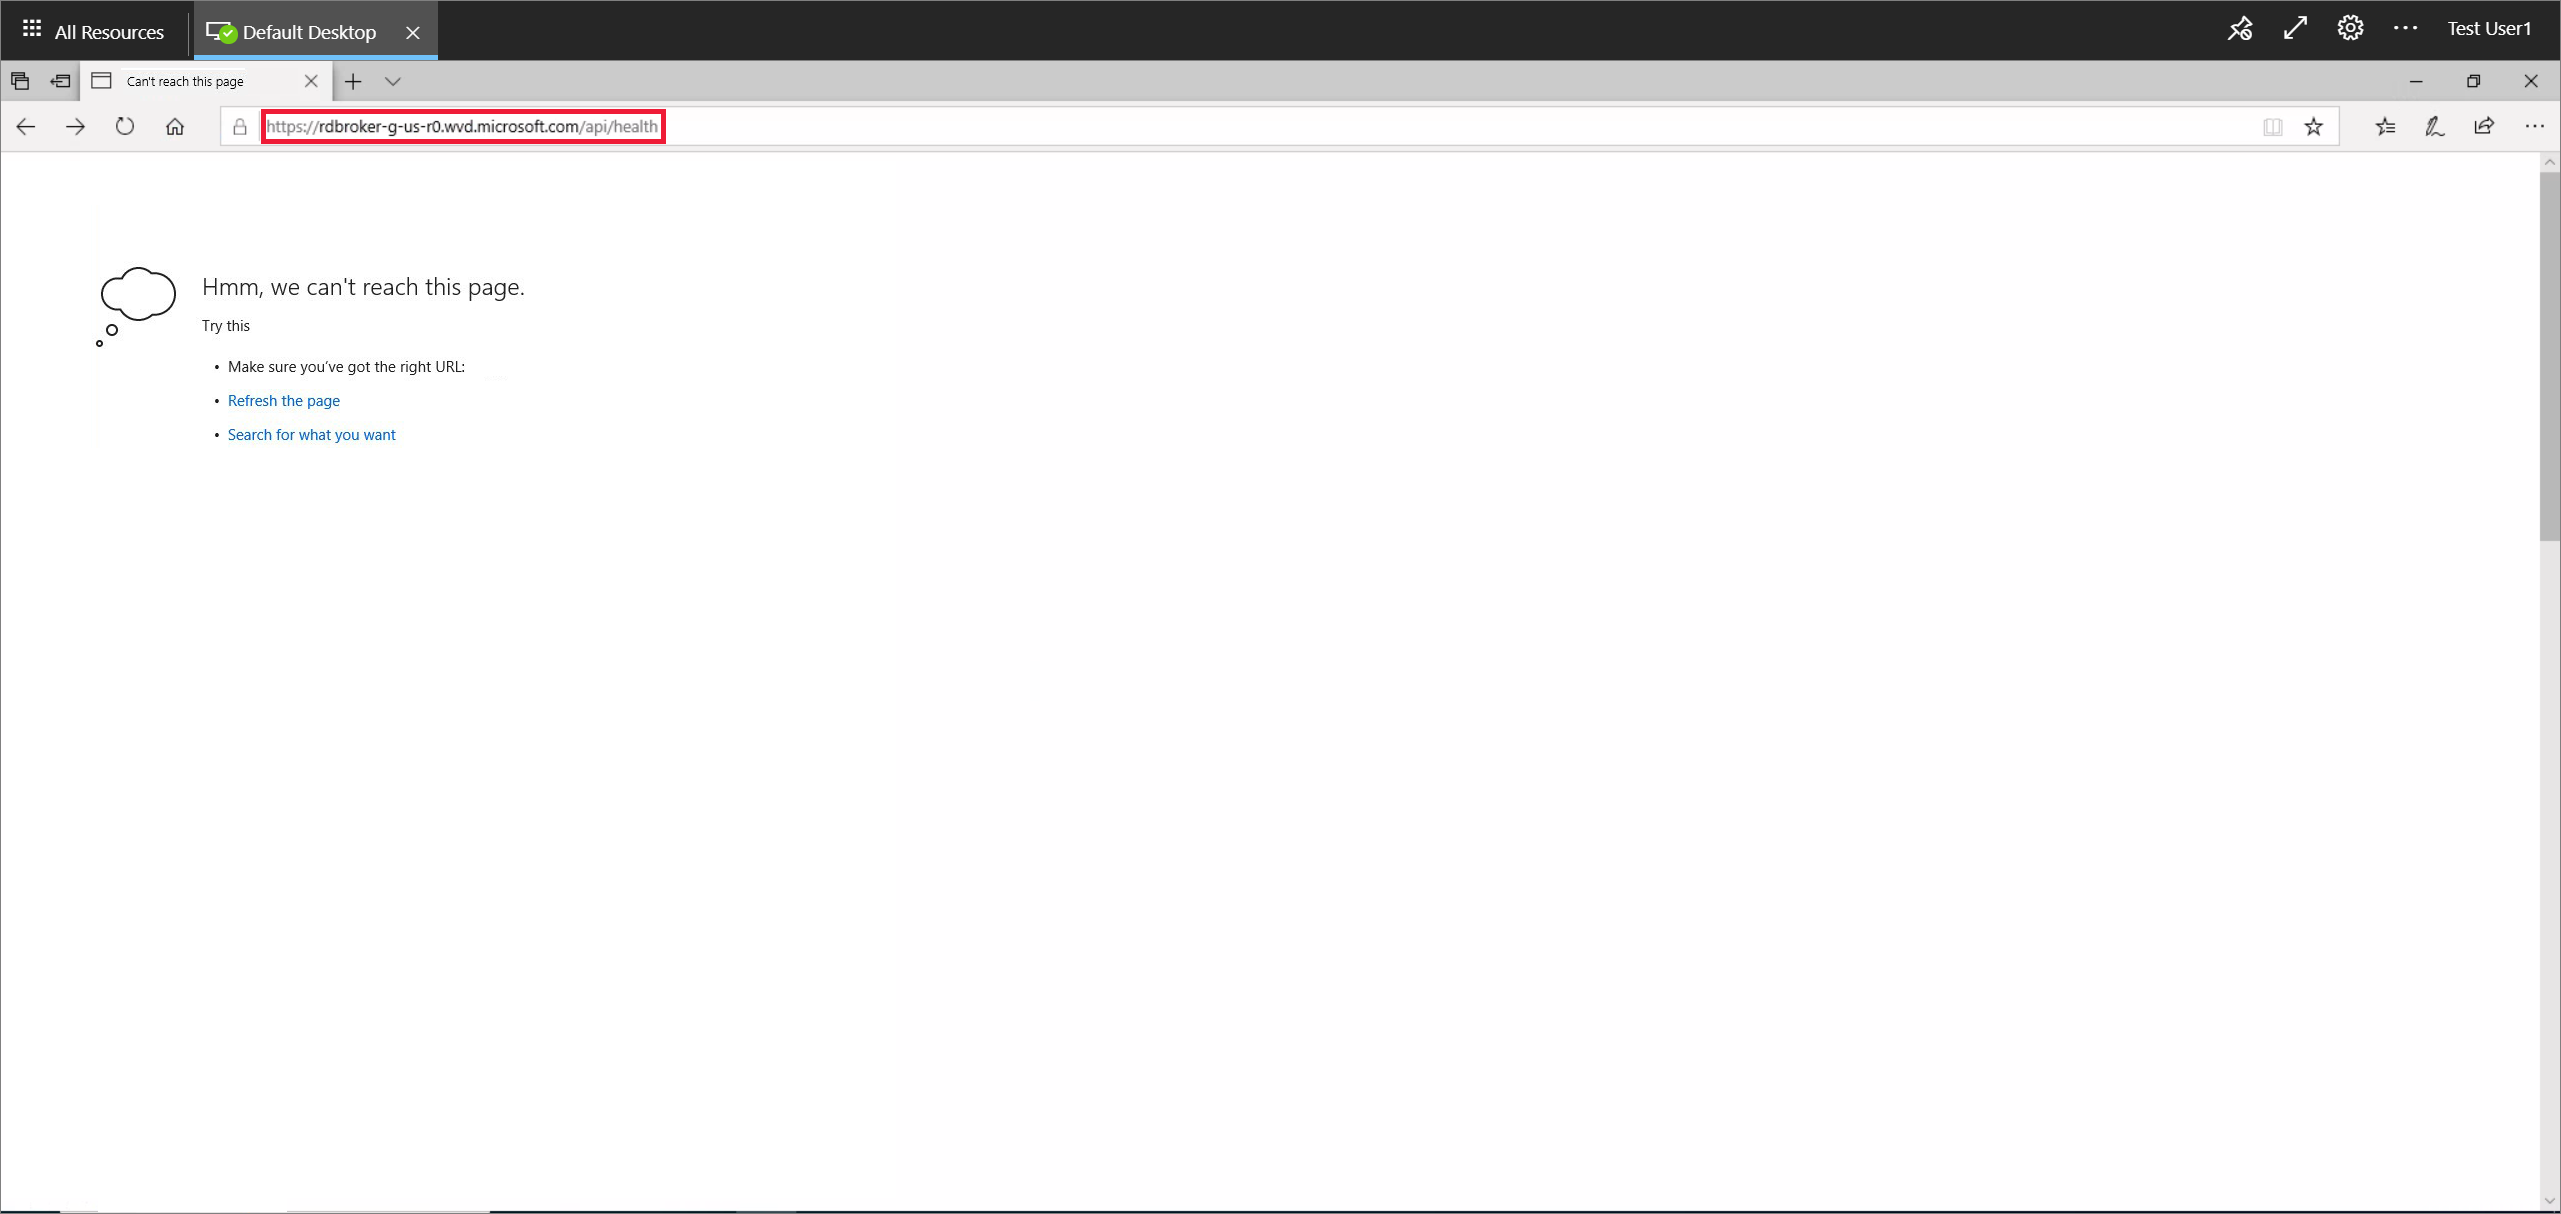
If the network is blocking broker connection, the pages won't load, as shown in the following screenshot.

You must unblock the required endpoints and then repeat steps 4 to 7. For more information, see Required URL List.
If following the previous steps doesn't resolve your issue, make sure that you don't have any group policies with ciphers that block the agent to broker connection. Azure Virtual Desktop uses the same TLS 1.2 ciphers as Azure Front Door. For more information, see Connection Security.
Error: 3703
On your session host VM, go to Event Viewer > Windows Logs > Application. If you see an event with ID 3703 with RD Gateway Url: is not accessible in the description, the agent is unable to reach the gateway URLs. To successfully connect to your session host, you must allow network traffic to the URLs from the Required URL List. Also, make sure your firewall or proxy settings don't block these URLs. Unblocking these URLs is required to use Azure Virtual Desktop.
To resolve this issue, verify whether you can access the required URLs by running the Required URL Check tool. If you're using Azure Firewall, see Use Azure Firewall to protect Azure Virtual Desktop deployments. and Azure Firewall DNS settings for more information on how to configure it for Azure Virtual Desktop.
Error: 3019
On your session host VM, go to Event Viewer > Windows Logs > Application. If you see an event with ID 3019, then the agent can't reach the web socket transport URLs. To successfully connect to your session host and allow network traffic to bypass these restrictions, you must unblock the URLs listed in the Required URL list. Work with your networking team to make sure your firewall, proxy, and DNS settings aren't blocking these URLs. You can also check your network trace logs to identify where the Azure Virtual Desktop service is being blocked. If you open a Microsoft Support case for this particular issue, make sure to attach your network trace logs to the request.
Error: InstallationHealthCheckFailedException
On your session host VM, go to Event Viewer > Windows Logs > Application. If you see an event with ID 3277 with InstallationHealthCheckFailedException in the description, then the stack listener isn't working because the terminal server has toggled the registry key for the stack listener.
To resolve this issue:
Check to see if the stack listener is working
If the stack listener isn't working, manually uninstall and reinstall the stack component.
Error: ENDPOINT_NOT_FOUND
On your session host VM, go to Event Viewer > Windows Logs > Application. If you see an event with ID 3277 with ENDPOINT_NOT_FOUND in the description, then the broker couldn't find an endpoint to establish a connection with. This connection issue can happen for one of the following reasons:
- There aren't any session host VMs in your host pool.
- The session host VMs in your host pool aren't active.
- All session host VMs in your host pool have exceeded the max session limit.
- None of the VMs in your host pool have the agent service running on them.
To resolve this issue:
Make sure the VM is powered on and hasn't been removed from the host pool.
Make sure that the VM hasn't exceeded the max session limit.
Make sure the agent service is running and the stack listener is working.
Make sure the agent can connect to the broker.
Make sure your VM has a valid registration token.
Make sure the VM registration token hasn't expired.
Error: InstallMsiException
On your session host VM, go to Event Viewer > Windows Logs > Application. If you see an event with ID 3277 with InstallMsiException in the description, the installer is already running for another application while you're trying to install the agent, or group policy is blocking msiexec.exe from running.
To check whether group policy is blocking msiexec.exe from running:
Open Resultant Set of Policy by running rsop.msc from an elevated command prompt.
In the Resultant Set of Policy window that pops up, go to Computer Configuration > Administrative Templates > Windows Components > Windows Installer > Turn off Windows Installer. If the state is Enabled, work with your Active Directory team to allow
msiexec.exeto run.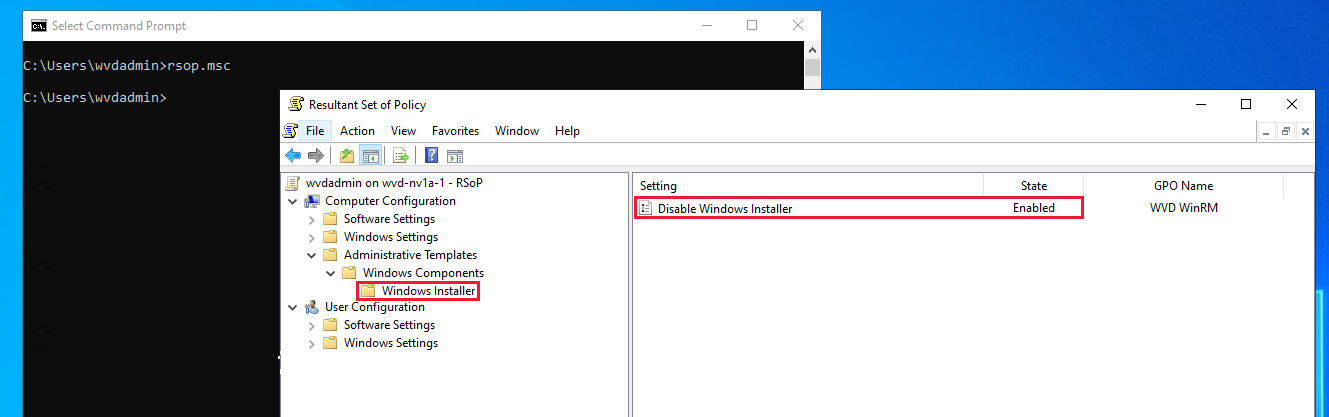
Note
This list isn't a comprehensive list of policies, just the ones we're currently aware of.
Error: Win32Exception
On your session host VM, go to Event Viewer > Windows Logs > Application. If you see an event with ID 3277 with InstallMsiException in the description, a policy is blocking cmd.exe from launching. Blocking this program prevents you from running the console window, which is what you need to use to restart the service whenever the agent updates.
Open Resultant Set of Policy by running rsop.msc from an elevated command prompt.
In the Resultant Set of Policy window that pops up, go to User Configuration > Administrative Templates > System > Prevent access to the command prompt. If the state is Enabled, work with your Active Directory team to allow
cmd.exeto run.
Error: Stack listener isn't working on a Windows 10 2004 session host VM
On your session host VM, from a command prompt run qwinsta.exe and make note of the version number that appears next to rdp-sxs in the SESSIONNAME column. If the STATE column for rdp-tcp and rdp-sxs entries isn't Listen, or if rdp-tcp and rdp-sxs entries aren't listed at all, it means that there's a stack issue. Stack updates get installed along with agent updates, but if the update was unsuccessful, the Azure Virtual Desktop Listener won't work.
To resolve this issue:
Open the Registry Editor.
Go to HKEY_LOCAL_MACHINE\SYSTEM\CurrentControlSet\Control\Terminal Server\WinStations.
Under WinStations you may see several folders for different stack versions, select a folder that matches the version information you saw when running
qwinsta.exein a command prompt.Find fReverseConnectMode and make sure its data value is 1. Also make sure that fEnableWinStation is set to 1.

If fReverseConnectMode isn't set to 1, select fReverseConnectMode and enter 1 in its value field.
If fEnableWinStation isn't set to 1, select fEnableWinStation and enter 1 into its value field.
Repeat the previous steps for each folder that matches the version information you saw when running
qwinsta.exein a command prompt.Tip
To change the fReverseConnectMode or fEnableWinStation mode for multiple VMs at a time, you can do one of the following two things:
- Export the registry key from the machine that you already have working and import it into all other machines that need this change.
- Create a group policy object (GPO) that sets the registry key value for the machines that need the change.
Restart your session host VM.
Open the Registry Editor.
Go to HKEY_LOCAL_MACHINE\SYSTEM\CurrentControlSet\Control\Terminal Server\ClusterSettings.
Under ClusterSettings, find SessionDirectoryListener and make sure its data value is
rdp-sxs<version number, where<version numbermatches the version information you saw when runningqwinsta.exein a command prompt .If SessionDirectoryListener isn't set to
rdp-sxs<version number, you'll need to follow the steps in the section Your issue isn't listed here or wasn't resolved.
Error: DownloadMsiException
On your session host VM, go to Event Viewer > Windows Logs > Application. If you see an event with ID 3277 with DownloadMsiException in the description, there isn't enough space on the disk for the RDAgent.
To resolve this issue, make space on your disk by:
- Deleting files that are no longer in use.
- Increasing the storage capacity of your session host VM.
Error: Agent fails to update with MissingMethodException
On your session host VM, go to Event Viewer > Windows Logs > Application. If you see an event with ID 3389 with MissingMethodException: Method not found in the description, then the Azure Virtual Desktop agent didn't update successfully and reverted to an earlier version. This issue may be happening because the version number of the .NET framework currently installed on your VMs is lower than 4.7.2. To resolve this issue, you need to upgrade the .NET to version 4.7.2 or later by following the installation instructions in the .NET Framework documentation.
Error: Session host VMs are stuck in Upgrading state
If the status listed for session hosts in your host pool always says Unavailable or Upgrading, the agent or stack didn't install successfully.
To resolve this issue, first reinstall the side-by-side stack:
Sign in to your session host VM as an administrator.
From an elevated PowerShell prompt run
qwinsta.exeand make note of the version number that appears next to rdp-sxs in the SESSIONNAME column. If the STATE column for rdp-tcp and rdp-sxs entries isn't Listen, or if rdp-tcp and rdp-sxs entries aren't listed at all, it means that there's a stack issue.Run the following command to stop the RDAgentBootLoader service:
Stop-Service RDAgentBootLoaderGo to Control Panel > Programs > Programs and Features, or on Windows 11 go to the Settings App > Apps.
Uninstall the latest version of the Remote Desktop Services SxS Network Stack or the version listed in Registry Editor in HKEY_LOCAL_MACHINE\SYSTEM\CurrentControlSet\Control\Terminal Server\WinStations under the value for ReverseConnectionListener.
Back at the PowerShell prompt, run the following commands to add the file path of the latest installer available on your session host VM for the side-by-side stack to a variable and list its name:
$sxsMsi = (Get-ChildItem "$env:SystemDrive\Program Files\Microsoft RDInfra\" | ? Name -like SxSStack*.msi | Sort-Object CreationTime -Descending | Select-Object -First 1).FullName
$sxsMsi
Install the latest installer available on your session host VM for the side-by-side stack by running the following command:
msiexec /i $sxsMsiRestart your session host VM.
From a command prompt run
qwinsta.exeagain and verify the STATE column for rdp-tcp and rdp-sxs entries is Listen. If not, you must re-register your VM and reinstall the agent component.
Error: Session hosts are stuck in Unavailable state
If your session host VMs are stuck in the Unavailable state, your VM didn't pass one of the health checks listed in Health check. You must resolve the issue that's causing the VM to not pass the health check.
Error: Session hosts are stuck in the Needs Assistance state
There are several health checks that can cause your session host VMs to be stuck in the Needs Assistance state, UrlsAccessibleCheck. MetaDataServiceCheck, and MonitoringAgentCheck.
UrlsAccessibleCheck
If the session host doesn't pass the UrlsAccessibleCheck health check, you'll need to identify which required URL your deployment is currently blocking. Once you know which URL is blocked, identify which setting is blocking that URL and remove it.
There are two reasons why the service is blocking a required URL:
- You have an active firewall that's blocking most outbound traffic and access to the required URLs.
- Your local hosts file is blocking the required websites.
To resolve a firewall-related issue, add a rule that allows outbound connections to the TCP port 80/443 associated with the blocked URLs.
If your local hosts file is blocking the required URLs, make sure none of the required URLs are in the Hosts file on your device. You can find the Hosts file location at the following registry key and value:
Key: HKLM\SYSTEM\CurrentControlSet\Services\Tcpip\Parameters
Type: REG_EXPAND_SZ
Name: DataBasePath
MetaDataServiceCheck
If the session host doesn't pass the MetaDataServiceCheck health check, then the service can't access the IMDS endpoint. To resolve this issue, you'll need to do the following things:
- Reconfigure your networking, firewall, or proxy settings to unblock the IP address 169.254.169.254.
- Make sure your HTTP clients bypass web proxies within the VM when querying IMDS. We recommend that you allow the required IP address in any firewall policies within the VM that deal with outbound network traffic direction.
If your issue is caused by a web proxy, add an exception for 169.254.169.254 in the web proxy's configuration. To add this exception, open an elevated Command Prompt or PowerShell session and run the following command:
netsh winhttp set proxy proxy-server="http=<customerwebproxyhere>" bypass-list="169.254.169.254"
MonitoringAgentCheck
If the session host doesn't pass the MonitoringAgentCheck health check, you'll need to check the Remote Desktop Services Infrastructure Geneva Agent and validate if it is functioning correctly on the session host:
Verify if the Remote Desktop Services Infrastructure Geneva Agent is installed on the session host. You can verify this in the list of installed programs on the session host. If you see multiple versions of this agent installed, uninstall older versions and only keep the latest version installed.
If you don't find the Remote Desktop Services Infrastructure Geneva Agent installed on the session host, please review logs located under C:\Program Files\Microsoft RDInfra\GenevaInstall.txt and see if installation is failing due to an error.
Verify if scheduled task GenevaTask_<version> is created. This scheduled task must be enabled and running. If it's not, please reinstall the agent using the
.msifile named Microsoft.RDInfra.Geneva.Installer-x64-<version>.msi, which is available at C:\Program Files\Microsoft RDInfra.
Error: Connection not found: RDAgent does not have an active connection to the broker
Your session host VMs may be at their connection limit and can't accept new connections.
To resolve this issue, either:
- Decrease the max session limit. This change ensures that resources are more evenly distributed across session hosts and prevent resource depletion.
- Increase the resource capacity of the session host VMs.
Error: Operating a Pro VM or other unsupported OS
The side-by-side stack is only supported by Windows Enterprise or Windows Server SKUs, which means that operating systems like Pro VM aren't. If you don't have an Enterprise or Server SKU, the stack installs on your VM but isn't activated, so it won't appear when you run qwinsta in your command line.
To resolve this issue, create session host VMs using a supported operating system.
Error: NAME_ALREADY_REGISTERED
The name of your session host VM has already been registered and is probably a duplicate.
To resolve this issue:
Follow the steps in the Remove the session host from the host pool section.
Create another VM. Make sure to choose a unique name for this VM.
Go to the Azure portal and open the Overview page for the host pool your VM was in.
Open the Session Hosts tab and check to make sure all session hosts are in that host pool.
Wait for 5-10 minutes for the session host status to say Available.

Your issue isn't listed here or wasn't resolved
If you can't find your issue in this article or the instructions didn't help you, we recommend you uninstall, reinstall, and re-register the Azure Virtual Desktop Agent. The instructions in this section show you how to reregister your session host VM to the Azure Virtual Desktop service by:
Uninstalling all agent, boot loader, and stack components.
Removing the session host from the host pool.
Generating a new registration key for the VM.
Reinstalling the Azure Virtual Desktop Agent and boot loader.
Follow these instructions in this section if one or more of the following scenarios apply to you:
- The state of your session host VM is stuck as Upgrading or Unavailable.
- Your stack listener isn't working and you're running on Windows 10 version 1809, 1903, or 1909.
- You're receiving an EXPIRED_REGISTRATION_TOKEN error.
- You're not seeing your session host VMs show up in the session hosts list.
- You don't see the Remote Desktop Agent Loader service in the Services console.
- You don't see the RdAgentBootLoader component as a running process in Task Manager.
- You're receiving a Connection Broker couldn't validate the settings error on custom image VMs.
- Previous sections in this article didn't resolve your issue.
Step 1: Uninstall all agent, boot loader, and stack component programs
Before reinstalling the agent, boot loader, and stack, you must uninstall any existing components from your VM. To uninstall all agent, boot loader, and stack component programs:
Sign in to your session host VM as an administrator.
Go to Control Panel > Programs > Programs and Features, or on Windows 11 go to the Settings App > Apps.
Uninstall the following programs, then restart your session host VM:
Caution
When uninstalling Remote Desktop Services SxS Network Stack, you'll be prompted that Remote Desktop Services and Remote Desktop Services UserMode Port Redirector should be closed. If you're connected to the session host VM using RDP, select Do not close applications then select OK, otherwise your RDP connection won't work.

- Remote Desktop Agent Boot Loader
- Remote Desktop Services Infrastructure Agent
- Remote Desktop Services Infrastructure Geneva Agent
- Remote Desktop Services SxS Network Stack
Note
You may see multiple instances of these programs. Make sure to remove all of them.

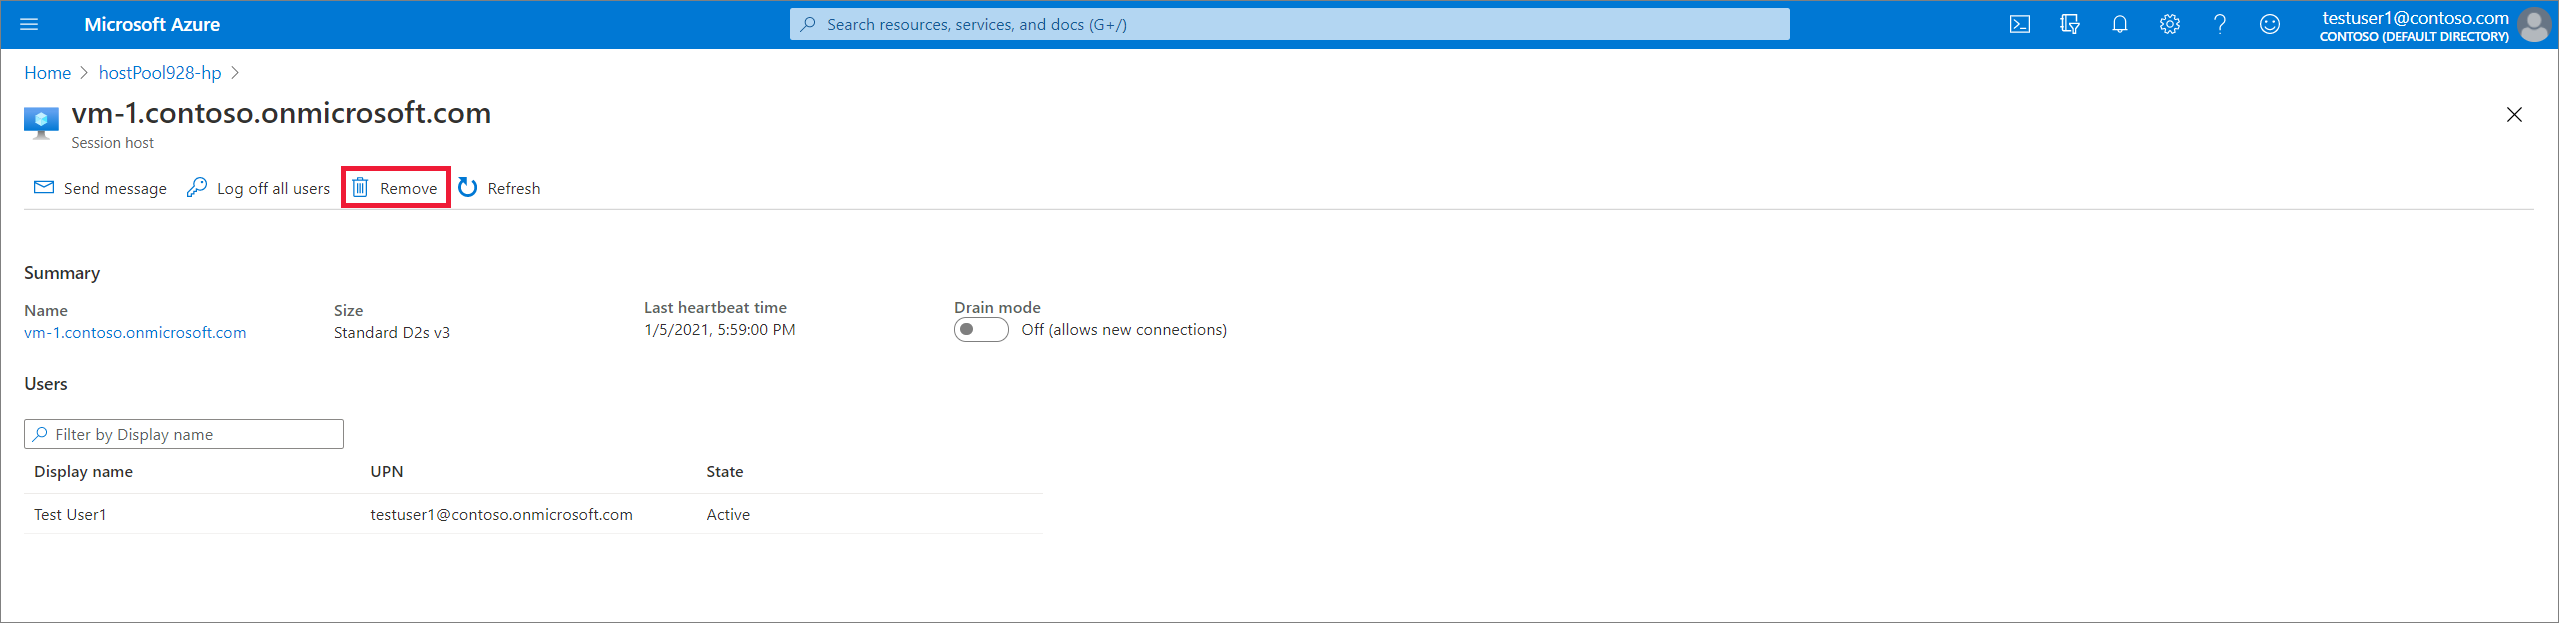
Step 2: Remove the session host from the host pool
When you remove the session host from the host pool, the session host is no longer registered to that host pool. This change acts as a reset for the session host registration. To remove the session host from the host pool:
Sign in to the Azure portal.
In the search bar, type Azure Virtual Desktop and select the matching service entry.
Select Host pools and select the name of the host pool that your session host VM is in.
Select Session Hosts to see the list of all session hosts in that host pool.
Look at the list of session hosts and tick the box next to the session host that you want to remove.
Select Remove.
Step 3: Generate a new registration key for the VM
You must generate a new registration key that is used to re-register your session VM to the host pool and to the service. To generate a new registration key for the VM:
Sign in to the Azure portal.
In the search bar, type Azure Virtual Desktop and select the matching service entry.
Select Host pools and select the name of the host pool that your session host VM is in.
On the Overview blade, select Registration key.

Open the Registration key tab and select Generate new key.
Enter the expiration date and then select Ok.
Note
The expiration date can be no less than an hour and no longer than 27 days from its generation time and date. Generate a registration key only for as long as you need.
- Copy the newly generated key to your clipboard or download the file. You'll need this key later.
Step 4: Reinstall the agent and boot loader
Reinstalling the latest version of the agent and boot loader also automatically installs the side-by-side stack and Geneva monitoring agent. To reinstall the agent and boot loader, follow these steps. This is the latest downloadable version of the Azure Virtual Desktop Agent in non-validation environments. For more information about the rollout of new versions of the agent, see What's new in the Azure Virtual Desktop Agent.
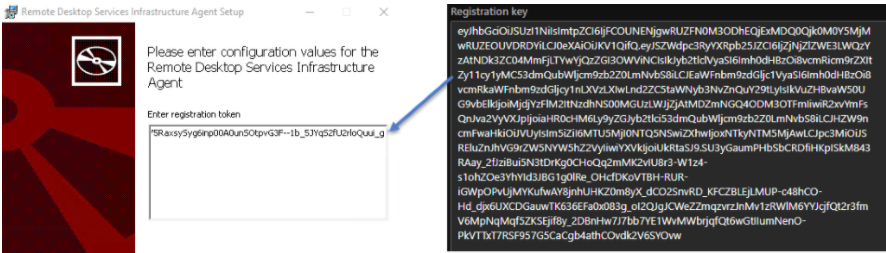
Sign in to your session host VM as an administrator and run the agent installer and bootloader for your session host VM:
Tip
For each of the the agent and boot loader installers you downloaded, you may need to unblock them. Right-click each file and select Properties, then select Unblock, and finally select OK.
When the installer asks you for the registration token, paste the registration key from your clipboard.
Run the boot loader installer.
Restart your session VM.
Sign in to the Azure portal.
In the search bar, enter Azure Virtual Desktop and select the matching service entry.
Select Host pools and select the name of the host pool that your session host VM is in.
Select Session Hosts to see the list of all session hosts in that host pool.
You should now see the session host registered in the host pool with the status Available.
Remove DisableRegistryTools registry key
If you've performed all four steps but the agent still doesn't work, that may be because the DisableRegistryTools registry key is enabled in one of the following locations:
- HKU:\DEFAULT\SOFTWARE\Microsoft\Windows\CurrentVersion\Policies\System\DisableRegistryTools = 1
- HKU:\S-1-5-18\SOFTWARE\Microsoft\Windows\CurrentVersion\Policies\System\DisableRegistryTools = 1
- HKCU:\SOFTWARE\Microsoft\Windows\CurrentVersion\Policies\System\DisableRegistryTools = 1
This registry key prevents the agent from installing the side-by-side stack, which results in an installMSIException error. This error leads to the session hosts being stuck in an unavailable state.
To resolve this issue, you'll need to remove the key:
Remove the DisableRegistryTools key from the three previously listed locations.
Uninstall and remove the affected side-by-side stack installation from the Apps & Features folder.
Remove the affected side-by-side stack's registry keys.
Restart your VM.
Start the agent and let it auto-install the side-by-side stack.
Next steps
If the issue continues, create a support case and include detailed information about the problem you're having and any actions you've taken to try to resolve it. The following list includes other resources you can use to troubleshoot issues in your Azure Virtual Desktop deployment.
- For an overview on troubleshooting Azure Virtual Desktop and the escalation tracks, see Troubleshooting overview, feedback, and support.
- To troubleshoot issues while creating a host pool in an Azure Virtual Desktop environment, see Environment and host pool creation.
- To troubleshoot issues while configuring a virtual machine (VM) in Azure Virtual Desktop, see Session host virtual machine configuration.
- To troubleshoot issues with Azure Virtual Desktop client connections, see Azure Virtual Desktop service connections.
- To troubleshoot issues when using PowerShell with Azure Virtual Desktop, see Azure Virtual Desktop PowerShell.
- To learn more about the service, see Azure Virtual Desktop environment.
- To go through a troubleshoot tutorial, see Tutorial: Troubleshoot Resource Manager template deployments.
- To learn about auditing actions, see Audit operations with Resource Manager.
- To learn about actions to determine the errors during deployment, see View deployment operations.
Feedback
Coming soon: Throughout 2024 we will be phasing out GitHub Issues as the feedback mechanism for content and replacing it with a new feedback system. For more information see: https://aka.ms/ContentUserFeedback.
Submit and view feedback for