Set up a Windows RDMA cluster with HPC Pack to run MPI applications
Important
Classic VMs will be retired on March 1, 2023.
If you use IaaS resources from ASM, please complete your migration by March 1, 2023. We encourage you to make the switch sooner to take advantage of the many feature enhancements in Azure Resource Manager.
For more information, see Migrate your IaaS resources to Azure Resource Manager by March 1, 2023.
Set up a Windows RDMA cluster in Azure with Microsoft HPC Pack and RDMA-capable HPC VM sizes to run parallel Message Passing Interface (MPI) applications. When you set up RDMA-capable, Windows Server-based nodes in an HPC Pack cluster, MPI applications communicate efficiently over a low latency, high throughput network in Azure that is based on remote direct memory access (RDMA) technology.
HPC Pack cluster deployment options
Microsoft HPC Pack is a tool provided at no additional cost to create HPC clusters on-premises or in Azure to run Windows or Linux HPC applications. HPC Pack includes a runtime environment for the Microsoft implementation of the Message Passing Interface for Windows (MS-MPI). When used with RDMA-capable instances running a supported Windows Server operating system, HPC Pack provides an efficient option to run Windows MPI applications that access the Azure RDMA network.
This article introduces two scenarios and links to detailed guidance to set up a Windows RDMA cluster with Microsoft HPC Pack 2012 R2.
- Scenario 1. Deploy compute-intensive worker role instances (PaaS)
- Scenario 2. Deploy compute nodes in compute-intensive VMs (IaaS)
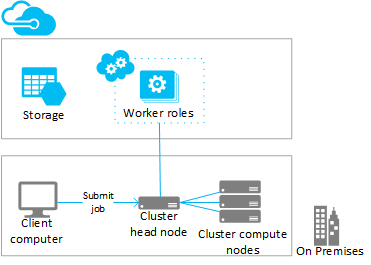
Scenario 1: Deploy compute-intensive worker role instances (PaaS)
From an existing HPC Pack cluster, add extra compute resources in Azure worker role instances (Azure nodes) running in a cloud service (PaaS). This feature, also called “burst to Azure” from HPC Pack, supports a range of sizes for the worker role instances. When adding the Azure nodes, specify one of the RDMA-capable sizes.
Following are considerations and steps to burst to RDMA-capable Azure instances from an existing (typically on-premises) cluster. Use similar procedures to add worker role instances to an HPC Pack head node that is deployed in an Azure VM.
Note
For a tutorial to burst to Azure with HPC Pack, see Set up a hybrid cluster with HPC Pack. Note the considerations in the following steps that apply specifically to RDMA-capable Azure nodes.
Steps
Deploy and configure an HPC Pack 2012 R2 head node
Download the HPC Pack installation package from the Microsoft Download Center. For requirements and instructions to prepare for an Azure burst deployment, see Burst to Azure Worker Instances with Microsoft HPC Pack.
Configure a management certificate in the Azure subscription
Configure a certificate to secure the connection between the head node and Azure. For options and procedures, see Scenarios to Configure the Azure Management Certificate for HPC Pack. For test deployments, HPC Pack installs a Default Microsoft HPC Azure Management Certificate you can quickly upload to your Azure subscription.
Create a new cloud service and a storage account
Use the Azure portal to create a cloud service (classic) and a storage account (classic) for the deployment. Create these resources in a region where the H-series, A8, or A9 size you want to use is available. See Azure products by region.
Create an Azure node template
Use the Create Node Template Wizard in HPC Cluster Manager. For steps, see Create an Azure node template in “Steps to Deploy Azure Nodes with Microsoft HPC Pack”.
For initial tests, we suggest configuring a manual availability policy in the template.
Add nodes to the cluster
Use the Add Node Wizard in HPC Cluster Manager. For more information, see Add Azure Nodes to the Windows HPC Cluster.
When specifying the size of the nodes, select one of the RDMA-capable instance sizes.
Note
In each burst to Azure deployment with the compute-intensive instances, HPC Pack automatically deploys a minimum of two RDMA-capable instances (such as A8) as proxy nodes, in addition to the Azure worker role instances you specify. The proxy nodes use cores that are allocated to the subscription and incur charges along with the Azure worker role instances.
Start (provision) the nodes and bring them online to run jobs
Select the nodes and use the Start action in HPC Cluster Manager. When provisioning is complete, select the nodes and use the Bring Online action in HPC Cluster Manager. The nodes are ready to run jobs.
Submit jobs to the cluster
Use HPC Pack job submission tools to run cluster jobs. See Microsoft HPC Pack: Job Management.
Stop (deprovision) the nodes
When you are done running jobs, take the nodes offline and use the Stop action in HPC Cluster Manager.
Scenario 2: Deploy compute nodes in compute-intensive VMs (IaaS)
In this scenario, you deploy the HPC Pack head node and cluster compute nodes on VMs in an Azure virtual network. HPC Pack provides several deployment options in Azure VMs, including automated deployment scripts and Azure quickstart templates. As an example, the following considerations and steps guide you to use the HPC Pack IaaS deployment script to automate the deployment of an HPC Pack 2012 R2 cluster in Azure.

Steps
Create a cluster head node and compute node VMs by running the HPC Pack IaaS deployment script on a client computer
Download the HPC Pack IaaS Deployment Script package from the Microsoft Download Center.
To prepare the client computer, create the script configuration file, and run the script, see Create an HPC Cluster with the HPC Pack IaaS deployment script.
For considerations to deploy RDMA-capable compute nodes, see High performance compute VM sizes and note the following:
Virtual network: Specify a new virtual network in a region in which the H-series, A8, or A9 size you want to use is available. See Azure products by region.
Windows Server operating system: To support RDMA connectivity, specify a compatible Windows Server operating system such as Windows Server 2012 R2 for the compute node VMs.
Cloud services: Because the script uses the classic deployment model, the cluster VMs are deployed using Azure cloud services (
ServiceNamesettings in the configuration file). We recommend deploying your head node in one cloud service and your compute nodes in a different cloud service.Head node size: For this scenario, consider a size of at least A4 (Extra Large) for the head node.
HpcVmDrivers extension: The deployment script installs the Azure VM Agent and the HpcVmDrivers extension automatically when you deploy size A8 or A9 compute nodes with a Windows Server operating system. HpcVmDrivers installs drivers on the compute node VMs so they can connect to the RDMA network. On RDMA-capable H-series VMs, you must manually install the HpcVmDrivers extension. See High performance compute VM sizes.
Cluster network configuration: The deployment script automatically sets up the HPC Pack cluster in Topology 5 (all nodes on the Enterprise network). This topology is required for all HPC Pack cluster deployments in VMs. Do not change the cluster network topology later.
Bring the compute nodes online to run jobs
Select the nodes and use the Bring Online action in HPC Cluster Manager. The nodes are ready to run jobs.
Submit jobs to the cluster
Connect to the head node to submit jobs, or set up an on-premises computer to do this. For information, see Submit Jobs to an HPC cluster in Azure.
Take the nodes offline and stop (deallocate) them
When you are done running jobs, take the nodes offline in HPC Cluster Manager. Then, use Azure management tools to shut them down.
Run MPI applications on the cluster
Example: Run mpipingpong on an HPC Pack cluster
To verify an HPC Pack deployment of the RDMA-capable instances, run the HPC Pack mpipingpong command on the cluster. mpipingpong sends packets of data between paired nodes repeatedly to calculate latency and throughput measurements and statistics for the RDMA-enabled application network. This example shows a typical pattern for running an MPI job (in this case, mpipingpong) by using the cluster mpiexec command.
This example assumes you added Azure nodes in a “burst to Azure” configuration ([Scenario 1](#scenario-1.-deploy-compute-intensive-worker-role-instances-(PaaS) in this article). If you deployed HPC Pack on a cluster of Azure VMs, you’ll need to modify the command syntax to specify a different node group and set additional environment variables to direct network traffic to the RDMA network.
To run mpipingpong on the cluster:
On the head node or on a properly configured client computer, open a Command Prompt.
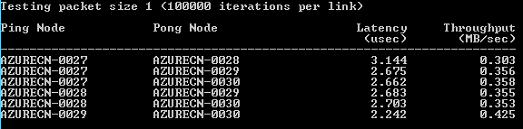
To estimate latency between pairs of nodes in an Azure burst deployment of four nodes, type the following command to submit a job to run mpipingpong with a small packet size and many iterations:
job submit /nodegroup:azurenodes /numnodes:4 mpiexec -c 1 -affinity mpipingpong -p 1:100000 -op -s nulThe command returns the ID of the job that is submitted.
If you deployed the HPC Pack cluster deployed on Azure VMs, specify a node group that contains compute node VMs deployed in a single cloud service, and modify the mpiexec command as follows:
job submit /nodegroup:vmcomputenodes /numnodes:4 mpiexec -c 1 -affinity -env MSMPI_DISABLE_SOCK 1 -env MSMPI_PRECONNECT all -env MPICH_NETMASK 172.16.0.0/255.255.0.0 mpipingpong -p 1:100000 -op -s nulWhen the job completes, to view the output (in this case, the output of task 1 of the job), type the following
task view <JobID>.1where <JobID> is the ID of the job that was submitted.
The output includes latency results similar to the following.
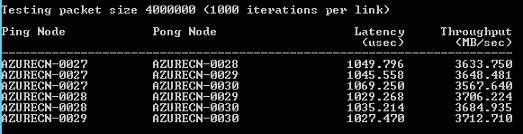
To estimate throughput between pairs of Azure burst nodes, type the following command to submit a job to run mpipingpong with a large packet size and a few iterations:
job submit /nodegroup:azurenodes /numnodes:4 mpiexec -c 1 -affinity mpipingpong -p 4000000:1000 -op -s nulThe command returns the ID of the job that is submitted.
On an HPC Pack cluster deployed on Azure VMs, modify the command as noted in step 2.
When the job completes, to view the output (in this case, the output of task 1 of the job), type the following:
task view <JobID>.1The output includes throughput results similar to the following.
MPI application considerations
Following are considerations for running MPI applications with HPC Pack in Azure. Some apply only to deployments of Azure nodes (worker role instances added in a “burst to Azure” configuration).
Worker role instances in a cloud service are periodically reprovisioned without notice by Azure (for example, for system maintenance, or in case an instance fails). If an instance is reprovisioned while it is running an MPI job, the instance loses its data and returns to the state when it was first deployed, which can cause the MPI job to fail. The more nodes that you use for a single MPI job, and the longer the job runs, the more likely that one of the instances is reprovisioned while a job is running. Also consider this if you designate a single node in the deployment as a file server.
To run MPI jobs in Azure, you don't have to use the RDMA-capable instances. You can use any instance size that is supported by HPC Pack. However, the RDMA-capable instances are recommended for running relatively large-scale MPI jobs that are sensitive to the latency and the bandwidth of the network that connects the nodes. If you use other sizes to run latency- and bandwidth-sensitive MPI jobs, we recommend running small jobs, in which a single task runs on only a few nodes.
Applications deployed to Azure instances are subject to the licensing terms associated with the application. Check with the vendor of any commercial application for licensing or other restrictions for running in the cloud. Not all vendors offer pay-as-you-go licensing.
Azure instances need further setup to access on-premises nodes, shares, and license servers. For example, to enable the Azure nodes to access an on-premises license server, you can configure a site-to-site Azure virtual network.
To run MPI applications on Azure instances, register each MPI application with Windows Firewall on the instances by running the hpcfwutil command. This allows MPI communications to take place on a port that is assigned dynamically by the firewall.
Note
For burst to Azure deployments, you can also configure a firewall exception command to run automatically on all new Azure nodes that are added to your cluster. After you run the hpcfwutil command and verify that your application works, add the command to a startup script for your Azure nodes. For more information, see Use a Startup Script for Azure Nodes.
HPC Pack uses the CCP_MPI_NETMASK cluster environment variable to specify a range of acceptable addresses for MPI communication. Starting in HPC Pack 2012 R2, the CCP_MPI_NETMASK cluster environment variable only affects MPI communication between domain-joined cluster compute nodes (either on-premises or in Azure VMs). The variable is ignored by nodes added in a burst to Azure configuration.
MPI jobs can't run across Azure instances that are deployed in different cloud services (for example, in burst to Azure deployments with different node templates, or Azure VM compute nodes deployed in multiple cloud services). If you have multiple Azure node deployments that are started with different node templates, the MPI job must run on only one set of Azure nodes.
When you add Azure nodes to your cluster and bring them online, the HPC Job Scheduler Service immediately tries to start jobs on the nodes. If only a portion of your workload can run on Azure, ensure that you update or create job templates to define what job types can run on Azure. For example, to ensure that jobs submitted with a job template only run on Azure nodes, add the Node Groups property to the job template and select AzureNodes as the required value. To create custom groups for your Azure nodes, use the Add-HpcGroup HPC PowerShell cmdlet.
Next steps
- As an alternative to using HPC Pack, develop with the Azure Batch service to run MPI applications on managed pools of compute nodes in Azure. See Use multi-instance tasks to run Message Passing Interface (MPI) applications in Azure Batch.