Tutorial: Enable disaster recovery for Windows VMs
Applies to: ✔️ Windows VMs ✔️ Flexible scale sets
This tutorial shows you how to set up disaster recovery for Azure VMs running Windows. In this article, learn how to:
- Enable disaster recovery for a Windows VM
- Run a disaster recovery drill to check it works as expected
- Stop replicating the VM after the drill
When you enable replication for a VM, the Site Recovery Mobility service extension installs on the VM, and registers it with Azure Site Recovery. During replication, VM disk writes are sent to a cache storage account in the source region. Data is sent from there to the target region, and recovery points are generated from the data. When you fail over a VM during disaster recovery, a recovery point is used to create a VM in the target region.
If you don't have an Azure subscription, create a free account before you begin.
Prerequisites
Check that your Azure subscription allows you to create a VM in the target region. If you just created your free Azure account, you're the administrator of the subscription, and you have the permissions you need.
If you're not the subscription administrator, work with the administrator to assign you:
- Either the Virtual Machine Contributor built-in role, or specific permissions to:
- Create a VM in the selected virtual network.
- Write to an Azure storage account.
- Write to an Azure-managed disk.
- The Site Recovery Contributor built-in role, to manage Site Recovery operations in the vault.
- Either the Virtual Machine Contributor built-in role, or specific permissions to:
We recommend you use a Windows VM running Windows Server 2012 or later. The VM disk shouldn't be encrypted for the purpose of this tutorial.
If VM outbound connections use a URL-based proxy, make sure it can access these URLs. Using an authenticated proxy isn't supported.
Name Public cloud Government cloud Details Storage *.blob.core.windows.net*.blob.core.usgovcloudapi.netWrite data from the VM to the cache storage account in the source region. Microsoft Entra ID login.microsoftonline.comlogin.microsoftonline.usAuthorize and authenticate to Site Recovery service URLs. Replication *.hypervrecoverymanager.windowsazure.com*.hypervrecoverymanager.windowsazure.comVM communication with the Site Recovery service. Service Bus *.servicebus.windows.net*.servicebus.usgovcloudapi.netVM writes to Site Recovery monitoring and diagnostic data. If you're using network security groups (NSGs) to limit network traffic for VMs, create NSG rules that allow outbound connectivity (HTTPS 443) for the VM using these service tags (groups of IP addresses). Try out the rules on a test NSG first.
Tag Allow Storage tag Allows data to be written from the VM to the cache storage account. Microsoft Entra ID tag Allows access to all IP addresses that correspond to Microsoft Entra ID. EventsHub tag Allows access to Site Recovery monitoring. AzureSiteRecovery tag Allows access to the Site Recovery service in any region. GuestAndHybridManagement Use if you want to automatically upgrade the Site Recovery Mobility agent that's running on VMs enabled for replication. On Windows VMs, install the latest Windows updates, to make sure that VMs have the latest root certificates.
Create a VM and enable disaster recovery
You can optionally enable disaster recovery when you create a VM.
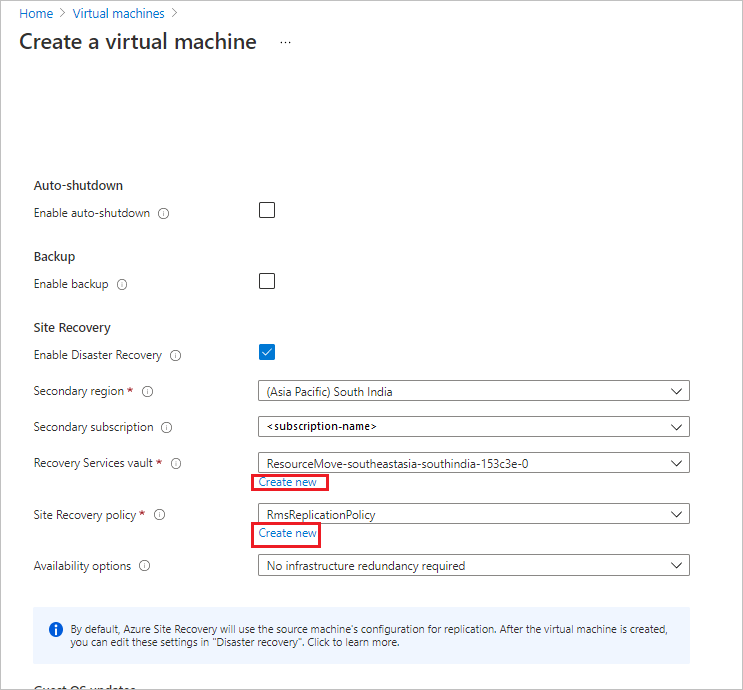
On the Management tab, select Enable disaster recovery.
In Secondary region, select the target region to which you want to replicate a VM for disaster recovery.
In Secondary subscription, select the target subscription in which the target VM will be created. The target VM is created when you fail over the source VM from the source region to the target region.
In Recovery Services vault, select the vault you want to use for the replication. If you don't have a vault, select Create new. Select a resource group in which to place the vault, and a vault name.
In Site Recovery policy, leave the default policy, or select Create new to set custom values.
- Recovery points are created from snapshots of VM disks taken at a specific point in time. When you fail over a VM, you use a recovery point to restore the VM in the target region.
- A crash-consistent recovery point is created every five minutes. This setting can't be modified. A crash-consistent snapshot captures data that was on the disk when the snapshot was taken. It doesn't include anything in memory.
- By default Site Recovery keeps crash-consistent recovery points for 24 hours. You can set a custom value between 0 and 72 hours.
- An app-consistent snapshot is taken every 4 hours. An app-consistent snapshot
- By default Site Recovery stores recovery points for 24 hours.
In Availability options, specify whether the VM is deploy as standalone, in an availability zone, or in an availability set.
Finish creating the VM.
Note
When you enable replication while creating a Windows VM, only the OS disk gets replicated. Data disks need to be initialized by you, after which Azure Site Recovery automatically replicates them.
Enable disaster recovery for an existing VM
If you want to enable disaster recovery on an existing VM instead of for a new VM, use this procedure.
In the Azure portal, open the VM properties page.
In Operations, select Disaster recovery.

In Basics, if the VM is deployed in an availability zone, you can select disaster recovery between availability zones.
In Target region, select the region to which you want to replicate the VM. The source and target regions must be in the same Microsoft Entra tenant.
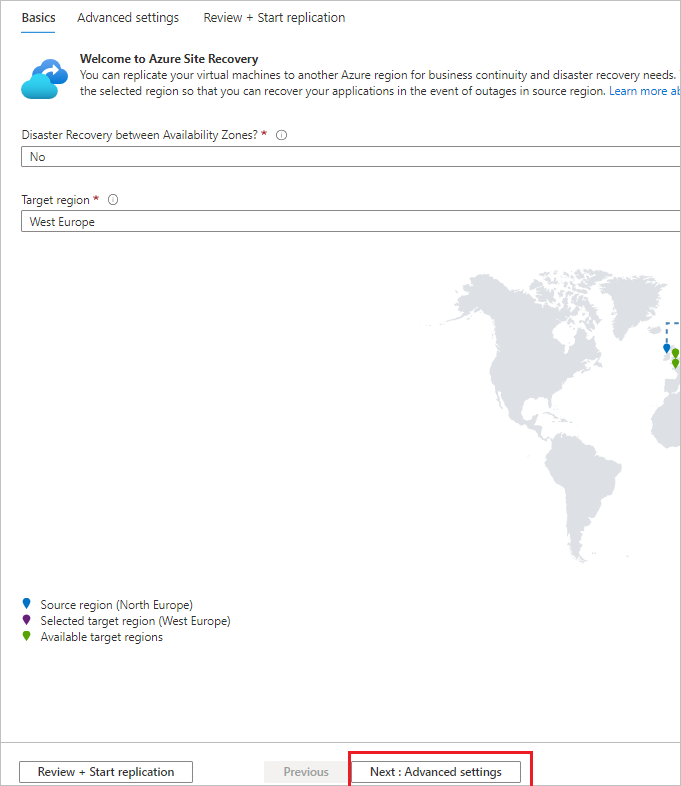
Select Next: Advanced settings.
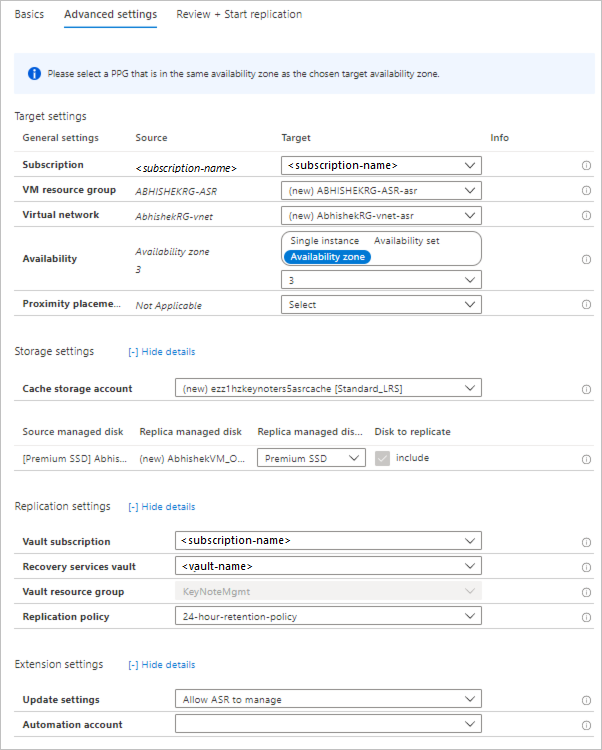
In Advanced settings, you can review settings, and modify values to custom settings. By default, Site Recovery mirrors the source settings to create target resources.
- Target subscription. The subscription in which the target VM is created after failover.
- Target VM resource group. The resource group in which the target VM is created after failover.
- Target virtual network. The Azure virtual network in which the target VM is located when it's created after failover.
- Target availability. When the target VM is created as a single instance, in an availability set, or availability zone.
- Proximity placement. If applicable, select the proximity placement group in which the target VM is located after failover.
- Storage settings-Cache storage account. Recovery uses a storage account in the source region as a temporary data store. Source VM changes are cached in this account, before being replicated to the target location.
- By default one cache storage account is created per vault and reused.
- You can select a different storage account if you want to customize the cache account for the VM.
- Storage settings-Replica managed disk. By default, Site Recovery creates replica managed disks in the target region.
- By default the target managed disk mirror the source VM managed disks, using the same storage type (standard HDD/SSD, or premium SSD).
- You can customize the storage type as needed.
- Replication settings. Shows the vault in which the VM is located, and the replication policy used for the VM. By default, recovery points created by Site Recovery for the VM are kept for 24 hours.
- Extension settings. Indicates that Site Recovery manages updates to the Site Recovery Mobility Service extension that's installed on VMs you replicate.
- The indicated Azure automation account manages the update process.
- You can customize the automation account.
Select Review + Start replication.
Select Start replication. Deployment starts, and Site Recovery starts creating target resources. You can monitor replication progress in the notifications.

Check VM status
After the replication job finishes, you can check the VM replication status.
Open the VM properties page.
In Operations, select Disaster recovery.
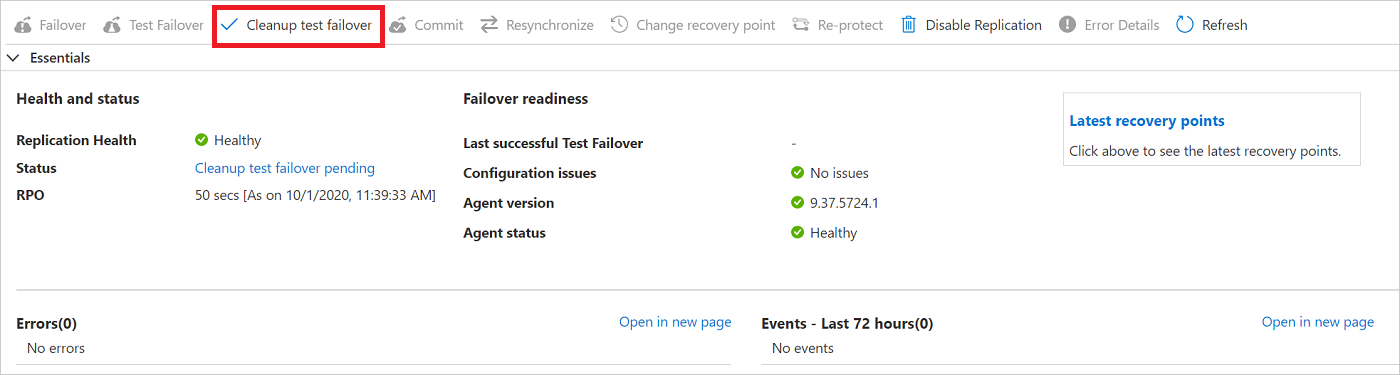
Expand the Essentials section to review defaults about the vault, replication policy, and target settings.
In Health and status, get information about replication state for the VM, the agent version, failover readiness, and the latest recovery points.
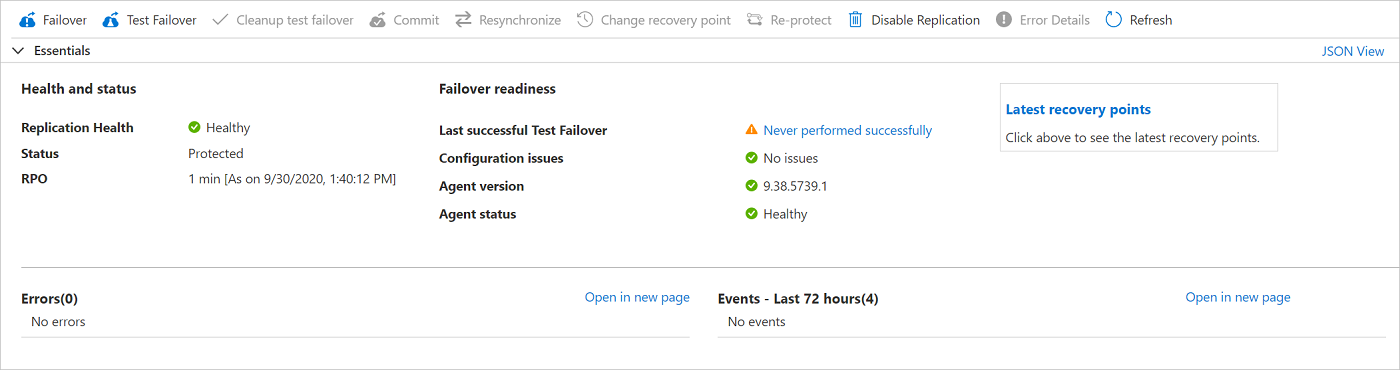
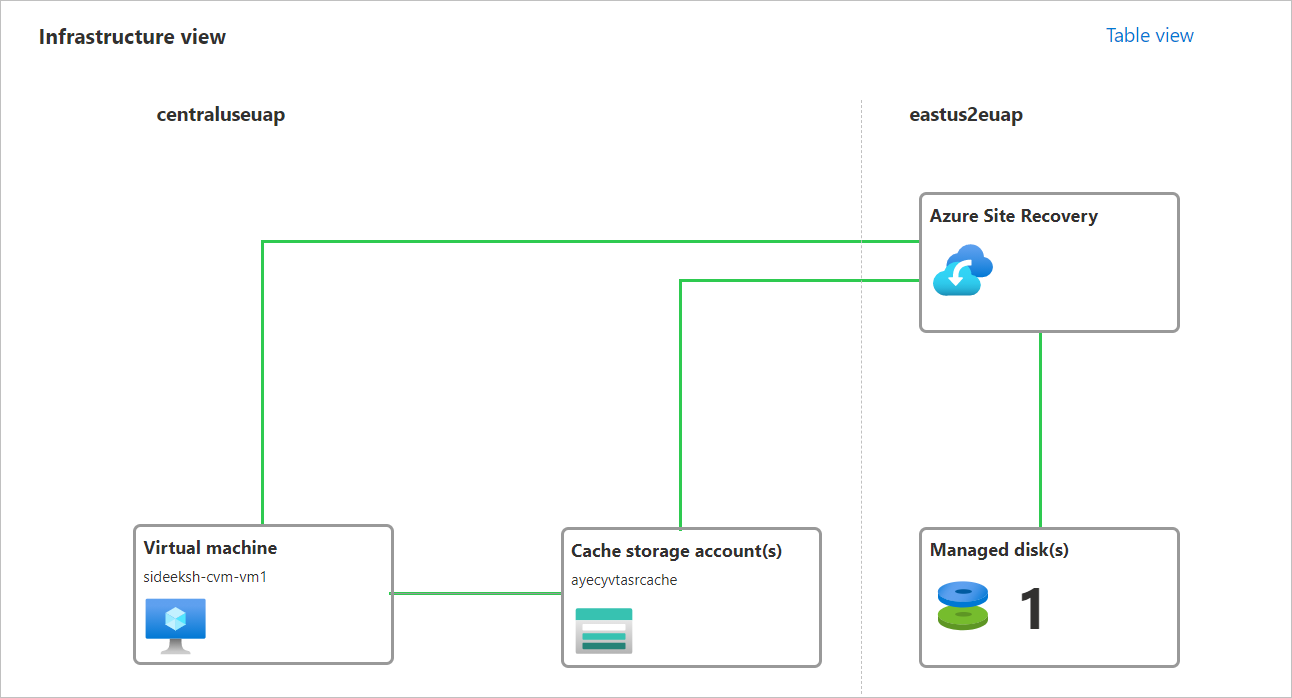
In Infrastructure view, get a visual overview of source and target VMs, managed disks, and the cache storage account.
Run a drill
Run a drill to make sure disaster recovery works as expected. When you run a test failover, it creates a copy of the VM, with no impact on ongoing replication, or on your production environment.
In the VM disaster recovery page, select Test failover.
In Test failover, leave the default Latest processed (low RPO) setting for the recovery point.
This option provides the lowest recovery point objective (RPO), and generally the quickest spin up of the target VM. It first processes all the data that has been sent to Site Recovery service, to create a recovery point for each VM, before failing over to it. This recovery point has all the data replicated to Site Recovery when the failover was triggered.
Select the virtual network in which the VM will be located after failover.

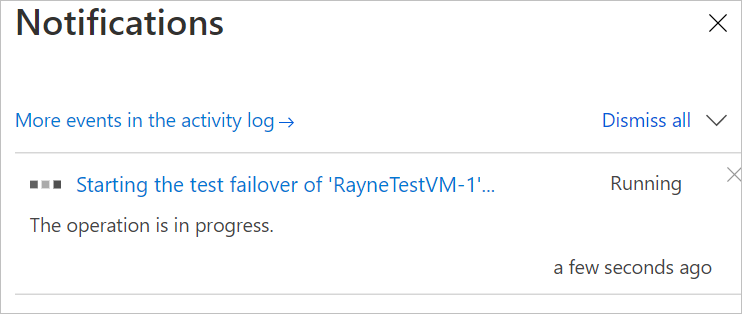
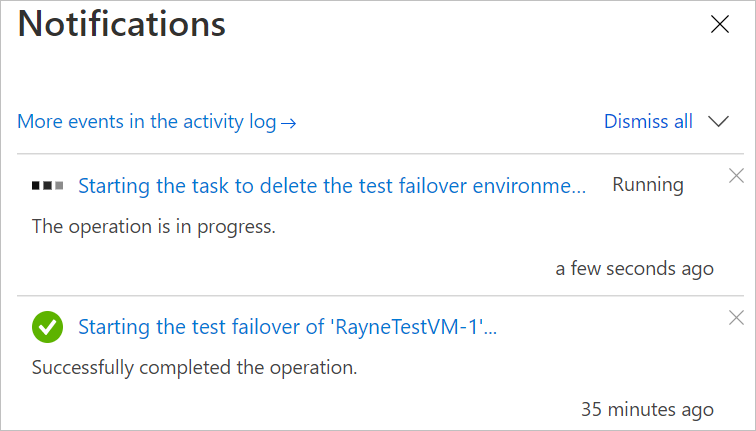
The test failover process begins. You can monitor the progress in notifications.
After the test failover completes, the VM is in the Cleanup test failover pending state on the Essentials page.
Clean up resources
The VM is automatically cleaned up by Site Recovery after the drill.
To begin automatic cleanup, select Cleanup test failover.
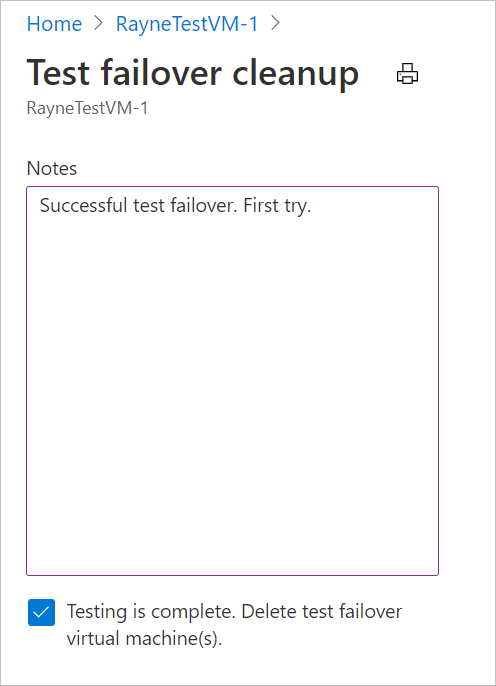
In Test failover cleanup, type in any notes you want to record for the failover, and then select Testing is complete. Delete test failover virtual machine. Then select OK.
The delete process begins. You can monitor progress in notifications.
Stop replicating the VM
After completing a disaster recovery drill, we suggest you continue to try out a full failover. If you don't want to do a full failover, you can disable replication. This does the following:
- Removes the VM from the Site Recovery list of replicated machines.
- Stops Site Recovery billing for the VM.
- Automatically cleans up source replication settings.
Stop replication as follows:
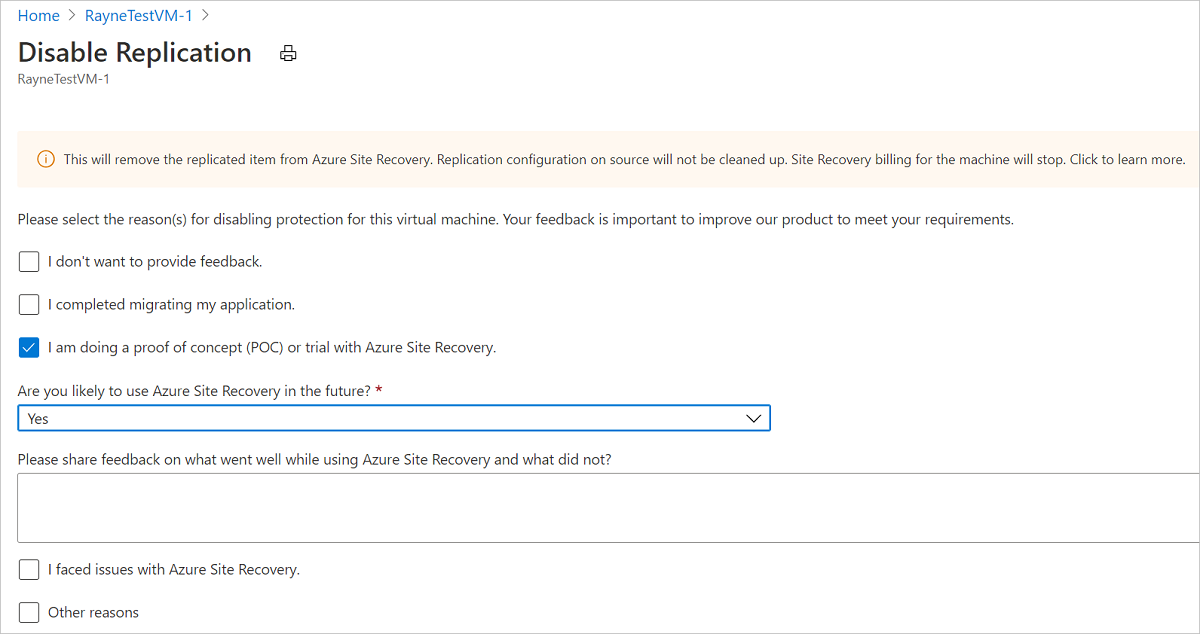
In the VM disaster recovery page, select Disable Replication.
In Disable Replication, select the reasons that you want to disable replication. Then select OK.
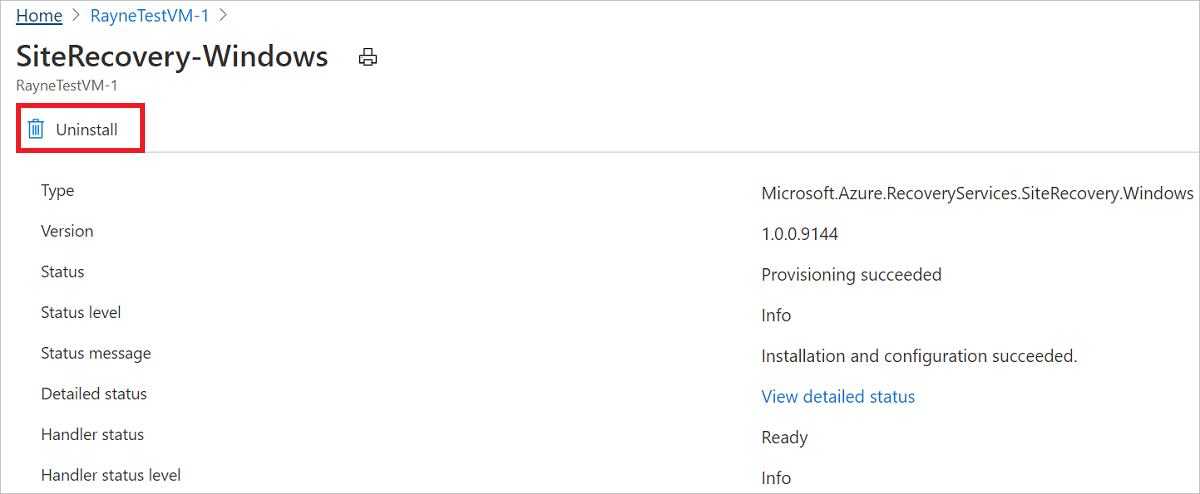
The Site Recovery extension installed on the VM during replication isn't removed automatically. If you disable replication for the VM, and you don't want to replicate it again at a later time, you can remove the Site Recovery extension manually, as follows:
Go to the VM > Settings > Extensions.
In the Extensions page, select each Microsoft.Azure.RecoveryServices entry for Linux.
In the properties page for the extension, select Uninstall.
Next steps
In this tutorial, you configured disaster recovery for an Azure VM, and ran a disaster recovery drill. Now, you can perform a full failover for the VM.
Feedback
Coming soon: Throughout 2024 we will be phasing out GitHub Issues as the feedback mechanism for content and replacing it with a new feedback system. For more information see: https://aka.ms/ContentUserFeedback.
Submit and view feedback for