GlusterFS on Azure VMs on Red Hat Enterprise Linux for SAP NetWeaver
This article describes how to deploy the virtual machines, configure the virtual machines, and install a GlusterFS cluster that can be used to store the shared data of a highly available SAP system. This guide describes how to set up GlusterFS that is used by two SAP systems, NW1 and NW2. The names of the resources (for example virtual machines, virtual networks) in the example assume that you have used the SAP file server template with resource prefix glust.
Be aware that as documented in Red Hat Gluster Storage Life Cycle Red Hat Gluster Storage will reach end of life at the end of 2024. The configuration will be supported for SAP on Azure until it reaches end of life stage. GlusterFS should not be used for new deployments. We recommend to deploy the SAP shared directories on NFS on Azure Files or Azure NetApp Files volumes as documented in HA for SAP NW on RHEL with NFS on Azure Files or HA for SAP NW on RHEL with Azure NetApp Files.
Read the following SAP Notes and papers first
SAP Note 1928533, which has:
- List of Azure VM sizes that are supported for the deployment of SAP software
- Important capacity information for Azure VM sizes
- Supported SAP software, and operating system (OS) and database combinations
- Required SAP kernel version for Windows and Linux on Microsoft Azure
SAP Note 2015553 lists prerequisites for SAP-supported SAP software deployments in Azure.
SAP Note 2002167 has recommended OS settings for Red Hat Enterprise Linux
SAP Note 2009879 has SAP HANA Guidelines for Red Hat Enterprise Linux
SAP Note 2178632 has detailed information about all monitoring metrics reported for SAP in Azure.
SAP Note 2191498 has the required SAP Host Agent version for Linux in Azure.
SAP Note 2243692 has information about SAP licensing on Linux in Azure.
SAP Note 1999351 has additional troubleshooting information for the Azure Enhanced Monitoring Extension for SAP.
SAP Community WIKI has all required SAP Notes for Linux.
Azure Virtual Machines planning and implementation for SAP on Linux
Azure Virtual Machines deployment for SAP on Linux (this article)
General RHEL documentation
Azure specific RHEL documentation:
Overview
To achieve high availability, SAP NetWeaver requires shared storage. GlusterFS is configured in a separate cluster and can be used by multiple SAP systems.
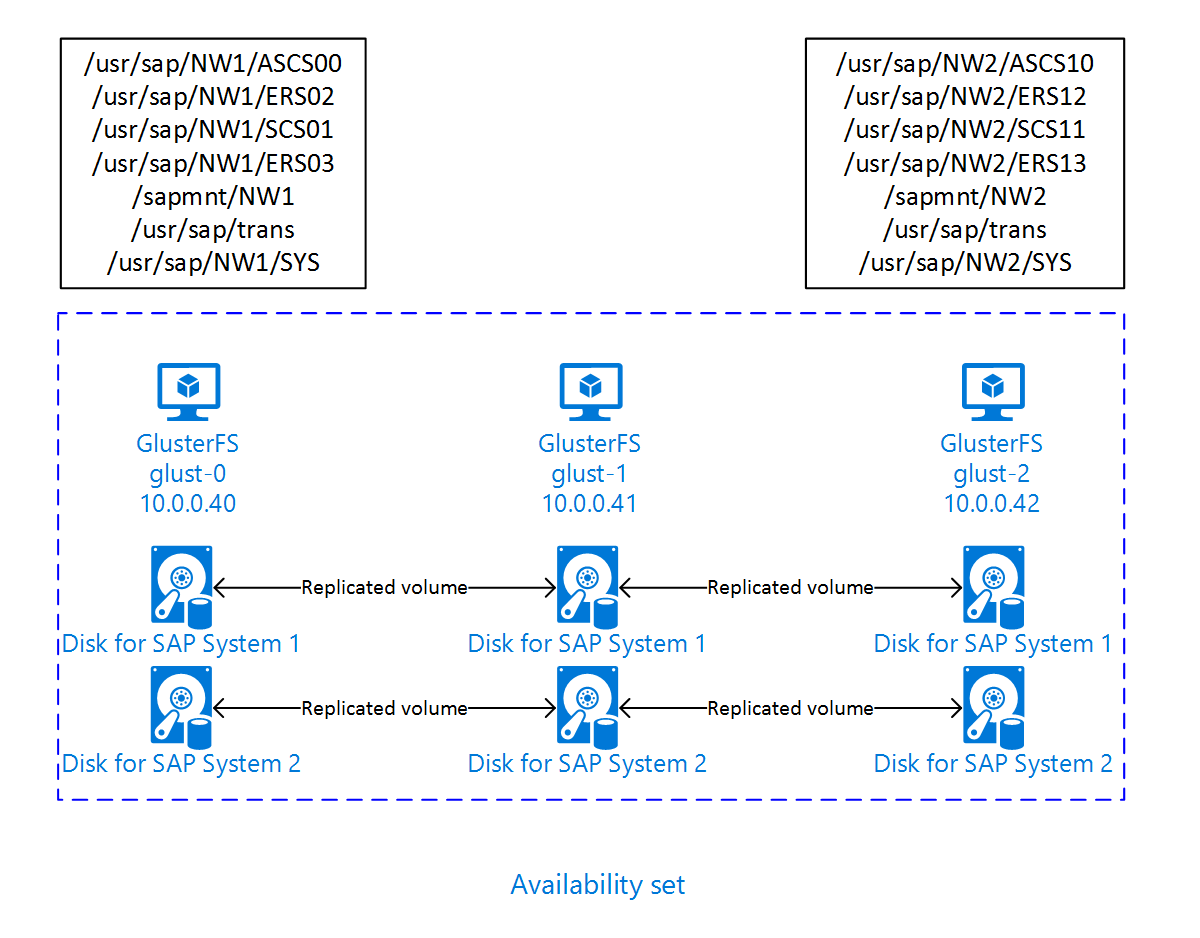
Set up GlusterFS
In this example, the resources were deployed manually via the Azure portal.
Deploy Linux manually via Azure portal
This document assumes that you've already deployed a resource group, Azure Virtual Network, and subnet.
Deploy virtual machines for GlusterFS. Choose a suitable RHEL image that is supported for Gluster storage. You can deploy VM in any one of the availability options - scale set, availability zone or availability set.
Configure GlusterFS
The following items are prefixed with either [A] - applicable to all nodes, [1] - only applicable to node 1, [2] - only applicable to node 2, [3] - only applicable to node 3.
[A] Setup host name resolution
You can either use a DNS server or modify the /etc/hosts on all nodes. This example shows how to use the /etc/hosts file. Replace the IP address and the hostname in the following commands
sudo vi /etc/hostsInsert the following lines to /etc/hosts. Change the IP address and hostname to match your environment
# IP addresses of the Gluster nodes
10.0.0.40 glust-0
10.0.0.41 glust-1
10.0.0.42 glust-2
[A] Register
Register your virtual machines and attach it to a pool that contains repositories for RHEL 7 and GlusterFS
sudo subscription-manager register
sudo subscription-manager attach --pool=<pool id>
[A] Enable GlusterFS repos
In order to install the required packages, enable the following repositories.
sudo subscription-manager repos --disable "*"
sudo subscription-manager repos --enable=rhel-7-server-rpms
sudo subscription-manager repos --enable=rh-gluster-3-for-rhel-7-server-rpms
[A] Install GlusterFS packages
Install these packages on all GlusterFS nodes
sudo yum -y install redhat-storage-serverReboot the nodes after the installation.
[A] Modify Firewall
Add firewall rules to allow client traffic to the GlusterFS nodes.
# list the available zones
firewall-cmd --get-active-zones

sudo firewall-cmd --zone=public --add-service=glusterfs --permanent
sudo firewall-cmd --zone=public --add-service=glusterfs
[A] Enable and start GlusterFS service
Start the GlusterFS service on all nodes.
sudo systemctl start glusterd
sudo systemctl enable glusterd
[1] Create GluserFS
Run the following commands to create the GlusterFS cluster
sudo gluster peer probe glust-1
sudo gluster peer probe glust-2

# Check gluster peer status
sudo gluster peer status

# Number of Peers: 2
#
# Hostname: glust-1
# Uuid: 10d43840-fee4-4120-bf5a-de9c393964cd
# State: Accepted peer request (Connected)
#
# Hostname: glust-2
# Uuid: 9e340385-12fe-495e-ab0f-4f851b588cba
# State: Accepted peer request (Connected)
[2] Test peer status
Test the peer status on the second node
sudo gluster peer status
# Number of Peers: 2
#
# Hostname: glust-0
# Uuid: 6bc6927b-7ee2-461b-ad04-da123124d6bd
# State: Peer in Cluster (Connected)
#
# Hostname: glust-2
# Uuid: 9e340385-12fe-495e-ab0f-4f851b588cba
# State: Peer in Cluster (Connected)
[3] Test peer status
Test the peer status on the third node
sudo gluster peer status
# Number of Peers: 2
#
# Hostname: glust-0
# Uuid: 6bc6927b-7ee2-461b-ad04-da123124d6bd
# State: Peer in Cluster (Connected)
#
# Hostname: glust-1
# Uuid: 10d43840-fee4-4120-bf5a-de9c393964cd
# State: Peer in Cluster (Connected)
[A] Create LVM
In this example, the GlusterFS is used for two SAP systems, NW1 and NW2. Use the following commands to create LVM configurations for these SAP systems.
Use these commands for NW1
sudo pvcreate --dataalignment 1024K /dev/disk/azure/scsi1/lun0
sudo pvscan
sudo vgcreate --physicalextentsize 256K rhgs-NW1 /dev/disk/azure/scsi1/lun0
sudo vgscan
sudo lvcreate -l 50%FREE -n rhgs-NW1/sapmnt
sudo lvcreate -l 20%FREE -n rhgs-NW1/trans
sudo lvcreate -l 10%FREE -n rhgs-NW1/sys
sudo lvcreate -l 50%FREE -n rhgs-NW1/ascs
sudo lvcreate -l 100%FREE -n rhgs-NW1/aers
sudo lvscan

sudo mkfs.xfs -f -K -i size=512 -n size=8192 /dev/rhgs-NW1/sapmnt
sudo mkfs.xfs -f -K -i size=512 -n size=8192 /dev/rhgs-NW1/trans
sudo mkfs.xfs -f -K -i size=512 -n size=8192 /dev/rhgs-NW1/sys
sudo mkfs.xfs -f -K -i size=512 -n size=8192 /dev/rhgs-NW1/ascs
sudo mkfs.xfs -f -K -i size=512 -n size=8192 /dev/rhgs-NW1/aers

sudo mkdir -p /rhs/NW1/sapmnt
sudo mkdir -p /rhs/NW1/trans
sudo mkdir -p /rhs/NW1/sys
sudo mkdir -p /rhs/NW1/ascs
sudo mkdir -p /rhs/NW1/aers

sudo chattr +i /rhs/NW1/sapmnt
sudo chattr +i /rhs/NW1/trans
sudo chattr +i /rhs/NW1/sys
sudo chattr +i /rhs/NW1/ascs
sudo chattr +i /rhs/NW1/aers

echo -e "/dev/rhgs-NW1/sapmnt\t/rhs/NW1/sapmnt\txfs\tdefaults,inode64,nobarrier,noatime,nouuid 0 2" | sudo tee -a /etc/fstab
echo -e "/dev/rhgs-NW1/trans\t/rhs/NW1/trans\txfs\tdefaults,inode64,nobarrier,noatime,nouuid 0 2" | sudo tee -a /etc/fstab
echo -e "/dev/rhgs-NW1/sys\t/rhs/NW1/sys\txfs\tdefaults,inode64,nobarrier,noatime,nouuid 0 2" | sudo tee -a /etc/fstab
echo -e "/dev/rhgs-NW1/ascs\t/rhs/NW1/ascs\txfs\tdefaults,inode64,nobarrier,noatime,nouuid 0 2" | sudo tee -a /etc/fstab
echo -e "/dev/rhgs-NW1/aers\t/rhs/NW1/aers\txfs\tdefaults,inode64,nobarrier,noatime,nouuid 0 2" | sudo tee -a /etc/fstab

sudo mount -a
Use these commands for NW2
sudo pvcreate --dataalignment 1024K /dev/disk/azure/scsi1/lun1
sudo pvscan
sudo vgcreate --physicalextentsize 256K rhgs-NW2 /dev/disk/azure/scsi1/lun1
sudo vgscan
sudo lvcreate -l 50%FREE -n rhgs-NW2/sapmnt
sudo lvcreate -l 20%FREE -n rhgs-NW2/trans
sudo lvcreate -l 10%FREE -n rhgs-NW2/sys
sudo lvcreate -l 50%FREE -n rhgs-NW2/ascs
sudo lvcreate -l 100%FREE -n rhgs-NW2/aers

sudo mkfs.xfs -f -K -i size=512 -n size=8192 /dev/rhgs-NW2/sapmnt
sudo mkfs.xfs -f -K -i size=512 -n size=8192 /dev/rhgs-NW2/trans
sudo mkfs.xfs -f -K -i size=512 -n size=8192 /dev/rhgs-NW2/sys
sudo mkfs.xfs -f -K -i size=512 -n size=8192 /dev/rhgs-NW2/ascs
sudo mkfs.xfs -f -K -i size=512 -n size=8192 /dev/rhgs-NW2/aers

sudo mkdir -p /rhs/NW2/sapmnt
sudo mkdir -p /rhs/NW2/trans
sudo mkdir -p /rhs/NW2/sys
sudo mkdir -p /rhs/NW2/ascs
sudo mkdir -p /rhs/NW2/aers

sudo chattr +i /rhs/NW2/sapmnt
sudo chattr +i /rhs/NW2/trans
sudo chattr +i /rhs/NW2/sys
sudo chattr +i /rhs/NW2/ascs
sudo chattr +i /rhs/NW2/aers
sudo lvscan

echo -e "/dev/rhgs-NW2/sapmnt\t/rhs/NW2/sapmnt\txfs\tdefaults,inode64,nobarrier,noatime,nouuid 0 2" | sudo tee -a /etc/fstab
echo -e "/dev/rhgs-NW2/trans\t/rhs/NW2/trans\txfs\tdefaults,inode64,nobarrier,noatime,nouuid 0 2" | sudo tee -a /etc/fstab
echo -e "/dev/rhgs-NW2/sys\t/rhs/NW2/sys\txfs\tdefaults,inode64,nobarrier,noatime,nouuid 0 2" | sudo tee -a /etc/fstab
echo -e "/dev/rhgs-NW2/ascs\t/rhs/NW2/ascs\txfs\tdefaults,inode64,nobarrier,noatime,nouuid 0 2" | sudo tee -a /etc/fstab
echo -e "/dev/rhgs-NW2/aers\t/rhs/NW2/aers\txfs\tdefaults,inode64,nobarrier,noatime,nouuid 0 2" | sudo tee -a /etc/fstab

sudo mount -a
[1] Create the distributed volume
Use the following commands to create the GlusterFS volume for NW1 and start it.
sudo gluster vol create NW1-sapmnt replica 3 glust-0:/rhs/NW1/sapmnt glust-1:/rhs/NW1/sapmnt glust-2:/rhs/NW1/sapmnt force
sudo gluster vol create NW1-trans replica 3 glust-0:/rhs/NW1/trans glust-1:/rhs/NW1/trans glust-2:/rhs/NW1/trans force
sudo gluster vol create NW1-sys replica 3 glust-0:/rhs/NW1/sys glust-1:/rhs/NW1/sys glust-2:/rhs/NW1/sys force
sudo gluster vol create NW1-ascs replica 3 glust-0:/rhs/NW1/ascs glust-1:/rhs/NW1/ascs glust-2:/rhs/NW1/ascs force
sudo gluster vol create NW1-aers replica 3 glust-0:/rhs/NW1/aers glust-1:/rhs/NW1/aers glust-2:/rhs/NW1/aers force

sudo gluster volume start NW1-sapmnt
sudo gluster volume start NW1-trans
sudo gluster volume start NW1-sys
sudo gluster volume start NW1-ascs
sudo gluster volume start NW1-aers
Use the following commands to create the GlusterFS volume for NW2 and start it.
sudo gluster vol create NW2-sapmnt replica 3 glust-0:/rhs/NW2/sapmnt glust-1:/rhs/NW2/sapmnt glust-2:/rhs/NW2/sapmnt force
sudo gluster vol create NW2-trans replica 3 glust-0:/rhs/NW2/trans glust-1:/rhs/NW2/trans glust-2:/rhs/NW2/trans force
sudo gluster vol create NW2-sys replica 3 glust-0:/rhs/NW2/sys glust-1:/rhs/NW2/sys glust-2:/rhs/NW2/sys force
sudo gluster vol create NW2-ascs replica 3 glust-0:/rhs/NW2/ascs glust-1:/rhs/NW2/ascs glust-2:/rhs/NW2/ascs force
sudo gluster vol create NW2-aers replica 3 glust-0:/rhs/NW2/aers glust-1:/rhs/NW2/aers glust-2:/rhs/NW2/aers force

sudo gluster volume start NW2-sapmnt
sudo gluster volume start NW2-trans
sudo gluster volume start NW2-sys
sudo gluster volume start NW2-ascs
sudo gluster volume start NW2-aers
Next steps
- Install the SAP ASCS and database
- Azure Virtual Machines planning and implementation for SAP
- Azure Virtual Machines deployment for SAP
- Azure Virtual Machines DBMS deployment for SAP
- To learn how to establish high availability and plan for disaster recovery of SAP HANA on Azure (large instances), see SAP HANA (large instances) high availability and disaster recovery on Azure.
- To learn how to establish high availability and plan for disaster recovery of SAP HANA on Azure VMs, see High Availability of SAP HANA on Azure Virtual Machines (VMs)
Feedback
Coming soon: Throughout 2024 we will be phasing out GitHub Issues as the feedback mechanism for content and replacing it with a new feedback system. For more information see: https://aka.ms/ContentUserFeedback.
Submit and view feedback for