Quickstart: Create a public IP address using the Azure portal
Article
In this quickstart, you learn how to create Azure public IP addresses, which you use for public connections to Azure resources. Public IP addresses are available in two SKUs: Basic and Standard. Two tiers of public IP addresses are available: regional and global. You can also set the routing preference of a public IP address when you create it: Microsoft network or Internet.
A public IP address with a Standard SKU is recommended for production workloads. For more information about SKUs, see Public IP addresses.
Create a Standard SKU public IP address
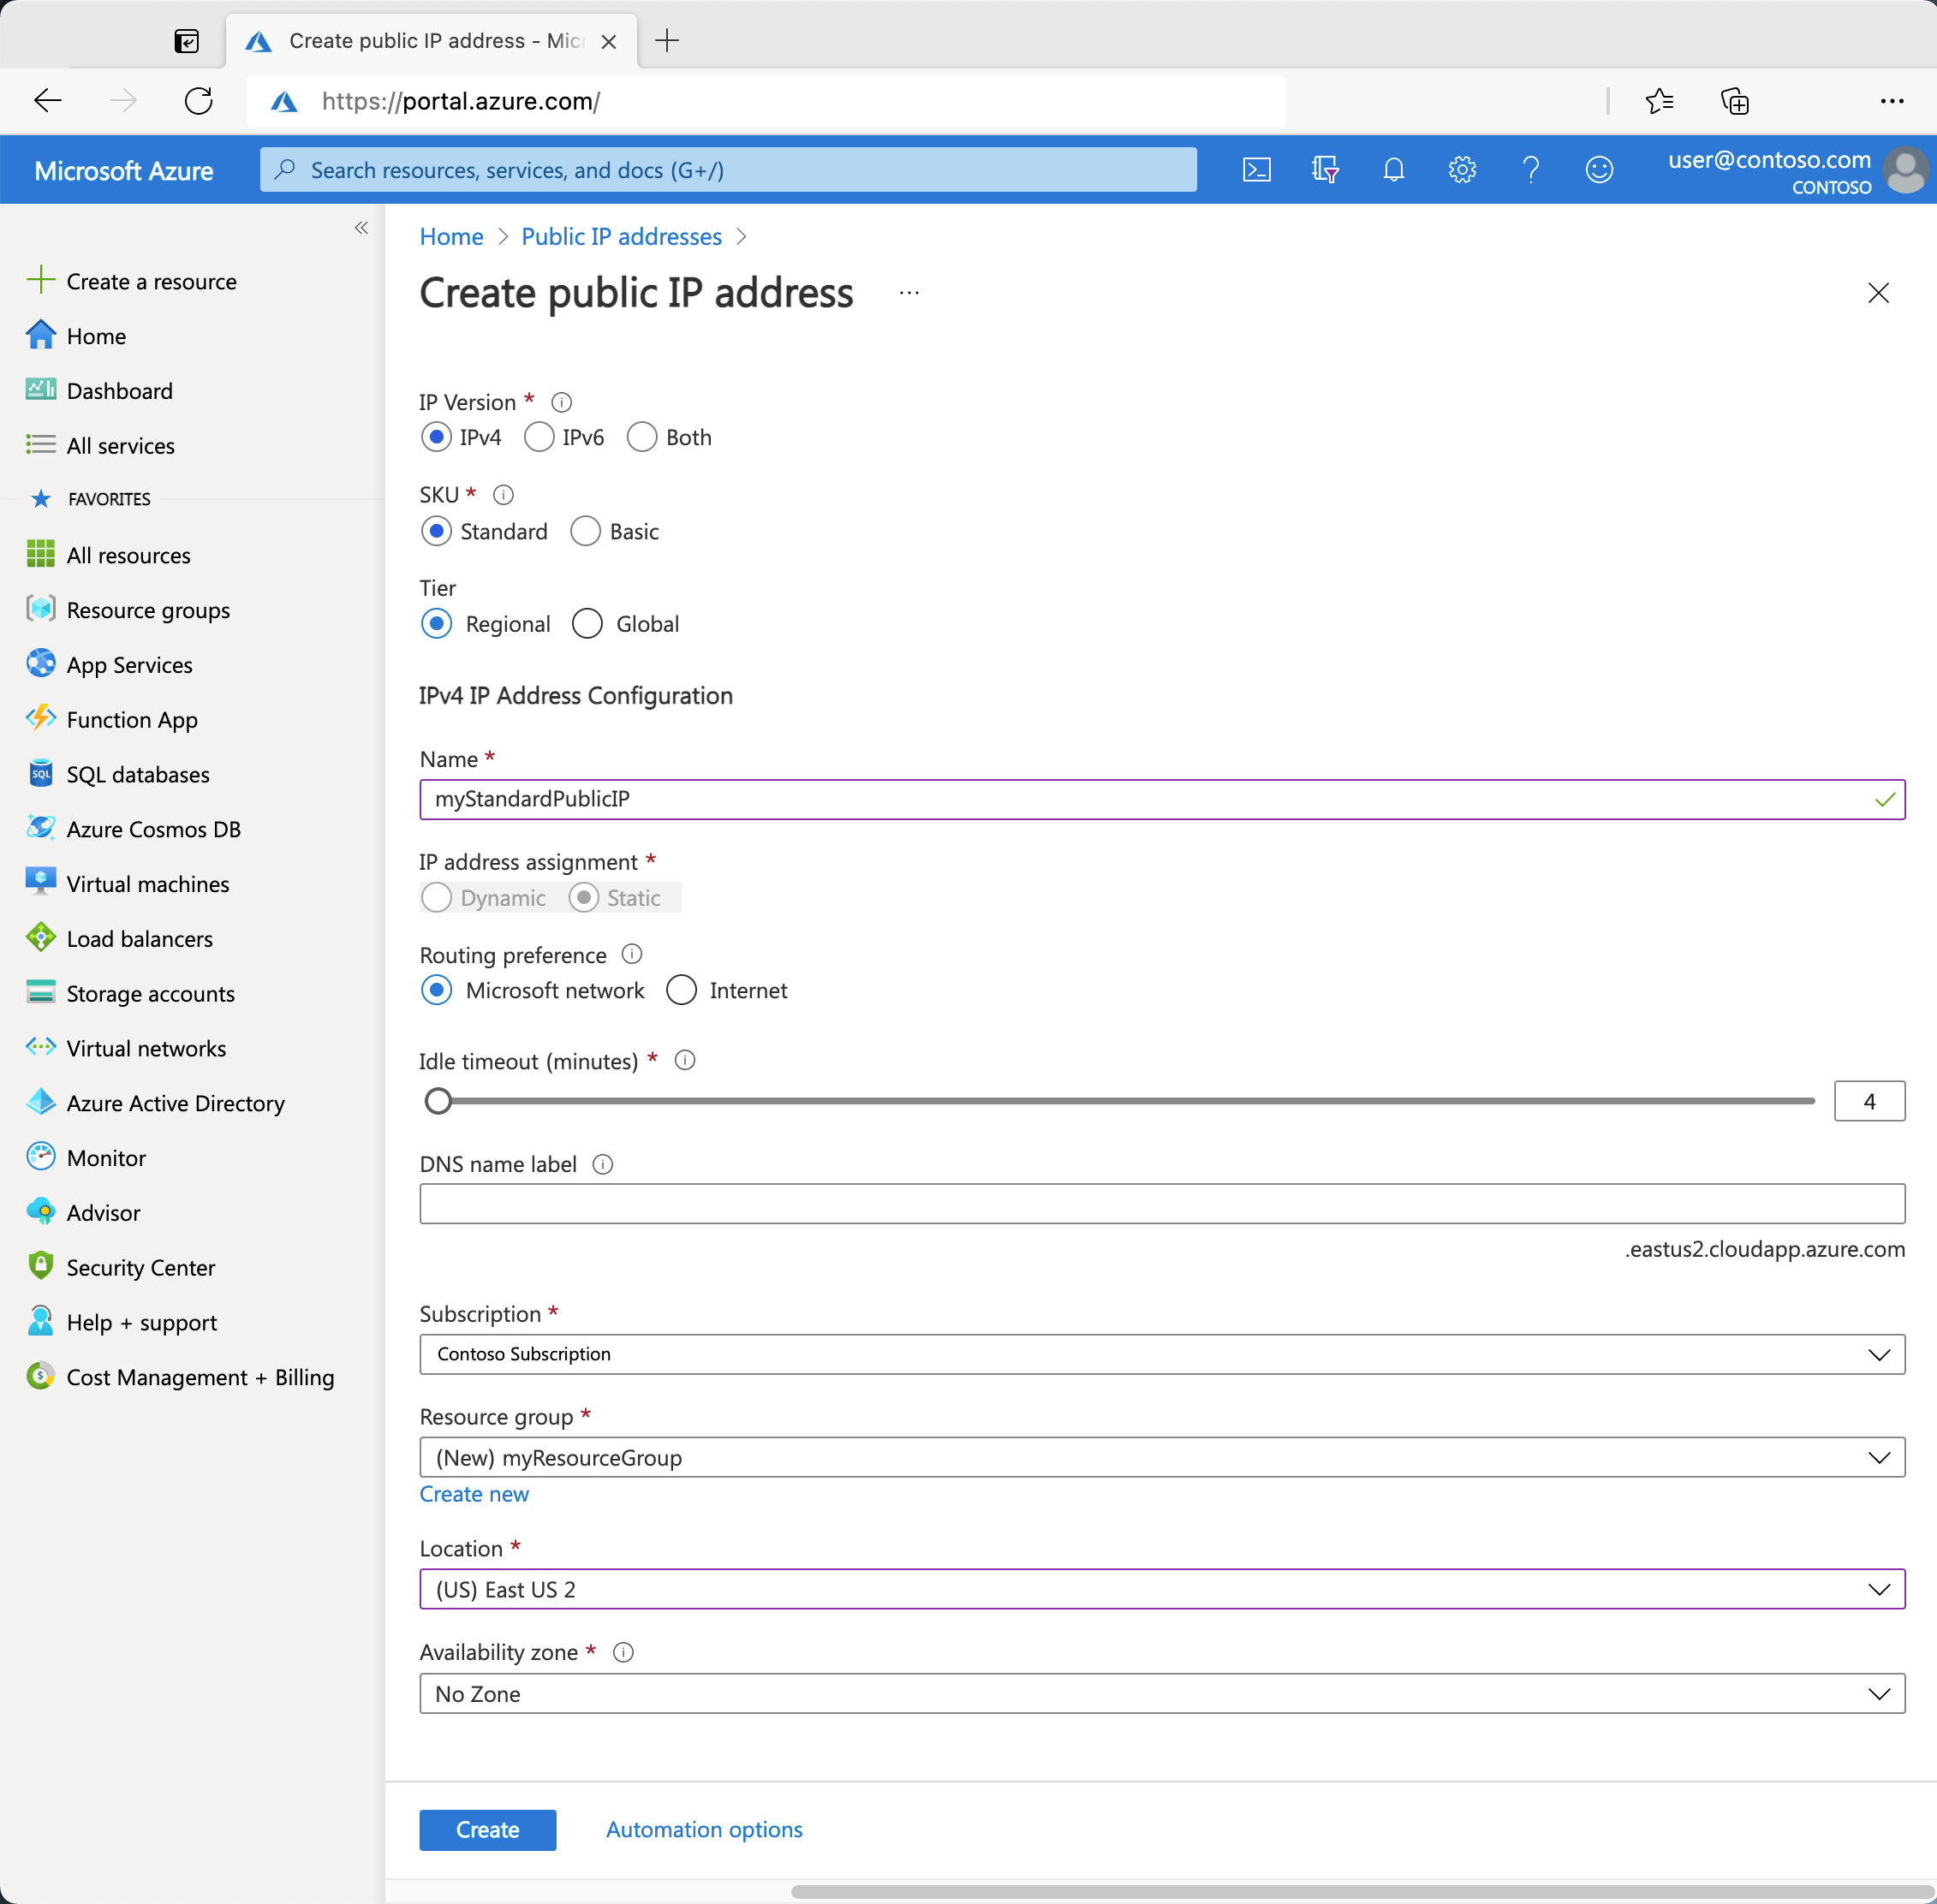
Follow these steps to create a public IPv4 address with a Standard SKU named myStandardPublicIP. To create an IPv6 address instead, choose IPv6 for the IP Version:
In the portal, search for and select Public IP addresses.
On the Public IP addresses page, select Create.
On the Basics tab of the Create public IP address screen, enter or select the following values:
Subscription: Keep the default or select a different subscription.
Resource group: Select Create new, and then name the group TestRG.
Region: Select (US) East US 2.
Name: Enter myStandardPublicIP.
IP Version: Select IPv4.
SKU: Select Standard.
Availability zone: Select No Zone.
Tier: Select Regional.
IP address assignment: Only option is Static.
Routing preference: Select Microsoft network.
Idle timeout (minutes): Keep the default of 4.
DNS name label: Leave the value blank.
Domain name label scope (preview): Leave the value blank.
Select Review + create. After validation succeeds, select Create.
Note
In regions with availability zones, you have the option to select No Zone (default), a specific zone, or Zone-redundant. The choice depends on your specific domain failure requirements. In regions without availability zones, this field doesn't appear.
You can associate the public IP address you created with a Windows or Linux virtual machine. For more information, see Associate a public IP address to a virtual machine. You can also associate a public IP address with an Azure Load Balancer by assigning it to the load balancer front-end configuration. The public IP address serves as a load-balanced virtual IP address (VIP).
Note
A public IP address with a Standard SKU is recommended for production workloads. For more information about SKUs, see Public IP addresses. Basic SKU public IPs don't support availability zones. If it's acceptable for the IP address to change over time, you can set IP address assignment to Dynamic instead of Static.
Create a Basic SKU public IP address
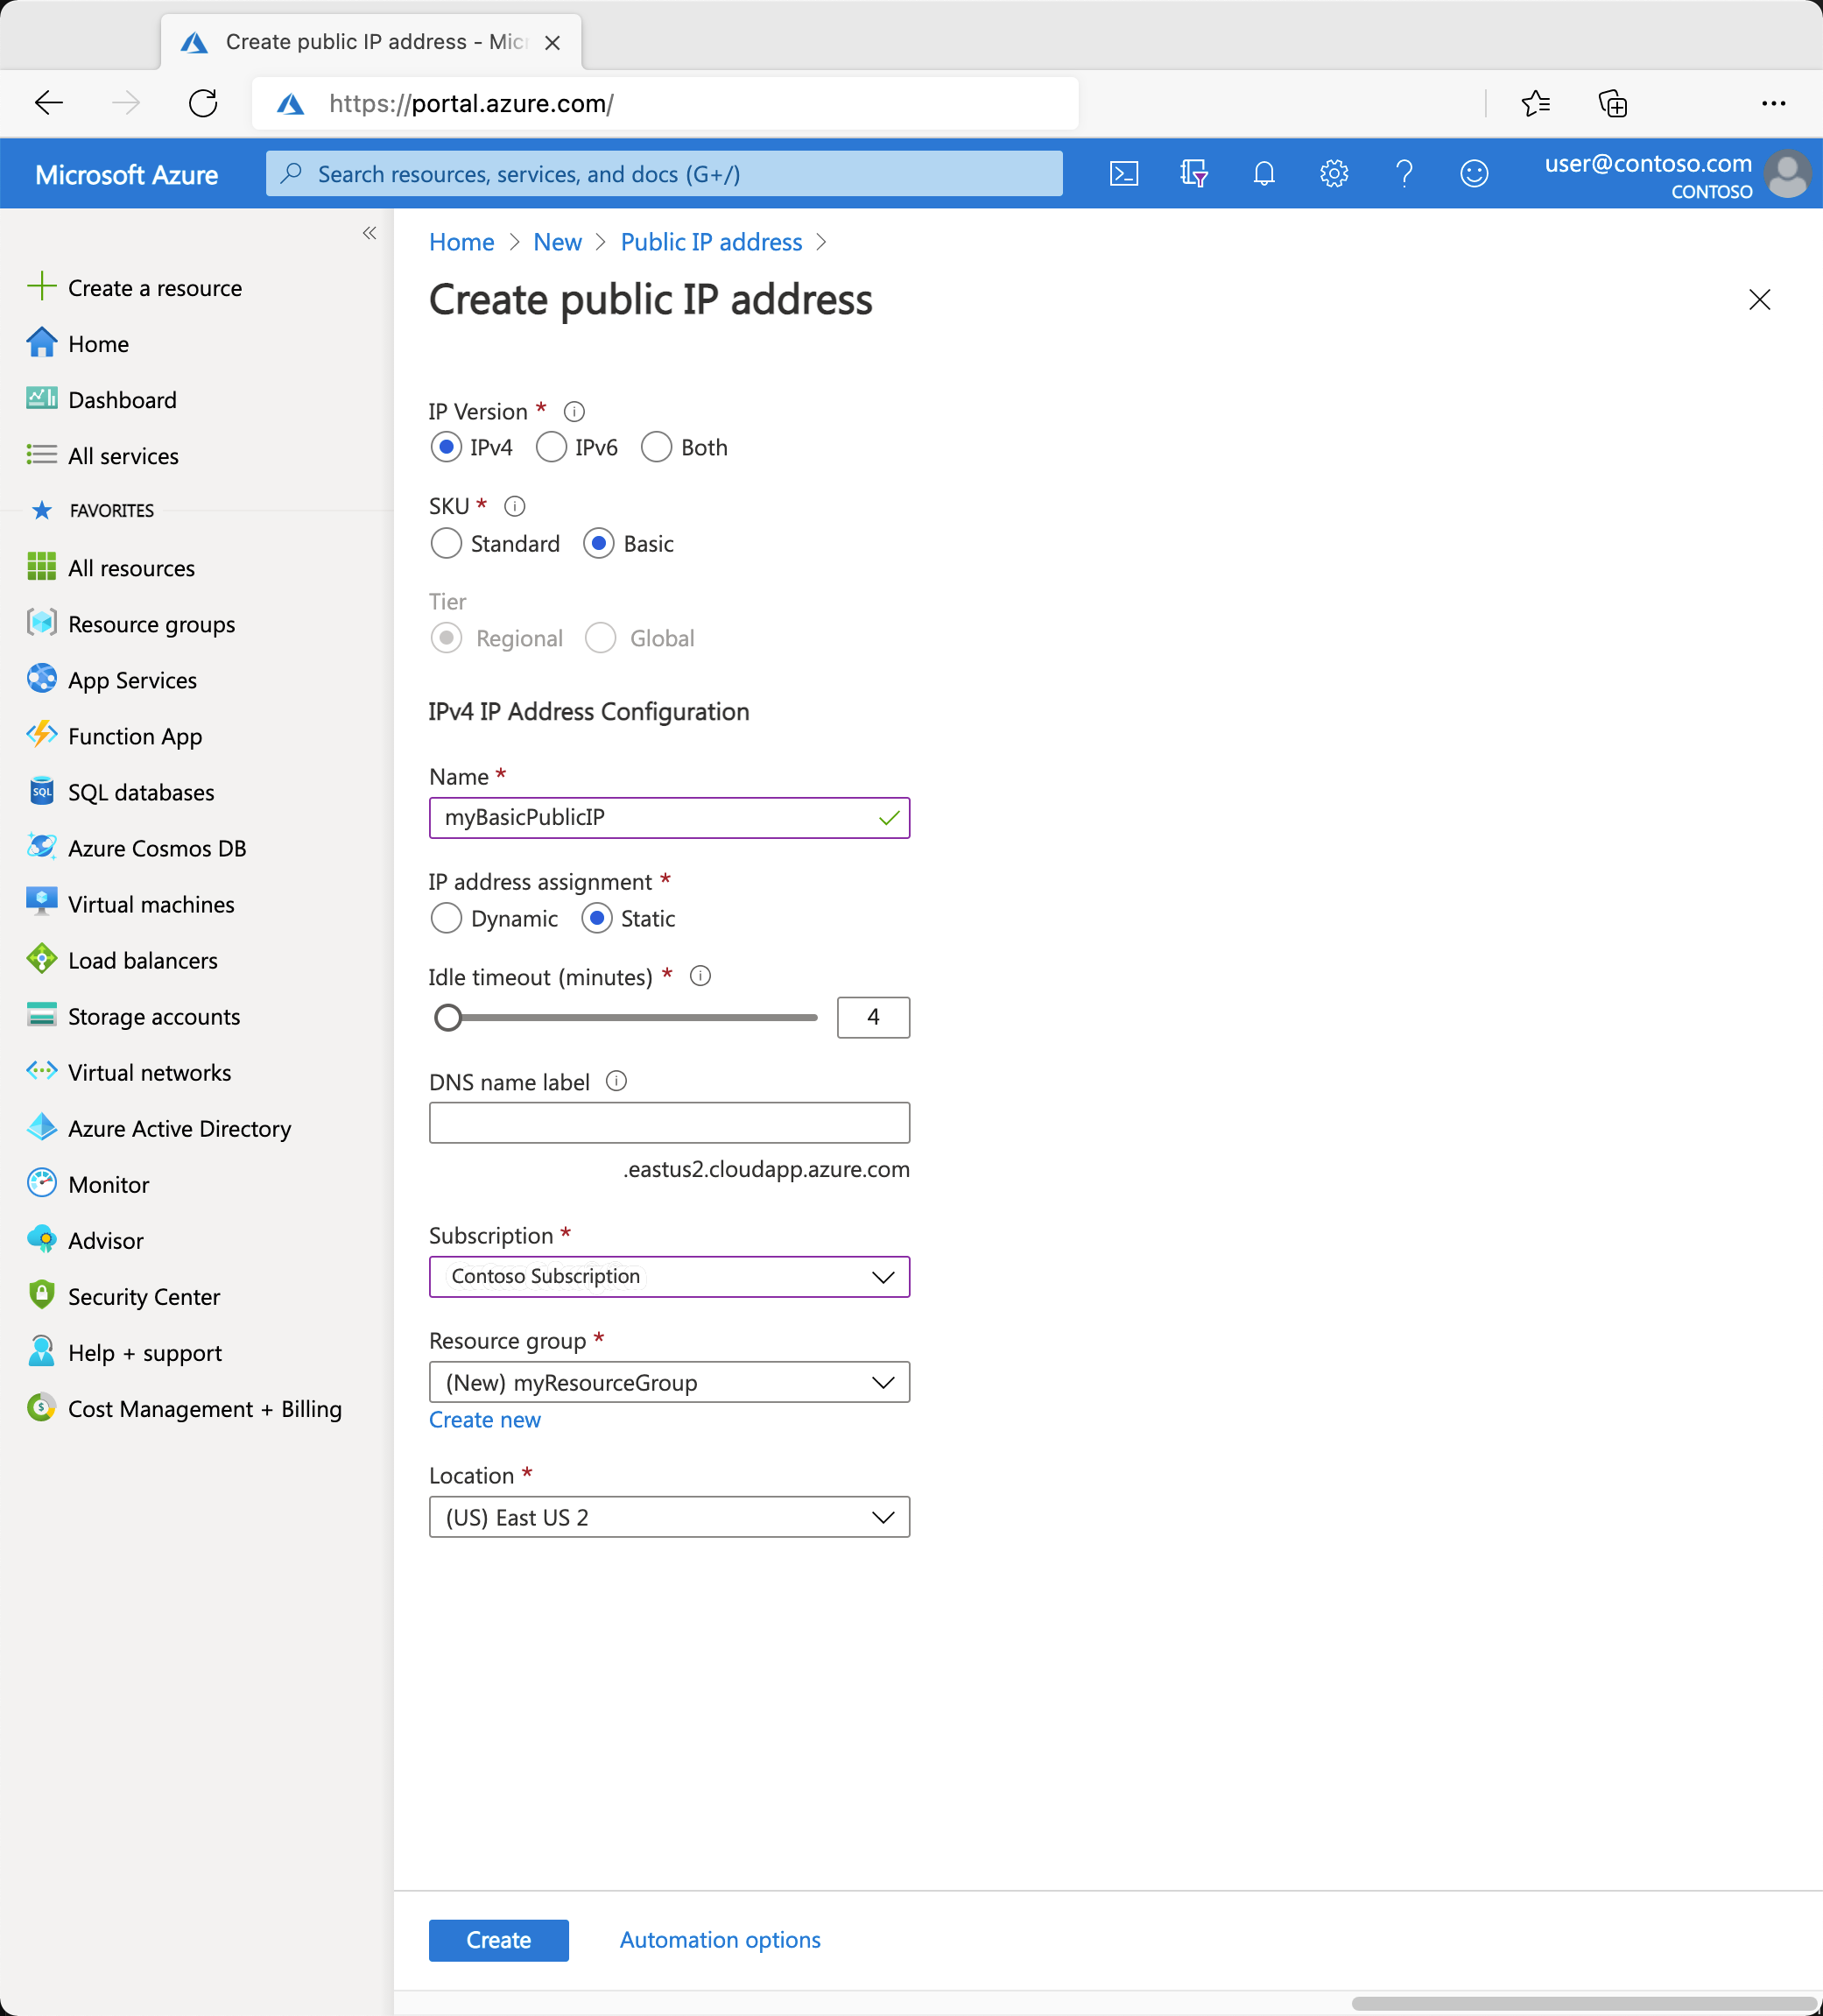
Follow these steps to create a public IPv4 address with a Basic SKU named myBasicPublicIP:
In the portal, search for and select Public IP addresses.
On the Public IP addresses page, select Create.
On the Basics tab of the Create public IP address screen, enter or select the following values:
Subscription: Keep the default or select a different subscription.
Resource group: Select Create new, and then name the group TestRG.
Region: Select (US) East US 2.
Name: Enter myBasicPublicIP.
IP Version: Select IPv4.
SKU: Select Basic.
IP address assignment: Select Static.
Idle timeout (minutes): Keep the default of 4.
Domain name label scope (preview): Leave the value blank.
Select Review + create. After validation succeeds, select Create.
This section shows you how to configure the routing preference for an ISP network (Internet option) for a public IP address. After you create the public IP address, you can associate it with the following Azure resources:
Azure Virtual Machines
Azure Virtual Machine Scale Set
Azure Kubernetes Service
Azure Load Balancer
Azure Application Gateway
Azure Firewall
By default, the routing preference for a public IP address is set to the Microsoft global network for all Azure services and can be associated with any Azure service.
Note
Although you can create a public IP address with either an IPv4 or IPv6 address, the Internet option of Routing preference supports only IPv4.
Create a public IP with internet routing
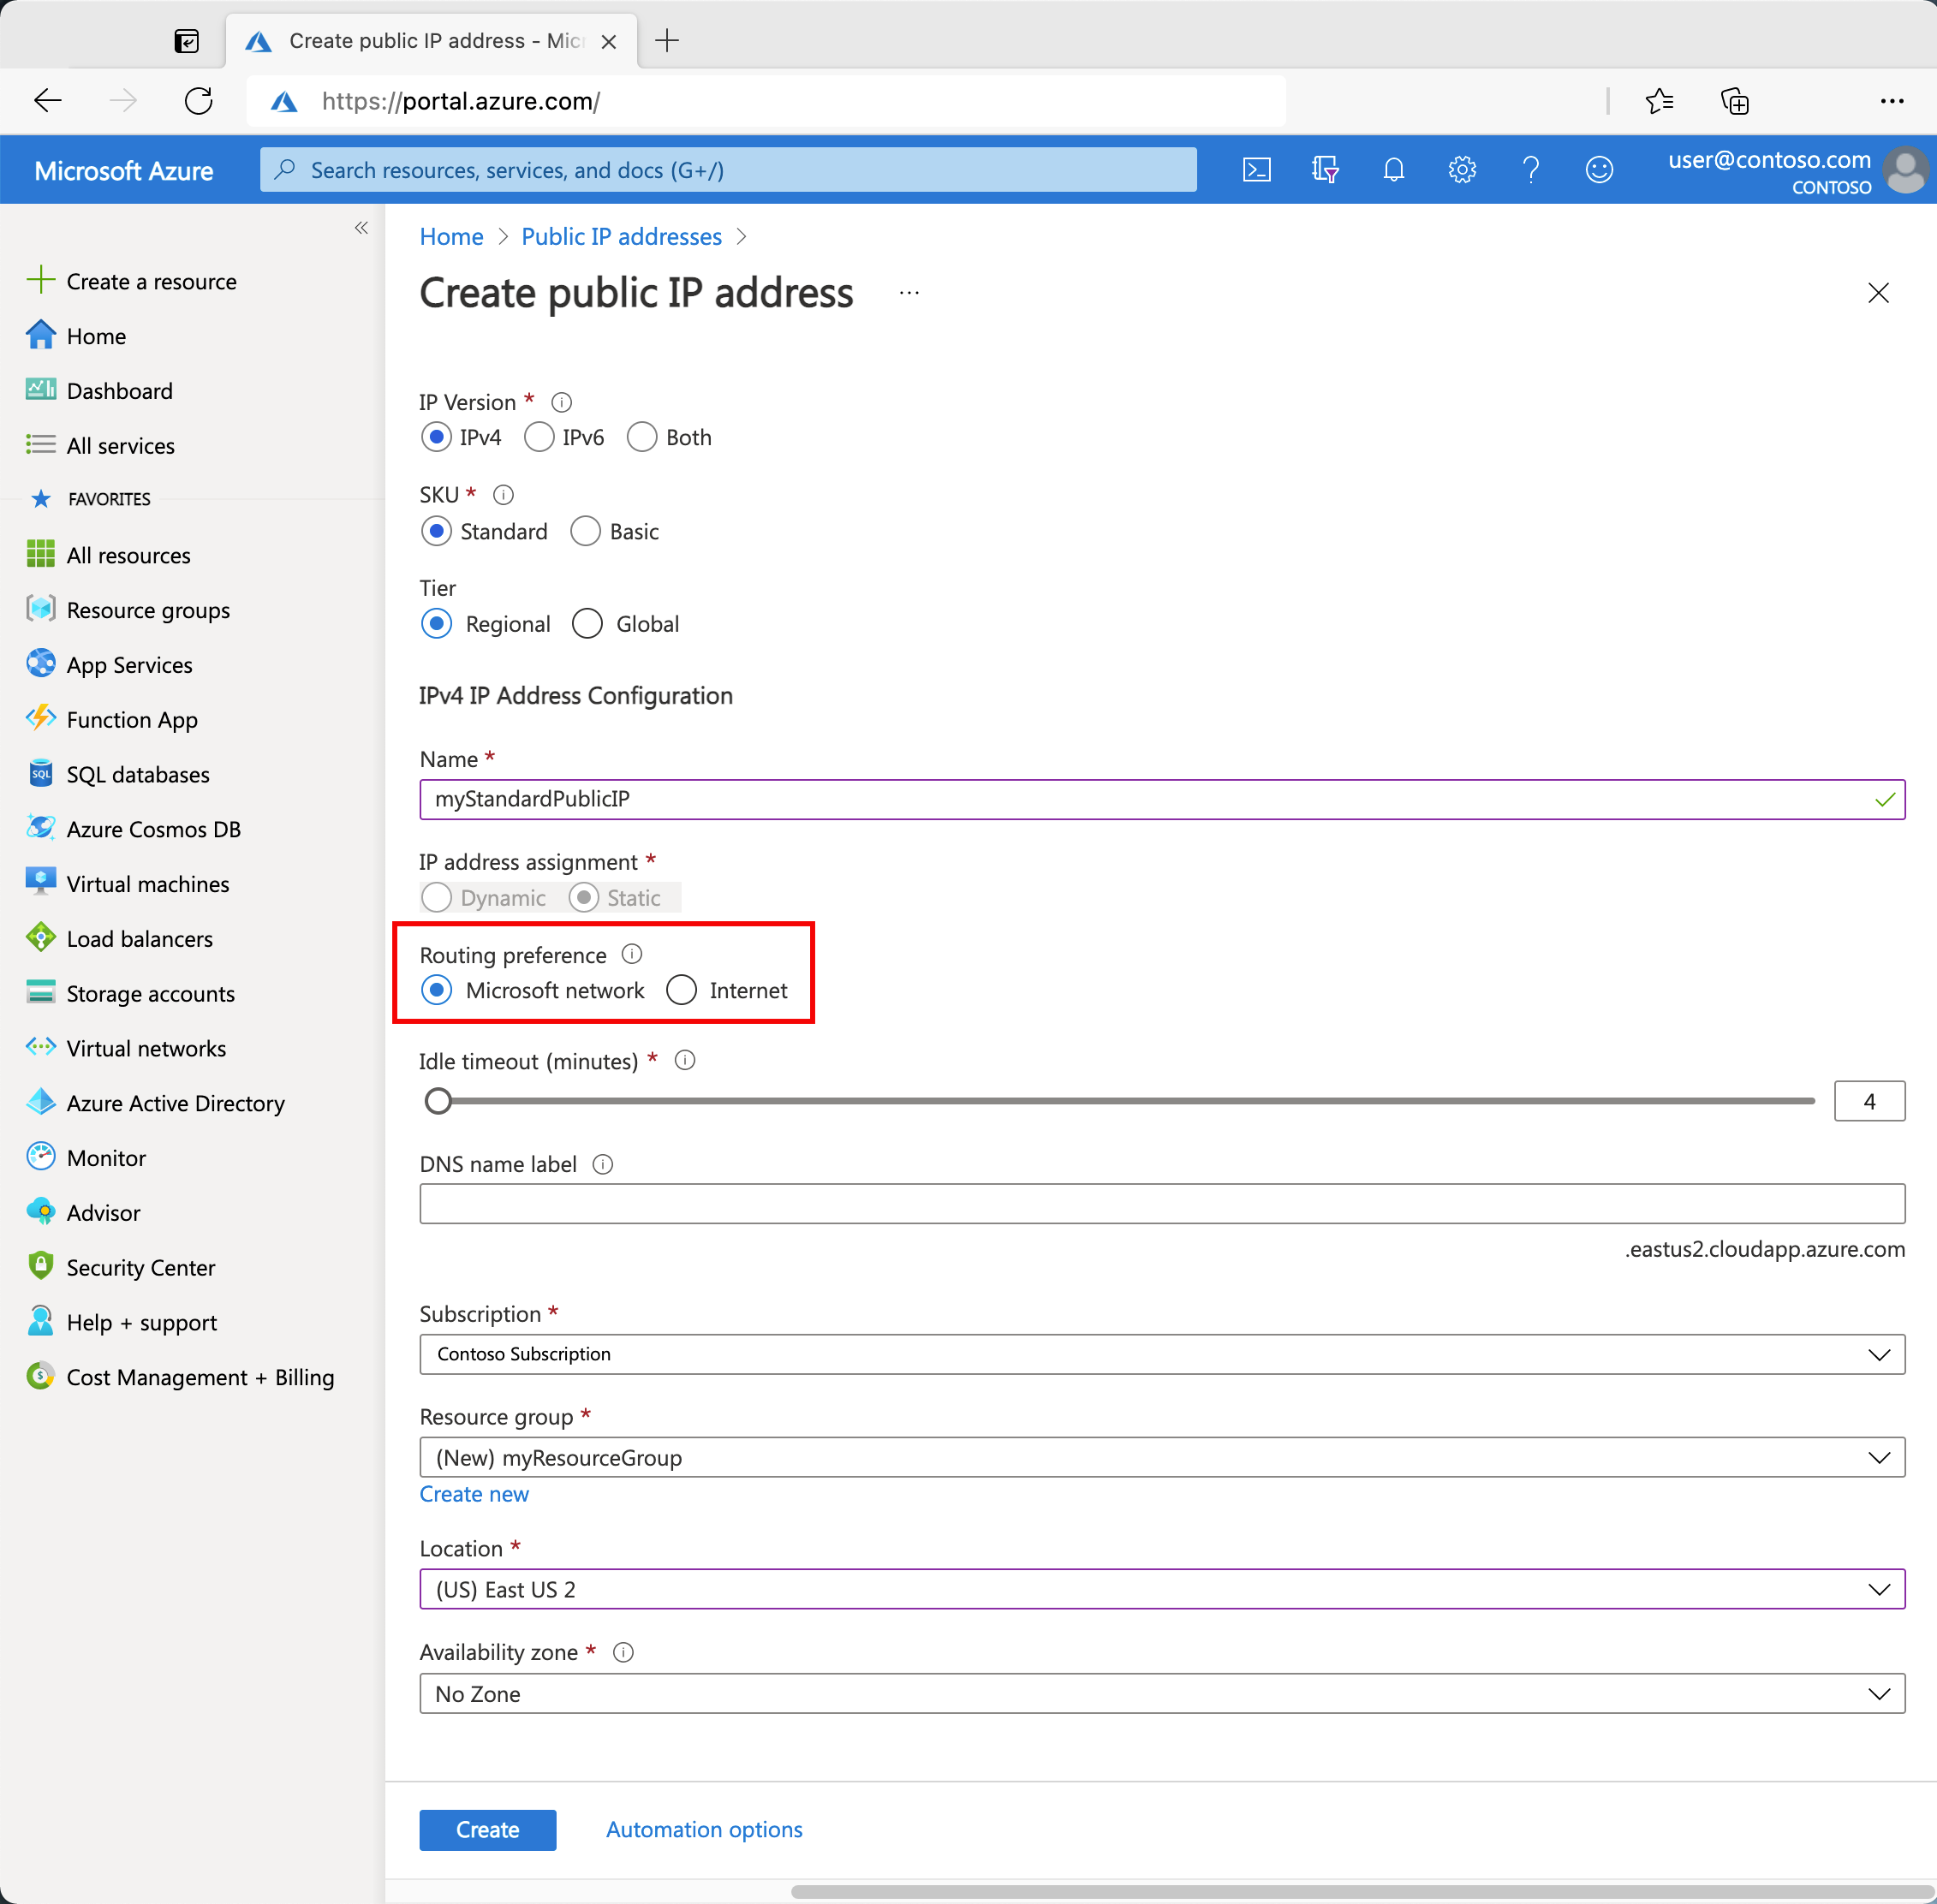
Follow these steps to create a public IPv4 address with a Standard SKU and routing preference of Internet named myStandardPublicIP-RP:
In the portal, search for and select Public IP addresses.
On the Public IP addresses page, select Create.
On the Basics tab of the Create public IP address screen, enter or select the following values:
Subscription: Keep the default or select a different subscription.
Resource group: Select Create new, and then name the group TestRG.
Region: Select (US) East US 2.
Name: Enter myStandardPublicIP-RP.
IP Version: Select IPv4.
SKU: Select Standard.
Availability zone: Select Zone-redundant.
Tier: Select Regional.
IP address assignment: Only option is Static.
Routing preference: Select Internet.
Idle timeout (minutes): Keep the default of 4.
DNS name label: Leave the value blank.
Domain name label scope (preview): Leave the value blank.
Select Review + create. After validation succeeds, select Create.
Note
In regions with availability zones, you have the option to select No Zone (default), a specific zone, or Zone-redundant. The choice depends on your specific domain failure requirements. In regions without availability zones, this field doesn't appear.
You can associate the public IP address you created with a Windows or Linux virtual machine. For more information, see Associate a public IP address to a virtual machine. You can also associate a public IP address with an Azure Load Balancer by assigning it to the load balancer front-end configuration. The public IP address serves as a load-balanced virtual IP address (VIP).
Public IP addresses are associated with a single region. The Global tier spans an IP address across multiple regions and is required for the front ends of cross-region load balancers. For a Global tier, Region must be a home region. For more information, see Cross-region load balancer and Home regions.
Create a global tier public IP
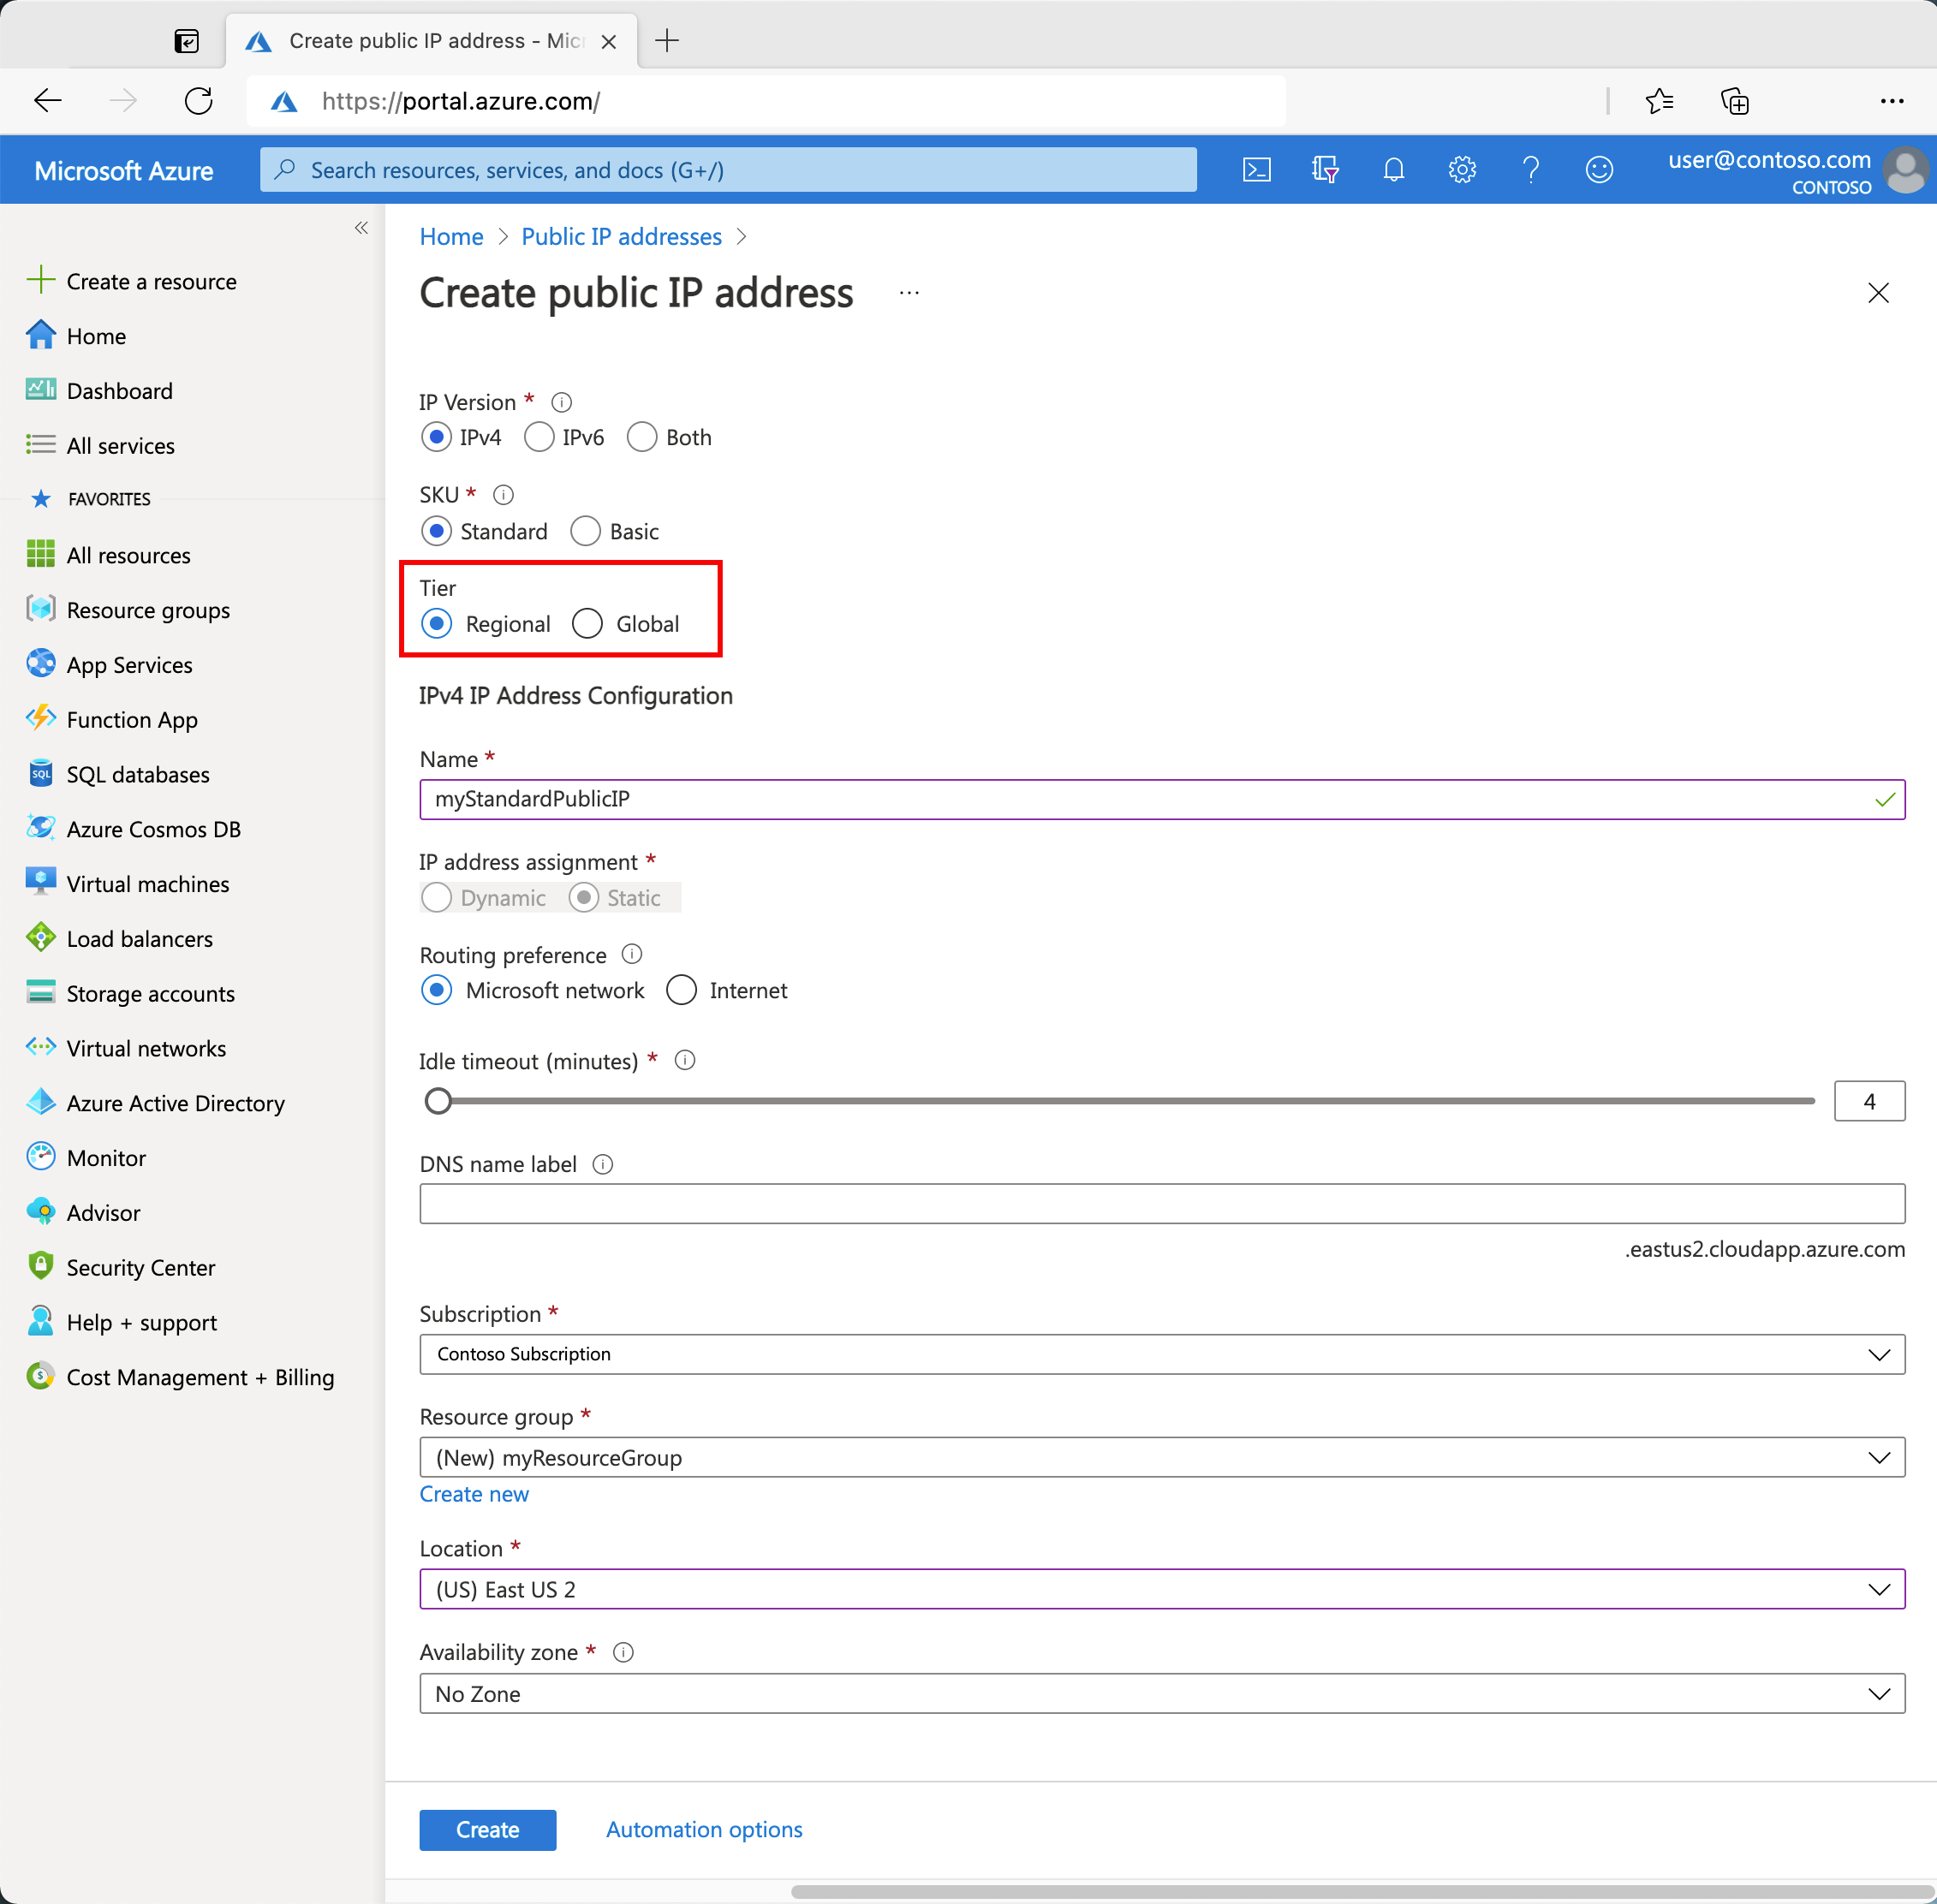
Follow these steps to create a public IPv4 address with a Standard SKU and a global tier named myStandardPublicIP-Global:
In the portal, search for and select Public IP addresses.
On the Public IP addresses page, select Create.
On the Basics tab of the Create public IP address screen, enter or select the following values:
Subscription: Keep the default or select a different subscription.
Resource group: Select Create new, and then name the group TestRG.
Region: Select (US) East US 2.
Name: Enter myStandardPublicIP-Global.
IP Version: Select IPv4.
SKU: Select Standard.
Availability zone: Select Zone-redundant.
Tier: Select Global.
IP address assignment: Only option is Static.
Routing preference: Select Microsoft network.
Idle timeout (minutes): Keep the default of 4.
DNS name label: Leave the value blank.
Domain name label scope (preview): Leave the value blank.
Select Review + create. After validation succeeds, select Create.
Coming soon: Throughout 2024 we will be phasing out GitHub Issues as the feedback mechanism for content and replacing it with a new feedback system. For more information see: https://aka.ms/ContentUserFeedback.