Configure BGP peering to an NVA - PowerShell
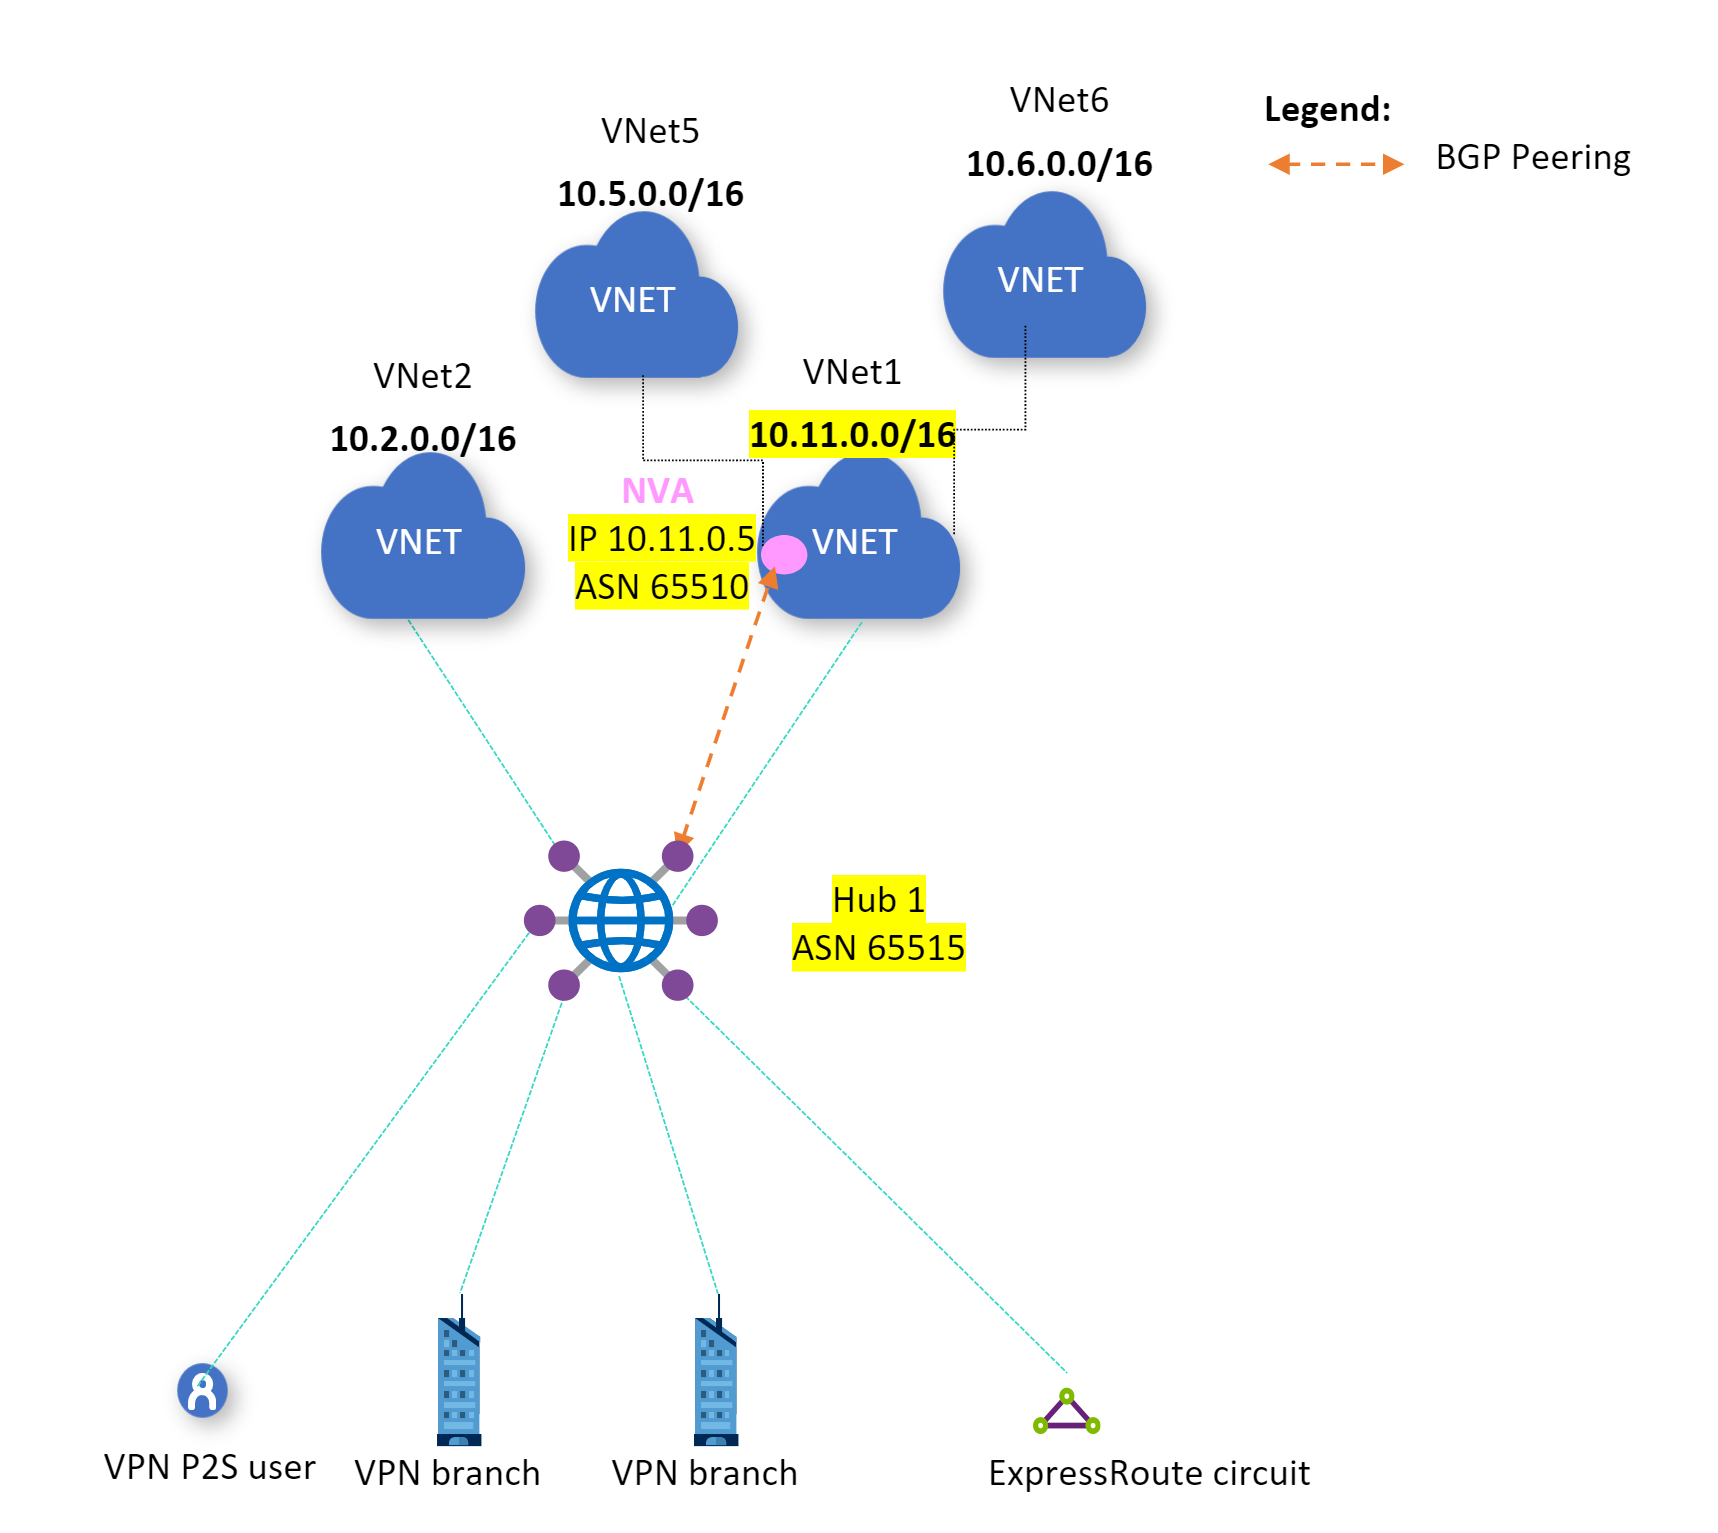
This article helps you configure an Azure Virtual WAN hub router to peer with a Network Virtual Appliance (NVA) in your virtual network using BGP Peering using Azure PowerShell. The virtual hub router learns routes from the NVA in a spoke VNet that is connected to a virtual WAN hub. The virtual hub router also advertises the virtual network routes to the NVA. For more information, see Scenario: BGP peering with a virtual hub. You can also create this configuration using the Azure portal.
Prerequisites
Verify that you've met the following criteria before beginning your configuration:
You have an Azure subscription. If you don't have an Azure subscription, create a free account.
You have a virtual network to which you want to connect.
- Verify that none of the subnets of your on-premises networks overlap with the virtual networks that you want to connect to.
- To create a virtual network in the Azure portal, see the Quickstart article.
Your virtual network must not have any existing virtual network gateways.
- If your virtual network already has gateways (VPN or ExpressRoute), you must remove all of the gateways before proceeding.
- This configuration requires that virtual networks connect to the Virtual WAN hub gateway only.
Decide the IP address range that you want to use for your virtual hub private address space. This information is used when configuring your virtual hub. A virtual hub is a virtual network that is created and used by Virtual WAN. It's the core of your Virtual WAN network in a region. The address space range must conform the certain rules:
- The address range that you specify for the hub can't overlap with any of the existing virtual networks that you connect to.
- The address range can't overlap with the on-premises address ranges that you connect to.
- If you're unfamiliar with the IP address ranges located in your on-premises network configuration, coordinate with someone who can provide those details for you.
Azure PowerShell
This article uses PowerShell cmdlets. To run the cmdlets, you can use Azure Cloud Shell. Cloud Shell is a free interactive shell that you can use to run the steps in this article. It has common Azure tools preinstalled and configured to use with your account.
To open Cloud Shell, just select Open Cloudshell from the upper-right corner of a code block. You can also open Cloud Shell on a separate browser tab by going to https://shell.azure.com/powershell. Select Copy to copy the blocks of code, paste them into Cloud Shell, and select the Enter key to run them.
You can also install and run the Azure PowerShell cmdlets locally on your computer. PowerShell cmdlets are updated frequently. If you haven't installed the latest version, the values specified in the instructions may fail. To find the versions of Azure PowerShell installed on your computer, use the Get-Module -ListAvailable Az cmdlet. To install or update, see Install the Azure PowerShell module.
Sign in
If you're using Azure Cloud Shell you'll automatically be directed to sign into your account after you open Cloudshell. You don't need to run Connect-AzAccount. Once signed in, you can still change subscriptions if necessary by using Get-AzSubscription and Select-AzSubscription.
If you're running PowerShell locally, open the PowerShell console with elevated privileges and connect to your Azure account. The Connect-AzAccount cmdlet prompts you for credentials. After you authenticate, it downloads your account settings so that they're available to Azure PowerShell. You can change subscription by using Get-AzSubscription and Select-AzSubscription -SubscriptionName "Name of subscription".
Create a virtual WAN
$virtualWan = New-AzVirtualWan -ResourceGroupName "testRG" -Name "myVirtualWAN" -Location "West US"
Create a virtual hub
A hub is a virtual network that can contain gateways for site-to-site, ExpressRoute, or point-to-site functionality. Once the hub is created, you'll be charged for the hub, even if you don't attach any sites.
$virtualHub = New-AzVirtualHub -VirtualWan $virtualWan -ResourceGroupName "testRG" -Name "westushub" -AddressPrefix "10.0.0.1/24"
Connect the VNet to the hub
Create a connection between your hub and VNet.
$remote = Get-AzVirtualNetwork -Name "[vnet name]" -ResourceGroupName "[resource group name]"
$hubVnetConnection = New-AzVirtualHubVnetConnection -ResourceGroupName "[parent resource group name]" -VirtualHubName "[virtual hub name]" -Name "[name of connection]" -RemoteVirtualNetwork $remote
Configure a BGP peer
Configure BGP peer for the $hubVnetConnection you created.
New-AzVirtualHubBgpConnection -ResourceGroupName "testRG" -VirtualHubName "westushub" -PeerIp 192.168.1.5 -PeerAsn 20000 -Name "testBgpConnection" -VirtualHubVnetConnection $hubVnetConnection
Or, you can configure BGP for an existing virtual hub VNet connection.
$hubVnetConnection = Get-AzVirtualHubVnetConnection -ResourceGroupName "[resource group name]" -VirtualHubName "[virtual hub name]" -Name "[name of connection]"

New-AzVirtualHubBgpConnection -ResourceGroupName "[resource group name]" -VirtualHubName "westushub" -PeerIp 192.168.1.5 -PeerAsn 20000 -Name "testBgpConnection" -VirtualHubVnetConnection $hubVnetConnection
Modify a BGP peer
Update an existing hub BGP peer connection.
Update-AzVirtualHubBgpConnection -ResourceGroupName "[resource group name]" -VirtualHubName "westushub" -PeerIp 192.168.1.6 -PeerAsn 20000 -Name "testBgpConnection" -VirtualHubVnetConnection $hubVnetConnection
Delete a BGP peer
Remove an existing hub BGP connection.
Remove-AzVirtualHubBgpConnection -ResourceGroupName "[resource group name]" -VirtualHubName "westushub" -Name "testBgpConnection"
Next steps
For more information about BGP scenarios, see Scenario: BGP peering with a virtual hub.
Feedback
Coming soon: Throughout 2024 we will be phasing out GitHub Issues as the feedback mechanism for content and replacing it with a new feedback system. For more information see: https://aka.ms/ContentUserFeedback.
Submit and view feedback for