Add a Site-to-Site connection to a VNet with an existing VPN gateway connection (classic)
This article walks you through using PowerShell to add Site-to-Site (S2S) connections to a VPN gateway that has an existing connection using the classic (legacy) deployment model. This type of connection is sometimes referred to as a "multi-site" configuration. These steps don't apply to ExpressRoute/Site-to-Site coexisting connection configurations.
The steps in this article apply to the classic (legacy) deployment model and don't apply to the current deployment model, Resource Manager. Unless you want to work in the classic deployment model specifically, we recommend that you use the Resource Manager version of this article.
Note
This article is written for the classic (legacy) deployment model. We recommend that you use the latest Azure deployment model instead. The Resource Manager deployment model is the latest deployment model and offers more options and feature compatibility than the classic deployment model. To understand the difference between these two deployment models, see Understanding deployment models and the state of your resources.
If you want to use a different version of this article, use the table of contents in the left pane.
About connecting
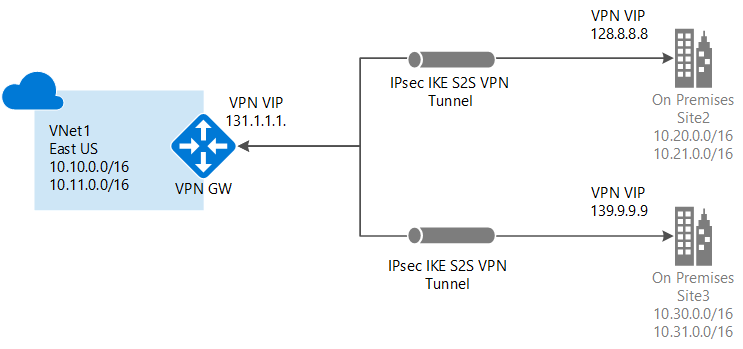
You can connect multiple on-premises sites to a single virtual network. This is especially attractive for building hybrid cloud solutions. Creating a multi-site connection to your Azure virtual network gateway is similar to creating other Site-to-Site connections. In fact, you can use an existing Azure VPN gateway, as long as the gateway is dynamic (route-based).
If you already have a static gateway connected to your virtual network, you can change the gateway type to dynamic without needing to rebuild the virtual network in order to accommodate multi-site. Before changing the routing type, make sure that your on-premises VPN gateway supports route-based VPN configurations.
Points to consider
You won't be able to use the portal to make changes to this virtual network. You need to make changes to the network configuration file instead of using the portal. If you make changes in the portal, they'll overwrite your multi-site reference settings for this virtual network.
You should feel comfortable using the network configuration file by the time you've completed the multi-site procedure. However, if you have multiple people working on your network configuration, you'll need to make sure that everyone knows about this limitation. This doesn't mean that you can't use the portal at all. You can use it for everything else, except making configuration changes to this particular virtual network.
Before you begin
Before you begin configuration, verify that you have the following:
- Compatible VPN hardware for each on-premises location. Check About VPN Devices for Virtual Network Connectivity to verify if the device that you want to use is something that is known to be compatible.
- An externally facing public IPv4 IP address for each VPN device. The IP address can't be located behind a NAT. This is a requirement.
- Someone who is proficient at configuring your VPN hardware. You'll have to have a strong understanding of how to configure your VPN device, or work with someone who does.
- The IP address ranges that you want to use for your virtual network (if you haven't already created one).
- The IP address ranges for each of the local network sites that you'll be connecting to. You'll need to make sure that the IP address ranges for each of the local network sites that you want to connect to don't overlap. Otherwise, the portal or the REST API rejects the configuration being uploaded.
For example, if you have two local network sites that both contain the IP address range 10.2.3.0/24 and you have a package with a destination address 10.2.3.3, Azure wouldn't know which site you want to send the package to because the address ranges are overlapping. To prevent routing issues, Azure doesn't allow you to upload a configuration file that has overlapping ranges.
Working with Azure PowerShell
When working with the classic deployment model, you can't use Azure Cloud Shell. Instead, you must install the latest version of the Azure Service Management (SM) PowerShell cmdlets locally on your computer. These cmdlets are different from the AzureRM or Az cmdlets. To install the SM cmdlets, see Install Service Management cmdlets. For more information about Azure PowerShell in general, see the Azure PowerShell documentation.
1. Create a Site-to-Site VPN
If you already have a Site-to-Site VPN with a dynamic routing gateway, great! You can proceed to Export the virtual network configuration settings. If not, do the following:
If you already have a Site-to-Site virtual network, but it has a static (policy-based) routing gateway:
- Change your gateway type to dynamic routing. A multi-site VPN requires a dynamic (also known as route-based) routing gateway. To change your gateway type, you'll need to first delete the existing gateway, then create a new one.
- Configure your new gateway and create your VPN tunnel. For instructions, For instructions, see Specify the SKU and VPN type. Make sure you specify the Routing Type as 'Dynamic'.
If you don't have a Site-to-Site virtual network:
- Create your Site-to-Site virtual network using these instructions: Create a Virtual Network with a Site-to-Site VPN Connection.
- Configure a dynamic routing gateway using these instructions: Configure a VPN Gateway. Be sure to select dynamic routing for your gateway type.
2. Export the network configuration file
Open your PowerShell console with elevated rights. To switch to service management, use this command:
azure config mode asm
Connect to your account. Use the following example to help you connect:
Add-AzureAccount
Export your Azure network configuration file by running the following command. You can change the location of the file to export to a different location if necessary.
Get-AzureVNetConfig -ExportToFile C:\AzureNet\NetworkConfig.xml
3. Open the network configuration file
Open the network configuration file that you downloaded in the last step. Use any xml editor that you like. The file should look similar to the following:
<NetworkConfiguration xmlns:xsd="https://www.w3.org/2001/XMLSchema" xmlns:xsi="https://www.w3.org/2001/XMLSchema-instance" xmlns="http://schemas.microsoft.com/ServiceHosting/2011/07/NetworkConfiguration">
  <VirtualNetworkConfiguration>
    <LocalNetworkSites>
      <LocalNetworkSite name="Site1">
        <AddressSpace>
          <AddressPrefix>10.0.0.0/16</AddressPrefix>
          <AddressPrefix>10.1.0.0/16</AddressPrefix>
        </AddressSpace>
        <VPNGatewayAddress>131.2.3.4</VPNGatewayAddress>
      </LocalNetworkSite>
      <LocalNetworkSite name="Site2">
        <AddressSpace>
          <AddressPrefix>10.2.0.0/16</AddressPrefix>
          <AddressPrefix>10.3.0.0/16</AddressPrefix>
        </AddressSpace>
        <VPNGatewayAddress>131.4.5.6</VPNGatewayAddress>
      </LocalNetworkSite>
    </LocalNetworkSites>
    <VirtualNetworkSites>
      <VirtualNetworkSite name="VNet1" AffinityGroup="USWest">
        <AddressSpace>
          <AddressPrefix>10.20.0.0/16</AddressPrefix>
          <AddressPrefix>10.21.0.0/16</AddressPrefix>
        </AddressSpace>
        <Subnets>
          <Subnet name="FE">
            <AddressPrefix>10.20.0.0/24</AddressPrefix>
          </Subnet>
          <Subnet name="BE">
            <AddressPrefix>10.20.1.0/24</AddressPrefix>
          </Subnet>
          <Subnet name="GatewaySubnet">
            <AddressPrefix>10.20.2.0/29</AddressPrefix>
          </Subnet>
        </Subnets>
        <Gateway>
          <ConnectionsToLocalNetwork>
            <LocalNetworkSiteRef name="Site1">
              <Connection type="IPsec" />
            </LocalNetworkSiteRef>
          </ConnectionsToLocalNetwork>
        </Gateway>
      </VirtualNetworkSite>
    </VirtualNetworkSites>
  </VirtualNetworkConfiguration>
</NetworkConfiguration>
4. Add multiple site references
When you add or remove site reference information, you'll make configuration changes to the ConnectionsToLocalNetwork/LocalNetworkSiteRef. Adding a new local site reference triggers Azure to create a new tunnel. In the example below, the network configuration is for a single-site connection. Save the file once you have finished making your changes.
  <Gateway>
    <ConnectionsToLocalNetwork>
      <LocalNetworkSiteRef name="Site1"><Connection type="IPsec" /></LocalNetworkSiteRef>
    </ConnectionsToLocalNetwork>
  </Gateway>
To add additional site references (create a multi-site configuration), simply add additional "LocalNetworkSiteRef" lines, as shown in the example below:
  <Gateway>
    <ConnectionsToLocalNetwork>
      <LocalNetworkSiteRef name="Site1"><Connection type="IPsec" /></LocalNetworkSiteRef>
      <LocalNetworkSiteRef name="Site2"><Connection type="IPsec" /></LocalNetworkSiteRef>
    </ConnectionsToLocalNetwork>
  </Gateway>
5. Import the network configuration file
Import the network configuration file. When you import this file with the changes, the new tunnels are added. The tunnels use the dynamic gateway that you created earlier. You can use PowerShell to import the file.
6. Download keys
Once your new tunnels have been added, use the PowerShell cmdlet 'Get-AzureVNetGatewayKey' to get the IPsec/IKE preshared keys for each tunnel.
For example:
Get-AzureVNetGatewayKey –VNetName "VNet1" –LocalNetworkSiteName "Site1"
Get-AzureVNetGatewayKey –VNetName "VNet1" –LocalNetworkSiteName "Site2"
If you prefer, you can also use the Get Virtual Network Gateway Shared Key REST API to get the preshared keys.
7. Verify your connections
Check the multi-site tunnel status. After downloading the keys for each tunnel, you'll want to verify connections. Use 'Get-AzureVnetConnection' to get a list of virtual network tunnels, as shown in the following example. VNet1 is the name of the VNet.
Get-AzureVnetConnection -VNetName VNET1
Example return:
    ConnectivityState         : Connected
    EgressBytesTransferred    : 661530
    IngressBytesTransferred   : 519207
    LastConnectionEstablished : 5/2/2014 2:51:40 PM
    LastEventID               : 23401
    LastEventMessage          : The connectivity state for the local network site 'Site1' changed from Not Connected to Connected.
    LastEventTimeStamp        : 5/2/2014 2:51:40 PM
    LocalNetworkSiteName      : Site1
    OperationDescription      : Get-AzureVNetConnection
    OperationId               : 7f68a8e6-51e9-9db4-88c2-16b8067fed7f
    OperationStatus           : Succeeded

    ConnectivityState         : Connected
    EgressBytesTransferred    : 789398
    IngressBytesTransferred   : 143908
    LastConnectionEstablished : 5/2/2014 3:20:40 PM
    LastEventID               : 23401
    LastEventMessage          : The connectivity state for the local network site 'Site2' changed from Not Connected to Connected.
    LastEventTimeStamp        : 5/2/2014 2:51:40 PM
    LocalNetworkSiteName      : Site2
    OperationDescription      : Get-AzureVNetConnection
    OperationId               : 7893b329-51e9-9db4-88c2-16b8067fed7f
    OperationStatus           : Succeeded
Next steps
To learn more about VPN Gateways, see About VPN Gateways.
Feedback
Coming soon: Throughout 2024 we will be phasing out GitHub Issues as the feedback mechanism for content and replacing it with a new feedback system. For more information see: https://aka.ms/ContentUserFeedback.
Submit and view feedback for