Walkthrough: Bing Ads API Web Application in Python
This tutorial explores how to get started running a Microsoft Advertising web application using the Bing Ads Python SDK, the Visual Studio Code IDE, and the Django web framework.
This tutorial does not explore various details about Django itself, such as working with data models and creating an administrative interface. For guidance on those aspects, refer to the Django documentation. For more details about how to work with Django in the VS Code terminal, editor, and debugger see Use Django in Visual Studio Code. This tutorial borrows heavily from the setup instructions in Use Django in Visual Studio Code.
Example Web Application Overview
By the end of this tutorial you will have a web application running on http://localhost that will authenticate your Microsoft Advertising user credentials and display your user and accounts info. You can then add multiple web application users, who can enable access for your application to use their Microsoft Advertising credentials. This web application provides a one to one mapping of a web application user e.g. ContosoUser to a Microsoft Advertising user. For information about how to modify the data model, please see Django documentation for more information. If your web application user enables access to their Microsoft Advertising accounts with a Microsoft account, a refresh token is stored in the SQL Lite database on your web server.
Prerequisites
You will need to have Visual Studio Code installed to follow this tutorial. To run the Django web app, you can use Visual Studio Community or Visual Studio Professional; however, the setup steps will vary from those in this tutorial.
You will need to have Python 3 installed from python.org; typically use the Download Python 3.7.0 button that appears first on the page (or whatever is the latest version). On Windows, make sure the location of your Python interpreter is included in your PATH environment variable. You can check this by running path at the command prompt. If the Python interpreter's folder isn't included, open Windows Settings, search for "environment", select Edit environment variables for your account, then edit the Path variable to include that folder.
You will need to install the Bing Ads Python SDK, and this tutorial will walk you through the installation.
You will need the Django web framework installed to deploy the application locally, and this tutorial will walk you through the installation.
You will need at least one user with Microsoft Advertising credentials and a developer token.
You will need to register an application and take note of the client ID (registered application ID) and client secret (registered password). You'll need to register a web app (not native) for this example. You will be asked to register one or more redirect URLs, and for this tutorial you should register http://localhost/callback. You should instead use https when deployed to a production server. For more details about registering an application and the authorization code grant flow, see Authentication with OAuth.
This tutorial was developed on Windows. Although Windows is not required to run the sample, some of the steps below will vary if you use another operating system e.g., Linux or MacOS.
Create a project environment for Django
In this section you create a virtual environment in which Django is installed. Using a virtual environment avoids installing Django into a global Python environment and gives you exact control over the libraries used in an application.
On your file system, create a project folder for this tutorial, such as
hello_django.In the
hello_djangofolder, open Powershell or your favorite script shell and use the following command to create a virtual environment namedenvbased on your current interpreter:py -3 -m venv envOpen the
hello_djangoproject folder in VS Code by runningcode ., or by running VS Code and using the File > Open Folder command.
In VS Code, open the Command Palette (View > Command Palette or
Ctrl+Shift+P). Then select the Python: Select Interpreter command.The command presents a list of available interpreters that VS Code can locate automatically. Your list will vary; if you don't see the desired interpreter, see Configuring Python environments. From the list, select the virtual environment in your project folder that starts with
./envor.\env: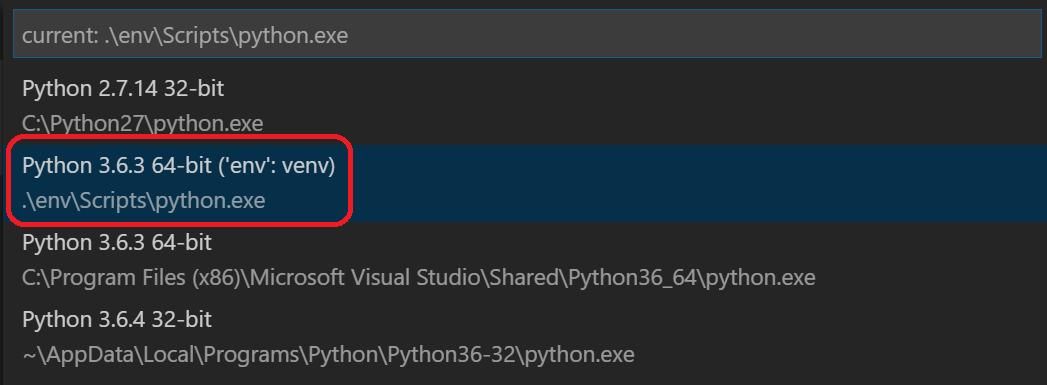
Run Terminal: New Terminal (
Ctrl+Shift+ `) from the Command Palette, which creates a terminal and automatically activates the virtual environment by running its activation script.Note
On Windows, if your default terminal type is PowerShell, you may see an error that it cannot run activate.ps1 because running scripts is disabled on the system. The error should provide a link for information on how to allow scripts. Otherwise, use Terminal: Select Default Shell to set your preferred default.
The selected environment appears at the lower left corner of the VS Code status bar. Notice the (venv) indicator that tells you that you're using a virtual environment:

Install Django in the virtual environment via pip in the VS Code Terminal:
python -m pip install djangoInstall the Bing Ads Python SDK in the virtual environment via pip in the VS Code Terminal:
python -m pip install bingads
You now have an self-contained virtual environment ready for writing Django and Microsoft Advertising code.
Create and run a Django app
In Django terminology, a "Django project" is composed of several site-level configuration files along with one or more "apps" that you deploy to a web host to create a full web application. A Django project can contain multiple apps, each of which typically has an independent function in the project, and the same app can be in multiple Django projects. An app, for its part, is just a Python package that follows certain conventions that Django expects.
To create a Django app, then, it's necessary to first create the Django project to serve as the container for the app, then create the app itself. For both purposes you use the Django administrative utility, django-admin, which is installed when you install the Django package.
Create the Django project
In the VS Code Terminal where your virtual environment is activated, run the following command:
django-admin startproject web_project .This
startprojectcommand assumes (by use of.at the end) that the current folder is your project folder, and creates the following within it:manage.py: The Django command-line administrative utility for the project. You run administrative commands for the project usingpython manage.py <command> [options].A subfolder named
web_project, which contains the following files:__init__.py: an empty file that tells Python that this folder is a Python package.wsgi.py: an entry point for WSGI-compatible web servers to serve your project. You typically leave this file as-is as it provides the hooks for production web servers.settings.py: contains settings for Django project, which you modify in the course of developing a web app.urls.py: contains a table of contents for the Django project, which you also modify in the course of development.
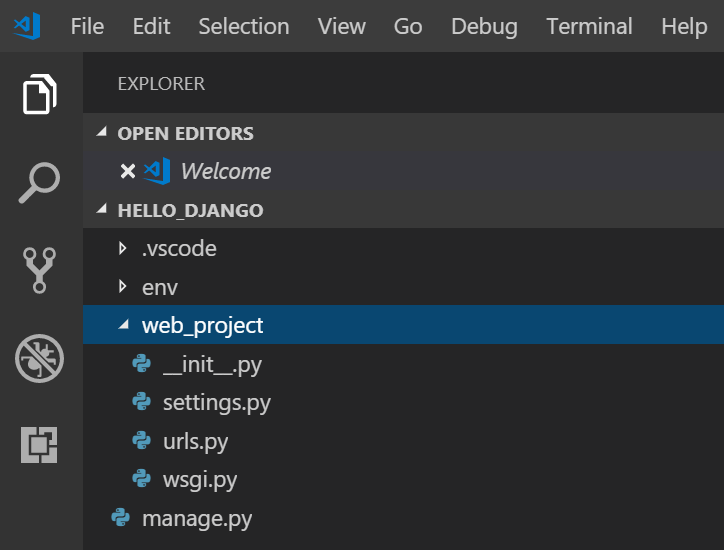
To verify the Django project, make sure your virtual environment is activated, then start Django's development server using the command
python manage.py runserver. The server runs on the default port 8000, and you see output like the following in the VS Code terminal output window:Performing system checks... System check identified no issues (0 silenced). You have 15 unapplied migration(s). Your project may not work properly until you apply the migrations for app(s): admin, auth, contenttypes, sessions. Run 'python manage.py migrate' to apply them. October 18, 2018 - 05:38:23 Django version 2.1.2, using settings 'web_project.settings' Starting development server at http://127.0.0.1:8000/ Quit the server with CTRL-BREAK.When you run the server the first time, it creates a default SQLite database in the file
db.sqlite3, which is generally intended for development purposes but can be used in production for low-volume web apps. Also, Django's built-in web server is intended only for local development purposes. When you deploy to a web host, however, Django uses the host's web server instead. Thewsgi.pymodule in the Django project takes care of hooking into the production servers.If you want to use a different port than the default 8000, simply specify the port number on the command line, such as
python manage.py runserver 5000.Ctrl+clickthehttp://127.0.0.1:8000/URL in the VS Code terminal output window to open your default browser to that address. If Django is installed correctly and the project is valid, you see the default page shown below. The VS Code Output window also shows the server log.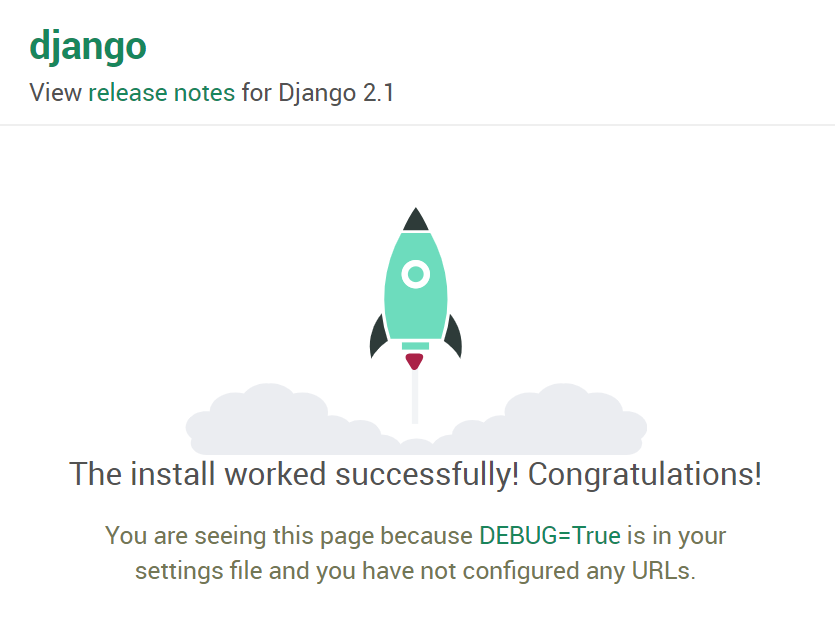
When you're done, close the browser window and stop the server in VS Code using
Ctrl+Cas indicated in the VS Code terminal output window.
Create A Django app for Microsoft Advertising
In the VS Code Terminal with your virtual environment activated, run the administrative utility's
startappcommand in your project folder (wheremanage.pyresides):python manage.py startapp appThe command creates a folder called
appthat contains a number of code files and one subfolder. Of these, you frequently work withviews.py(that contains the functions that define pages in your web app) andmodels.py(that contains classes defining your data objects). Themigrationsfolder is used by Django's administrative utility to manage database versions as discussed later in this tutorial. There are also the filesapps.py(app configuration),admin.py(for creating an administrative interface), andtests.py(for unit tests), which are not covered here.Within
app/settings.pyadd the following code and set your own CLIENT_ID, CLIENT_SECRET, DEVELOPER_TOKEN, and ENVIRONMENT values.""" Bing Ads API settings Edit with your credentials. """ REDIRECTION_URI = "http://localhost:8000/callback" CLIENT_ID = "ClientIdGoesHere" # Your registered App ID CLIENT_SECRET="ClientSecretGoesHere" # Your registered App Password DEVELOPER_TOKEN = "DeveloperTokenGoesHere" # Your production developer token ENVIRONMENT = 'production' API_VERSION=13Within
app/settings.pyaddappto the list of installed apps.INSTALLED_APPS = [ 'django.contrib.admin', 'django.contrib.auth', 'django.contrib.contenttypes', 'django.contrib.sessions', 'django.contrib.messages', 'django.contrib.staticfiles', 'app', ]In the VS Code Terminal create the
app/static/appandapp/templates/appfolders:(env) PS C:\dev\hello_django> mkdir app/static/app (env) PS C:\dev\hello_django> mkdir app/templates/appWithin the
app/static/appfolders create a new file named site.css and add the following contents..message { font-weight: 600; color: blue; } .message_list th,td { text-align: left; padding-right: 15px; } .navbar { background-color: lightslategray; font-size: 1em; font-family: 'Trebuchet MS', 'Lucida Sans Unicode', 'Lucida Grande', 'Lucida Sans', Arial, sans-serif; color: white; padding: 8px 5px 8px 5px; } .navbar a { text-decoration: none; color: inherit; } .navbar-brand { font-size: 1.2em; font-weight: 600; } .navbar-item { font-variant: small-caps; margin-left: 30px; } .body-content { padding: 5px; font-family:'Segoe UI', Tahoma, Geneva, Verdana, sans-serif; } input[name=message] { width: 80%; }Within the
app/templates/appfolder create a file,index.htmlwith the contents below.{% extends "app/layout.html" %} {% block content %} {% if errors %} <div class="jumbotron"> <section id="errors"> <h1>Errors occurred in your last request to Bing Ads API.</h1> <table class="message_list"> <tr> <th>Code</th> <th>ErrorCode</th> <th>Message</th> </tr> {% for error in errors %} <tr> <td>{{ error.Code }}</td> <td>{{ error.ErrorCode }}</td> <td>{{ error.Message }}</td> </tr> {% endfor %} </table> </section> </div> {% endif %} {% if user.is_authenticated %} {% if bingadsuser %} <div class="jumbotron"> <section id="enabled"> <h1>Your credentials have access to Microsoft Advertising.</h1> <table class="message_list"> <tr> <th>Id</th> <th>UserName</th> <th>First Name</th> <th>Last Name</th> </tr> <tr> <td>{{ bingadsuser.Id }}</td> <td>{{ bingadsuser.UserName }}</td> <td>{{ bingadsuser.Name.FirstName }}</td> <td>{{ bingadsuser.Name.LastName }}</td> </tr> </table> </section> </div> <div class="jumbotron"> <section id="revoke"> <p class="lead">Click here to revoke access for this app to your Microsoft Advertising accounts. You will then be able to login with a different Microsoft Advertising user. </p> <form id="revokeForm" action="/revoke" method="post" class="navbar-left"> {% csrf_token %} <p><a href="javascript:document.getElementById('revokeForm').submit()" class="btn btn-primary btn-large">Delete Refresh Token</a></p> </form> </section> </div> <div class="jumbotron"> <section id="accounts"> <h1>Account Details</h1> <table class="message_list"> <thead> <tr> <th>Id</th> <th>Name</th> </tr> </thead> <tbody> {% for account in accounts %} <tr> <td>{{ account.Id }}</td> <td>{{ account.Name }}</td> </tr> {% endfor %} </tbody> </table> </section> </div> {% else %} <div class="jumbotron"> <section id="enable"> <h1>Enable Microsoft Advertising Access</h1> <p class="lead"> You are logged into the Django web application, but not yet signed in with your Microsoft Advertising credentials. You can sign in with Microsoft Advertising credentials below. </p> </section> </div> <div> <div class="col-md-6"> <section id="socialLoginForm"> <h1>Microsoft Account Login</h1> <p class="lead"> Click here to authenticate your Microsoft Account. If you don't have Microsoft Advertising credentials, you can go to the <a href="https://ads.microsoft.com/customer/Signup.aspx">Microsoft Advertising Sign Up</a> page. </p> <p><a href="/callback" class="btn btn-primary btn-large">Authenticate Microsoft Account »</a></p> </section> </div> </div> {% endif %} {% else %} <div class="jumbotron"> <div class="col-md-6"> <section id="socialLoginForm"> <h1>Microsoft Advertising Example Web Application</h1> <p class="lead"> Before you can provide your Microsoft Advertising user credentials and access Microsoft Advertising data, you must <a href="{% url 'login' %}">login</a> to the Django web application. </p> <p class="lead">Use your site's Django admin portal to add web app users.</p> <p><a href="/admin" class="btn btn-primary btn-large">Django Admin »</a></p> </section> </div> </div> {% endif %} <div> <div class="col-md-4"> <h2>Get Started Using Python with Bing Ads API</h2> <p>The Bing Ads Python Software Development Kit (SDK) simplifies workflows such as OAuth authentication and report file parsing.</p> <p><a class="btn btn-default" href="https://learn.microsoft.com/advertising/guides/get-started-python">Learn more »</a></p> </div> <div class="col-md-4"> <h2>Django</h2> <p>Django is a free web framework for building Web sites and Web applications using HTML, CSS and JavaScript.</p> <p><a class="btn btn-default" href="https://www.djangoproject.com/">Learn more »</a></p> </div> <div class="col-md-4"> <h2>Microsoft Azure</h2> <p>You can publish your web app to Microsoft Azure. Find out how you can host your application with a free trial today.</p> <p><a class="btn btn-default" href="https://azure.microsoft.com">Learn more »</a></p> </div> </div> {% endblock %} {% block scripts %} {% load static %} <link rel="stylesheet" type="text/css" href="{% static 'app/site.css' %}"/> {% endblock %}Within the
app/templates/appfolder create a file,layout.htmlwith the contents below.<!DOCTYPE html> <html> <head> <meta charset="utf-8" /> <meta name="viewport" content="width=device-width, initial-scale=1.0"> <title>{{ title }} - My Django Application</title> {% load static %} <link rel="stylesheet" type="text/css" href="{% static 'app/site.css' %}"/> <script src="{% static 'app/scripts/modernizr-2.6.2.js' %}"></script> </head> <body> <div class="navbar navbar-inverse navbar-fixed-top"> <div class="container"> <div class="navbar-header"> <button type="button" class="navbar-toggle" data-toggle="collapse" data-target=".navbar-collapse"> <span class="icon-bar"></span> <span class="icon-bar"></span> <span class="icon-bar"></span> </button> <a href="/" class="navbar-brand">Microsoft Advertising App via Django</a> </div> <div class="navbar-collapse collapse"> <ul class="nav navbar-nav"> <li><a href="{% url 'home' %}">Home</a></li> </ul> {% include 'app/loginpartial.html' %} </div> </div> </div> <div class="container body-content"> {% block content %}{% endblock %} <hr/> <footer> <p>© {{ year }} - My Django Application</p> </footer> </div> {% block scripts %}{% endblock %} </body> </html>Within the
app/templates/appfolder create a file,login.htmlwith the contents below.{% extends "app/layout.html" %} {% block content %} <h2>{{ title }}</h2> <div class="row"> <div class="col-md-8"> <section id="loginForm"> <form action="." method="post" class="form-horizontal"> {% csrf_token %} <h4>Use a local account to log in.</h4> <hr /> <div class="form-group"> <label for="id_username" class="col-md-2 control-label">User name</label> <div class="col-md-10"> {{ form.username }} </div> </div> <div class="form-group"> <label for="id_password" class="col-md-2 control-label">Password</label> <div class="col-md-10"> {{ form.password }} </div> </div> <div class="form-group"> <div class="col-md-offset-2 col-md-10"> <input type="hidden" name="next" value="/" /> <input type="submit" value="Log in" class="btn btn-default" /> </div> </div> {% if form.errors %} <p class="validation-summary-errors">Please enter a correct user name and password.</p> {% endif %} </form> </section> </div> </div> {% endblock %} {% block scripts %} {% load static %} <link rel="stylesheet" type="text/css" href="{% static 'app/site.css' %}"/> {% endblock %}Within the
app/templates/appfolder create a file,loginpartial.htmlwith the contents below.{% if user.is_authenticated %} <form id="logoutForm" action="/applogout" method="post" class="navbar-right"> {% csrf_token %} <ul class="nav navbar-nav navbar-right"> <li><span class="navbar-brand">Hello {{ user.username }}!</span></li> <li><a href="javascript:document.getElementById('logoutForm').submit()">Log off</a></li> </ul> </form> {% else %} <ul class="nav navbar-nav navbar-right"> <li><a href="{% url 'login' %}">Log in</a></li> </ul> {% endif %}Within the
appfolder create a file,forms.pywith the contents below.from django import forms from django.contrib.auth.forms import AuthenticationForm from django.utils.translation import ugettext_lazy as _ class BootstrapAuthenticationForm(AuthenticationForm): """Authentication form which uses boostrap CSS.""" username = forms.CharField(max_length=254, widget=forms.TextInput({ 'class': 'form-control', 'placeholder': 'User name'})) password = forms.CharField(label=_("Password"), widget=forms.PasswordInput({ 'class': 'form-control', 'placeholder':'Password'}))Modify
app/models.pyto match the following code.from django.db import models from django.contrib.auth.models import User # In this web app a Microsoft Advertising user maps a Django web user to a refresh token. class BingAdsUser(models.Model): user = models.OneToOneField(User, on_delete=models.PROTECT) refresh_token = models.CharField(max_length=200) # def __unicode__(self): # __unicode__ on Python 2 # return self.refresh_token def __str__(self): # __str__ on Python 3 return self.refresh_tokenModify
app/views.pyto match the following code.from django.http import HttpRequest, HttpResponse from django.shortcuts import render from django.template.loader import get_template, render_to_string from web_project import settings from datetime import datetime from django.shortcuts import redirect from django.contrib.auth import authenticate, login, logout, get_user_model from django.contrib.auth.models import User from app.models import BingAdsUser from bingads import * # import logging # logging.basicConfig(level=logging.INFO) # logging.getLogger('suds.client').setLevel(logging.DEBUG) # logging.getLogger('suds.transport').setLevel(logging.DEBUG) authorization_data = AuthorizationData( account_id=None, customer_id=None, developer_token=None, authentication=None) customer_service=None def home(request): """ If an authenticated user returns to this page after logging in, the appropriate context is provided to index.html for rendering the page. """ assert isinstance(request, HttpRequest) # If the Django user has a refresh token stored, # try to use it to get Microsoft Advertising data. if user_has_refresh_token(request.user.username): return redirect('/callback') else: return render( request, 'app/index.html' ) def callback(request): """Handles OAuth authorization, either via callback or direct refresh request.""" assert isinstance(request, HttpRequest) authentication = OAuthWebAuthCodeGrant( client_id=settings.CLIENT_ID, client_secret=settings.CLIENT_SECRET, redirection_uri=settings.REDIRECTION_URI, env=settings.ENVIRONMENT) return authorize_bing_ads_user(request, authentication) def authorize_bing_ads_user(request, authentication): assert isinstance(request, HttpRequest) global customer_service bingadsuser = None try: Users = get_user_model() user = User.objects.get(username=request.user.username) except User.DoesNotExist: return render( request, 'app/index.html' ) try: bingadsuser = user.bingadsuser except BingAdsUser.DoesNotExist: bingadsuser = BingAdsUser() bingadsuser.user = user pass try: # If we have a refresh token let's refresh the access token. if(bingadsuser is not None and bingadsuser.refresh_token != ""): authentication.request_oauth_tokens_by_refresh_token(bingadsuser.refresh_token) bingadsuser.refresh_token = authentication.oauth_tokens.refresh_token # If the current HTTP request is a callback from the Microsoft Account authorization server, # use the current request url containing authorization code to request new access and refresh tokens. elif (request.GET.get('code') is not None): authentication.request_oauth_tokens_by_response_uri(response_uri = request.get_full_path()) bingadsuser.refresh_token = authentication.oauth_tokens.refresh_token except OAuthTokenRequestException: bingadsuser.refresh_token = "" user.save() bingadsuser.save() # If there is no refresh token saved and no callback from the authorization server, # then connect to the authorization server and request user consent. if (bingadsuser.refresh_token == ""): return redirect(authentication.get_authorization_endpoint()) set_session_data(request, authentication) # At this point even if the user has valid Django web application credentials, # we don't know whether they have access to Microsoft Advertising. # Let's test to see if they can call Bing Ads API service operations. bing_ads_user = None accounts=[] errors=[] try: bing_ads_user = get_user(None) accounts = search_accounts_by_user_id(bing_ads_user.Id)['AdvertiserAccount'] except WebFault as ex: errors=get_webfault_errors(ex) pass context = { 'bingadsuser': bing_ads_user, 'accounts': accounts, 'errors': errors, } return render( request, 'app/index.html', context ) def revoke(request): """Deletes the refresh token for the user authenticated in the current session.""" assert isinstance(request, HttpRequest) try: Users = get_user_model() user = User.objects.get(username=request.user.username) bingadsuser = user.bingadsuser if(bingadsuser is not None): bingadsuser.refresh_token = "" bingadsuser.save() except User.DoesNotExist: pass except BingAdsUser.DoesNotExist: pass clear_session_data(request) return render( request, 'app/index.html' ) def user_has_active_session(request): try: return True if request.session['is_authenticated'] else False except KeyError: return False def user_has_refresh_token(username): try: Users = get_user_model() user = User.objects.get(username=username) bingadsuser = user.bingadsuser if(bingadsuser is not None and bingadsuser.refresh_token != ""): return True except User.DoesNotExist: return False except BingAdsUser.DoesNotExist: return False def set_session_data(request, authentication): global authorization_data global customer_service try: request.session['is_authenticated'] = True authorization_data.authentication = authentication authorization_data.developer_token = settings.DEVELOPER_TOKEN customer_service = ServiceClient( service='CustomerManagementService', version=settings.API_VERSION, authorization_data=authorization_data, environment=settings.ENVIRONMENT ) except KeyError: pass return None def clear_session_data(request): global authorization_data global customer_service request.session['is_authenticated'] = False authorization_data = AuthorizationData(account_id=None, customer_id=None, developer_token=None, authentication=None) customer_service = None def applogout(request): logout(request) clear_session_data(request) return redirect('/') def get_user(user_id): ''' Gets a Microsoft Advertising User object by the specified user ID. :param user_id: The Microsoft Advertising user identifier. :type user_id: long :return: The Microsoft Advertising user. :rtype: User ''' global customer_service return customer_service.GetUser(UserId = user_id).User def search_accounts_by_user_id(user_id): ''' Search for account details by UserId. :param user_id: The Microsoft Advertising user identifier. :type user_id: long :return: List of accounts that the user can manage. :rtype: Dictionary of AdvertiserAccount ''' predicates={ 'Predicate': [ { 'Field': 'UserId', 'Operator': 'Equals', 'Value': user_id, }, ] } accounts=[] page_index = 0 PAGE_SIZE=100 found_last_page = False while (not found_last_page): paging=set_elements_to_none(customer_service.factory.create('ns5:Paging')) paging.Index=page_index paging.Size=PAGE_SIZE search_accounts_response = customer_service.SearchAccounts( PageInfo=paging, Predicates=predicates ) if search_accounts_response is not None and hasattr(search_accounts_response, 'AdvertiserAccount'): accounts.extend(search_accounts_response['AdvertiserAccount']) found_last_page = PAGE_SIZE > len(search_accounts_response['AdvertiserAccount']) page_index += 1 else: found_last_page=True return { 'AdvertiserAccount': accounts } def set_elements_to_none(suds_object): for (element) in suds_object: suds_object.__setitem__(element[0], None) return suds_object def get_webfault_errors(ex): errors=[] if not hasattr(ex.fault, "detail"): raise Exception("Unknown WebFault") error_attribute_sets = ( ["ApiFault", "OperationErrors", "OperationError"], ["AdApiFaultDetail", "Errors", "AdApiError"], ["ApiFaultDetail", "BatchErrors", "BatchError"], ["ApiFaultDetail", "OperationErrors", "OperationError"], ["EditorialApiFaultDetail", "BatchErrors", "BatchError"], ["EditorialApiFaultDetail", "EditorialErrors", "EditorialError"], ["EditorialApiFaultDetail", "OperationErrors", "OperationError"], ) for error_attribute_set in error_attribute_sets: errors = get_api_errors(ex.fault.detail, error_attribute_set) if errors is not None: return errors return None def get_api_errors(error_detail, error_attribute_set): api_errors = error_detail for field in error_attribute_set: api_errors = getattr(api_errors, field, None) if api_errors is None: return None errors=[] if type(api_errors) == list: for api_error in api_errors: errors.append(api_error) else: errors.append(api_errors) return errorsReplace the contents of
web_project/urls.pywith the contents below. Theurls.pyfile is where you specify patterns to route different URLs to their appropriate views. For example the code below maps the root URL of the app ("") to thehomefunction that you just added toapp/views.py:from django.contrib import admin from django.urls import path from app import views as app_views from django.contrib.auth import views as auth_views from datetime import datetime from django.conf.urls import include, url from app.forms import BootstrapAuthenticationForm from django.contrib.auth.views import HttpResponseRedirect from django.contrib import admin admin.autodiscover() urlpatterns = [ url(r'^applogout', app_views.applogout, name='applogout'), url(r'^callback', app_views.callback, name='callback'), url(r'^revoke', app_views.revoke, name='revoke'), url(r'^$', app_views.home, name='home'), url(r'^login/$', auth_views.LoginView.as_view( template_name='app/login.html', authentication_form=BootstrapAuthenticationForm, extra_context= { 'title':'Log in', 'year':datetime.now().year, } ), name='login'), url(r'^logout$', auth_views.LogoutView.as_view(), { 'next_page': '/', }, name='logout'), url(r'^admin/', admin.site.urls), ]Save all modified files with
Ctrl+K S.Run
python manage.py makemigrationsto generate scripts in the migrations folder that migrate the database from its current state to the new state.Run
python manage.py migrateto apply the scripts to the actual database. The migration scripts effectively record all the incremental changes you make to your data models (models.py) over time. By applying the migrations, Django updates the database to match your models. Because each incremental change has its own script, Django can automatically migrate any previous version of a database (including a new database) to the current version. As a result, you need concern yourself only with your models in models.py, never with the underlying database schema or the migration scripts. You let Django do that part!Create a superuser account in the app by opening a Terminal in VS Code for your virtual environment, then running the command
python manage.py createsuperuser --username=<username> --email=<email>, replacing<username>and<email>, of course, with your personal information. When you run the command, Django prompts you to enter and confirm your password.Important
Be sure to remember your username and password combination. These are the credentials you use to authenticate in the admin portal of the web app.
In the VS Code Terminal, again with the virtual environment activated, run the development server with
python manage.py runserverand open a browser tohttp://127.0.0.1:8000/to see a page that renders "Hello, Django".In the web browser go to
http://127.0.0.1:8000/admin/and create a new Django web user under Users. This is distinct from your Microsoft Advertising user credentials, so that multiple Microsoft Advertising users could login to your app separately.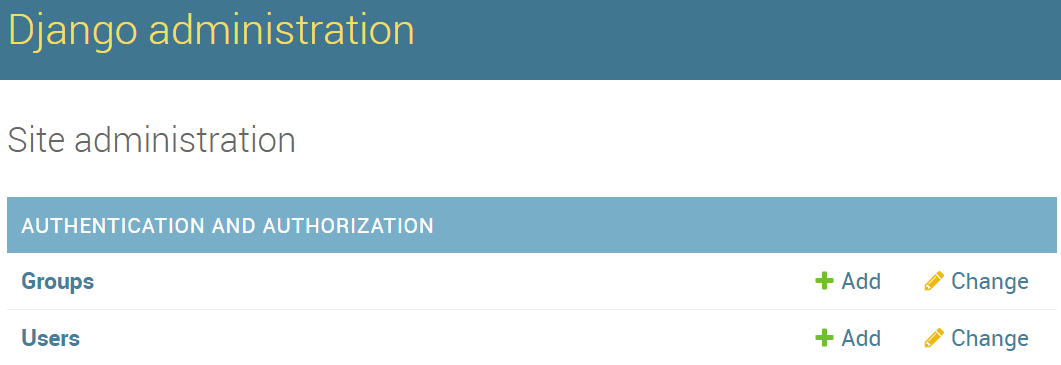
Login with the new user (not the super admin) and you should see the option to authenticate with a Microsoft account.
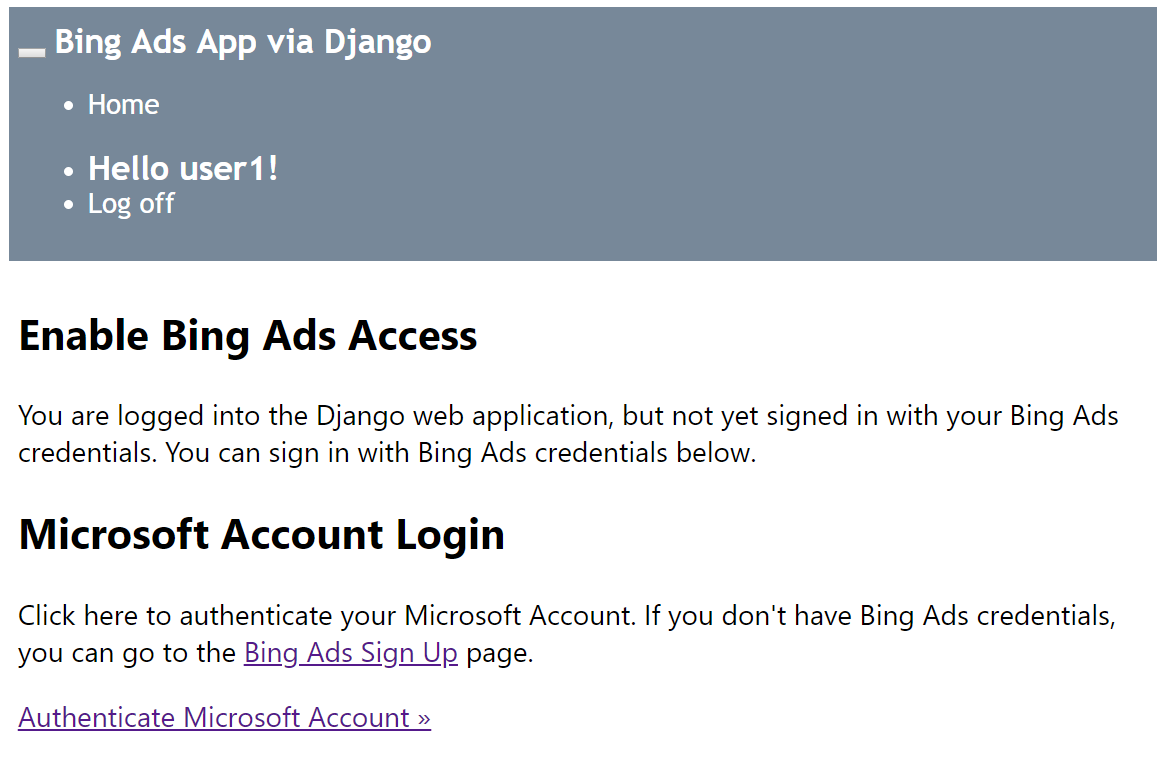
After you click Authenticate Microsoft Account you will be prompted to grant your own web app permissions to manage your Microsoft Advertising accounts. If you consent, and if you have access to Microsoft Advertising accounts, then you should be redirected to a view of your account name(s) and ID(s).
See Also
Feedback
Coming soon: Throughout 2024 we will be phasing out GitHub Issues as the feedback mechanism for content and replacing it with a new feedback system. For more information see: https://aka.ms/ContentUserFeedback.
Submit and view feedback for