How to Configure BizTalk Server for Sending Signed Messages
The following procedure lists the steps that you have to follow to configure BizTalk Server to send signed messages.
To create a pipeline to send signed messages
To configure the send port for sending signed messages
Prerequisites
Before configuring BizTalk Servers for sending signed messages, you must perform the steps in How to install the Certificates for Digital Signatures.
To create a pipeline to send signed messages
In Solution Explorer in the Microsoft Visual Studio, select the project in which you want to create the pipeline.
On the File menu, click Add New Item.
In the Add New Item dialog box, expand BizTalk Project Items, click Pipeline Files, and then click the Send Pipeline template.
In the Name field, type a name for the pipeline.
Click Add.
The new pipeline appears in Solution Explorer.
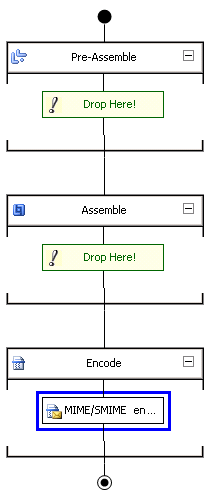
Drag the MIME/SMIME Encoder pipeline component into the Encode stage of a receive pipeline.

In the Properties window, configure the MIME/SMIME Encoder pipeline component Signature type property to ClearSignor BlobSign. For more information about the Enable encryption property, see How to Configure the MIME-SMIME Encoder Pipeline Component.
Important
If you are also using encryption, you can only select BlobSign.
Note
You can configure the send pipeline component properties using the BizTalk Server Administration console after the pipeline has been deployed into a BizTalk group. For more information, see How to Configure Per-Instance Pipeline Properties for a Send Port.
Note
The MIME/SMIME Encoder pipeline component performs both encryption and digital signing (when configured to perform both functions). Therefore, if you are configuring BizTalk Server to send encrypted and signed messages, you can use the same send pipeline. In other words, you do not have to create separate pipelines for encryption and digital signing.
Build and deploy the send pipeline.
To configure the send port for sending signed messages
Add the BizTalk assembly that you created in previous procedure to the BizTalk Application including the receive locations to sending signed messages. For more information about how to add BizTalk assemblies, see How to Add a BizTalk Assembly to an Application.
Configure the send port in the BizTalk Application with the send pipeline that you created in previous procedure. For more information about how to configure send ports, see Creating and Configuring Send Ports.
Configure the BizTalk group with the signing certificate that you installed in How to install the Certificates for Digital Signatures. For more information how to configure a BizTalk group, see How to Modify Group Properties.
See Also
How to Configure BizTalk Server for Receiving Signed Messages
Certificates that BizTalk Server Uses for Signed Messages
Sending and Receiving Signed Messages
Feedback
Coming soon: Throughout 2024 we will be phasing out GitHub Issues as the feedback mechanism for content and replacing it with a new feedback system. For more information see: https://aka.ms/ContentUserFeedback.
Submit and view feedback for